Showing posts with label art. Show all posts

Saturday, March 12, 2022

Masterpiece Pop Up Card | Hero Arts | My Monthly Hero Kit March 2022

Masterpiece, Pop Up Card, Easy, Hero Arts, My Monthly Hero Kit, March 2022, Card Making, Stamping, Die Cutting, handmade card, ilovedoingallthingscrafty, Stamps, how to, Picasso, Museum, Art,3D,

Hello friends and happy weekend!

I finally got a chance to play with the My Monthly Hero Kit March 2022 and I am absolutely in love with the cards I made! Don't worry, I will be sharing them throughout the month. 

This month's KIT INCLUDES:
• 4" x 6" Clear Stamp Set
• Fancy Window Die
• 4 Embossing Powders in Goldenrod, Orange, Blue, Purple (1/4 oz. each)
• Clear Embossing & Watermark Ink Cube
• 2 Sheets Extra Thick Canvas Paper (4.25" x 5.5")
• 1 Sheet Canvas-textured Paper (5.5" x 8.5")

Kits arrive in a Hero Arts reusable 8" x 10" zipper pouch. 
Your kit will arrive in a Hero Arts reusable 8" x 10" zipper pouch. With all of the goodies packed into this kit, it's an incredible value at $34.99. (Contents add up to $70 if bought separately.)
Valued at $34.99. (Contents add up to $70 if bought separately.)

Today's card features the dies included in this month's kit. I soon as I saw the dies, I knew I had to make a Pop Up using a technique Jennifer McGuire recently shared (she's so clever). This would give the card a 3-dimensional vibe and give you the feeling like you are also staring at a gorgeous piece of art at a museum.

CARD RECIPE

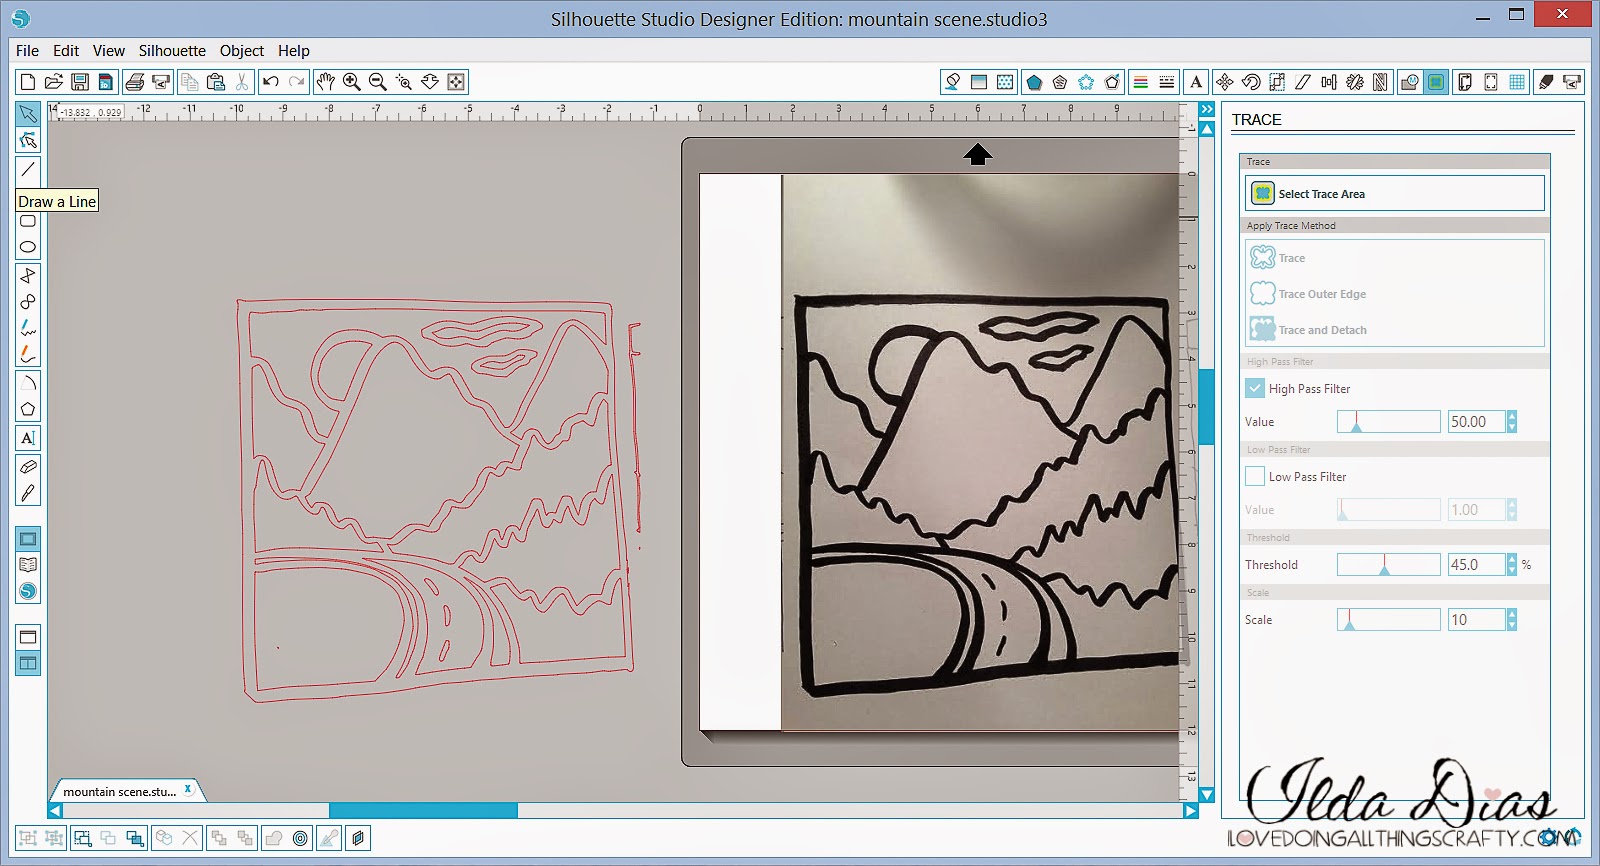
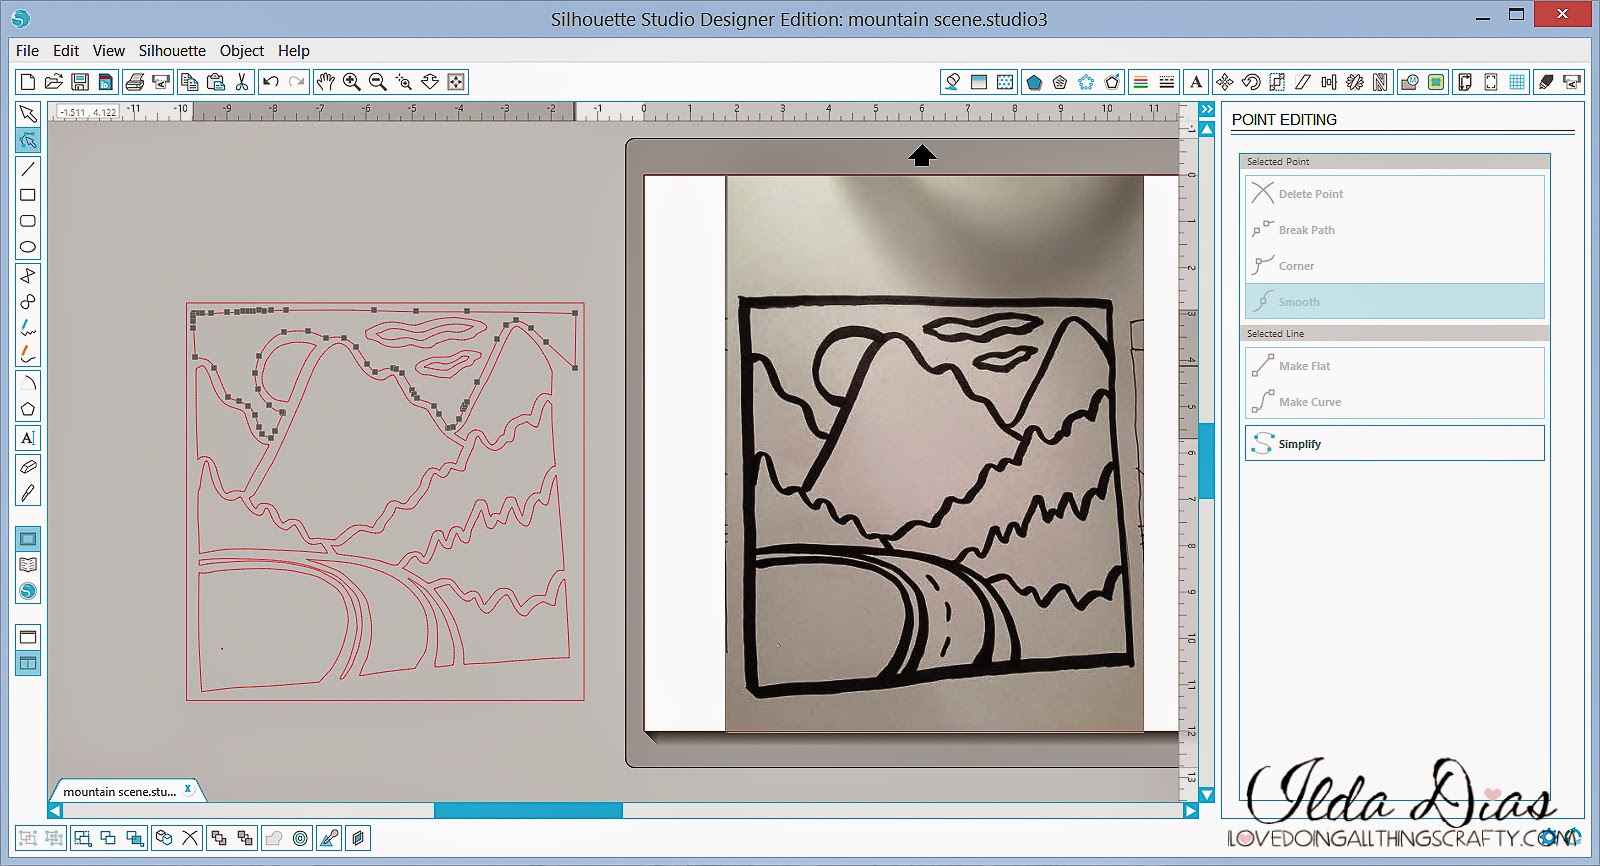
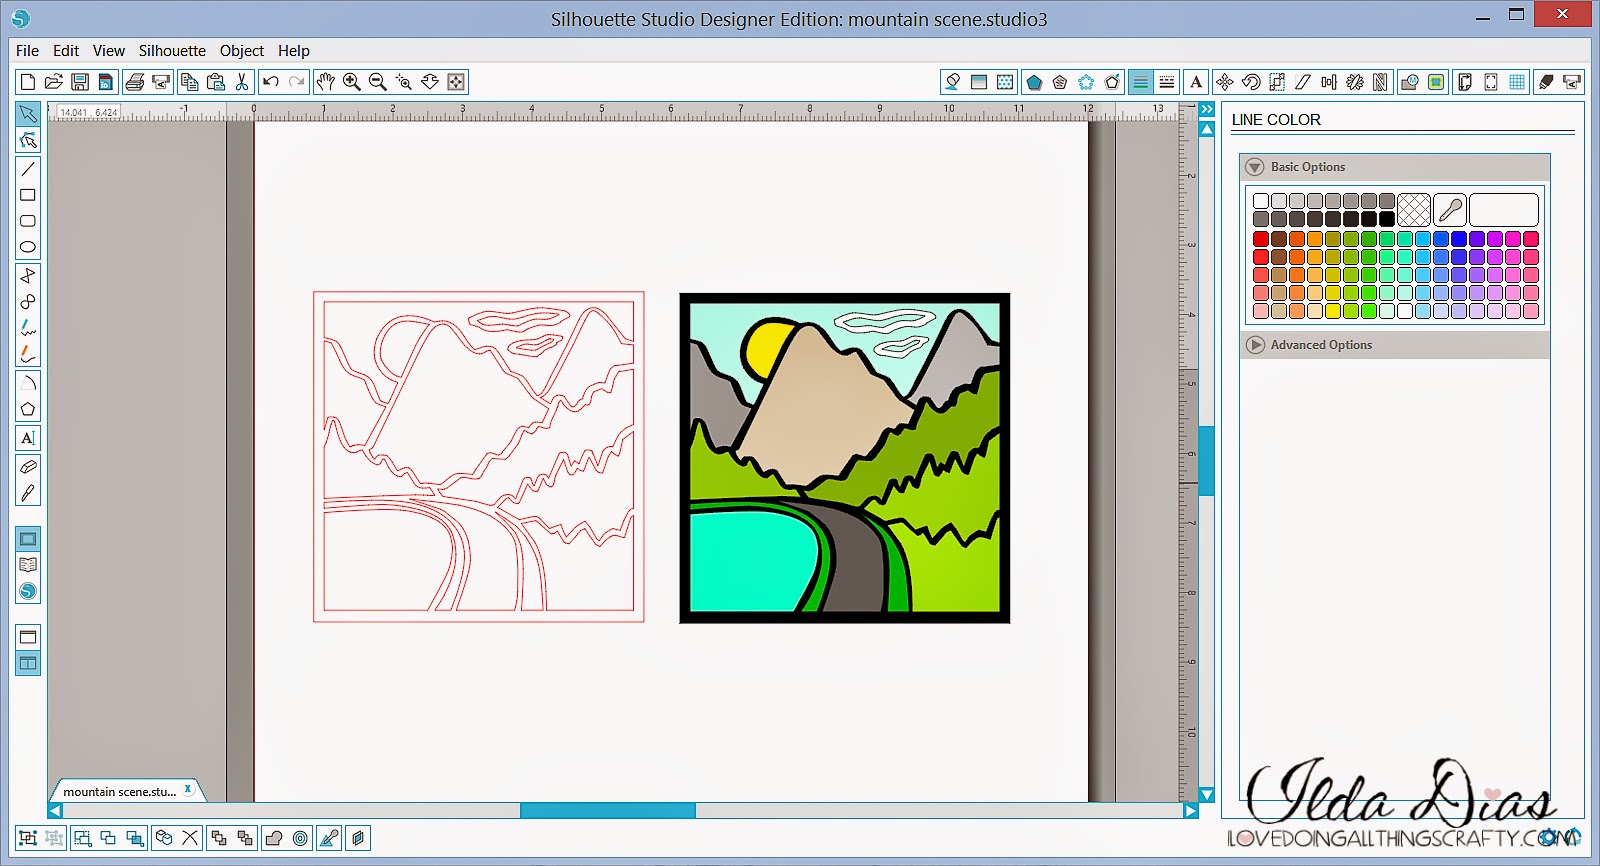
To begin, I actually started with the art piece. I used the Picasso Inspired Stencil with Prismacolor pencils to color in the individual openings of the stencil. Once the coloring was done I then applied a layer of Hero Paste Glitter to the top and set it aside to dry.

Next, I die cut the frame using a scrap piece of foiled gold paper. I then glue the frame to the stenciled glitter piece that I had trimmed down to fit the frame. 

Masterpiece, Pop Up Card, Easy, Hero Arts, My Monthly Hero Kit, March 2022, Card Making, Stamping, Die Cutting, handmade card, ilovedoingallthingscrafty, Stamps, how to, Picasso, Museum, Art,3D,

Using the dies from the kit, I die cut two layers of the bottom half of the images using a white and black piece of cardstock. I then snipped the pieces off that I wasn't going to use leaving only the man, the bench, and the woman. I used Copic markers to color in the images and the floor. I then glued the images to the black layer to make the pieces sturdier. 

To create the box for the pop-up, I just measured the height of the floor, which was 7/8" inches. I then scored a black piece of cardstock that was 4 1/4" wide and scored it at 7/8" then at 1 1/4", then at 2 1/8" and again at 2 1/2", I then trimmed the paper at 3 inches. I then used a bone folder to crease the scorelines and glue the box together, ensuring that the box folded flat and that it made a perfect rectangle. Once the box was made I glued the tiled area of the die-cut piece to the front of the rectangle. Once the pop-up piece had dried I then glued it to the bottom of the front of the card base so that the box would fold upward. I then added the art piece with foam tape and centered it on the wall/card front.

To finish I used a sentiment from the kit that was stamped and heat embossed using Unicorn Pigment Ink and White Detail Embossing Powder.

Masterpiece, Pop Up Card, Easy, Hero Arts, My Monthly Hero Kit, March 2022, Card Making, Stamping, Die Cutting, handmade card, ilovedoingallthingscrafty, Stamps, how to, Picasso, Museum, Art,3D,

As you can see from this next picture the card folds nicely into an envelope.

Masterpiece, Pop Up Card, Easy, Hero Arts, My Monthly Hero Kit, March 2022, Card Making, Stamping, Die Cutting, handmade card, ilovedoingallthingscrafty, Stamps, how to, Picasso, Museum, Art,3D,

I hope you loved your trip to the museum with me today. I'm still trying to figure out the Picasso-inspired painting I made. What do you see in it? I'm really curious. Leave me a comment if you do see something and I will reply with what I see. 


Thank you for stopping by and until next time... Happy Crafting!
Ilda 🖼

SUPPLIES

My Monthly Hero Kit March 2022
My Monthly Hero
Kit March 2022

Shop at:
HA
Picasso Inspired Stencil
Picasso Inspired
Stencil

Shop at:
SSS | SB | HA
Museum Frame Fancy Die
Museum Frame
Fancy Die

Shop at:
SSS | SB | HA
Hero Paste Glitter
Hero Paste Glitter
Shop at:
SSS | SB | HA
Unicorn Pigment Ink
Unicorn
Pigment
Ink

Shop at:
SSS | SB | HBS | HA
White Detail Embossing Powder
White Detail
Embossing Powder

Shop at:
SSS | HA
Precision Glue
Precision Glue
Shop at:
SSS | SB | HA
Gemini Jr. Die-Cutter
Gemini Jr.
Die-Cutter

Shop at:
SSS | SB
New Mini Misti
New Mini Misti
Shop at:
SSS | SB
Prismacolor Pencils
Prismacolor
Pencils

Shop at:
SSS | AMZ
Neenah Solar White 110lbs
Neenah Solar
White 110lbs

Shop at:
SSS | AMZ | HBS
Media Spatulas
Media Spatulas
Shop at:
SSS | SB | HBS |
TS US | HA
To make supplies easy for you to find, I have linked them above. If something is no longer available I will link to a similar product. Affiliate links may be used depending on the product linked. Please help support my blog by using these links while shopping at no additional cost to you. For more information about the affiliates I use, please visit my disclaimer here. Thanks so much for all your support!

Tuesday, September 9, 2014

Silhouette Tutorial - How to create your own art from a drawing

Hey Everybody!

Today I want to share with you how to create your own art from a drawing! I'll show you how to go from a hand drawn sketch to the beautiful piece of art below step by step using the Silhouette Designer Edition. Super easy once you know how :)


I made this as a gift for our Cousins that travelled from Portugal to join us on a road trip we took this summer!


Here is a close up of the mountain scene, which I had hand drawn while driving through Jasper. So happy with how it turned out!


Here is the HOW TO...
  • Using a sharpie marker create any image you want (pen or pencil lines are too thin). Make sure the lines all connect with each other or it will be difficult to break each piece apart. (Maybe use a ruler, and create straight lines if possible it might save you some work!)
  • Take a picture of the drawing, as straight on top of it as possible. (I just used my cell phone, to make things easier and quicker, then email the picture to myself).
  • Locate the picture on the computer and open it up in the Silhouette's work space (see image below).

  • Next thing you need to do is trace the drawing, by highlighting the trace area (I increased the high pass filter value to 50 and then clicked on the trace function). Refer to next image.


  • Once you have traced the image you will be left with the outline of the drawing. Move the outlines off the drawing.
  • Right click on the image and select Release Compound Path. (This will break up your image in to many different pieces). 
  • Delete any unnecessary pieces. (Just like the little lines on the outside of the drawing below).


  • Next thing I did was remove the outside square of the drawing as it was all crocked, and replaced it with a square I created with the square drawing tool. (This is where using a ruler when creating your drawing may have helped a little!)
  • Now this is where the work really begins. Clean up time! Highlight each piece of the drawing and using the edit point tool (top left hand, image below) simplify and delete any points that make the lines smoother for your machine to cut. Don't worry about deleting the wrong points as you can just use the undo function and start again. Drag outside points of each piece to make the outer lines parallel to the square you created. See image below.


  • Once you are satisfied with the image and your lines all look fairly straight, group all pieces together and resize it to fit the frame you are going to use. 
  • Ungroup the image again.
  • Before sending each piece to be cut out, I like to visualize what it will look like with color. (This will also help you when selecting your cardstock).
  • To add color to your image, I first copied the image and pasted it it next to it. Then simply selected each piece by highlighting it and used the fill color and line function. Group the colored image together and use it refer back to it when assembling the pieces back together.
  • You are now ready to cut!
  • Once you have all the pieces cut out glue them back onto the square, reproducing the color image created below. 
  • Emboss and embellish as desired!


Hope this tutorial has inspired you to create your own art work! Now that you know how and aren't limited to files you have purchased the possibilities are endless! Sometimes the best things in life are FREE, well with a little bit of work and patience that is!

Thanks for stopping by!
Happy Crafting  :)

Sharing this with my Crafty Peeps!

Tuesday, July 9, 2013

DIY Paint Theme Birthday Party

My daughter Maia will be 7 if a few more weeks but because her birthday always falls on the August long weekend here in Canada, her little school friends always seem to be away on vacation. Last year it was she who was on vacation, so she never did get to celebrate with her little friends. This year we thought we would celebrate it earlier to avoid disappointments.

Since Maia loves art, we thought it would be a great idea to have her party at a local art studio. Turns out the owner of the studio's son was in Maia's class last year... what a small world! If you are an art lover, you should definitely check out 4 Cats Art Studio. This fun little franchise started here in Canada and is spreading all over the world! Here are some pictures of the party... I'm warning you, there are quite a few! 

This was such a fun place, here is the cake table all set up. I love all the art on the walls, so bright and colorful!


Here is Maia surprised to see her name upon the board!


Pictured below are some of the girls quietly coloring while they wait for all the guests to arrive.


The Birthday girl showing off her pastel drawing.


Look at all those paints... an artists dream *swoon* ;)


Maia's ready to start on her version of Picasso's flower paintings!


 What a bunch of great little artists!


Clean up time!


After all that work they deserved a little snack!


Yay! Cake time, my favorite ;)
Don't they look so excited?! LOVE those little smiles!


Sit back, it's sparkler time! Happy Birthday to you, Happy Birthday to you...


Maia couldn't blow out the last two candles, but I love how she got some help from her friend Elise!


Cake anyone? If you would like to see more details on the cake click here.


Here are our future little artists posing by their masterpieces! Beautiful job girls! So much fun!


As our little guests left the party, they each received a goody bag. Here is what was inside... more crafty goodness and some candy to keep them going, hehe!


Thanks so much to Maha from 4 Cats Art Studio for making this such a fun Party, everything ran on time and very smoothly. Also, thanks to all the little girls that were able to come out and join Maia on her"early" Bday!

I hope I've inspired you with some ideas for your next birthday party! Thanks so much for stopping by!

Happy Crafting and Party Planning :)

Monday, July 8, 2013

Paint Palette Cake | DIY Cake


Yesterday we celebrated my daughter's 7th birthday party will all her little school friends. Her actual birthday is still a few weeks away but because it ends up being in the middle of the summer, many of her friends are going on vacation. Since my daughter Maia loves art, we decided to book her party at an art studio. To match the theme I created a paint palette cake! I was really happy with how it turned out and she loved it!


The coolest part about the cake was the inside! Here is how you can make your own...


You will need 2 white cake mix boxes. Follow the directions on the packaging. Once your batter is ready, divide it into as many colors as you want to make by pouring it into smaller bowls. (I made six) Next add gel food color to each bowl, a little at a time until you've reached your desired shade.


Pour your cake batter into your tins, alternating colors as you like (I used two 10 inch round cake pans.) Bake as per box instructions. Cool and ice your cake, decorate as desired! 

Here is a photo of the inside of the cake, isn't it so cool!


Since I like to use fondant to decorate my cakes, I freeze my cake until I am ready to decorate it. This way they are much easier to ice.  


Thanks for visiting today... I hope I have inspired you to add a little color to your next cake! It sure was fun to make and even better to eat! It will surely be a hit at your party :) Stay tuned for more details on the Paint Party!

Happy Crafting or in this case Baking :)