Showing posts with label 3D. Show all posts

Tuesday, May 23, 2023

Spring Birthday Gift Card Box | Adventure Awaits Release | Honey Bee Stamps

Spring, Birthday, Gift Card, Box,Adventure Awaits, Honey Bee Stamps, wedding, how to,handmade card,Stamps,ilovedoingallthingscrafty,stamping, diecutting,3D, paper flowers

Hey Friends, I am back again today with more inspiration for the Adventure Awaits Release from Honey Bee Stamps.

Today I am featuring the Vintage Gift Card Box Dies not in the theme of the Release but rather as a Spring Birthday Gift Card Box. This Gift Card Box could easily be made to suit your needs for any occasion by simply changing your papers and the sentiment. Make sure to check out all the supplies I used in the links below.

Here is a photo of me holding it for reference of scale. It is large enough to hold a gift card plus it could hold some treats as well.

Spring, Birthday, Gift Card, Box,Adventure Awaits, Honey Bee Stamps, wedding, how to,handmade card,Stamps,ilovedoingallthingscrafty,stamping, diecutting,3D, paper flowers

The window is optional, but I like that it's there. You could easily also change the shape of the by using an oval or a rectangular die too. Other than die cutting and assembling the box and flowers there is not much to explain. The sentiment comes from the new Hooked on You Stamp and Die sets.

Spring, Birthday, Gift Card, Box,Adventure Awaits, Honey Bee Stamps, wedding, how to,handmade card,Stamps,ilovedoingallthingscrafty,stamping, diecutting,3D, paper flowers

I hope this little birthday gift card box inspired you. The Box Die itself is a bit pricey, but if you are someone that loves to give out gift cards this die will definitely come in handy and pay for itself. I think this would make a great little treat box to give as a gift to your guests for a larger event like a shower or even a wedding.


Don't forget to stop by the Honey Bee Stamps Blog for more inspiration. Thank you for stopping by and until next time... Happy Crafting!

Ilda🎕


SUPPLIES
Vintage Gift Card Box Dies
Shop at:
HBS
Hooked On You Stamps
Shop at:
HBS
Hooked On You Dies
Hooked On You Dies
Shop at:
HBS
SPRING BOUQUETS DIES
Shop at:
SSS | HBS
Pinstripes and Polkadots: Outdoors
Shop at:
HBS
Bee Creative Acetate Sheets
Shop at:
HBS

White Foam Dots With Tab - 1/2" x 1/8"
Shop at:
HBS
Bee Creative Glue
Bee Creative Glue
Shop at:
SSS | SB | HBS
Intense Black Ink Pad
Shop at:
SSS | SB | HBS
Stamping Pressure Tool
Shop at:
HBS
Honey Bee Reverse Tweezers
Shop at:
SSS | HBS
Platinum 6 Die Cutting Platform
Shop at:
SSS | SB | SB
New Mini Misti
New Mini Misti
Shop at:
SSS | SB | HBS
To make supplies easy for you to find, I have linked them above. If something is no longer available I will link to a similar product. Affiliate links may be used depending on the product linked. Please help support my blog by using these links while shopping at no additional cost to you. For more information about the affiliates I use, please visit my disclaimer here. Thanks so much for all your support!


Enjoyed this post? Never miss out on future posts by Following this Blog

Saturday, March 12, 2022

Masterpiece Pop Up Card | Hero Arts | My Monthly Hero Kit March 2022

Masterpiece, Pop Up Card, Easy, Hero Arts, My Monthly Hero Kit, March 2022, Card Making, Stamping, Die Cutting, handmade card, ilovedoingallthingscrafty, Stamps, how to, Picasso, Museum, Art,3D,

Hello friends and happy weekend!

I finally got a chance to play with the My Monthly Hero Kit March 2022 and I am absolutely in love with the cards I made! Don't worry, I will be sharing them throughout the month. 

This month's KIT INCLUDES:
• 4" x 6" Clear Stamp Set
• Fancy Window Die
• 4 Embossing Powders in Goldenrod, Orange, Blue, Purple (1/4 oz. each)
• Clear Embossing & Watermark Ink Cube
• 2 Sheets Extra Thick Canvas Paper (4.25" x 5.5")
• 1 Sheet Canvas-textured Paper (5.5" x 8.5")

Kits arrive in a Hero Arts reusable 8" x 10" zipper pouch. 
Your kit will arrive in a Hero Arts reusable 8" x 10" zipper pouch. With all of the goodies packed into this kit, it's an incredible value at $34.99. (Contents add up to $70 if bought separately.)
Valued at $34.99. (Contents add up to $70 if bought separately.)

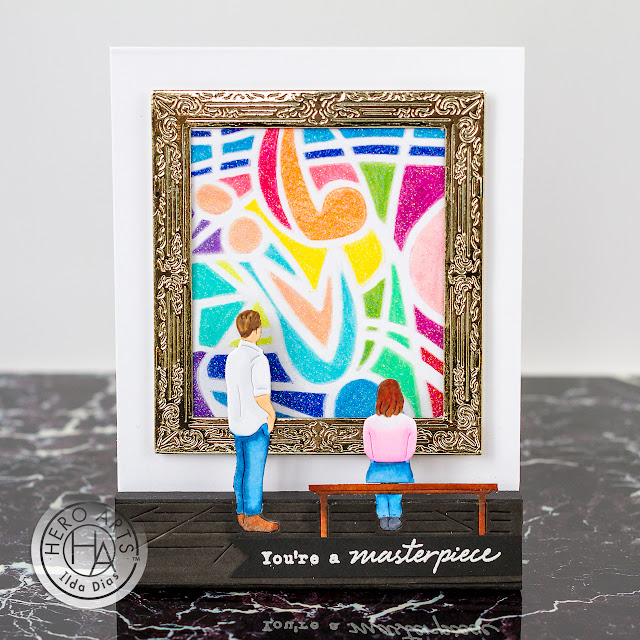
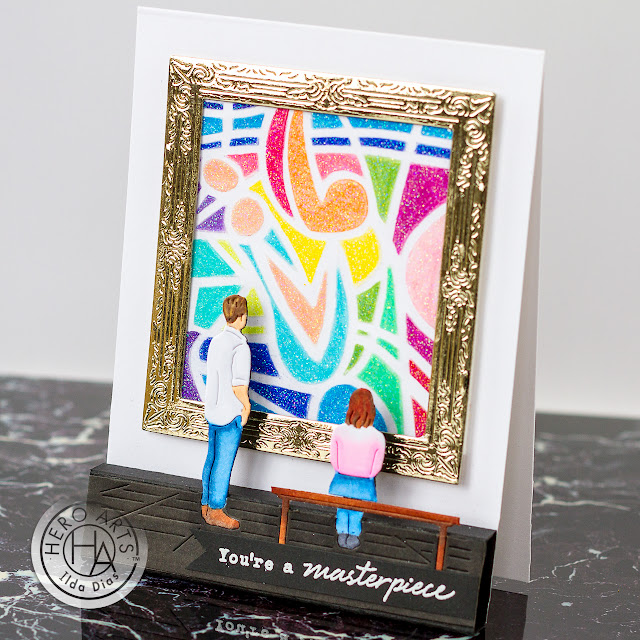
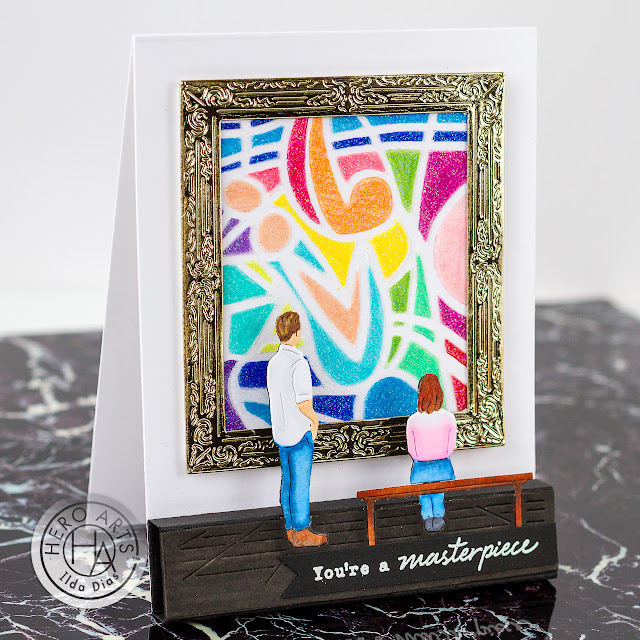
Today's card features the dies included in this month's kit. I soon as I saw the dies, I knew I had to make a Pop Up using a technique Jennifer McGuire recently shared (she's so clever). This would give the card a 3-dimensional vibe and give you the feeling like you are also staring at a gorgeous piece of art at a museum.

CARD RECIPE

To begin, I actually started with the art piece. I used the Picasso Inspired Stencil with Prismacolor pencils to color in the individual openings of the stencil. Once the coloring was done I then applied a layer of Hero Paste Glitter to the top and set it aside to dry.

Next, I die cut the frame using a scrap piece of foiled gold paper. I then glue the frame to the stenciled glitter piece that I had trimmed down to fit the frame. 

Masterpiece, Pop Up Card, Easy, Hero Arts, My Monthly Hero Kit, March 2022, Card Making, Stamping, Die Cutting, handmade card, ilovedoingallthingscrafty, Stamps, how to, Picasso, Museum, Art,3D,

Using the dies from the kit, I die cut two layers of the bottom half of the images using a white and black piece of cardstock. I then snipped the pieces off that I wasn't going to use leaving only the man, the bench, and the woman. I used Copic markers to color in the images and the floor. I then glued the images to the black layer to make the pieces sturdier. 

To create the box for the pop-up, I just measured the height of the floor, which was 7/8" inches. I then scored a black piece of cardstock that was 4 1/4" wide and scored it at 7/8" then at 1 1/4", then at 2 1/8" and again at 2 1/2", I then trimmed the paper at 3 inches. I then used a bone folder to crease the scorelines and glue the box together, ensuring that the box folded flat and that it made a perfect rectangle. Once the box was made I glued the tiled area of the die-cut piece to the front of the rectangle. Once the pop-up piece had dried I then glued it to the bottom of the front of the card base so that the box would fold upward. I then added the art piece with foam tape and centered it on the wall/card front.

To finish I used a sentiment from the kit that was stamped and heat embossed using Unicorn Pigment Ink and White Detail Embossing Powder.

Masterpiece, Pop Up Card, Easy, Hero Arts, My Monthly Hero Kit, March 2022, Card Making, Stamping, Die Cutting, handmade card, ilovedoingallthingscrafty, Stamps, how to, Picasso, Museum, Art,3D,

As you can see from this next picture the card folds nicely into an envelope.

Masterpiece, Pop Up Card, Easy, Hero Arts, My Monthly Hero Kit, March 2022, Card Making, Stamping, Die Cutting, handmade card, ilovedoingallthingscrafty, Stamps, how to, Picasso, Museum, Art,3D,

I hope you loved your trip to the museum with me today. I'm still trying to figure out the Picasso-inspired painting I made. What do you see in it? I'm really curious. Leave me a comment if you do see something and I will reply with what I see. 


Thank you for stopping by and until next time... Happy Crafting!
Ilda 🖼

SUPPLIES

My Monthly Hero Kit March 2022
My Monthly Hero
Kit March 2022

Shop at:
HA
Picasso Inspired Stencil
Picasso Inspired
Stencil

Shop at:
SSS | SB | HA
Museum Frame Fancy Die
Museum Frame
Fancy Die

Shop at:
SSS | SB | HA
Hero Paste Glitter
Hero Paste Glitter
Shop at:
SSS | SB | HA
Unicorn Pigment Ink
Unicorn
Pigment
Ink

Shop at:
SSS | SB | HBS | HA
White Detail Embossing Powder
White Detail
Embossing Powder

Shop at:
SSS | HA
Precision Glue
Precision Glue
Shop at:
SSS | SB | HA
Gemini Jr. Die-Cutter
Gemini Jr.
Die-Cutter

Shop at:
SSS | SB
New Mini Misti
New Mini Misti
Shop at:
SSS | SB
Prismacolor Pencils
Prismacolor
Pencils

Shop at:
SSS | AMZ
Neenah Solar White 110lbs
Neenah Solar
White 110lbs

Shop at:
SSS | AMZ | HBS
Media Spatulas
Media Spatulas
Shop at:
SSS | SB | HBS |
TS US | HA
To make supplies easy for you to find, I have linked them above. If something is no longer available I will link to a similar product. Affiliate links may be used depending on the product linked. Please help support my blog by using these links while shopping at no additional cost to you. For more information about the affiliates I use, please visit my disclaimer here. Thanks so much for all your support!

Wednesday, October 20, 2021

3D Christmas Tree Flat Shaker Card | Honey Bee Stamps

3D, Christmas Tree, Flat Shaker, Card, Frameless Shaker, Honey Bee Stamps, Christmas Card, Card Making, Stamping, Die Cutting, handmade card, ilovedoingallthingscrafty, Stamps, how to, Pine trees,CAS,

Hello, my friends!

Today's 3D Christmas Christmas Tree Shaker card is part of the Honey Bee Stamps Vintage Holiday Release Instagram Hop. I hope you can join us →there and leave a comment to qualify for two $25 Gift Cards to their shop.

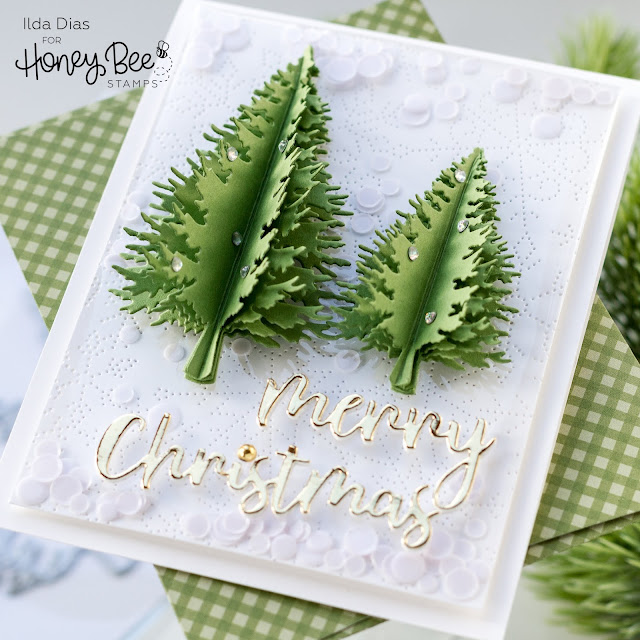
This card is a bit of an oxymoron. It has 3D elements along with a flat shaker window, but the trees do fold flat to fit in an envelope. I will also share a Reel on Instagram where I show you what that looks like later today.

CARD RECIPE
  • Dry emboss the snowflake design using the Pierced Fancy Flakes Cover Plate onto a card panel using white cardstock.
  • Trim off the edges of the panel. (This isn't necessary but I wanted to create a smaller frame to glue to the card front).
  • Build your shaker pocket. 
    • Cut plastic/acetate slightly larger than the panel. 
    • Cut off corners.
    • Fold sides flaps down and adhere in behind with double-sided tape, leaving one side open.  
    • Pour in shaker bits I used Blizzard Confetti Mix (Glitter, flat sequins, or confetti work best to keep down the bulk and they slide around better with limited space).
    • Adhere the remaining flap down to close the shaker pocket.
    • Add the shaker pocket to the front panel of the card base. I used foam tape, but not necessary if you want to make it flat.
    • Use either scrap plastic from packaging, acetate, or a premade shaker pocket. I used packaging plastic this time. If you want to see how I created the first-ever frameless/edge to edge/infinity/flat shaker card watch this video I made a few years ago→ HERE.
3D, Christmas Tree, Flat Shaker, Card, Frameless Shaker, Honey Bee Stamps, Christmas Card, Card Making, Stamping, Die Cutting, handmade card, ilovedoingallthingscrafty, Stamps, how to, Pine trees,CAS,
  • Cut four layers for each tree using the Pine Tree Dies (Largest and smallest were used here).
  • Used a scoring board and score each tree down the middle. 
  • Fold each tree.
  • Add a line of liquid adhesive down the middle score line of each layer. Glue scored edge of the next tree down. Repeat until the last tree is glued to the top. Allow them to dry completely before fluffing.
  • Add gems or embellish as desired.
3D, Christmas Tree, Flat Shaker, Card, Frameless Shaker, Honey Bee Stamps, Christmas Card, Card Making, Stamping, Die Cutting, handmade card, ilovedoingallthingscrafty, Stamps, how to, Pine trees,CAS,

  • Die-cut the Merry Christmas greeting from Bitty Buzzwords: Holidays Dies I glued four layers together to give it that chipboard thickness and look.
  • Finish off by gluing the elements to the card front.

3D, Christmas Tree, Flat Shaker, Card, Frameless Shaker, Honey Bee Stamps, Christmas Card, Card Making, Stamping, Die Cutting, handmade card, ilovedoingallthingscrafty, Stamps, how to, Pine trees,CAS,

I hope you were inspired by this 3D Christmas Tree Flat Shaker Card. I had so much fun making it. This technique will work with many other die cuts to create the 3D effect. I hope you give it a try!

Here's a quick video to show you how this came together.
Ilda😊

SUPPLIES
Pine Trees Dies
Pine Trees Dies
Shop at:
SSS | SB | HBS
Pierced Fancy Flakes Cover Plate
Shop at:
SSS | SB | HBS
Bitty Buzzwords: Holidays Dies
Shop at:
SSS | SB | HBS
Bee Creative Glue
Bee Creative Glue
Shop at:
SSS | SB | HBS
Vintage Holiday Gem Stickers
Shop at:
SSS | SB | HBS
BLIZZARD CONFETTI MIX
Shop at:
HBS
Gingham Galore: Holiday Envelopes
Shop at:
HBS
Neenah Solar White 110lbs
Shop at:
SSS | AMZ | HBS
GEMINI JR. DIE CUTTER
Shop at:
SSS | SB
Scor-Pal MINI SCOR-BUDDY
Shop at:
SSS | HBS
Gold Hearted Paper Pad
Shop at:
TS US | TS UK
FOAM TAPE
FOAM TAPE
Shop at:
SSS | SK
To make supplies easy for you to find, I have linked them above. If something is no longer available I will link to a similar product. Affiliate links may be used depending on the product linked. Please help support my blog by using these links while shopping at no additional cost to you. For more information about the affiliates I use, please visit my disclaimer here. Thanks so much for all your support!

Monday, January 27, 2020

Happy Mail Just Beecause | 3D Post Box Card | Honey Bee Stamps


Happy Mail Just Beecause | 3D Post Box Card | Honey Bee Stamps by ilovedoingallthingscrafty.com

Hello, my Honey Bee Friends! 

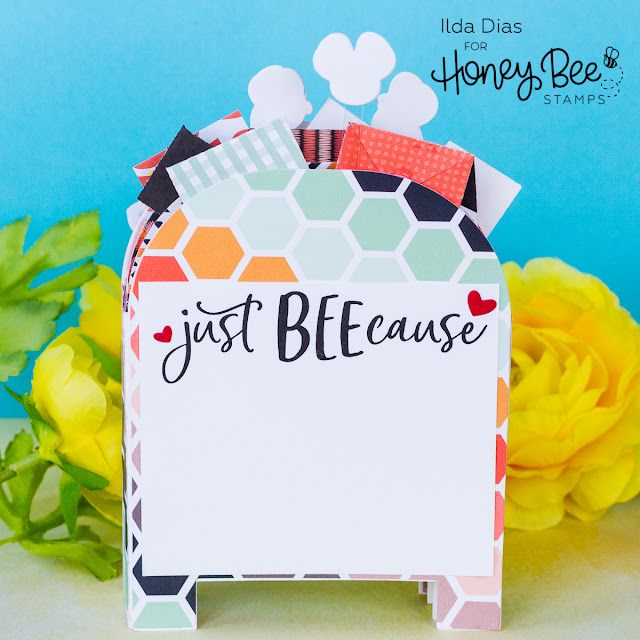
Today I have a super cute Box Card to share with you, in fact, it is a 3D Post Box Card using the new POST BOX CARD BASE DIES from the latest BEE MINE Release. I am not going to lie and tell you this was a quick and easy card because it took about 3 hours to make and probably could have been made faster but I was figuring things out as I created it. So I will share with you my process and what I would do differently to make it easier for you if you wanted to create something like this 😉

CARD DETAILS
Here I have compiled some images of my process to make things more visual for you.

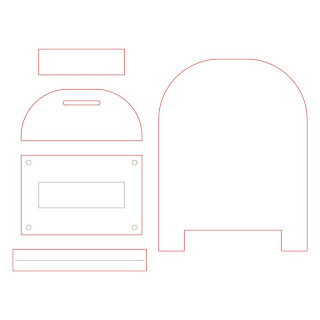
1. Die-cut 4 of the Post Box Panels.
2. To create the side panel for the box card I die cut 2 pieces of the connector die (12 total)
3. Bend the die-cut pieces at the scoreline.
4. Glue the 2 pieces together to create one side panel connector for each layer of the box card.

Happy Mail Just Beecause | 3D Post Box Card | Honey Bee Stamps by ilovedoingallthingscrafty.com

5. You will need to create 6 connectors pieces.
6. Line up the connector with the outer edge of the post box panel and glue in place.
7. Push flat the connector piece and add glue to the flap. 
8. Attach the next panel in place lining it up with the scored edge and repeat steps 6-8 for the remainder of panels.


Happy Mail Just Beecause | 3D Post Box Card | Honey Bee Stamps by ilovedoingallthingscrafty.com

9. Glue connectors onto the other side of the box and connect the coordinating panel.
10. Repeat until all panels are connected. As you build the box, before the glue completely dries, bend the panels from side to side to ensure they fold flat each way.
11. Die-cut your decorative papers to cover up the panels. For the middle pieces, you do not need to cut the full Post Box panel. I just did the tops as that is what is visible.

Happy Mail Just Beecause | 3D Post Box Card | Honey Bee Stamps by ilovedoingallthingscrafty.com

Not Pictured
12. Glue the patterned papers in place. For the inside pieces, I had to trim a tiny sliver on each side of the panels to make it easier to glue in place.
13. Glue on the outer and inner pieces of patterned paper. This paper comes from the SWEET ON YOU PAPER PAD.
14. Cut a strip of paper to the size of the side panels to cover up the connector pieces and glue in place.
15. Embellish the Post Box Card as desired.

MORE CARD DETAILS

To decorate and complete this card I stamped out, colored and die cut the bees from the BUSY BEE stamps set and Coordinating BUSY BEE dies.

I then used thin strips of acetate to connect a few of them in the air. To cover up the ink bleed from the coloring on the backside of the bees, I used a blank die-cut to sandwich the acetate piece.

Happy Mail Just Beecause | 3D Post Box Card | Honey Bee Stamps by ilovedoingallthingscrafty.com

The greeting stamp I used on the back of the Box card comes from the HI HONEY Stamp Set.

The little hearts I used to decorate the letters and the backside of the card come from POCKET FULL OF LOVE HONEY CUTS.

Happy Mail Just Beecause | 3D Post Box Card | Honey Bee Stamps by ilovedoingallthingscrafty.com

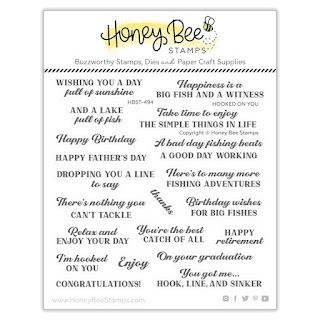
For the letters, I used the LOVE ENCLOSED HONEY CUTS to create both the postcard type letters and the envelopes. I then also stamped a few using the stamps from theLOVE ENCLOSED Stamp Set.

Happy Mail Just Beecause | 3D Post Box Card | Honey Bee Stamps by ilovedoingallthingscrafty.com

As you can see from this next photo this card will fold flat to fit into a 5x7 envelope. Keep in mind it is quite thick and will require extra postage for shipping.

Happy Mail Just Beecause | 3D Post Box Card | Honey Bee Stamps by ilovedoingallthingscrafty.com

WHAT I WOULD DO DIFFERENTLY
If I was to recreate this project again I would have used a lighter weight paper. I used Neenah 110lbs for this, which made it too bulky. Instead, I would have used a 65lbs paper because it will be reinforced with the patterned paper making it strong enough and less bulky for mailing.

Also, I would have adhered all the patterned paper first onto the white panels then glued the pieces together. I did it the way I did to hide some of the white connections inside, but honestly, they wouldn't have been that noticeable.


I hope you have been inspired by this fun 3D Happy Mail Just Beecause Post Box Card. I also think would also make a great mini-album too simply by using the single connector pieces and layering as many post box panels as you desire!

Thank you for stopping by 😊
Until next time... Happy Crafting 👋


SUPPLIES
POST BOX CARD BASE | CUTS
Shop at:
SSS | HBS
LOVE ENCLOSED | CUTS
Shop at:
SSS | HBS
LOVE ENCLOSED
LOVE ENCLOSED
Shop at:
SSS | HBS
BUSY BEE
BUSY BEE
Shop at:
SSS | SBC | HBS
BUSY BEE | CUTS
BUSY BEE | CUTS
Shop at:
SSS | SBC | HBS
POCKET FULL OF LOVE | CUTS
Shop at:
SSS | HBS
HI HONEY
HI HONEY
Shop at:
SSS | SBC | HBS
SWEET ON YOU PAPER PAD
Shop at:
SSS | HBS
RAW HONEY GEM STICKERS
Shop at:
SSS | SBC | HBS
GEMINI JR. DIE CUTTER
Shop at:
SSS | AMZ | SBC
NEENAH SOLAR WHITE 110
Shop at:
SSS | AMZ | HBS
MINI MISTI
MINI MISTI
Shop at:
SSS | AMZ | SBC | SK | HBS
BLACKOUT INK
BLACKOUT INK
Shop at:
SSS | IO3
CLEAR ACETATE SHEETS
Shop at:
SK
STUDIO KATIA GLUE
STUDIO KATIA GLUE
Shop at:
SSS | SK
FOAM TAPE - WHITE
FOAM TAPE - WHITE
Shop at:
SSS | SK
LIQUID PIXIE DUST
LIQUID PIXIE DUST
Shop at:
SSS | IO3
GLOSSY ACCENTS
GLOSSY ACCENTS
Shop at:
SSS | AMZ | SBC | HBS
WHITE GELLY ROLLER PEN SET
Shop at:
SSS | AMZ | SBC

To make supplies easy for you to find, I have linked them above. If something is no longer available I will link to a similar product. Affiliate links may be used depending on the product linked. 
Please help support my blog by using these links while shopping at no additional cost to you. For more information about the affiliates I use, please visit my disclaimer here. Thanks so much for all your support!