Tuesday, September 23, 2014

Victor + Jessica's Wedding Shadow Box and Card | SVGCuts

So excited to share with you all the latest Shadow Box! I think they just keep getting more and more beautiful! 

This Shadow Box was made as a gift for my cousin Victor and his bride Jessica who just got married this past weekend! I absolutely love how it turned out and I'm pretty sure they loved it too! Congratulations again Victor and welcome to our family Jessica!!! Had so much fun with you both and the rest of our crazy awesome family!

Gift,Roses,etched glass,SVGCuts,Silhouette Cameo,Wedding Shadow Box,ilovedoingallthingscrafty,Wedding card,heart,Cricut,Paper crafts,Framed,personalized,

It's hard to see that I etched the glass in the above picture, so below is a closer look at the etched glass. Click here for a previous glass etching tutorial and project.

The rose file I used to create the heart of roses comes from the Crush On You Boxes SVG Kit here. They were just cut at different sizes and glued onto a heart template.

Gift,Roses,etched glass,SVGCuts,Silhouette Cameo,Wedding Shadow Box,ilovedoingallthingscrafty,Wedding card,heart,Cricut,Paper crafts,Framed,personalized,

And here is the card I made them! SO adorable, right!?
The stamp comes from the Simply Said Stamp Pack by Craftin Desert Diva's.

Gift,Roses,etched glass,SVGCuts,Silhouette Cameo,Wedding Shadow Box,ilovedoingallthingscrafty,Wedding card,heart,Cricut,Paper crafts,Framed,personalized,

The files I used to create the card come from the Love Always SVG Kit here.
(Please note that the original files have been altered to make the card using the Silhouette DSE program.)


... and here is the lovely couple's first kiss as husband and wife!


Hope you loved this project as much I loved making it!
Thanks for stopping by!

Happy Crafting  :)

Thursday, September 11, 2014

Pumpkin Carriage Shaped Card - Fleurette Bloom DT Project


Hey Everybody!

Today I want to share with you my latest Fleurette Bloom DT Project! A super sweet Pumpkin Carriage Shaped Card. Really easy to do and today I will show you how :)

But first, have you noticed Fleurette has been giving away a ton of files for FREE? Keep your eyes pealed for Fleurette's Freebies, FREE for a limited time when she releases them! SO go download them while you can! Quick Tip: Just look on my side bar, I will usually have a direct link to it there for you! 

The file I used for this Pumpkin Carriage was one of this week's Freebies, now it's in the store for $0.99! 


How to make your own Shaped Card:


1. Start by creating an offset/shadow of the shape you want to use. In this case the bottom layer of the pumpkin carriage.


2. Move the pumpkin layer off to the side. Make a copy of the offset/shadow you created above.


3. Using the draw a line tool. Select the area where you want to create the fold for your card. Hold down the shift key and drag the line across the top of one of the offset/shadow layers, this will create a straight line. This layer will become the base of your card.


4. Highlight the line you just created and change the style of line to a dash line. Group the dash line to the base of the card. 

5. Copy and create another pumpkin layer. Drag it on to the center of the base of the card you just created. Select the knife tool and again by holding down the shift key and the knife tool drag it over the pumpkin layer just above the dash line you created on the base of the card.


 6. Drag the bottom part of the pumpkin to the side. Delete the top piece.

7. If you want to create some writing space for the inside of the card, create a shape like I did using the draw an ellipse tool. You are now ready to cut out all the pieces for your shaped card! To assemble the card: Just add glue above the dash line on the base of the card, continue by gluing the remaining pieces to the top and inside. Embellish as desired! 


Here is a peek at what the inside should look like. I chose to add the orange and green layer to the inside of the card. This is not necessary! You can just leave it blank , but in doing this you will make a sturdier card... and it looks cuter! ;)


Hope you have enjoyed this card and tutorial! 
If you have any questions feel free to ask me :) 


Don't forget to look out for Fleurette's FREEbies!

Thanks for stopping by!
Happy Crafting  :)

Tuesday, September 9, 2014

Silhouette Tutorial - How to create your own art from a drawing

Hey Everybody!

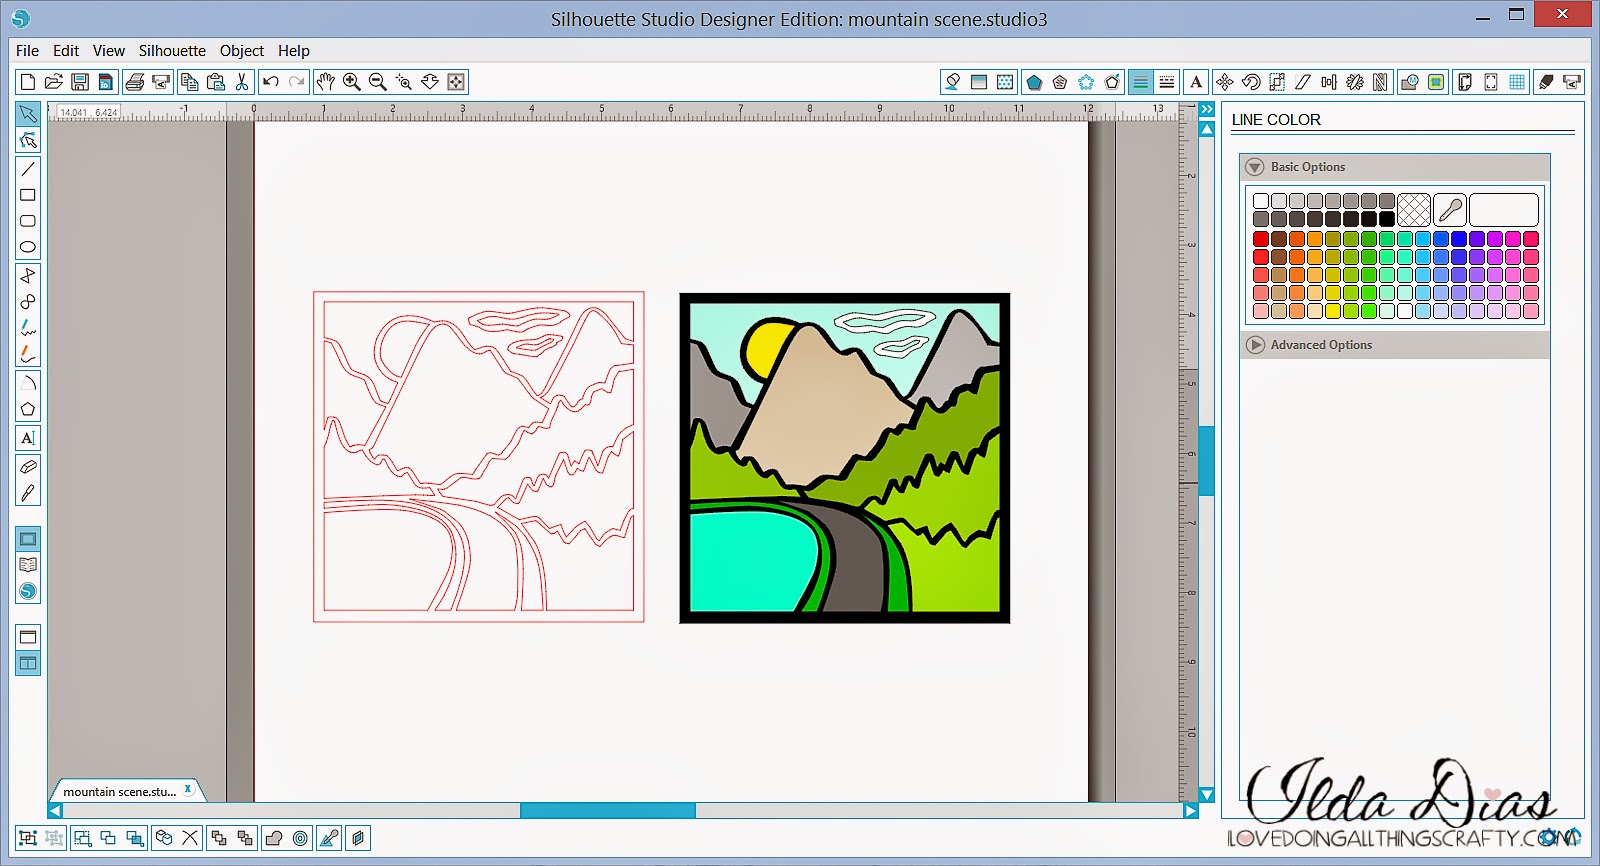
Today I want to share with you how to create your own art from a drawing! I'll show you how to go from a hand drawn sketch to the beautiful piece of art below step by step using the Silhouette Designer Edition. Super easy once you know how :)


I made this as a gift for our Cousins that travelled from Portugal to join us on a road trip we took this summer!


Here is a close up of the mountain scene, which I had hand drawn while driving through Jasper. So happy with how it turned out!


Here is the HOW TO...
  • Using a sharpie marker create any image you want (pen or pencil lines are too thin). Make sure the lines all connect with each other or it will be difficult to break each piece apart. (Maybe use a ruler, and create straight lines if possible it might save you some work!)
  • Take a picture of the drawing, as straight on top of it as possible. (I just used my cell phone, to make things easier and quicker, then email the picture to myself).
  • Locate the picture on the computer and open it up in the Silhouette's work space (see image below).

  • Next thing you need to do is trace the drawing, by highlighting the trace area (I increased the high pass filter value to 50 and then clicked on the trace function). Refer to next image.


  • Once you have traced the image you will be left with the outline of the drawing. Move the outlines off the drawing.
  • Right click on the image and select Release Compound Path. (This will break up your image in to many different pieces). 
  • Delete any unnecessary pieces. (Just like the little lines on the outside of the drawing below).
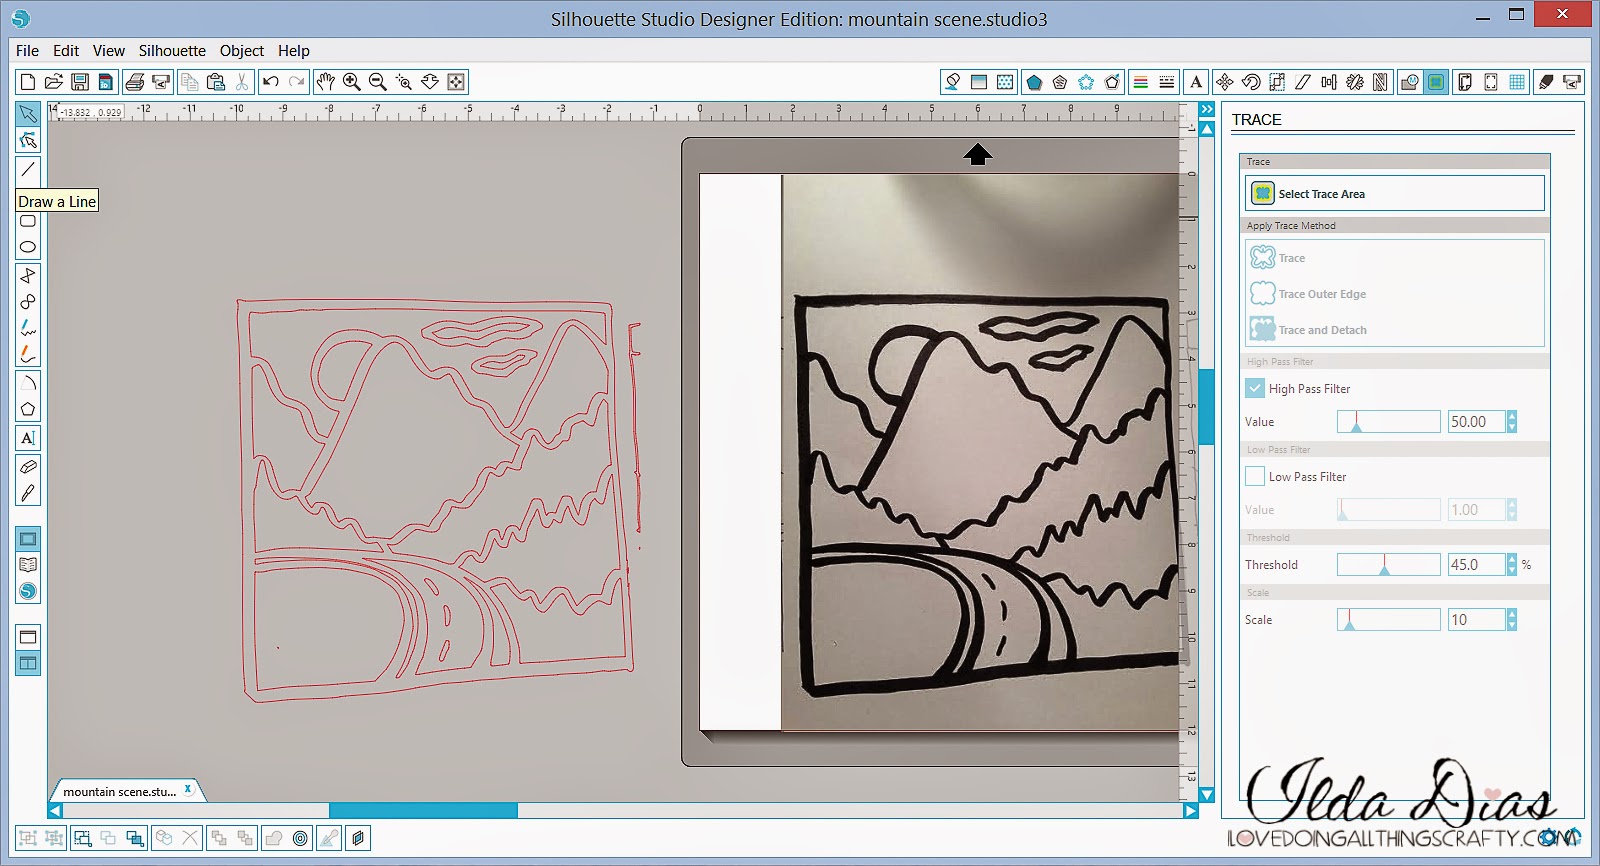

  • Next thing I did was remove the outside square of the drawing as it was all crocked, and replaced it with a square I created with the square drawing tool. (This is where using a ruler when creating your drawing may have helped a little!)
  • Now this is where the work really begins. Clean up time! Highlight each piece of the drawing and using the edit point tool (top left hand, image below) simplify and delete any points that make the lines smoother for your machine to cut. Don't worry about deleting the wrong points as you can just use the undo function and start again. Drag outside points of each piece to make the outer lines parallel to the square you created. See image below.
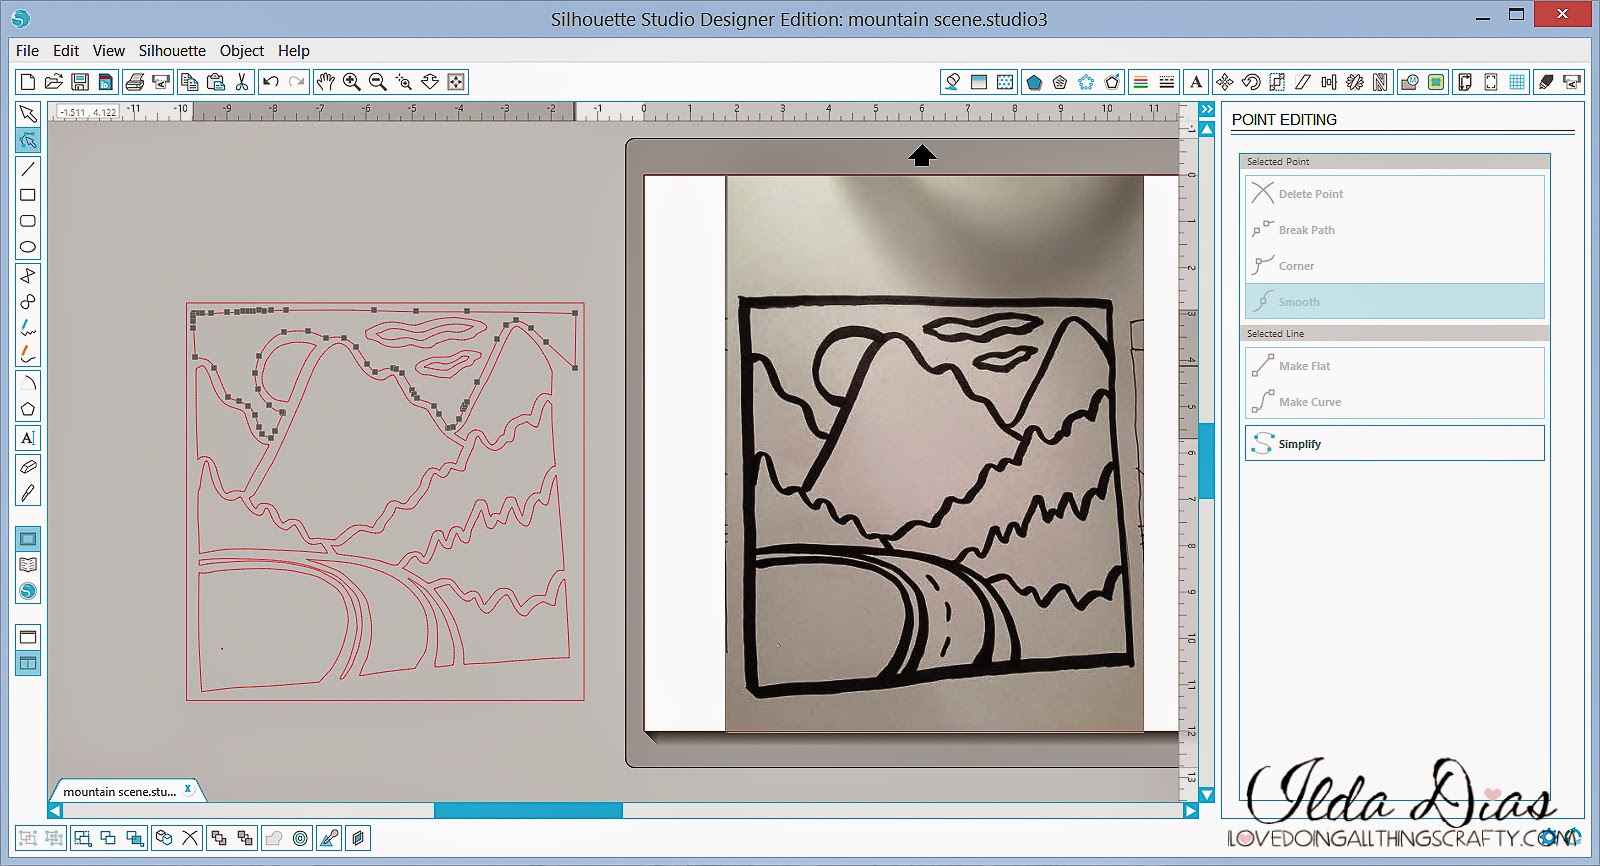

  • Once you are satisfied with the image and your lines all look fairly straight, group all pieces together and resize it to fit the frame you are going to use. 
  • Ungroup the image again.
  • Before sending each piece to be cut out, I like to visualize what it will look like with color. (This will also help you when selecting your cardstock).
  • To add color to your image, I first copied the image and pasted it it next to it. Then simply selected each piece by highlighting it and used the fill color and line function. Group the colored image together and use it refer back to it when assembling the pieces back together.
  • You are now ready to cut!
  • Once you have all the pieces cut out glue them back onto the square, reproducing the color image created below. 
  • Emboss and embellish as desired!


Hope this tutorial has inspired you to create your own art work! Now that you know how and aren't limited to files you have purchased the possibilities are endless! Sometimes the best things in life are FREE, well with a little bit of work and patience that is!

Thanks for stopping by!
Happy Crafting  :)

Sharing this with my Crafty Peeps!

Tuesday, September 2, 2014

Pencil Treat Box and Classroom Clipboard for Teachers | SVGCuts

Are you all doing the happy dance?!

Today my kiddos went back to school! Yippee!!! Don't get me wrong I loved having them home for the Summer but honestly, it will be nice to have a routine again and some quiet time! Hopefully, it won't be too stressful for the teachers ;) Thank-YOU teachers!

Hopefully, some treats will make the teacher's day a little better! 

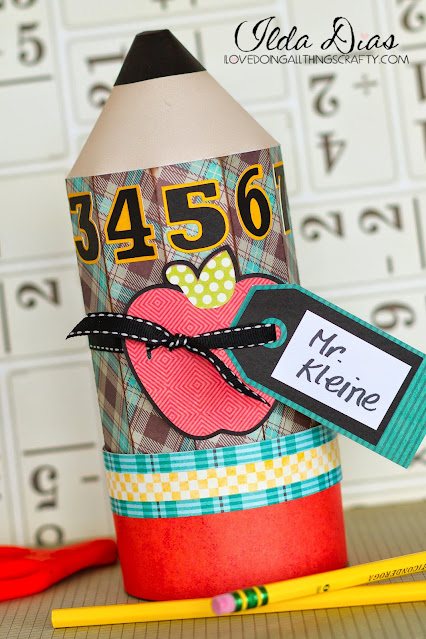
Here is the Pencil Treat Box I made for my son's Teacher! Perfect gift box for the first day of school.

Fancy Pants Designs,SVGCuts,Silhouette Cameo,Back to School Project Ideas,ilovedoingallthingscrafty,Classroom decor,3D Pencil Box,teacher Gift,Cricut,Paper craft, Clipboard

The file for the Pencil Box comes from SVGCuts School Days SVG Kit, papers by Fancy Pants Designs.

Here's what it looks like when the box is opened up.

Fancy Pants Designs,SVGCuts,Silhouette Cameo,Back to School Project Ideas,ilovedoingallthingscrafty,Classroom decor,3D Pencil Box,teacher Gift,Cricut,Paper craft, Clipboard

Next up is the Classroom Clipboard I made for my daughter's teacher, my latest SVG Cuts DT Project. 

How cute will that look in the classroom?! Love the oversized glasses on the cuties!

Fancy Pants Designs,SVGCuts,Silhouette Cameo,Back to School Project Ideas,ilovedoingallthingscrafty,Classroom decor,3D Pencil Box,teacher Gift,Cricut,Paper craft, Clipboard

Fancy Pants Designs,SVGCuts,Silhouette Cameo,Back to School Project Ideas,ilovedoingallthingscrafty,Classroom decor,3D Pencil Box,teacher Gift,Cricut,Paper craft, Clipboard

Even though the kids have only been gone for a little while I'm already looking forward to picking them up and hearing all about their first day back! Hopefully, they weren't too much for the teachers to handle!

Thanks for stopping by!
Happy Crafting  :)