Showing posts with label Gift. Show all posts

Monday, July 4, 2016

DIY Personalized Etched Cutting Board Tutorial + Free .studio File


Hello my Crafty Friends!

Today I want to share with you a fun wedding gift I made for a beautiful couple that got married this past weekend. I hope they love it as much as I loved enjoyed making it. This project was super simple and easy to make and I'll show you exactly how I did it!

How cool looking is this cutting board!? 
I think I might have to make one for myself now ;)


For my DIYer friends, I have numbered each picture and will explain step by step how I did it. Hopefully the steps are easy enough to follow!

  • 1. Buy yourself a glass cutting board. I found this one at the Dollar Store. Yes, the dollar store... Don't worry it's going to go from drab to FAB!
  • 2. Flip the board onto its front side. (You will be etching the smooth glass surface on the back.)
  • 3. Peal away the backing. 
  • 4. In this case the backing was vinyl and pealed off really nicely.


  • 5. Use Goo Gone or any type of adhesive remover to remove any glue residue left behind.
  • 6. Use warm soapy water and wipe the board clean.
  • 7. Use an electronic cutting Machine to cut out your design (I used the Silhouette Cameo). The script font I used is called Arabella and the type font is Bernard Mt Condensed. I also used inexpensive vinyl (the kind you line drawers with) because you will be discarding it. No need to waste the good stuff! Make sure you reverse the image as this is done on the bottom/reverse side of the glass.  I then used painters masking tape to transfer the vinyl and keep my pieces together.
  • 8. Peal off the backing from the vinyl.


  • 9. Flip over your vinyl and centre it on the cutting board. Make sure you are using the smooth glass surface (bottom of the board).
  • 10. Remove the painters tape and ensure the edges are stuck really well to the glass. You do not want any thing to seep under the edges or you may not get a crisp design.
  • 11. Use Armour Etch Cream and a paintbrush to apply the mixture to the exposed glass areas.
  • 12. Follow the instructions of the Armour Etch. I like to leave mine on a little longer than instructed to ensure a deeper etched look, about 15 minutes.


  • 13. Rinse off the cream using warm water.
  • 14. Once the cream is off peal the vinyl back. 
  • 15. Dry off your board and add clear non slip pads to each corner of the bottom of the cutting board.
  • 16. Flip it over and you are now ready to use it!


For those of you that have a Silhouette and would like the Design I used I'm giving it away for FREE!

All I ask before you download...
is to read my free files RULES!!!
  1. If you choose to download all I ask is you become a follower. (Any social media link to the right of this pg would be appreciated)
  2. Note my files are for personal use only! (Personal use means... only for you to use (no trading, or sharing of my files... let me do that!) 
  3. If you want to share, send your friends over to my blog for the download. 
  4. I'm OK with people sharing my files on their own sites as long as there is a direct link back to this blog...Please give credit where credit is due! (a message to me would also be appreciated)
Here is what the design you download will look like, play with it and add your own fonts and designs to make it your own! 


Click on the link for your FREE Spoon, Knife and Fork Cutting Board Design 
Note this file will only work with Silhouette Studio Software!

Here is one last look at this beauty! 
I'm pretty sure it won't be the last one of these I make ;)
Is it too soon to start thinking of Christmas gifts!?!


Hope you liked my Personalized Etched Cutting Board Tutorial, and if you downloaded my file and plan on using it I definitely would love to see it! Feel free to share it with me by leaving me a link to your work, emailing it to me or sharing it on my FB page!

 I find sometimes it's the smallest gifts made from the heart are the ones that mean the most!

I'll be posting the cute wedding card I made for the beautiful couple next... stay tuned :)

Thanks for stopping by!
Happy Crafting  :)


Thursday, June 16, 2016

Dr. Who's TARDIS Telephone Box | 3D Paper Treat Box | SVGCuts

Any Dr.Who fans out there?!? 
Well if you are, I think you love this project!

Hopefully, my husband isn't paying much attention to my blog posts these days. 
Or he may just see the surprise I made him for Father's Day. 
Recognize it?

For those of you that don't, it is the TARDIS time machine and spacecraft from Dr. Who! 
Don't ask me anything else about the show though, I have no clue... in fact when I was growing up my brother would watch it and I would run away because it creeped me out. Well as is turns out my husband was also a big fan of the show, haha! 

Cool right?! 
Even for non-fans, I love how it turned out!

Gift,3D,SVG Cuts files,#SVGCuts,Father's Day,Gift Box,Tardis,Dr. Who's TARDIS Telephone Box,ilovedoingallthingscrafty,


This file is actually the London Telephone Box from a recent SVGCuts kit, Travel the World.
But with a few simple alterations, I was able to change it to the TARDIS Telephone Box.

Here is a screenshot of my alterations and panels with measurements for those interested. I did shrink the file slightly to use 8.5 x 11-inch paper as well.


I stamped the back panel with a stamp from Happy Celebrations - Craftin Desert Divas and added some fun enamel dots.


Here is a closer look.
For the telephone signs, I did a print and cut on the Silhouette Cameo.


The box is large enough that I will be putting a small gift inside for a bonus surprise.

Take a look at it all lit up.
I just added a string of battery-operated led lights to the bottom. You can also secure them to the top as Mary did with the Telephone Box.


Hope this project has inspired you to create Dr. Who's TARDIS Telephone Box for yourself or for that true fan in your life.

Happy early Father's Day to all Dads out there :)

Thanks for stopping by!
Happy Crafting  :)

Tuesday, February 9, 2016

Valentine's Day Mail House | 3D Paper Valentines House/Gift Box | SVGCuts

Are you ready for Valentine's Day?! 
I most definitely am NOT :(  Still working on some last-minute projects!

Every year I like to make something special for the teachers. This year one of them will be receiving this super cute Valentine's Day Mail House! 

How CUTE is that!?! LOVE it!

Gift,SVGCuts files,3D,#SVGCuts,3D House,Fleurette Bloom Stamps,Valentine's Day Mailbox,teacher Gift,ilovedoingallthingscrafty,

The awesome files I used to make this beauty comes from SVGCuts Hugs and Kisses SVG Kit and the Hearts Aflame SVG Kit.


The stamp I used on the front door comes from Fleurette Bloom's Happy Days Stamp Set.
Paper from Pink Paislee - Pen Pals


As you can see I altered the house a little by adding a slit to the roof of the house from  Hugs and Kisses SVG Kit. To create this you must add the same slit line to the roof panel and each roof liner (top and inside piece). You will have to ungroup some files to be able to do this and copy the opening in the exact same spot on each piece. Regroup everything once you are done.  Really easy, just make sure the opening is wide enough for the letters!


There is still plenty of time to create one of these for yourself or as a gift for someone!
Hope this has inspired you to create your own Valentine's Day Mail House :)

Thanks for stopping by!
Happy Crafting  :)


Thursday, November 26, 2015

SVG Cuts Mistletoe Manor | 3D Paper Christmas House | SVGCuts

Hello, my crafty Friends!

Today I have probably one of my largest projects to share with you! I'm so pleased with how it turned out, hopefully, the recipient will love it just as much! 

This house comes from SVG Cuts Mistletoe Manor SVG Kit, but of course, I had to add my own touches to it! I do have to give Thienly Azim lots of credit for my inspiration as well, as I have incorporated touches of her Home For Christmas project. (One of my all-time favorite SVG Cuts DT projects from her, if you haven't seen it it's definitely worth checking out!)

Well, what do you think? Isn't she a beauty!?
So realistic looking... I can't believe it's made out of paper!

Christmas decoration,Gift,3D,treat box,paper house,#SVGCuts,Silhouette Cameo,ilovedoingallthingscrafty,DIY Icicles,3D House,SVG Cuts Mistletoe Manor,

For those of you interested here are all the SVG Cuts kits I used:
(yup, there were lots!)

House - Mistletoe Manor SVG Kit
Patio Greens - Clara’s Christmas Strips SVG Collection
 Fence - For My Valentine SVG Kit
 Chimney - December Gifts SVG Kit
Porch Greens - 3D Wintergreens
Bows - SVG File 3D Bow 2/25/12
Silhouette Trees - Forest County SVG Collection

Some other alterations I made to the house was to create little holes in the roofline to poke my Christmas lights through. I also added siding panels to my copula, to match the middle floor siding. 


I wanted to create some realistic-looking icicles. Creating them was super simple!
Using a glue gun, simply apply the glue to a craft mat in a straight line as long as you need it. Then go back and attached the glue icicles to the line. If you don't have a craft mat you can also use parchment paper (any nonstick surface will work). Wait for the glue to dry completely and attach it to your project!


I also wanted to add some realistic-looking snow. I used Snow-tex from DecoArt, which I purchased at Micheal's. This stuff is awesome! It didn't seem to warp my paper at all, and was dry within a few hours!

For the little snowballs on the trees, I used Liquid Applique. This stuff is so much fun, it's almost magical. Goes on wet, but add your heat gun to it and watch it magically puff up!


One of my favorite touches is the Silhouette of a woman at the door. Looks like she is waving goodbye to someone!

Well, I guess that goes for me too!
Goodbye, everyone ;)
Hope you enjoyed and were inspired by my version of SVGCuts Mistletoe Manor!

Thanks for stopping by!
Happy Crafting  :)

Tuesday, July 7, 2015

Pocket Watch Treat Box


Hey Everyone!

Lately my life has been a bit crazy busy, with the kids at home and summer activities there never seems to be enough time. I think you will agree today's project is perfect for what is going on in my life right now and probably in many of yours too! So, without further adieu, check out this cool little pocket watch treat box... my latest Fleurette Bloom Design Team Project. 


Here is the list of files I used to create this cutie!

Box - Hooked on Fishing SVG Kit
Rosette - Lush Flowers SVG Collection
Pocket Watch SVG File

I used the reel box to create the base of the box. The pocket watch elements were then resized to match up with the base of the reel box. For fun I used a clear acetate circle to create the face on the watch. I then I also used some Tim Holtz Game spinners to create the hands. Finished it off by attaching a metal chain to the pocket watch handle and embellishing it with a couple rosettes.


This stamp couldn't be more perfect for this project. 
It comes from Craftin Desert Diva's - Blooming for you
The paper I used comes from Fancy Pants Designs - The Good Life 


 I think this would make a really great birthday gift for someone. It would also make a a really cool guys gift or maybe even a retirement treat. So many possibilities for this, you just need a little imagination and think about who you are making it for :)

Hope you enjoyed my Pocket Watch Treat Box, now go take time to smell the flowers!

Thanks for stopping by!
Happy Crafting  :)


Thursday, June 18, 2015

Personalized Teacher Tumblers | SVGCuts

Are you ready for school to be over?
I know I am and so are my kids, but I can almost bet the teachers are even more excited!

Today I want to share with you the year-end treats I made for these great teachers. These personalized teacher tumblers were super easy and quick to put together. This was the first time I layered vinyl on a project and I love how simple it was to do.

SVGCuts files,Gift,#SVGCuts,Silhouette Cameo,Personalized Teacher Tumblers,teacher gifts for Year End,I love doing all things crafty,layered vinyl,vinyl,ilovedoingallthingscrafty,

To make your own here is what you will need:

  1. Tumblers
  2. Black, green, red, white, gold vinyl sheets (Oracal 651)
  3. Transfer tape
  4. SVG Files from Miss Baker's Classroom SVG Kit and  Miss Karen's Back to School Bags SVG Kit
  5. Font: Bernard MT Condensed
  6. Silhouette Cameo / Electronic Cutting Machine


The only alteration I made to create this project, was to add the teacher's name to the red layer of the apple. By doing that when you cut it out, the name is already cut out of that layer. This will save you from worrying about getting perfectly straight letters! The rest was layering the pieces of vinyl onto each other. Begin with the black layer of the apple, followed by the red, green leaf, gold worm, white eyes, and then the black again for the eyes and glasses. The tricky part is aligning the layers, so make sure you have great lighting to see through the transfer paper. Also, use a straight edge (credit card/ruler) to press out the air bubbles as you add each layer.


Hope this has inspired anyone still looking for that quick last-minute teacher gift. If you have any questions, I would love to hear from you!


Thanks for stopping by!
Happy Crafting  :)


 Miss Baker's Classroom SVG Kit


Sunday, May 24, 2015

Smile for the Camera Shadow Box


Smile for the camera!!!

Today I have a fun project to share with you all! I've been wanting to create something with the camera file for a while and this shadow box from Fleurette Bloom's I'm Wishing Kit inspired me to create something with it!

How cute is this!?! Doesn't it make you want to smile!?!
I think this would make great little gift for the young photographer in your life!


These fun papers I used come from Studio Calico's Printshop Collection.
The Smile stamp is from Craftin' Desert Divas, Simply Said Set.


To recreate a shadow box like this you will need these awesome Fleurette Bloom kits/collections!

I'm Wishing 3D SVG Kit


Hope this project has inspired you to make your own fun Shadow boxes :)

Thanks for stopping by!
Happy Crafting  :)


Monday, May 4, 2015

Mother's Day Shadow Box | SVGCuts

Hey All!

 Are you all ready for Mother's Day?!? Today I want to share with you another one of my Shadowbox creations, another commissioned project for my friend and fan Tomina! Hope her mother loves it ;)

SVGCuts files,Gift,Roses,etched picture frame,#SVGCuts,Silhouette Cameo,Mother's Day Shadow Box,ilovedoingallthingscrafty,

It's hard to see that I etched the glass in the above picture, so below is a closer look at the etched glass. Click here for a previous glass etching tutorial and project.

Mother's Day Shadow Box by ilovedoingallthingscrafty

To replicate your own Rose Heart Shadow Box you will need:
The rose file from - Crush On You Boxes SVG Kit cut at various sizes.
8 X 8 Shadow Box (purchased from IKEA).
Etching cream

Happy Mother's Day to all my Crafty Friends and Followers! Hope you are all spoiled by your loved ones this Mother's day!

Thanks for stopping by!
Happy Crafting  :)


Tuesday, March 17, 2015

Love Shadow Box | SVGCuts

Hi guys!
 I have a Fall project to share with you today! I know it's not even Spring here yet (although it feels like it), but somewhere around the world, it is Autumn... my favorite time of year! 

Today I want to share with you my latest shadow box creation. I was commissioned to make this for a friend and fan of mine. She loved the original Autumn Love Shadowbox I made and wanted me to make her something similar. I really love how it turned out! Enjoy it Tomina!!! :)

birthday,SVGCuts files,etched glass,#SVGCuts,Silhouette Cameo,Anniversary,Valentines,Gift,decor,Wedding Shadow Box,Autumn love Flower Shadowbox,Love,Fall,ilovedoingallthingscrafty,

For those interested in the files I used, here are the SVG Cuts kits required to make this:

Fall Harvest SVG Kit


Hope you "love" this Shadow Box as much as I do! I think this would make the perfect gift for a birthday, wedding, or anniversary! Next time you are looking for inspiration for a unique gift idea, I hope you remember this beautiful love shadow box.

Thanks for stopping by!
Happy Crafting  :)


Monday, December 8, 2014

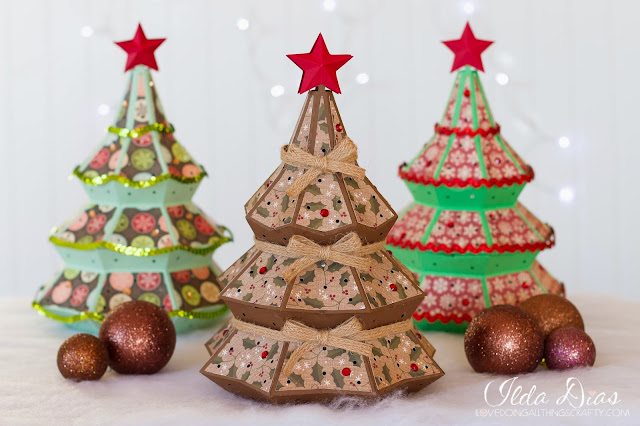
3D Christmas Tree Luminary | SVGCuts

Have you seen the latest SVGCuts kit Santa's Surprises? So many super cute paper boxes in this kit, perfect for gift giving this year... trust me, you'll just have to check it out!

Today I'm going to share with you the 3D tree from this kit... Ok, 3 of them! How cute are they? They have plenty of room for some treats and then they can be lit up and used as a decoration!

Gift,#SVGCuts,SVG Cuts file,Chritmas decorations,box,3D Christmas Tree Luminary,vintage tree,ilovedoingallthingscrafty,

I enlarged the star files a little and added some score lines to create a 3D look to the star. Really love that look!


Here they are all lit up! SO cool!
Absolutely love how they all turned out!


Hope this has inspired you to make your own 3D Christmas Tree Luminary!

Thanks for stopping by!
Happy Crafting  :)