Showing posts with label Pictorial. Show all posts

Monday, January 27, 2020

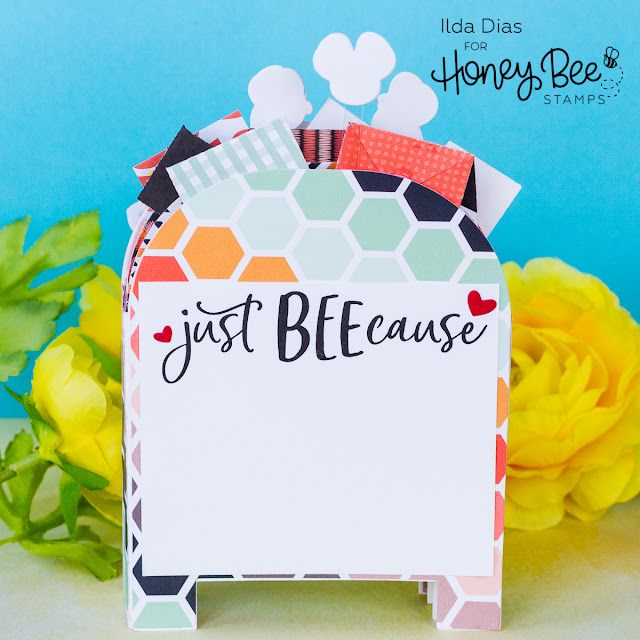
Happy Mail Just Beecause | 3D Post Box Card | Honey Bee Stamps


Happy Mail Just Beecause | 3D Post Box Card | Honey Bee Stamps by ilovedoingallthingscrafty.com

Hello, my Honey Bee Friends! 

Today I have a super cute Box Card to share with you, in fact, it is a 3D Post Box Card using the new POST BOX CARD BASE DIES from the latest BEE MINE Release. I am not going to lie and tell you this was a quick and easy card because it took about 3 hours to make and probably could have been made faster but I was figuring things out as I created it. So I will share with you my process and what I would do differently to make it easier for you if you wanted to create something like this 😉

CARD DETAILS
Here I have compiled some images of my process to make things more visual for you.

1. Die-cut 4 of the Post Box Panels.
2. To create the side panel for the box card I die cut 2 pieces of the connector die (12 total)
3. Bend the die-cut pieces at the scoreline.
4. Glue the 2 pieces together to create one side panel connector for each layer of the box card.

Happy Mail Just Beecause | 3D Post Box Card | Honey Bee Stamps by ilovedoingallthingscrafty.com

5. You will need to create 6 connectors pieces.
6. Line up the connector with the outer edge of the post box panel and glue in place.
7. Push flat the connector piece and add glue to the flap. 
8. Attach the next panel in place lining it up with the scored edge and repeat steps 6-8 for the remainder of panels.


Happy Mail Just Beecause | 3D Post Box Card | Honey Bee Stamps by ilovedoingallthingscrafty.com

9. Glue connectors onto the other side of the box and connect the coordinating panel.
10. Repeat until all panels are connected. As you build the box, before the glue completely dries, bend the panels from side to side to ensure they fold flat each way.
11. Die-cut your decorative papers to cover up the panels. For the middle pieces, you do not need to cut the full Post Box panel. I just did the tops as that is what is visible.

Happy Mail Just Beecause | 3D Post Box Card | Honey Bee Stamps by ilovedoingallthingscrafty.com

Not Pictured
12. Glue the patterned papers in place. For the inside pieces, I had to trim a tiny sliver on each side of the panels to make it easier to glue in place.
13. Glue on the outer and inner pieces of patterned paper. This paper comes from the SWEET ON YOU PAPER PAD.
14. Cut a strip of paper to the size of the side panels to cover up the connector pieces and glue in place.
15. Embellish the Post Box Card as desired.

MORE CARD DETAILS

To decorate and complete this card I stamped out, colored and die cut the bees from the BUSY BEE stamps set and Coordinating BUSY BEE dies.

I then used thin strips of acetate to connect a few of them in the air. To cover up the ink bleed from the coloring on the backside of the bees, I used a blank die-cut to sandwich the acetate piece.

Happy Mail Just Beecause | 3D Post Box Card | Honey Bee Stamps by ilovedoingallthingscrafty.com

The greeting stamp I used on the back of the Box card comes from the HI HONEY Stamp Set.

The little hearts I used to decorate the letters and the backside of the card come from POCKET FULL OF LOVE HONEY CUTS.

Happy Mail Just Beecause | 3D Post Box Card | Honey Bee Stamps by ilovedoingallthingscrafty.com

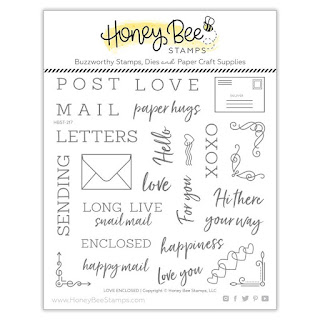
For the letters, I used the LOVE ENCLOSED HONEY CUTS to create both the postcard type letters and the envelopes. I then also stamped a few using the stamps from theLOVE ENCLOSED Stamp Set.

Happy Mail Just Beecause | 3D Post Box Card | Honey Bee Stamps by ilovedoingallthingscrafty.com

As you can see from this next photo this card will fold flat to fit into a 5x7 envelope. Keep in mind it is quite thick and will require extra postage for shipping.

Happy Mail Just Beecause | 3D Post Box Card | Honey Bee Stamps by ilovedoingallthingscrafty.com

WHAT I WOULD DO DIFFERENTLY
If I was to recreate this project again I would have used a lighter weight paper. I used Neenah 110lbs for this, which made it too bulky. Instead, I would have used a 65lbs paper because it will be reinforced with the patterned paper making it strong enough and less bulky for mailing.

Also, I would have adhered all the patterned paper first onto the white panels then glued the pieces together. I did it the way I did to hide some of the white connections inside, but honestly, they wouldn't have been that noticeable.


I hope you have been inspired by this fun 3D Happy Mail Just Beecause Post Box Card. I also think would also make a great mini-album too simply by using the single connector pieces and layering as many post box panels as you desire!

Thank you for stopping by 😊
Until next time... Happy Crafting 👋


SUPPLIES
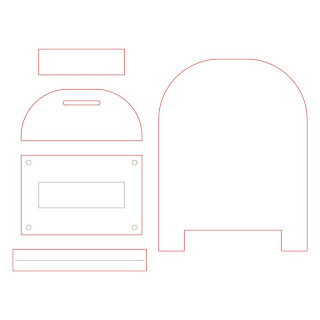
POST BOX CARD BASE | CUTS
Shop at:
SSS | HBS
LOVE ENCLOSED | CUTS
Shop at:
SSS | HBS
LOVE ENCLOSED
LOVE ENCLOSED
Shop at:
SSS | HBS
BUSY BEE
BUSY BEE
Shop at:
SSS | SBC | HBS
BUSY BEE | CUTS
BUSY BEE | CUTS
Shop at:
SSS | SBC | HBS
POCKET FULL OF LOVE | CUTS
Shop at:
SSS | HBS
HI HONEY
HI HONEY
Shop at:
SSS | SBC | HBS
SWEET ON YOU PAPER PAD
Shop at:
SSS | HBS
RAW HONEY GEM STICKERS
Shop at:
SSS | SBC | HBS
GEMINI JR. DIE CUTTER
Shop at:
SSS | AMZ | SBC
NEENAH SOLAR WHITE 110
Shop at:
SSS | AMZ | HBS
MINI MISTI
MINI MISTI
Shop at:
SSS | AMZ | SBC | SK | HBS
BLACKOUT INK
BLACKOUT INK
Shop at:
SSS | IO3
CLEAR ACETATE SHEETS
Shop at:
SK
STUDIO KATIA GLUE
STUDIO KATIA GLUE
Shop at:
SSS | SK
FOAM TAPE - WHITE
FOAM TAPE - WHITE
Shop at:
SSS | SK
LIQUID PIXIE DUST
LIQUID PIXIE DUST
Shop at:
SSS | IO3
GLOSSY ACCENTS
GLOSSY ACCENTS
Shop at:
SSS | AMZ | SBC | HBS
WHITE GELLY ROLLER PEN SET
Shop at:
SSS | AMZ | SBC

To make supplies easy for you to find, I have linked them above. If something is no longer available I will link to a similar product. Affiliate links may be used depending on the product linked. 
Please help support my blog by using these links while shopping at no additional cost to you. For more information about the affiliates I use, please visit my disclaimer here. Thanks so much for all your support!

Monday, July 4, 2016

DIY Personalized Etched Cutting Board Tutorial + Free .studio File


Hello my Crafty Friends!

Today I want to share with you a fun wedding gift I made for a beautiful couple that got married this past weekend. I hope they love it as much as I loved enjoyed making it. This project was super simple and easy to make and I'll show you exactly how I did it!

How cool looking is this cutting board!? 
I think I might have to make one for myself now ;)


For my DIYer friends, I have numbered each picture and will explain step by step how I did it. Hopefully the steps are easy enough to follow!

  • 1. Buy yourself a glass cutting board. I found this one at the Dollar Store. Yes, the dollar store... Don't worry it's going to go from drab to FAB!
  • 2. Flip the board onto its front side. (You will be etching the smooth glass surface on the back.)
  • 3. Peal away the backing. 
  • 4. In this case the backing was vinyl and pealed off really nicely.


  • 5. Use Goo Gone or any type of adhesive remover to remove any glue residue left behind.
  • 6. Use warm soapy water and wipe the board clean.
  • 7. Use an electronic cutting Machine to cut out your design (I used the Silhouette Cameo). The script font I used is called Arabella and the type font is Bernard Mt Condensed. I also used inexpensive vinyl (the kind you line drawers with) because you will be discarding it. No need to waste the good stuff! Make sure you reverse the image as this is done on the bottom/reverse side of the glass.  I then used painters masking tape to transfer the vinyl and keep my pieces together.
  • 8. Peal off the backing from the vinyl.


  • 9. Flip over your vinyl and centre it on the cutting board. Make sure you are using the smooth glass surface (bottom of the board).
  • 10. Remove the painters tape and ensure the edges are stuck really well to the glass. You do not want any thing to seep under the edges or you may not get a crisp design.
  • 11. Use Armour Etch Cream and a paintbrush to apply the mixture to the exposed glass areas.
  • 12. Follow the instructions of the Armour Etch. I like to leave mine on a little longer than instructed to ensure a deeper etched look, about 15 minutes.


  • 13. Rinse off the cream using warm water.
  • 14. Once the cream is off peal the vinyl back. 
  • 15. Dry off your board and add clear non slip pads to each corner of the bottom of the cutting board.
  • 16. Flip it over and you are now ready to use it!


For those of you that have a Silhouette and would like the Design I used I'm giving it away for FREE!

All I ask before you download...
is to read my free files RULES!!!
  1. If you choose to download all I ask is you become a follower. (Any social media link to the right of this pg would be appreciated)
  2. Note my files are for personal use only! (Personal use means... only for you to use (no trading, or sharing of my files... let me do that!) 
  3. If you want to share, send your friends over to my blog for the download. 
  4. I'm OK with people sharing my files on their own sites as long as there is a direct link back to this blog...Please give credit where credit is due! (a message to me would also be appreciated)
Here is what the design you download will look like, play with it and add your own fonts and designs to make it your own! 


Click on the link for your FREE Spoon, Knife and Fork Cutting Board Design 
Note this file will only work with Silhouette Studio Software!

Here is one last look at this beauty! 
I'm pretty sure it won't be the last one of these I make ;)
Is it too soon to start thinking of Christmas gifts!?!


Hope you liked my Personalized Etched Cutting Board Tutorial, and if you downloaded my file and plan on using it I definitely would love to see it! Feel free to share it with me by leaving me a link to your work, emailing it to me or sharing it on my FB page!

 I find sometimes it's the smallest gifts made from the heart are the ones that mean the most!

I'll be posting the cute wedding card I made for the beautiful couple next... stay tuned :)

Thanks for stopping by!
Happy Crafting  :)


Tuesday, September 9, 2014

Silhouette Tutorial - How to create your own art from a drawing

Hey Everybody!

Today I want to share with you how to create your own art from a drawing! I'll show you how to go from a hand drawn sketch to the beautiful piece of art below step by step using the Silhouette Designer Edition. Super easy once you know how :)


I made this as a gift for our Cousins that travelled from Portugal to join us on a road trip we took this summer!


Here is a close up of the mountain scene, which I had hand drawn while driving through Jasper. So happy with how it turned out!


Here is the HOW TO...
  • Using a sharpie marker create any image you want (pen or pencil lines are too thin). Make sure the lines all connect with each other or it will be difficult to break each piece apart. (Maybe use a ruler, and create straight lines if possible it might save you some work!)
  • Take a picture of the drawing, as straight on top of it as possible. (I just used my cell phone, to make things easier and quicker, then email the picture to myself).
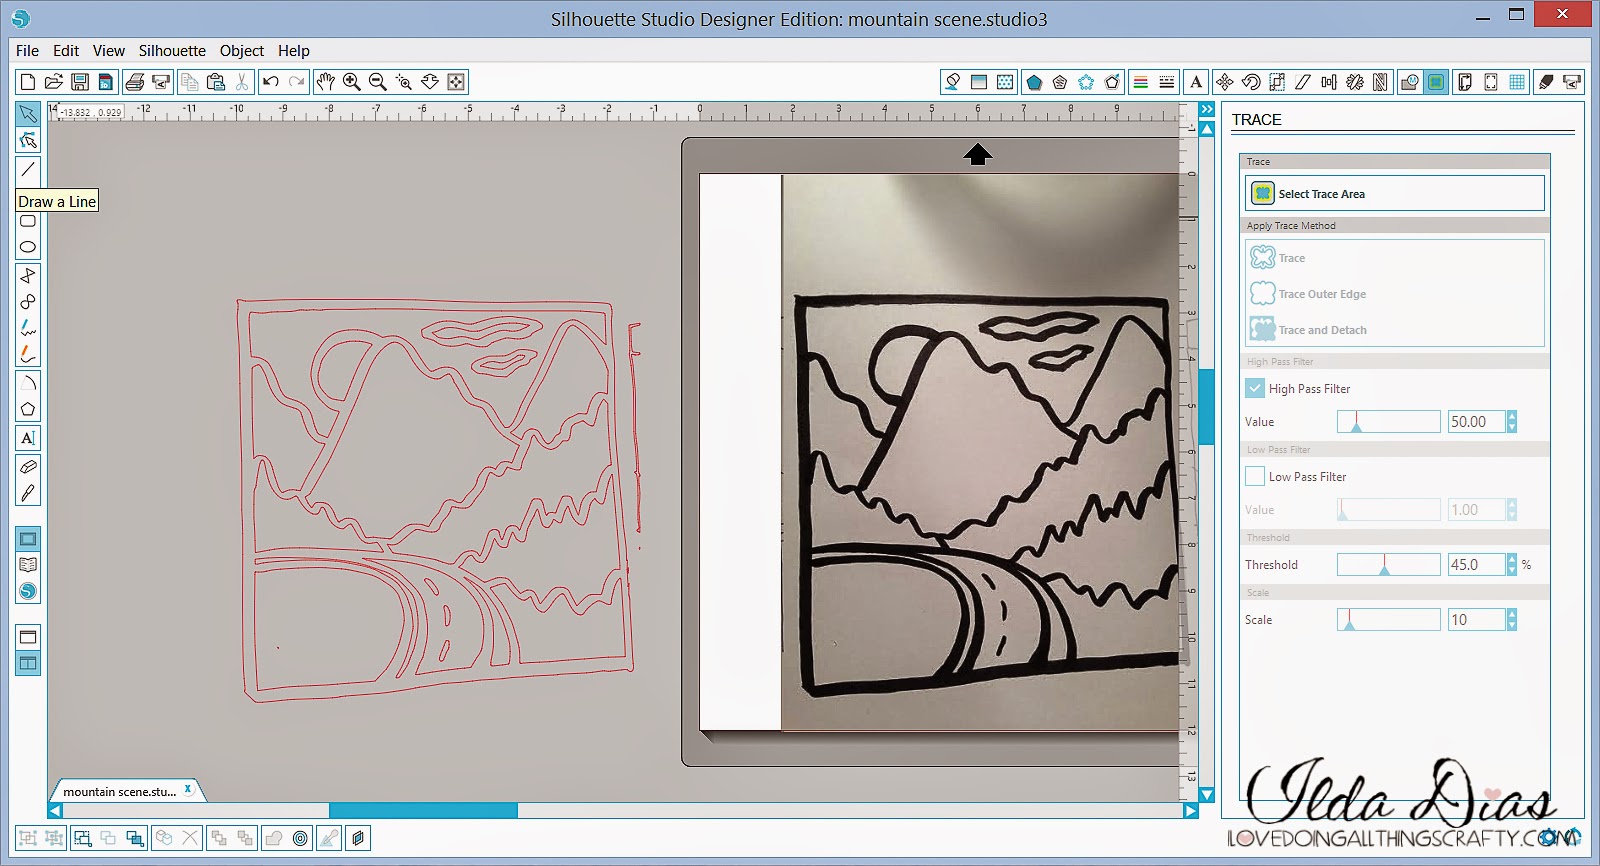
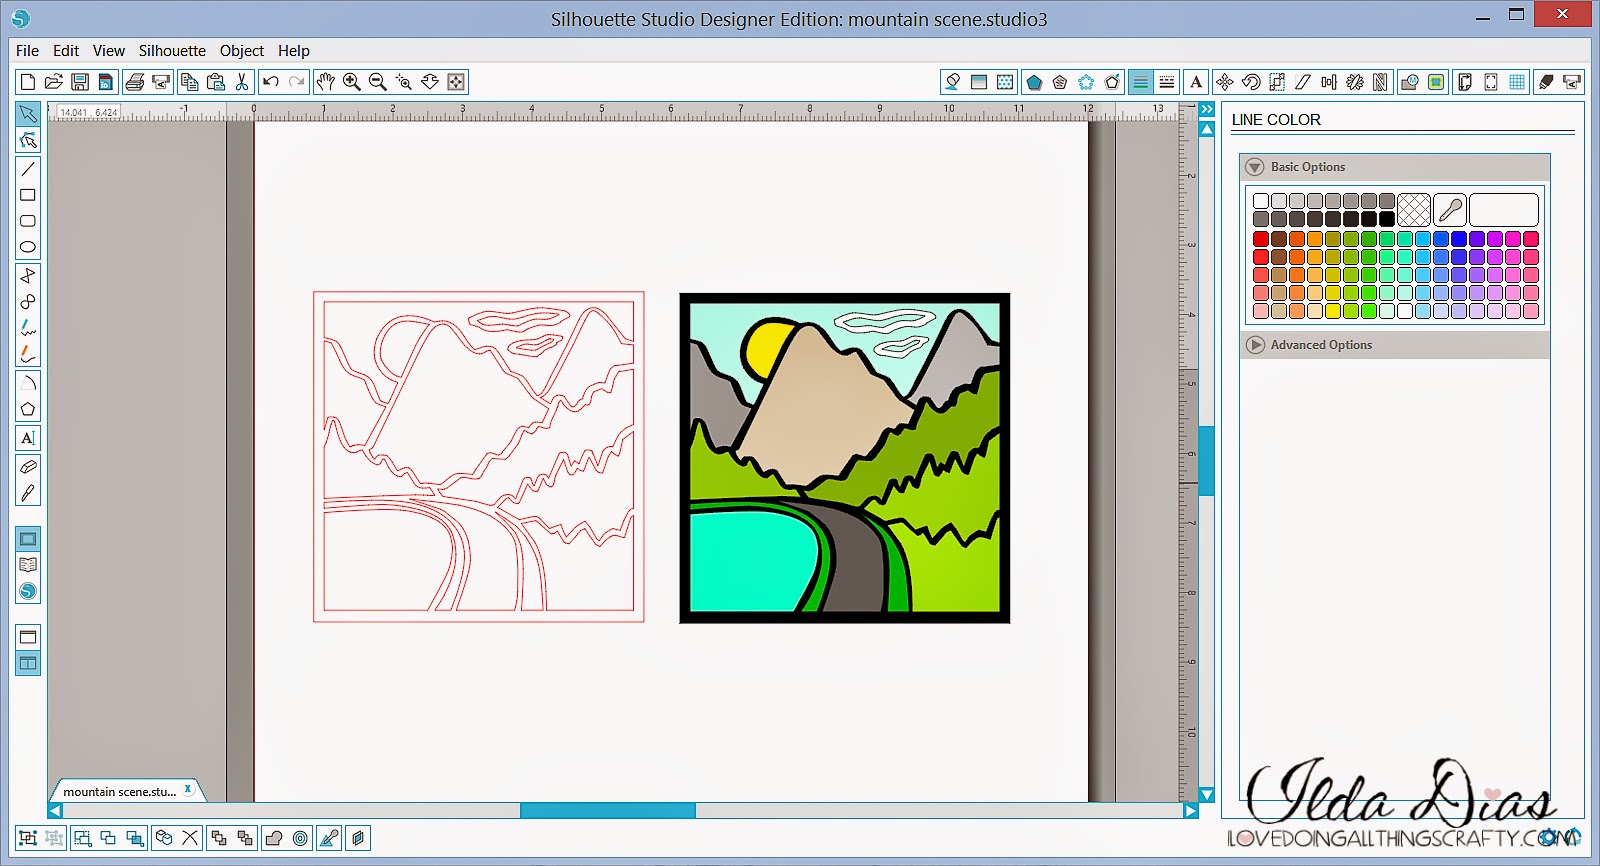
  • Locate the picture on the computer and open it up in the Silhouette's work space (see image below).

  • Next thing you need to do is trace the drawing, by highlighting the trace area (I increased the high pass filter value to 50 and then clicked on the trace function). Refer to next image.


  • Once you have traced the image you will be left with the outline of the drawing. Move the outlines off the drawing.
  • Right click on the image and select Release Compound Path. (This will break up your image in to many different pieces). 
  • Delete any unnecessary pieces. (Just like the little lines on the outside of the drawing below).


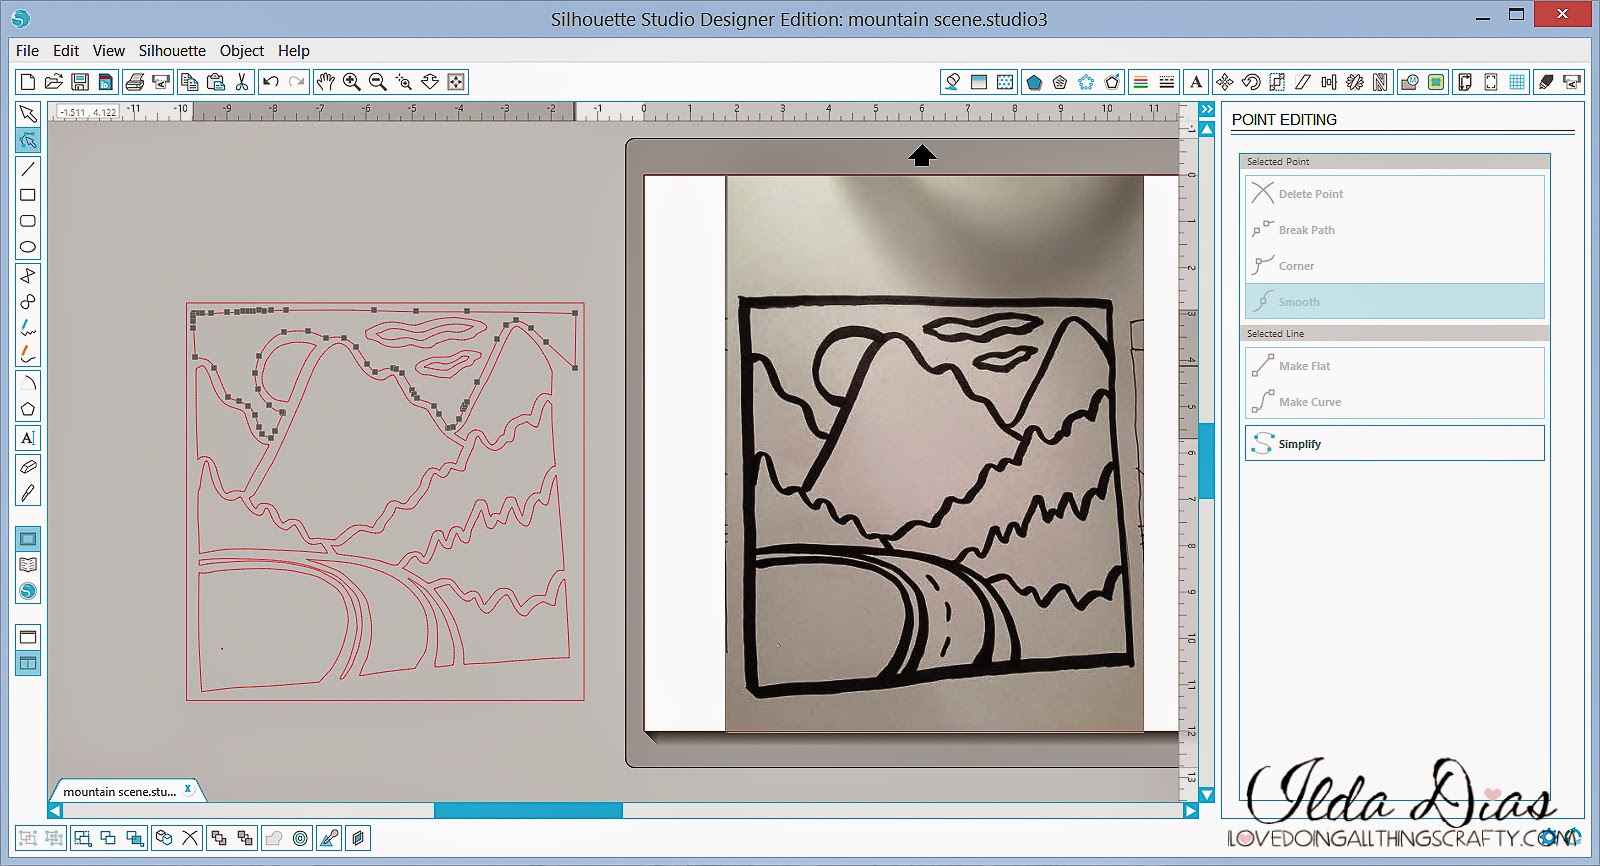
  • Next thing I did was remove the outside square of the drawing as it was all crocked, and replaced it with a square I created with the square drawing tool. (This is where using a ruler when creating your drawing may have helped a little!)
  • Now this is where the work really begins. Clean up time! Highlight each piece of the drawing and using the edit point tool (top left hand, image below) simplify and delete any points that make the lines smoother for your machine to cut. Don't worry about deleting the wrong points as you can just use the undo function and start again. Drag outside points of each piece to make the outer lines parallel to the square you created. See image below.


  • Once you are satisfied with the image and your lines all look fairly straight, group all pieces together and resize it to fit the frame you are going to use. 
  • Ungroup the image again.
  • Before sending each piece to be cut out, I like to visualize what it will look like with color. (This will also help you when selecting your cardstock).
  • To add color to your image, I first copied the image and pasted it it next to it. Then simply selected each piece by highlighting it and used the fill color and line function. Group the colored image together and use it refer back to it when assembling the pieces back together.
  • You are now ready to cut!
  • Once you have all the pieces cut out glue them back onto the square, reproducing the color image created below. 
  • Emboss and embellish as desired!


Hope this tutorial has inspired you to create your own art work! Now that you know how and aren't limited to files you have purchased the possibilities are endless! Sometimes the best things in life are FREE, well with a little bit of work and patience that is!

Thanks for stopping by!
Happy Crafting  :)

Sharing this with my Crafty Peeps!

Monday, March 11, 2013

DIY Pin Cushion from an Old Sock


DIY Pin Cushion from an Old SockI've been meaning to share this with you all for a while and finally got to it this morning when my husband handed me another holy sock! Usually, they end up as grease rags for the garage, but a while ago I had this idea to turn one into a pincushion. So today I decided to show you how I did that. SUPER easy!!!


  • First make sure you have a clean sock... who wants to work with a dirty, smelly one! YUCK!!! Also, make sure that the hole in your sock is not in the toe area, or else it won't look as pretty!


DIY Pin Cushion from an Old Sock


  • Starting at the top of the sock, roll it inward until you reach the toe part. Should end up looking something like this! You could just leave it like this, but it doesn't look very pretty :(


DIY Pin Cushion from an Old Sock, recycled


Squeeze the sock into a small clay pot or container of your choice. I didn't even have to use glue to secure it in place it was wedged in pretty tightly! Stick your pins in it and there you have the quickest little useful project ever!


Hope you like this DIY tutorial, would love to know what you think. What do you do with your old socks?

Happy Crafting Everyone :)
Thanks again for stopping by!