Showing posts with label decor. Show all posts

Tuesday, March 17, 2015

Love Shadow Box | SVGCuts

Hi guys!
 I have a Fall project to share with you today! I know it's not even Spring here yet (although it feels like it), but somewhere around the world, it is Autumn... my favorite time of year! 

Today I want to share with you my latest shadow box creation. I was commissioned to make this for a friend and fan of mine. She loved the original Autumn Love Shadowbox I made and wanted me to make her something similar. I really love how it turned out! Enjoy it Tomina!!! :)

birthday,SVGCuts files,etched glass,#SVGCuts,Silhouette Cameo,Anniversary,Valentines,Gift,decor,Wedding Shadow Box,Autumn love Flower Shadowbox,Love,Fall,ilovedoingallthingscrafty,

For those interested in the files I used, here are the SVG Cuts kits required to make this:

Fall Harvest SVG Kit


Hope you "love" this Shadow Box as much as I do! I think this would make the perfect gift for a birthday, wedding, or anniversary! Next time you are looking for inspiration for a unique gift idea, I hope you remember this beautiful love shadow box.

Thanks for stopping by!
Happy Crafting  :)


Monday, December 29, 2014

DIY Laundry Sign

Happy Holidays Everyone!

This year 14 of our family members and friends spent Christmas in Cuba! I do have to say I think Cuban beaches must be some of the most beautiful in the world and am SO happy we got to spend our week there. I miss the beach already! 

Here is a picture of how Santa came to Cuba! Check out that crystal clear water... sigh!!!


Sadly once the vacation is over, reality always sets in and loads of laundry need to be done. Not sure about you all but every article of clothing I pack needs to be washed (even if unworn) especially when coming from a humid climate. So for the last few days I have been tackling my least favorite chore, LAUNDRY!

Here is an iphone pic of what my laundry room looks like today :( 
And there is still more to fold in the dryer!


So lets get to the reason for today's post!!! 

Over the last few months I have been tackling various parts of my house by painting, cleaning, purging and even redecorating. Today I want to share with you the sign I made for my Laundry Room/Mud Room. Honestly I think the Laundry Room is my least favorite room in the house. Mostly because doing it is my least favorite thing to do! So I thought maybe if I prettied it up, I might enjoy the time I spend in there, well maybe a little!

Having seen various laundry signs all over Pinterest, I thought I could make my own... of course I did! Isn't that what everyone that looks on Pinterest does? LOL!  Well I am SO happy with the results! I took ideas from various signs and combined them to make my own! Well what do you think? SO true, right!?!


I used the PVPP technique to create this sign. For those that don't know what that means it's Paint, Vinyl, Paint, and Peel. Lots of tutorials on line for those of you interested. Basically I painted white a 12x24 wood board (bought at Micheal's). Cut out my Vinyl using the Silhouette Cameo, and transferred it to my board. Then, once the letters were all down I painted with the black all over the entire board. Once the paint dried, I peeled off the vinyl to reveal the white letters. I then took sandpaper and lightly sanded the edges and the top to distress it. Voila, that easy! 

The whole process took less then 30 min to make! To speed the drying time I used a blow dryer... hey what can I say, sometimes I can be a little impatient! 

TIP: If you want to avoid the bleeding of the letters, once you apply the vinyl add another white coat first, this will seal the edges around the letters. Then add the black coat. I didn't really want perfect letters as I wanted it to look more vintage and distressed!


 For all those interested in creating one for yourselves I am giving away the .studio file that I created to make the sign for FREE! Maybe it will help you enjoy the laundry room a little more as well! Enjoy!!!

Before you download...

My free files RULES!
  1. If you choose to download all I ask is you become a follower.
  2. Note my files are for personal use only! (Personal use means... only for you to use (no trading, or sharing of my files... let me do that!) 
  3. If you want to share, send your friends over to my blog for the download. 
  4. I'm OK with people sharing my files on their own sites as long as there is a direct link back to this blog...Give credit where credit is due! (a message to me would also be appreciated)
Click on the links below for your FREE download! 

Laundry Sign

If you would like to donate, (click the đŸ‘‰DONATE button on the sidebar) I will happily accept any amount you see fit. No pressure at all either :) It will just make my day that someone wants to support my passion.

Click HERE to see the Laundry Bins I made earlier this year! I like when my laundry room looks this clean. Hopefully by tomorrow it will again ;)


Well this will be my last post for 2014, so I would like to wish everyone a Happy New Year!!! Here is to an amazing 2015!!! Cheers!

Thanks for stopping by!
Happy Crafting  :)


Tuesday, July 8, 2014

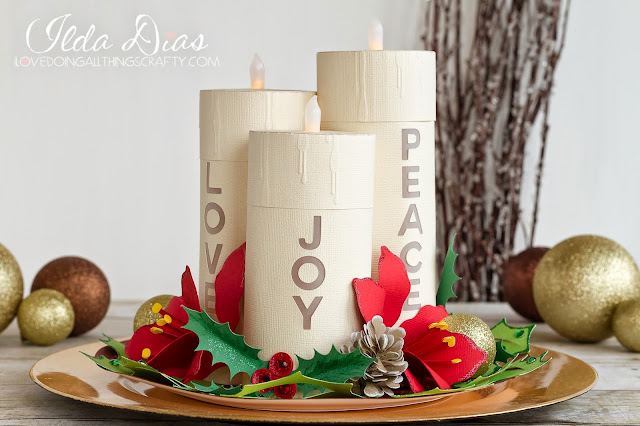
Christmas Candle Centerpiece | SVGCuts

Hello Everybody!!!

Today I have a Christmas project to share with you all. WHAT?! I know it's crazy to think about Christmas yet, especially today when the weather here is the hottest it's been all year! No, I haven't completely lost my marbles... it's my latest SVG Cuts DT project for Christmas in July! Perfect for those crafters that like to get a head start on their Christmas ideas :)

Here is my Christmas Candle Centerpiece! Isn't it purdy? 


For those of you that want to know what SVGCuts kits I've used, here is my list:


All cut on the Silhouette Cameo

Make the 4th Candle and you have yourself an advent wreath!

Gift,SVGCuts Design Team Project,personalized candle,decor,#SVGCuts,Silhouette Cameo,DIY 3D paper candle,Christmas Candle Centerpiece,luminaire,ilovedoingallthingscrafty,

Ooooooo, Aaaaaaaa... just look how they light up! Beautiful!!!


Hey if you're not wanting to wait to make these for Christmas, make them for whatever occasion or holiday you need. Coordinate them to go with your decor and personalize them as much as you like! 


I hope you've enjoyed this little Christmas inspiration! If you do make this please share it over on the SVG Cuts Facebook Fan page, I would love to see your creations! :)

Thanks for stopping by,
Happy Crafting  :)

Thursday, October 17, 2013

House of Haunts Halloween Decor | Facebook Challenge Entry | SVGCuts


Muhahahahahahah! Scared yet? You should be... this post is going to freak you out! WARNING, run if you don't like pictures... this is a very picture heavy post!

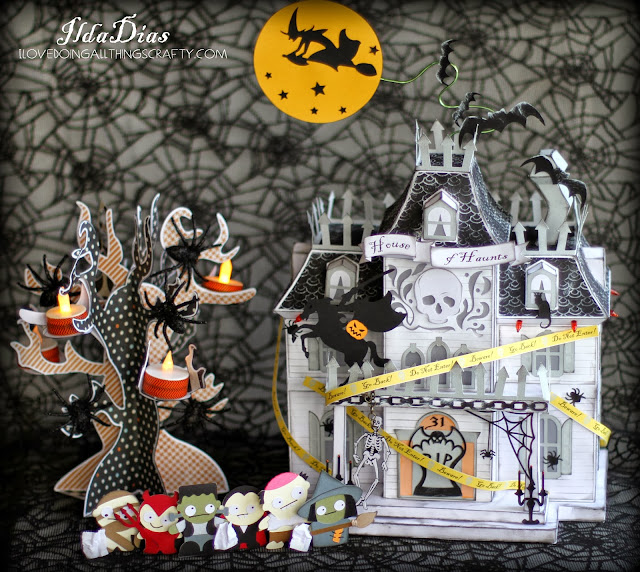
Today I'm so excited to share with you what I've been working on the past week! SVG Cuts is having another Facebook Challenge this time it's Halloween-themed. Of course, I can't resist a good challenge... they are so much fun! I LOVE to create, and with SVGCuts files, the possibilities are endless! For this challenge, I wanted to create a little street scene.

Wait until you see it all lit up!
  
House of Haunts | Facebook House of Haunts Halloween Decor | Facebook Challenge Entry | SVGCuts FilesChallenge Entry | SVGCuts Files


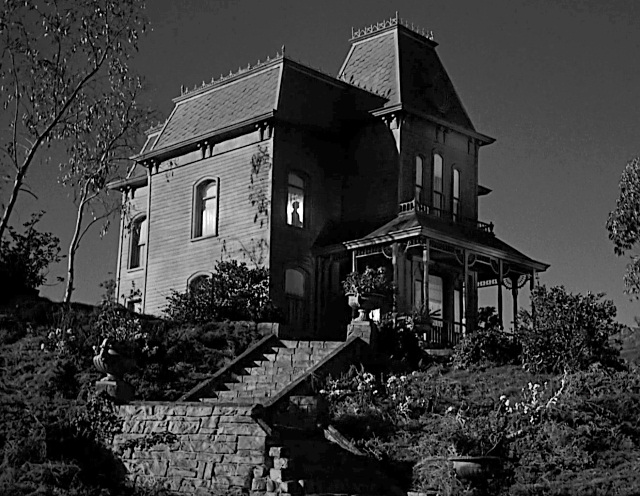
Since I wanted to create a spooky house, the first one I thought of was the Bates House from the movie Psycho. When I looked it up I knew it was the perfect inspiration I needed for my House of Haunts! 

Creepy isn't it!

So how did I do?  Looks a bit like the Bates house, doesn't it? OK well, maybe minus Norman!


For those that are interested, here are all the SVG Cuts Kits I used:


All cut out on the Silhouette Cameo

WOW, right! Love how it looks all lit up... I think this has to be one of my favorite paper projects to date and one of my most challenging for sure!

House of Haunts Halloween Decor | Facebook Challenge Entry | SVGCuts Files

Look at those little faces on the Trick or Tr-eaters! The Witch looks like she's ready to beat someone with her broom... leave it to the boys to send in the girl first, LOL!

House of Haunts Halloween Decor | Facebook Challenge Entry | SVGCuts Files

I can see why they are so scared... the skeleton, the headless horseman, the spiders, creepy tombstone door! These little cuties are working hard for their candy!

To make these little guys stand, I used a strip of paper and created score lines at different depths, essentially creating steps. Then adhered each one of them to a step.

House of Haunts Halloween Decor | Facebook Challenge Entry | SVGCuts Files

Poor Witch, she looks terrified! And, just for some scale, the skeleton measures 3 inches tall! I'm sure she can take him on!!!

House of Haunts Halloween Decor | Facebook Challenge Entry | SVGCuts Files

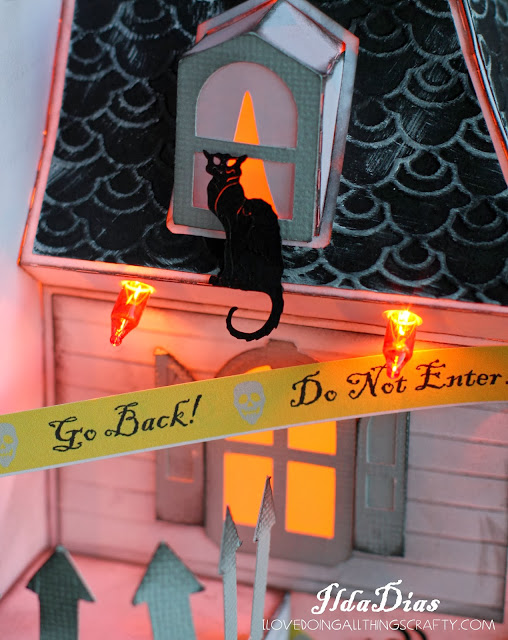
Did you notice the lights? It's a modern-day Victorian, complete with outdoor lighting, hehe! 

To add the string of lights, all I did when I cut out my house panels was add a couple of circle cutouts just underneath the roofline to poke my mini lights through. 

House of Haunts Halloween Decor | Facebook Challenge Entry | SVGCuts Files

Because I also wanted the top of the house to light up I also created two more holes in the top roof tower as shown below. Still, plenty of room to fill with goodies if you wanted to give a house like this away!

House of Haunts Halloween Decor | Facebook Challenge Entry | SVGCuts Files

I wanted to make the house look Evil, so another modification I did to the house was to remove the top window from the tower and add the Skull and flames. The banner was made using Print and Cut, and the file comes from TOIL AND TROUBLE KIT here

House of Haunts Halloween Decor | Facebook Challenge Entry | SVGCuts Files

To the rooftop, I added iron roof trim from ELMHURST HOLLOW here. To attach it, I added a score line to make a bend and then I adhered it to the edge of the roofline and porch. I also added the crooked chimney from the same kit. 

House of Haunts Halloween Decor | Facebook Challenge Entry | SVGCuts Files

Is that not the scariest-looking cat? He has no eyes... EEK! The file comes from MAPLE MANOR KIT.

The yellow tape you see I created with the Print and Cut feature of the Silhouette. The name of the font I used is Blackadder ITC. For the roof, I used a Japanese Scale embossing folder and ran them through the Cuttlebug. Then distressed them with a white ink pad.

House of Haunts Halloween Decor | Facebook Challenge Entry | SVGCuts Files

For my tree of spiders comes from the Spooky Soiree SVG Kit, I used a white card stock base and inked the edges black.  The patterned paper comes from My Mind's Eye Mischievous Paper Kit. To make my tea lights coordinate with the rest of the scene I wrapped Washi tape (Recollections) around them.

House of Haunts Halloween Decor | Facebook Challenge Entry | SVGCuts Files

Here is what the inside looks like with the string of lights through it... You could secure them all the top part of the roof but I found the lighting better when some of the lights were on the base of the house. This would also be a great idea for a Christmas Themed house, with all the lights around the house!

House of Haunts Halloween Decor | Facebook Challenge Entry | SVGCuts Files

To close it up, I just created a little slit with my scissors and pulled the end of the cord through.

House of Haunts Halloween Decor | Facebook Challenge Entry | SVGCuts Files

Did you notice the siding? I didn't have an embossing folder that looked like a siding of any kind, so I thought I would make my own.  I did it by creating score lines on my panels with my scoreboard. What took me forever was the ink distressing and "dirtying" of the house! But all so worth it, I absolutely love how it all came together :) Now I just have to clean up my dirty craft room :(

Here's one last look at the House of Haunts. Oh, almost forgot the flying witch comes from Midnight Jamboree SVG Kit here and the bats from Party On Elm Street SVG Kit here. I used some floral wiring and poked a hole through the top of the roof tower and used hot glue to secure it. 

House of Haunts Halloween Decor | Facebook Challenge Entry | SVGCuts Files

I hope you have enjoyed my House of Haunts! I have had so much fun coming up with it, and if you haven't entered there are still a few days left! Good luck to all that are participating, there are already many great entries.

Wish me luck on the Challenge, I sure would love to win a Sizzix Eclipse or anything else for that matter!

Thanks so much for stopping by, would love to hear what you think :)
Happy Crafting Everyone!