Wednesday, August 27, 2014

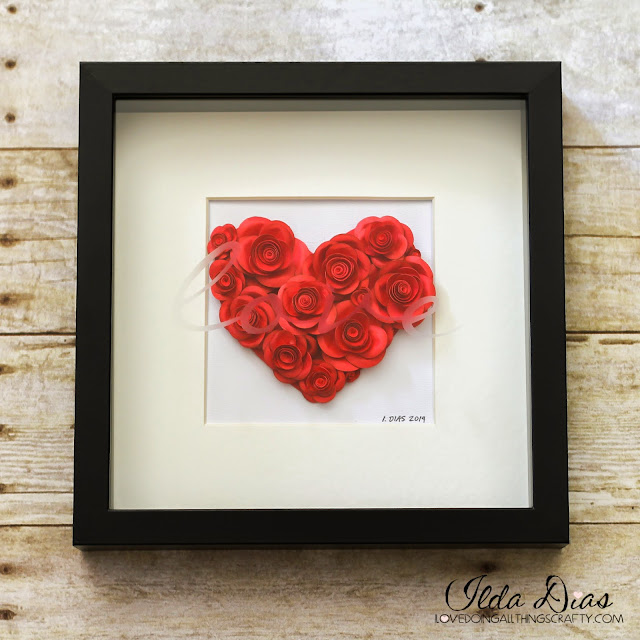
Rose Heart Shadow Box | SVGCuts

Recently one of my high school besties Daniele was in town for a post destination wedding celebration. Haven't seen much of her in years since she moved to London, England after University. We did get to see her and her man a few summers ago when we visited London. This summer she married her best friend Benni in a gorgeous villa in Tuscany! 

Today I want to share with you the gift I made them. Since I am in love with shadowboxes, I thought I would make the happy couple a Rose Heart Shadow Box as a little wedding gift from us.

Gift,Wedding,Roses, Heart,SVGCuts,Silhouette Cameo,Rose Heart Shadow Box,ilovedoingallthingscrafty,SVG file,personalized, paper art

For examples of other shadow boxes I've made, click here, here, here and here.

Below is a close up of the roses and the word love etched on the glass. Click here for a previous etching tutorial.

Gift,Wedding,Roses, Heart,SVGCuts,Silhouette Cameo,Rose Heart Shadow Box,ilovedoingallthingscrafty,SVG file,personalized, paper art

To replicate your own Rose Heart Shadow Box you will need:

The rose file from - Crush On You Boxes SVG Kit cut at various sizes.
Cut on the Silhouette Cameo.
8 X 8 Shadow Box (purchased from IKEA.
Etching cream

Yes, that is it! Simple and easy, yet elegant results!

Once again, congratulations Daniele and Benni! It was so nice to see you both again, I really enjoyed our afternoon together! Wish you both a lifetime of love and happiness!!!

Thanks for stopping by!
Happy Crafting  :)

Monday, August 25, 2014

Wine Barrel Birthday Cake

Wine anyone? OK then, now how about some cake to go with that wine?

Today I am sharing with you a wine barrel cake I made for my father's 60th Birthday party. As you've may have guessed he love his homemade wine. So I thought this would be perfect  cake for him. Actually one of my earliest memories was of my dad stomping grapes with his feet the old fashioned way as they did back in Portugal, I think I was about 3 or 4!


This cake was made up up 3 layers - 1 vanilla and 2 chocolate. Baked in 6 inch pans. All frosted with vanilla butter cream icing and covered with fondant.

To create the wood grain look, I just scratched up the fondant using a fork and painted it with brown icing gel.


The label and the number 60 was created using my Silhouette Cameo. So much easier than having to make it out of fondant and icing!


Hope you liked my dad's Wine Barrel Birthday Cake!
Happy Birthday Dad, LOVE YOU!

Thanks for stopping by!
Happy Crafting  :)

Sharing this with my Crafty Peeps!

Monday, August 4, 2014

Laundry Room Bin Organizers

Hello my crafty friends!

It's been a while since my last post. Just seems I can't get any crafting done while the kids are home for the summer. I did manage to do a quick home organizational project and thought I would share it with you all. Check out my new Laundry Room Bin Organizers!

A few years ago we installed this floating shelf above the counter in our laundry just so that the counter would stay clear of clutter when I needed the counter space for folding and ironing my laundry. For a while everyone in the house had a different coloured fabric box that sat on the shelf. With all the abuse they got, the boxes started falling apart and becoming an eye sore. Last week I found these great plastic bins at the Dollar Store. They were the perfect sized containers to store all the little seasonal accessories. The only problem I had was that they were all red and difficult to distinguish between whose bin was whose?

Vinyl to the rescue!


Here's a few pics of my process.

First, I cut out my vinyl words on the Silhouette Cameo. Then I weeded the negative space around the words. For those interested the font I used was called Kayleigh.


I didn't have any transfer paper but I did have some painters tape handy.
I placed the tape directly over the wording and pressed it just enough to lift the word off.


Below is what the wording should look like once removed from the paper backing.


I then centred the word as best as possible on the plastic bin, and voila!
Super quick and easy, and if you shop like me super cheap too!!!
(I actually bought my vinyl at the Dollar Store too, woohoo!)


Love how doing something so simple can make a space look and work better!


Hope that these Laundry Room Bin Organizers have inspired you to organize your own space with a little vinyl!

Thanks for stopping by!
Happy Crafting  :)