Showing posts with label Silhouette Tutorial. Show all posts

Monday, July 4, 2016

DIY Personalized Etched Cutting Board Tutorial + Free .studio File


Hello my Crafty Friends!

Today I want to share with you a fun wedding gift I made for a beautiful couple that got married this past weekend. I hope they love it as much as I loved enjoyed making it. This project was super simple and easy to make and I'll show you exactly how I did it!

How cool looking is this cutting board!? 
I think I might have to make one for myself now ;)


For my DIYer friends, I have numbered each picture and will explain step by step how I did it. Hopefully the steps are easy enough to follow!

  • 1. Buy yourself a glass cutting board. I found this one at the Dollar Store. Yes, the dollar store... Don't worry it's going to go from drab to FAB!
  • 2. Flip the board onto its front side. (You will be etching the smooth glass surface on the back.)
  • 3. Peal away the backing. 
  • 4. In this case the backing was vinyl and pealed off really nicely.


  • 5. Use Goo Gone or any type of adhesive remover to remove any glue residue left behind.
  • 6. Use warm soapy water and wipe the board clean.
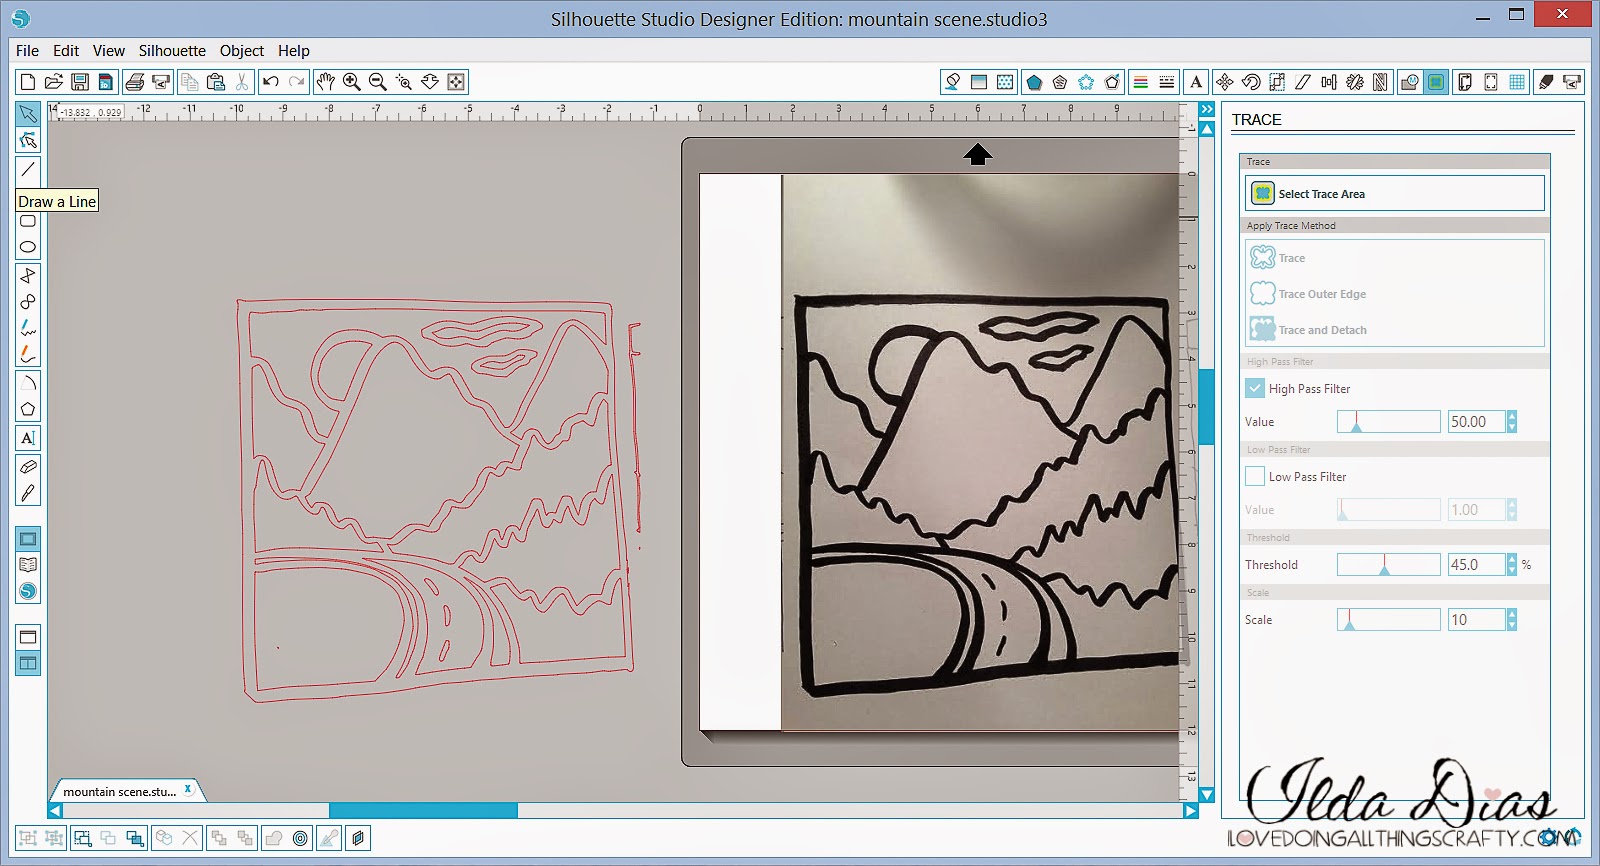
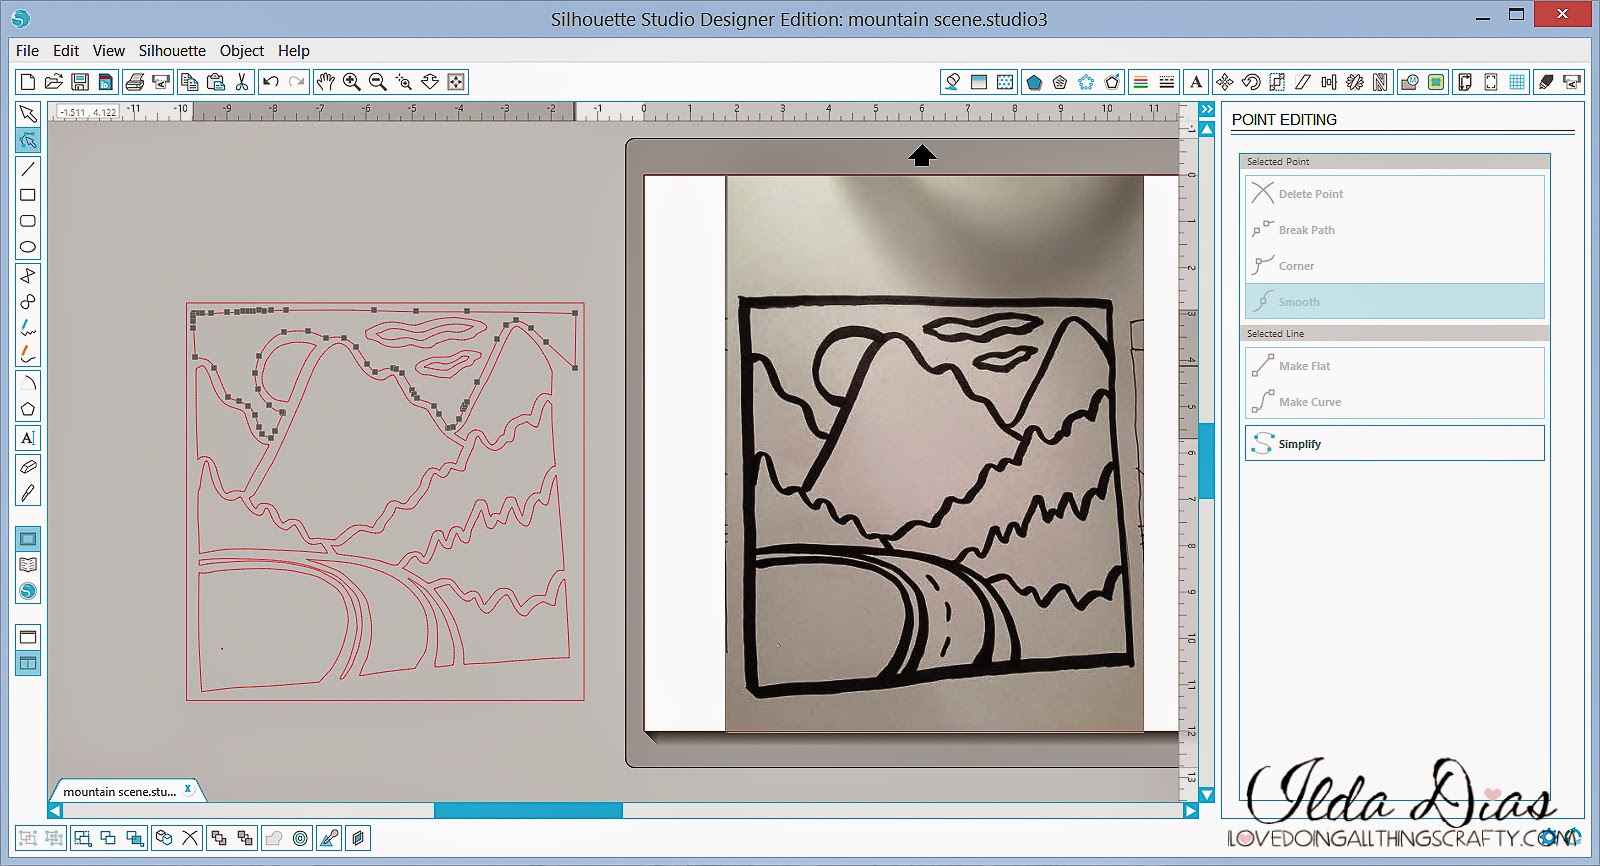
  • 7. Use an electronic cutting Machine to cut out your design (I used the Silhouette Cameo). The script font I used is called Arabella and the type font is Bernard Mt Condensed. I also used inexpensive vinyl (the kind you line drawers with) because you will be discarding it. No need to waste the good stuff! Make sure you reverse the image as this is done on the bottom/reverse side of the glass.  I then used painters masking tape to transfer the vinyl and keep my pieces together.
  • 8. Peal off the backing from the vinyl.


  • 9. Flip over your vinyl and centre it on the cutting board. Make sure you are using the smooth glass surface (bottom of the board).
  • 10. Remove the painters tape and ensure the edges are stuck really well to the glass. You do not want any thing to seep under the edges or you may not get a crisp design.
  • 11. Use Armour Etch Cream and a paintbrush to apply the mixture to the exposed glass areas.
  • 12. Follow the instructions of the Armour Etch. I like to leave mine on a little longer than instructed to ensure a deeper etched look, about 15 minutes.


  • 13. Rinse off the cream using warm water.
  • 14. Once the cream is off peal the vinyl back. 
  • 15. Dry off your board and add clear non slip pads to each corner of the bottom of the cutting board.
  • 16. Flip it over and you are now ready to use it!


For those of you that have a Silhouette and would like the Design I used I'm giving it away for FREE!

All I ask before you download...
is to read my free files RULES!!!
  1. If you choose to download all I ask is you become a follower. (Any social media link to the right of this pg would be appreciated)
  2. Note my files are for personal use only! (Personal use means... only for you to use (no trading, or sharing of my files... let me do that!) 
  3. If you want to share, send your friends over to my blog for the download. 
  4. I'm OK with people sharing my files on their own sites as long as there is a direct link back to this blog...Please give credit where credit is due! (a message to me would also be appreciated)
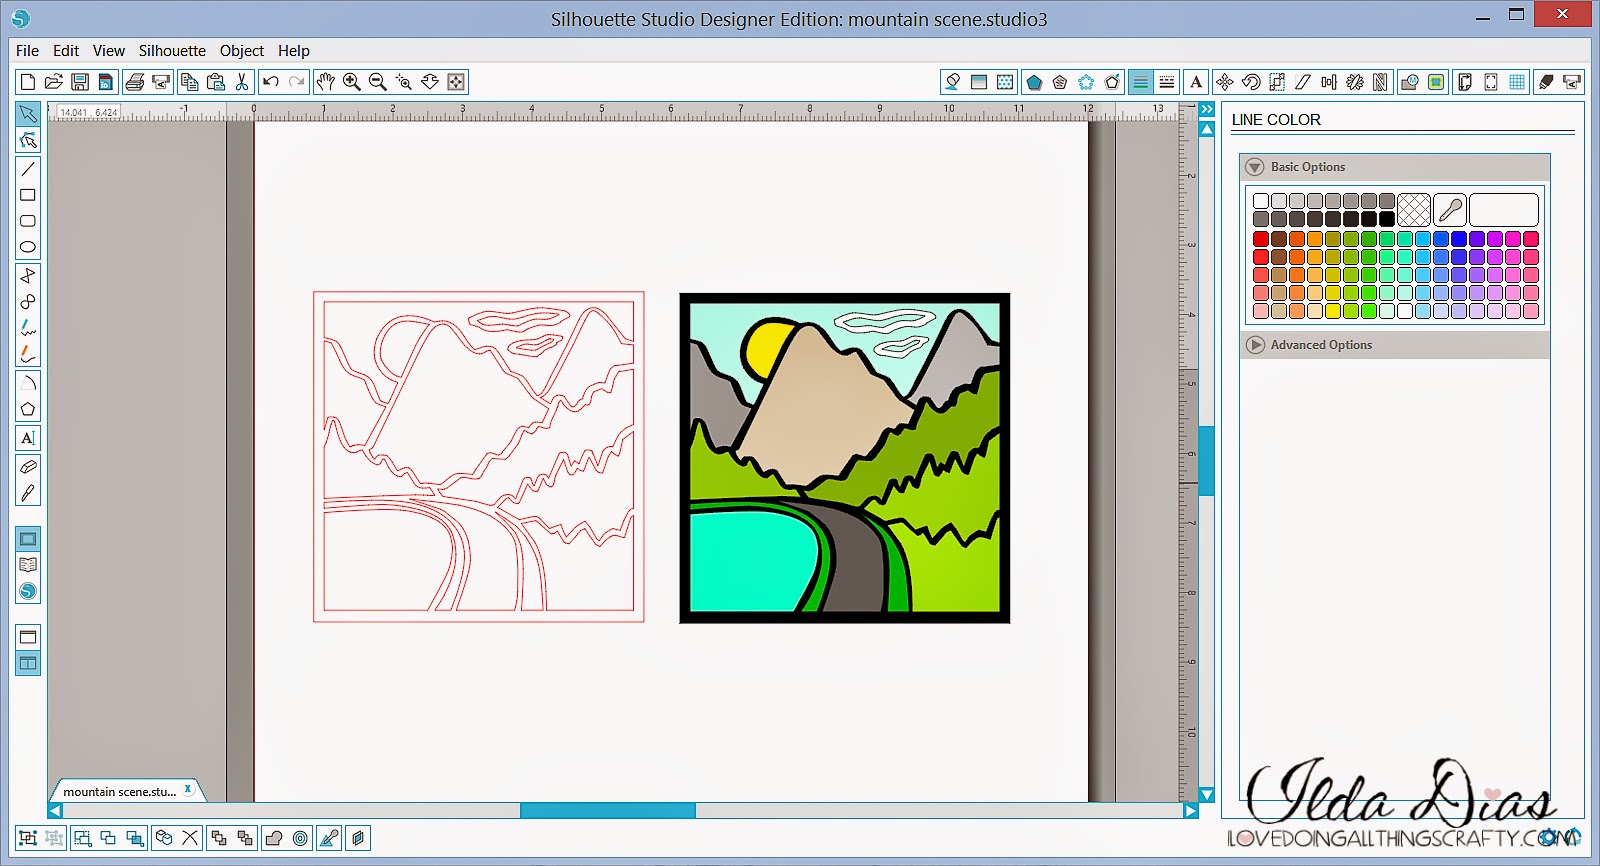
Here is what the design you download will look like, play with it and add your own fonts and designs to make it your own! 


Click on the link for your FREE Spoon, Knife and Fork Cutting Board Design 
Note this file will only work with Silhouette Studio Software!

Here is one last look at this beauty! 
I'm pretty sure it won't be the last one of these I make ;)
Is it too soon to start thinking of Christmas gifts!?!


Hope you liked my Personalized Etched Cutting Board Tutorial, and if you downloaded my file and plan on using it I definitely would love to see it! Feel free to share it with me by leaving me a link to your work, emailing it to me or sharing it on my FB page!

 I find sometimes it's the smallest gifts made from the heart are the ones that mean the most!

I'll be posting the cute wedding card I made for the beautiful couple next... stay tuned :)

Thanks for stopping by!
Happy Crafting  :)


Friday, December 11, 2015

Christmas Door Card - PixScan/Scanner Silhouette Tutorial


Come and knock on my door... 
We've been waiting for you...

Who remembers Three's Company? I don't know why but this picture below reminded me of the theme song and now it's stuck in my head, haha!

Anyways, I'm excited to share with you this really simple yet elegant door card I made using Fleurette Bloom files with one of her latest Stamp sets! The card comes from Christmas Memories SVG Kit and the stamps come from the Peace on Earth Stamp set.


Not a lot of colouring required for this project, which makes it easy to whip up a bunch of these! In case you are wondering I used my Spectrum Noir Markers, gold embossing powder and VersaMark ink.

Take a closer look.
Aren't those stamps amazing!?!
For those of you interested, Fleurette has here Stamps Sets on SALE right now!


As many of you know I am a Silhouette girl. I love my Silhouette Cameo! It does pretty much everything I have ever wanted it to do. So when the PixScan mat for the Silhouette first came out I had to have it. The results I had when I first used it were disappointing. Some of the cuts were OK, but many were way off, so for a longest time I hadn't used it.  Then through a FB Group I heard of this fantastic machine that simply scanned an image and cut it out, the Brother Scan and Cut. So for a while now I have been debating on whether or not to buy myself one as I am starting to get a little more into stamping... damned the Stamping Enabler Group, lol! After doing a bunch of research on it, it would cost me about $400 to get one to me here in Canada, plus version 2 is not available here yet! That's quite the investment!

Well, I am happy to say that I saved myself $400 by giving the PixScan mat another try! This time instead of using my phone to take the picture I actually used a scanner, and OMG what a difference that made! You see when you use a camera, there is a high chance that the image will have a slight angle to it, distorting the image once imported. You need a flat image, because a slight angle will make a lot of difference in the cut you get! Lucky for me, last weekend at Costco they had a promotion on the HP Envy 4522 for $39.99! This thing prints, scans and copies... How can I go wrong with that! All I needed was the scanner, and for $40 I was SOLD!

So once I figured out how to install the scanner, the rest was easy! Here is what I did next...
  1. Stamped my images and load them on to the PixScan mat (Use a permanent, waterproof ink if you plan on colouring them to avoid bleeding).
  2. Open the Silhouette Studio, click on the PixScan Image Icon.
  3. Place the PixScan Mat into your your scanner, ensuring that at least one of the sides of the registration marks are in the scanning field. (Don't worry if your mat is bigger than the scanner. The silhouette will stitch the two images together later.)
  4. Select Import from Scanner.
  5. Next, select your source and then Import the image (I used the WIA- option), click Scan.
  6. Now wait for it to transfer the data.
  7. You should now have an image that shows half a page loaded on a PixScan mat on the screen. 
  8. If your image is larger, you may need to follow the next step. If all your image was imported ignore it and go to step 10.
  9. Flip your PixScan Mat around and scan the other side of the image, again ensuring that the other registration marks are in the scan field. Repeating steps 5-7. Once your image imports the whole image should look like it was stitched together.
  10. Now all that is left to do is trace your images, select the edges you want to cut out, and if you want some white space around them you will need to create the offsets of your images. Delete any unwanted cutlines.
  11. Load your PixScan mat into the Silhouette. 
  12. Finally, send to Silhouette to cut it out. Your machine will detect the registration marks and begin cutting!

Here are my results.
SO, SO, SO, happy with it! Look at those perfect outlines/offsets! No more spending money on coordinating dies for stamps! YAY!!! And the best part was that I only spent $40!!!


Well I hope you liked my Christmas Card Door Card and that this post has helped anyone debating on whether or not to purchase the Scan and Cut machine... If you have a Silhouette, I would suggest you give your PixScan Mat another try using a scanner vs a camera. You might just end up saving a ton of money! 

Thanks for stopping by!
Happy Crafting  :)


Tuesday, September 15, 2015

Sea Critters Digi Die Cuts & Stamps Shaker Card

Hello my bloggy friends!

Today I have a really super cute and fairly simple card to share with you from one of Fleurette Bloom's latest Sea Critter Digi Die Cuts and Digi Stamps. I am anxiously awaiting for the arrival of her polymer stamp collection that were recently released, hopefully my happy mail will arrive soon!  In the mean time I want to show you how you can create the stamped look with out the having to do any stamping or colouring by hand.

So here is my Sea Critter Shaker Card! How cute did that turn out?! :)
Looks like they are having a fun "shell-o-bration!"


Here is how I created my card, hope this helps you if you are wanting to make something similar.
  • Using the Silhouette Studio Designer Edition software I opened the colored digi files I wanted to use. 
  • Next I created a rectangle slightly smaller than the front of the basecard I wanted to use. 
  • I then filled the rectangle with a gradient blue. 
  • Send rectangle (background image) to the back of the layers. 
  • Next you will want to resize and arrange the critters onto the background/rectangle you created. 
  • Make sure that the cut setting of the images used inside the background are set to No Cut. 
  • For some added fun and interest I added a few layered critters. To do that I traced the outer edge of each image. Next, highlight the image with the outer edge, select the Object function, Modify and create a crop this will create a cut line around the image now if you select Cut Edge in the Cutting options. 
  • When you are happy with the layout of your card send the image to your printer, ensure your registrations marks are turned on. 
  • Once your images are printed out, you are now ready to cut them out!
Here is a phone pic of what mine looked like once I did the Print and Cut.
(Didn't want to waste paper so I created two cards the same way)

  • To finish the card Glue the printed image to the front of your base card. 
  • For some fun and dimension I glued some of the other cut out critters onto the printed images using pop dots. 
  • The next thing I did was cut out a black border slightly larger then the the image I printed out. 
  • Glue some clear acetate to the back of the border. 
  • Add a border of foam tape along the edge of the black border, you may want to use two layers of tape to allow your sequins to freely move inside the card.
  • Add some sequins/beads to the middle of the card and then attach the acetate black border to the top of the card. 
  • All done your shaker card! Embellish as you like ;)


Here is a closer look as these cute critters. :)


For those that love stamping and would rather use your own colours, here is the coordinating Sea Critters Clear Photopolymer Stamps


Don't forget to stop by the Shop and check out Fleurette's other Stamp Sets and Coordinating Digi Dies and Cuts! 


Thanks for stopping by!
Happy Crafting  :)


Thursday, May 21, 2015

Keyhole Housewarming Cards and Tutorial


Hi Guys!

I've been a little behind on sharing some projects. Just seems there is never enough time these days! 

Today I want to share with you all a few housewarming cards I made for some friends and family that moved in to their homes a few weeks ago. I also thought I would share exactly how simple they were to make too!


Housewarming Card Tutorial  
(See screenshot below)

  1. Draw a circle. Below the circle draw a rectangle. Center the two down the middle.
  2. With the edit point tool, highlight the rectangle and drag the top two points to the bottom of the circle. 
  3. Weld the two shapes together.
  4. Create an offset of the keyhole.
  5. Draw a rectangle to the size of the card you want to make. Create a smaller inset rectangle set it aside (for step 6).  Drag the first (smaller) keyhole and center it with the (larger) rectangle. Highlight the two shapes and create a compound path.
  6. Repeat step 5 using the larger keyhole and the smaller rectangle. This will become your top layer.
  7. Piece card together onto a card base.


Here are a few more shaker versions of the same card! I've been kind of obsessed with shakers recently. 


I thought some Snarky Stamps be perfect with theses cards. You can find your own Snarky stamps here!


Hope these DIY cards and tutorial help inspire you the next time you're looking to make a simple housewarming card!

Thanks for stopping by!
Happy Crafting  :)


Thursday, September 11, 2014

Pumpkin Carriage Shaped Card - Fleurette Bloom DT Project


Hey Everybody!

Today I want to share with you my latest Fleurette Bloom DT Project! A super sweet Pumpkin Carriage Shaped Card. Really easy to do and today I will show you how :)

But first, have you noticed Fleurette has been giving away a ton of files for FREE? Keep your eyes pealed for Fleurette's Freebies, FREE for a limited time when she releases them! SO go download them while you can! Quick Tip: Just look on my side bar, I will usually have a direct link to it there for you! 

The file I used for this Pumpkin Carriage was one of this week's Freebies, now it's in the store for $0.99! 


How to make your own Shaped Card:


1. Start by creating an offset/shadow of the shape you want to use. In this case the bottom layer of the pumpkin carriage.


2. Move the pumpkin layer off to the side. Make a copy of the offset/shadow you created above.


3. Using the draw a line tool. Select the area where you want to create the fold for your card. Hold down the shift key and drag the line across the top of one of the offset/shadow layers, this will create a straight line. This layer will become the base of your card.


4. Highlight the line you just created and change the style of line to a dash line. Group the dash line to the base of the card. 

5. Copy and create another pumpkin layer. Drag it on to the center of the base of the card you just created. Select the knife tool and again by holding down the shift key and the knife tool drag it over the pumpkin layer just above the dash line you created on the base of the card.


 6. Drag the bottom part of the pumpkin to the side. Delete the top piece.

7. If you want to create some writing space for the inside of the card, create a shape like I did using the draw an ellipse tool. You are now ready to cut out all the pieces for your shaped card! To assemble the card: Just add glue above the dash line on the base of the card, continue by gluing the remaining pieces to the top and inside. Embellish as desired! 


Here is a peek at what the inside should look like. I chose to add the orange and green layer to the inside of the card. This is not necessary! You can just leave it blank , but in doing this you will make a sturdier card... and it looks cuter! ;)


Hope you have enjoyed this card and tutorial! 
If you have any questions feel free to ask me :) 


Don't forget to look out for Fleurette's FREEbies!

Thanks for stopping by!
Happy Crafting  :)

Tuesday, September 9, 2014

Silhouette Tutorial - How to create your own art from a drawing

Hey Everybody!

Today I want to share with you how to create your own art from a drawing! I'll show you how to go from a hand drawn sketch to the beautiful piece of art below step by step using the Silhouette Designer Edition. Super easy once you know how :)


I made this as a gift for our Cousins that travelled from Portugal to join us on a road trip we took this summer!


Here is a close up of the mountain scene, which I had hand drawn while driving through Jasper. So happy with how it turned out!


Here is the HOW TO...
  • Using a sharpie marker create any image you want (pen or pencil lines are too thin). Make sure the lines all connect with each other or it will be difficult to break each piece apart. (Maybe use a ruler, and create straight lines if possible it might save you some work!)
  • Take a picture of the drawing, as straight on top of it as possible. (I just used my cell phone, to make things easier and quicker, then email the picture to myself).
  • Locate the picture on the computer and open it up in the Silhouette's work space (see image below).

  • Next thing you need to do is trace the drawing, by highlighting the trace area (I increased the high pass filter value to 50 and then clicked on the trace function). Refer to next image.


  • Once you have traced the image you will be left with the outline of the drawing. Move the outlines off the drawing.
  • Right click on the image and select Release Compound Path. (This will break up your image in to many different pieces). 
  • Delete any unnecessary pieces. (Just like the little lines on the outside of the drawing below).


  • Next thing I did was remove the outside square of the drawing as it was all crocked, and replaced it with a square I created with the square drawing tool. (This is where using a ruler when creating your drawing may have helped a little!)
  • Now this is where the work really begins. Clean up time! Highlight each piece of the drawing and using the edit point tool (top left hand, image below) simplify and delete any points that make the lines smoother for your machine to cut. Don't worry about deleting the wrong points as you can just use the undo function and start again. Drag outside points of each piece to make the outer lines parallel to the square you created. See image below.


  • Once you are satisfied with the image and your lines all look fairly straight, group all pieces together and resize it to fit the frame you are going to use. 
  • Ungroup the image again.
  • Before sending each piece to be cut out, I like to visualize what it will look like with color. (This will also help you when selecting your cardstock).
  • To add color to your image, I first copied the image and pasted it it next to it. Then simply selected each piece by highlighting it and used the fill color and line function. Group the colored image together and use it refer back to it when assembling the pieces back together.
  • You are now ready to cut!
  • Once you have all the pieces cut out glue them back onto the square, reproducing the color image created below. 
  • Emboss and embellish as desired!


Hope this tutorial has inspired you to create your own art work! Now that you know how and aren't limited to files you have purchased the possibilities are endless! Sometimes the best things in life are FREE, well with a little bit of work and patience that is!

Thanks for stopping by!
Happy Crafting  :)

Sharing this with my Crafty Peeps!