Showing posts with label tutorial. Show all posts

Friday, January 29, 2016

Simple DIY Stamping Tool


Hey All!

Today I want to share with you this quick stamping tool I whipped up in under 10 minutes!
What does this tool do you may ask? Well, it allows you to stamp an image multiple times in the exact same spot, just in case the ink didn't go on dark enough or crisp enough that first time!


I have wanted to get myself the MISTI tool for the longest time. But, with the plummeting Canadian Dollar and the outrageous shipping costs I thought I would hold off for now.  In the mean time the DIYer in me decided to make something that could get me started. For the amount of stamping I do this is perfect for me and it is for my own personal use! So with supplies I had around the house I made my self this really Simple DIY Stamping Tool.

I have put together a video tutorial for those that would like to make something similar :)


Here are the supplies I used in case you missed it in the video:
CD case
grid paper
page protector or/laminator
craft fun foam
adhesive
pliers
scissors
paper slicer

Hope this has inspired you to try stamping and maybe even create you own little stamping tool!

Thanks for stopping by!
Happy Crafting  :)


Tuesday, November 10, 2015

80's Themed Cake + Bonus Timlapse Videos


Hey Everyone ;)

I have a sweet treat for you all today... Literally! 
I was asked by my BOSS a while ago to make an 80's themed Birthday Cake for her BIL's surprise 60th party. How could you say no to your boss, right? Well... she's lucky I really like her, plus she is also my friend and a great Nurse Manager!

So, check out my 80's themed cake. How RAD is that?! 


Wouldn't be the 80's without a Ghetto Blaster! 


Do you remember the rubix cube? I was never able to solve those suckers... I always cheated and pealed off the stickers when I got frustrated, lol!

And of course I had to use my Silhouette to add a little paper to the cake.
Love the look, plus it saved me tons of time from trying to cut out intricate shapes and letters out of fondant!


Oh, and what about Pac Man?
It must have been one of the first video games I had ever played as a little girl!


Well for those interested in what is actually inside the cake 
The rubix cube is made up of rice krispies treats 
Top layers- Vanilla & Chocolate flavored - baked in two 6 inch round pans
Bottom layer - Vanilla & Chocolate flavored - baked in a 10 inch round pans
Entire cake was frosted with vanilla butter cream icing and covered with fondant.

As a BONUS for those of you that want to see how I created the cake, I made a 2 part timelapse video to condense approximately 12 hours into a little over 12 minutes!

(Everybody always wants to know how I do it, so here you go! Enjoy!!!)

80's Cake - Part 1


80's Cake - Part 2


Hope you enjoyed my 80's Themed Cake today, even if you didn't get to eat it! 

Thanks for stopping by!
Happy Crafting  :)


Friday, September 18, 2015

Soccer Ball Spinner Birthday Card | SVGCuts

Hey all!

Today I have a really cute Soccer Ball Spinner card to share with you all! Made this birthday card a couple of weeks ago for a super cool 15 year old, who loves everything soccer! 

birthday,SVGCuts files,#SVGCuts,Soccer,Silhouette Cameo,Soccer Ball Spinner Card,Snarky Stamps,guy,tutorial,boy,Card,ilovedoingallthingscrafty,

The only file I used for this card was the soccer ball that comes from SVGCuts Sports Lovers SVG Collection.


This card is super simple to make, so here is how I made mine...
  1. Cut out two soccer balls and glue them back to back with a piece of embroidery string or twine running down the center in between the layers. Set this to the side.
  2. Next using circle dies, cut a large enough circle out of the front panel of the base card as well as the top layer of your card. 
  3. Attach the soccer ball cut out using the stings to the top and bottom of the circle cut out, make sure to pull the strings taught. Use strong adhesive.
  4. Emboss the top layer of the card if you like, and glue that layer to the top of the card covering up the string ends and sandwiching them between the layers. 
  5. I cut out a (red) circle border to finish the opening around the soccer ball using two different-sized circle dies. 
  6. Embellish the rest of the card as you like!
SUPER easy!


The stamp inside is a combination of stamps I used from Snarky Stamps.

Hope you have enjoyed my Soccer Ball Spinner Card, maybe even inspired to make one of your own!

Have a great weekend!
& Happy Crafting  :)

Wednesday, July 29, 2015

Using Vinyl to Create Watercolor Cards + How to Video


Recently I have seen watercolor cards popping up everywhere ! So I had to jump on board and give them a try!


Before I even got started I watched tons of you tube videos but I have to say I fell in love with Kristina Werner Design videos. What a talented artist! I even went out and purchased some masking fluid to create something like I saw from one of her tutorials. But then one night, I had a light bulb moment and thought to myself why not try making a card using vinyl rather than the masking fluid. With the fluid you need to be really steady with your hand and have great calligraphy skills. But, with vinyl all you need is a nice font and a electronic cutting machine. The designs with the Silhouette are endless!

So then came the experiment and I am pleased to say I am truly happy with the results. I have to admit I had so much fun working with watercolors that I am positive this will be the first of many projects using them!

Take a look as I flub my way through my first actual (speaking) video tutorial. I thought it would be cool for you to see as I saw my experiment come to life! Hope you enjoy it and let me know what you think :)


Here is a look at all 3 cards I made created using this same technique. Mini works of art!


Stamps I used come from Snarky Stamps found here.

Hope you enjoyed this fun and unique way of personalizing watercolor cards using vinyl :)

Thanks for stopping by!
Happy Crafting  :)


Saturday, July 18, 2015

DIY Growth Chart Ruler + Video Tutorial


Hey Everyone!

I am super excited to share with you my latest DIY project, a growth chart ruler! I have been wanting to make one forever. I can't believe it took me this long! In fact I had wood stashed in my garage for years... it is actually one piece of a bi-fold door that I kept from when we built our house over 10 years ago! Talk about hoarding, I know right!?!

A friend from work (hey Katie!) had asked me if I could cut out some numbers for her to create a growth chart ruler on my silhouette. Of course I said yes, but at the time I had way too much other stuff going on. Fast forward a couple of months and finally I had sometime this past week to work on it. So since I was making a template for her, I thought why not make one for myself.  Finally I could check it off my to do list!

There are many ways to make these growth chart rulers but I wanted mine to last forever as a family keepsake and treasure, not sure how vinyl was going to hold up over the years and that is why I chose to do it like I did. I am SO happy with how it turned out and how simple it was to make. The hardest part was being patient and waiting for things to dry! 


For this tutorial I thought I would try doing things a little differently. Rather than having tons of pictures, I decided to create a little video! Hope you find this step by step instructional video helpful on creating your own growth chart. I used the paint, vinyl, paint, peel technique all the time (PVPP) and wanted to show you exactly how it works.

I have to apologize in advance as you may need to pause the video as it is jammed packed with great tips and I didn't want the video to be super long! So with out further adieu, hope enjoy my first ever You Tube video... and as they say all the time on You Tube "please give me a thumbs up if you liked my video and leave me a comment"!


Here is the list of supplies I used:
  • Wood (piece of a bi-fold door re purposed)
  • Modpodge
  • Acrylic paint
  • Foam roller and brush (could use a paint brush as well)
  • Paper plates (for paint an Modpodge, easy clean up)
  • Measuring tape
  • Scissors
  • Vinyl (cheap kind that you can line drawers with, got mine at the dollar store)
  • Silhouette Machine (to cut out the growth chart)
  • FREE file from the Silhouette School (see details below)
  • Heat gun or blow drier (if you are impatient like me ;)
  • Hanging hardware
  • OPTIONAL: stain or paint for the wood (If you choose do this, prep your wood by using the stain or paint before starting this tutorial. VERY IMPORTANT: Make sure you sand your wood lightly if using a stain before applying the Modpodge, this will give the Modpodge something to grab on to, or it may all peel off!)

For those of you with a Silhouette Machine, Melissa from the Silhouette School has the growth chart ruler Studio cut file for FREE on her blog! While you're there check out some of her amazing tutorials and projects :)

Thanks for stopping by!
Happy Crafting  :)


PS. For those of you wondering why Modpodge? Well I had lots of it around, and it is the perfect top coat sealer. Plus it gave the wood a natural look that I was going for!


Thursday, December 26, 2013

Framed Paper Christmas Wreaths | SVGCuts Files


Happy Boxing Day to all that celebrate the Holiday today! For us Canadians, it's kinda like the US Black Friday, lots of crazy shopping and SALES ;) I hope you all had a very Merry Christmas and enjoyed some time with your friends and family! 

Today I want to share with you these awesome framed Paper Christmas Wreaths I created. I purposely didn't share this post sooner as I didn't want to spoil the surprise as they were given as gifts.

Back in the Fall, I had created something similar but on a much smaller scale as a Wedding gift for Mary and Leo of SVG Cuts. The post was titled Autumn "love". Since then, I had thought of making a similar project, only this time as a Christmas gift.

Here is my "White and Gold" Framed Wreath. Isn't it beautiful?!


To add some gold touches, I inked the edges of the flowers with a gold stamp pad and added a little gold glitter to the tips.


A little time-consuming and messy when working with the glitter, but so worth the end results! LOVE how they came together. The picture doesn't do the glitter justice... it is so vibrant and sparkly in person!


For those interested here is how I planned it out on the SSDE.
  1. First I grouped all the layers of my flowers together. 
  2. Next, I created a circle (not shown as covered up by the flowers below) the size I wanted my wreath to be. (As you can see the wreath is larger than the cutting mat)
  3. Resize the flowers as you like and arrange them on top of the circle you created (this will give you an idea of what the finished project will look like and how many flowers you will need to cut out).
  4. Ungroup each flower and cut. 

Here is the list of supplies and files I used to create both frames:

poinsettias - 3D Wintergreens SVG Kit
RIBBA Shadow Box Frame from IKEA - 19 ¾x19 ¾x1 ¾"
Embellished with glitter, gemstones, beads, buttons, pearls, and Ribbon
Brown and gold ink
 Hot glue and a glue gun
Scotch Quick Dry glue
White poster board 
Cut and created on the Silhouette Cameo using SSDE.

Here is a more traditional colored Christmas Wreath. I don't know which one I LOVE more!?
I guess it all depends on the rest of your Christmas decor and what would look best in your home! Don't the poinsettias look SO realistic?


By far the poinsettias from the 3D Wintergreens SVG Kit have been my most used file this Holiday Season! I LOVE how easy and beautiful they turn out each time! They are so stunning!!! I'm always amazed as to what we can make out of plain old paper these days!


For these photos, I have removed the glass from the frames. I wanted to get great pictures and avoid all the glare you get when taking pictures of a reflective surface. With the glass on, these frames look just as amazing!

Another option if you chose to do so, is to etch something across the middle of the glass. If etching intimidates you, use vinyl! Click here for an example.


I hope you enjoyed my Framed Christmas Wreaths. My Family LOVED them by the way!

It is a little late to create this as a gift for someone this year... but you can sure get an early start for next year, or why not make one for yourself  ;)

Enjoy your holidays everyone! EAT, DRINK, and stay SAFE!

Thanks for stopping by!
Happy Crafting  :)

Monday, September 30, 2013

Baby Feet Shadow Box Keepsake - DIY Tutorial

Hi All! Today I want to share with you something that I have been meaning to show you for a while now. I'm talking about Baby Feet! I think Baby Baby Feet are the cutest things ever. Don't worry, it's not a foot fetish... I don't like all feet, only tiny ones ;)

So even before Pinterest was around I had made these shadow boxes of both my children's feet! The one on the left is my son Tomas' at 1 month old (2004) and the one on the right is my daughter Maia's feet also at one month old (2006). They are both soooo very different! The 8x10 frames I used below were bought at IKEA. Now that my kids are older they love to see how small they really were. Today I will share with you how to make your own. You may want to pin this if you have a baby in your life or on its way! Those little tiny feet eventually get huge and not so cute, so if you want to remember how they used to be you might want to give this craft a try!

Baby Feet Shadow Box Keepsake - DIY Tutorial

Very good friends of ours recently had a baby, we were so thrilled when they asked Us to be his God Parents! As a gift to them, I wanted to make little Cristiano his own Baby Feet Shadow Box. 

Baby Feet Shadow Box Keepsake - DIY Tutorial

Here is how you can make your own... 
You will need two people for this project. (Dad can hold baby, while mom gets crafty, lol!)
  1. You will need a 3D Mold Kit. The one I used was by Precious Impressions that I bought at Micheal's Craft Store. Follow the instructions as directed to create your 3D impression. 
  2. Once your impressions have dried, carefully remove the mold. It just peels right off. Because I wasn't too concerned about the top of the feet, those air bubbles don't really bother me. You can always go back and fill those air bubbles in with more plaster. 
  3. With a serrated knife I carefully shaved the top of the feet to the depth of my shadow box. You may at this point also sand an smooth down any imperfections that turned up from your molding process (bumps, air bubbles). Once I knew they would fit in the shadow box I brushed the excess dust off with a paintbrush.
  4. Next, I took some white acrylic paint and covered the entire surface of each foot. (Bottom first until dry and then the tops).  You may want to do two coats to ensure proper coverage. Paint will dry quickly because of the plaster being so porous.
  5. This step is optional but it will seal your feet forever... In a well-ventilated room, place your feet on some cardboard or newspaper. Spray your feet with a sealant Gloss Spray Sealant. If you don't like the gloss look there are mate sealants available. Let the feet completely dry. Once they are completely dry, you are ready to frame them! (I waited another 24 hours).

Here is a close up of the tiny foot! Not so tiny zoomed in, but you can see all his little creases and bumps on his feet. To mount them in the frame I used hot glue and adhered it to card stock.

Baby Feet Shadow Box Keepsake - DIY Tutorial

Before framing the feet I etched Cristiano's name into the glass. Click here for a tutorial of glass etching.

Baby Feet Shadow Box Keepsake - DIY Tutorial

Here is the finished Shadow Box. Love how it turned out! Aren't those little feet so precious? The possibilities are endless with these molds. Frame whatever you like, now that you know how!

Baby Feet Shadow Box Keepsake - DIY Tutorial

I hope this has inspired you to capture some of your own memories! A Keepsake that your child will treasure forever. If your kids are older, it's not too late! Make one of them now or do the whole family (Hands, feet whatever you want to frame)... years from now they will see how small they were at that point in time!

Thanks so much for stopping by!
Happy Crafting :)

Monday, September 23, 2013

Autumn "love" Flower Shadow Box Tutorial | SVGCuts

Happy Fall Everyone!!!

Fall has always been my favorite time of year, I just love the warm colors of nature and the gorgeous flowers of the season! Today, I want to share with you a little wedding gift I made for a very special couple that celebrated their wedding this past weekend. Hope they'll like this little gift :)

Autumn "love" Flower Shadow Box Tutorial | SVGCuts Files

Here is how you can make your own... 

(You will need an electronic cutting machine, I used the Silhouette Cameo with the Silhouette Studio Designer Edition)
  • To create this shadow box, first, create a square the size of the opening of the frame. 
  • Next, select a heart SVG file, I used one from LOVE ME DO SVG KIT here as my template. Enlarge the heart until you are happy with the size. 
  • Then select all the flowers you would like to use. With each flower, ungroup them and place each layer on top of each other so that you can see how they would look like in the end. 
  • Resize each flower then place them on top of the heart. This will give you an idea of how it will look and show you how many you may need to cut out.  
  • Next step, select your papers and cut all the flowers out. I inked some of my flower petals to add some extra colors and add dimension.
  • Once you have all your flowers assembled, arrange them on the heart template as you like. I used hot glue to secure them down to my heart template. 
  • Select the color of your background and cut it to fit your frame. Center the heart and adhere it to your background. 
  • Place the flowered heart inside your shadow box frame. If you want to you can skip the next step and you are done!
Autumn "love" Flower Shadow Box Tutorial | SVGCuts Files
  • The next thing I did was etch the glass with the word "love" written in the center of the heart. See here some of my previous tutorials.

A little bit of work but the results are amazing! Here is a close-up of the flowers... don't the flowers look so realistic!?!

Autumn "love" Flower Shadow Box Tutorial | SVGCuts Files

Want to know where these gorgeous flower files came from... SVGCuts of course! 

Here are all the kits I used for this project:


I'm so happy that what I had envisioned turned out even prettier than what I imagined! I love how it turned out so much, I think I want to make one for myself now! Hubby and I got married in the Fall as well, so this would be perfect for us... it will be 15 years in a few weeks, woohoo!

Congratulations to all getting married this Fall or celebrating an Anniversary this season... this one is for you :) I hope you enjoyed it!

Thanks so much for stopping by!
Happy Crafting :)

Thursday, September 5, 2013

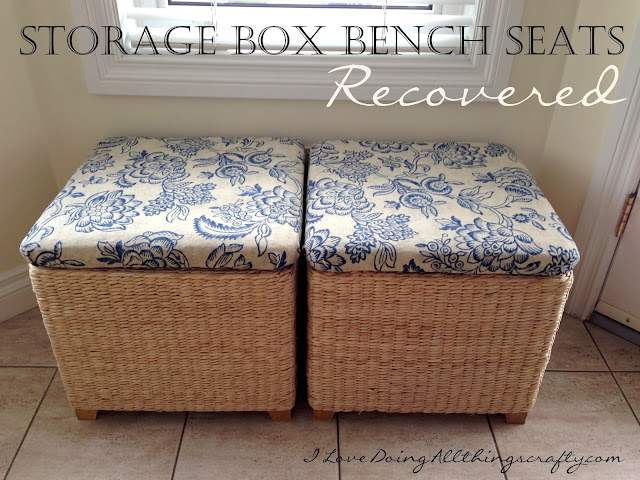
Storage Box Bench Seats Recovered | DIY Tutorial


Storage Box Bench Seats Recovered | DIY Tutorial

Hi Everybody! Now that the kids are back in school I have a little more time for my DIY projects... Woohoo, I love DIY projects! Today, I'm going to share with you how I quickly and easily I recovered these storage box seat covers for my dear mother.


My parents have had these Raffia (I think that's what they are made of) storage box/seats for years now. They are where everyone sits when they need to put on their shoes on in the mud room.


They have been sat on so many times, the seats were starting to fall apart. So, my mom asked if I could help her recover them, I was all over that idea. Luckily, she had leftover fabric from when she made her kitchen valences, so absolutely no money was spent on this project!

Here is a pictorial of how I covered the seats. I even show you how to do those hard to do corners!


  1. Cut the fabric large enough to wrap around the side of the seat. 
  2. Fold the cut seam, and staple it as close to the edge as possible, start in the middle and work your way to the edge. Ensure you pull the fabric taut before stapling on opposite sides. 
  3. Once you reach the corners, place a staple diagonally on each side of the fabric. 
  4. Cut off excess fabric, this makes it less bulky at the corners. 
  5. Pull, fold and tuck the corner. 
  6. Staple as much as you need to finish and secure the corner. Finish the remaining corners the same way. Easy!  


And here they are... Don't they look awesome! I placed them at the back exit in the nook area, just to show you how they fit so well with the rest of my parent's decor. Hopefully, I have added many more years to them!

Thanks so much for stopping by, love to hear from you! 
Happy Crafting :)

Tuesday, August 20, 2013

Freezer Paper Stencils on the Silhouette | DIY Baby Onesie

Today I going to share with you all this cute little onesie I made for a good friend who recently had her baby. I had seen a shirt like this on our last visit to San Francisco and thought it was the funniest thing ever, and so I want to see if I could make one too. I absolutely love how it turned out and so easy to do. 
I didn't have any heat transfer material on hand so I thought I would try using freezer paper. Recently, I had cut out some stencils from freezer paper for a friend who wanted to make some shirts for her husband's band. So I thought I could do the same for this project and show you all how too! (Thanks Amanda for the inspiration)

Here is what you will need:
Shirt - in this case a onesie (pre-washed)
Freezer Paper
Fabric Paint
Foam Brush
Iron


Here is how...
  • First, I created my image on the Silhouette SDE using basic shapes and a font that looked like the iPod font. 
  • Then I loaded cutting mat with the freezer paper, shiny side down. (If you choose to do shiny side up you will need to reverse your image). 
  • I set my speed to 3 and thickness was set to 20. (I had to do a few test cuts until I found the setting I liked).


Here's what it looked like once the freezer paper was cut... a few snags, no big deal! (My blade was brand new, but my mat was not (if it's too sticky it may tear the paper). Do not throw away any little piece of paper, you will need it when you transfer the paper to the fabric to keep everything lined up properly.


  • Once you have the paper lined up how you like on the fabric, iron on the freezer paper (do not use a steam setting). 
  • On the inside of the shirt place, another piece of freezer paper shiny face up. Iron it on, ensuring that the piece is covering the entire area to be painted. This will prevent bleeding to the back of the shirt. You may also want to use cardboard for extra protection and to keep the shirt surface straight and flat.


Flood the image by blotting the area to be painted with a foam brush. Do not brush the paint on as it may cause bleeding underneath the freezer paper. Allow the paint to dry before applying another coat. Dry time is dependent on the paint you use, follow the directions on the fabric paint bottle. That's it, now just let the paint completely dry before removing the freezer paper.


Here is a close up of the onesie! I think it turned out pretty awesome, if you are looking for perfect I would recommend using heat transfer material (a bit more pricy). But if your not, this technique will work just as well!

Hope I've inspired you to go and create some fun projects using freezer paper!  

Thanks so much for stopping by!
Happy Crafting :)