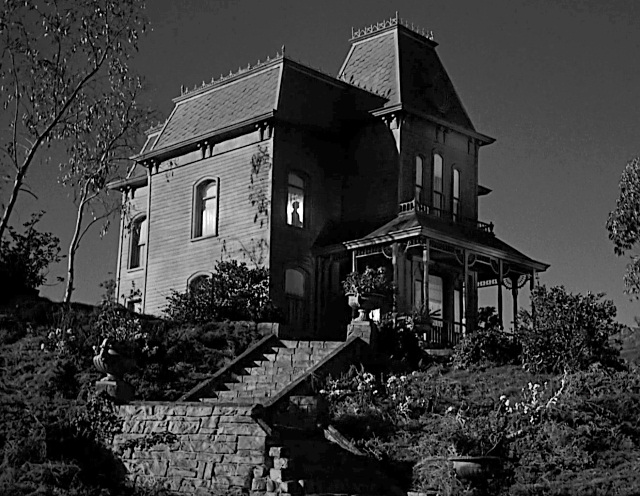
Showing posts with label 3D Paper Art. Show all posts

Monday, May 30, 2016

Fairy Cottage featuring Lawn Fawn Fairy Friends | 3D paper Fairytale House | SVGCuts

Hello, my friends!

I am super excited to share with you all my latest SVG Cuts project. When Mary first released this kit I knew exactly how I was going to make it. I just needed the time to do it... finally I can show you what I have been up to the last few weeks! I know I have said this before, but I think this has to be one of my very favorite 3D projects! 

So here is my take on the SVG Cuts Fairy Cottage. How cute is that?!?
 I am SO in love with it... and the Lawn Fawn Fairy Friend Stamps are the perfect match for this piece!

magic,SVG Cuts files,#SVGCuts,FREE file,cancer patients,ilovedoingallthingscrafty,papercraft,Fairy Cottage,3D Paper Art,fairy tale,3D House,Lawn Fawn Fairy Friends Stamp set,hospital,decoration,

Like some of my recent larger projects, this Fairy Cottage will be displayed on one of the Hospital Units I work on. I think the sentiments and the whole fairy theme is perfect for the patients at our hospital. Even if it is just to make someone smile, I have done my job and all the work was worth it!


So let me give you a tour of this little cottage...

As you can see I used a lot of different embossing folders, this adds a lot of interest and added detail to the cottage without a lot of work. I also thought it would be fun to continue the twig railing down the steps. I think that has to be one of my favorite touches! I loved how Mary added the spinners on her cottage and I happened to have the same ones in my stash, so I thought if I added a clock face it would look cool too!


The back of the fairy cottage has a large opening for plugging in a string of lights or as I did by adding a LED battery-powered pack. I chose to use a multicolored string that I had purchased around Christmas time. The different color of lights just makes the cottage look magical!

Along the bottom of the cottage, I added floral stamps that I colored and cut out from the same Lawn Fawn Fairy Friends Stamp set. To do that, I used Tuxedo Black Memento ink and my Spectrum Noir markers then used my Silhouette PixScan to do the trace and cut them out.   


Also, to the perimeter of the cottage I used this grass file that comes from the FREE Design section, just welded the files together to create longer strips. 

I stuck to plain colored card stock, simply because I have lots of supplies and find it difficult sometimes to coordinate patterned papers with projects this size.  I like to let patterned paper inspire the project rather than the other way around. 


The only alteration I did to the original file of the house was to add some circle cutouts on the mushroom-like roof.  I think it would have looked good with the solid panels, but I guess this is how my mind thinks a fairy tail mushroom looks like ;)


To create the stain glass appearance I used my Spectrum Noir Markers and colored the velum sections of the window in various colors. I also added Wink of Stella for that extra sparkle to the window and all of the fairies' wings. 


With white pigment ink and a Studio G Alphabet set, I stamped various "fairy" like sentiments on the steps and the rock. I thought of my patients going through their cancer treatments when I was doing this part and words that would motivate them to get through it.


For fun, I thought it would look cool to make the fairies look like they were flying around their house. I used some red wire and attached them with hot glue. 

I thought the fairy holding this stamped phrase was the perfect finishing touch!


Well, thanks for stopping by! Let me know what you think of this project 
:)

I hope you all enjoyed my take of the SVG Cuts Fairy Cottage featuring Lawn Fawn Fairy Friends. Hopefully, it has inspired you to create one for yourself or for someone else!

and like the Fairies said, "have a magical day!"
Happy Crafting  :)

Friday, October 25, 2013

Halloween Owl Witch Treat Box | SVGCuts

Hi Everyone!

Today I want to share with you another Halloween project of mine. It's a Treat Box I made for my Daughter Maia. For now, until Halloween comes it looks like a nice decoration piece! Selfish, I know... Shhhh don't tell her!

Halloween Owl Witch Treat Box | SVGCuts Files

Who says only humans get dressed up for Halloween? Whoooo you!!! 
Whooo called her a Witch?!?! Boy she looks mad now, even her Bat Wings are up, LOL!

Halloween Owl Witch Treat Box | SVGCuts Files

Here in Edmonton, they are calling for snow this weekend... Nooooooo! I hope those weather people are wrong, at least until Halloween has passed! It's no fun Trick or Treating with snow boots on :( 
Since snow is coming I thought it would be cute to make my Owl a Snowy-looking one!

I used a few SVG Cuts Kits for this project:
Witch's hat - Catacomb Manor SVG Kit

Cut using the Silhouette Cameo

Halloween Owl Witch Treat Box | SVGCuts Files

The pretty patterned paper I used on the hat comes from Fleurette Bloom's Howlin Halloween Digital Paper Collection. The tag was also made on my Silhouette Cameo with the Print and Cut feature.

Halloween Owl Witch Treat Box | SVGCuts Files

Look!!! She REALLY is a Witch! Her head just came flew off, Muhahaha! 
As you can see lots of room to fill up with candy maybe even a little gift :)

Don't forget to stop by SVGCuts for their Halloween sale!

I had a Hoot making this one... I can't help myself with the Owl puns! Thanks so much for stopping by today, hope you've enjoyed this unusual Halloween Treat Box!

Happy Crafting :)

Saturday, March 2, 2013

3D Easter Daffodil Vase Framed Paper Art | SVGCuts

It's time again for the SVG Cuts Spring Facebook Challenge! The Challenge is to use elements from the chosen kits/collections ONLY and create a 2D or 3D project. 

This time I wanted to keep my project clean and simple! Here is what I came up with! Isn't it pretty!?! I used a RIBBA frame from IKEA, removed the glass and the mat, and just placed it in behind the art for later use... smart right? You could use this frame over and over again and change it with your holidays! 

Here it is sitting in our wall alcove...


3D Easter Daffodil Vase Framed Paper Art | SVGCuts

This project is perfect for Spring and the upcoming Easter Holiday! The daffodils that Mary (designer of these files from SVG Cuts) created are so gorgeous and realistic! Who knew that simple plain paper could look this amazing! These flowers come from the 3D Flowers SVG Kit here.

3D Easter Daffodil Vase Framed Paper Art | SVGCuts

Here is a closer look! Can you say WOW!!! And yet so easy to create!

3D Easter Daffodil Vase Framed Paper Art | SVGCuts

And how about the vase that the flowers are in? I would have never guessed it came from a Halloween Apothecary jar from TOIL AND TROUBLE KIT here! I adjusted the sizes of my files so that the finished results would fit nicely in the frame. I also cut a few panels off the file so that I could mount it flat. The vase stands 5" tall. 

3D Easter Daffodil Vase Framed Paper Art | SVGCuts

And this banner, how adorable is it? Love the buttons! The banner comes from here.

3D Easter Daffodil Vase Framed Paper Art | SVGCuts

The picture above shows you what it looks like hanging on a wall. 

Here are the kits and supplies I used for this project...

RIBBA frame from IKEA
Twine from American Crafts
Paper from Recollections
Green Floral Wire
Cuttlebug and Polka Dot embossing folder
Scotch Quick Dry Adhesive
Hot Glue and Gun
Cut on the Silhouette Cameo

Well, hope you like my little Spring project! I LOVE how it all came together, wish me luck!!! And, if you haven't entered there’s still time to get your entry in! Good luck! Thanks for stopping by.

Happy Crafting :)

Friday, February 24, 2012

Monkey Themed Baby Shower 3D Letters and Banner | SVGCuts

Happy weekend everyone! 

So today I am going to share a project with you that I made for my friend Kristina. Her sister recently had a baby boy and she is throwing her a "little monkey" themed baby shower. 

Monkey Themed Baby Shower 3D Letters and Banner by ilovedoingallthingscrafty.com

The banner was created with basic shapes from the SCAL library and cut with the Silhouette Cameo. The bottom layer is an elongated triangle with a scalloped edge, topped off with another rounded corner triangle. I made the rosette by using my Martha Stewart scoring board. For each rosette, I used two 1.5" x 12" piece of paper the scored the paper every 0.25". Folded the paper like an accordion, then glue the ends to each other. To cover the center of the rosette I used just a simple white circle. The font that I chose for the letters was Arial Black. If you would like the SVG file for the banner, email me and I will gladly send it to you. 

Monkey Themed Baby Shower 3D Letters and Banner by ilovedoingallthingscrafty.com


These paper 3D letters stand about 6.5" tall. They were filled with some dried beans to keep them from toppling over. The 3D letters are from SVG Cuts 3D letter kit and so is the hanging little monkey (freebie on their blog). I had so much fun making this and love how it turned out. I can't wait to make some more 3D letters!

Monkey Themed Baby Shower 3D Letters and Banner by ilovedoingallthingscrafty.com

Now how cute is that going to look at the shower...  better yet how cute will that look in his Nursery!
God bless you, Luca!!!


Thanks for visiting and have a great weekend!
Ilda :)