Showing posts with label Keepsake. Show all posts

Saturday, January 4, 2014

Something Blue Bridal Shower Card and Tag | SVGCuts

So excited to share with you my latest SVGCuts guest post!

Today I have a Bridal Shower Card and Tag I made to complete a gift ensemble. The gift wrap and bow inspired my "Something Blue" creations! For complete instructions on how to recreate your own stop by the SVG Cuts Blog.

Something Blue Bridal Shower Card and Tag | SVGCuts Files

Here are the SVG Cuts Collections I used:


Cut and created on the Silhouette Cameo using SSDE

 This elegant gift tag is SO pretty that it could easily become an ornamental keepsake for the Bride!

Something Blue Bridal Shower Card and Tag | SVGCuts Files

Really LOVE how this card came together... the tulle on the Brides Dress and veil, and the umbrella are my favorites :)

Something Blue Bridal Shower Card and Tag | SVGCuts Files

I used the Print n Cut on the Silhouette Cameo to create the banner and the Sentiment on the inside of the card. With Print n Cut you can make your cards as personal as you like! No more worrying about messy writing or making mistakes. All you really have to do is sign your name!

Something Blue Bridal Shower Card and Tag | SVGCuts Files

Next time you attend a shower, surprise the Bride with your own handmade gifts, they will truly be unforgettable!

Don't forget to check out this week's FREE gift from SVG Cuts Winter Gazebo SVG Kit! Just look at that Gazebo!!! What a perfect wedding creation that would make!


Thanks for stopping by!
Happy Crafting  :)

Monday, September 30, 2013

Baby Feet Shadow Box Keepsake - DIY Tutorial

Hi All! Today I want to share with you something that I have been meaning to show you for a while now. I'm talking about Baby Feet! I think Baby Baby Feet are the cutest things ever. Don't worry, it's not a foot fetish... I don't like all feet, only tiny ones ;)

So even before Pinterest was around I had made these shadow boxes of both my children's feet! The one on the left is my son Tomas' at 1 month old (2004) and the one on the right is my daughter Maia's feet also at one month old (2006). They are both soooo very different! The 8x10 frames I used below were bought at IKEA. Now that my kids are older they love to see how small they really were. Today I will share with you how to make your own. You may want to pin this if you have a baby in your life or on its way! Those little tiny feet eventually get huge and not so cute, so if you want to remember how they used to be you might want to give this craft a try!

Baby Feet Shadow Box Keepsake - DIY Tutorial

Very good friends of ours recently had a baby, we were so thrilled when they asked Us to be his God Parents! As a gift to them, I wanted to make little Cristiano his own Baby Feet Shadow Box. 

Baby Feet Shadow Box Keepsake - DIY Tutorial

Here is how you can make your own... 
You will need two people for this project. (Dad can hold baby, while mom gets crafty, lol!)
  1. You will need a 3D Mold Kit. The one I used was by Precious Impressions that I bought at Micheal's Craft Store. Follow the instructions as directed to create your 3D impression. 
  2. Once your impressions have dried, carefully remove the mold. It just peels right off. Because I wasn't too concerned about the top of the feet, those air bubbles don't really bother me. You can always go back and fill those air bubbles in with more plaster. 
  3. With a serrated knife I carefully shaved the top of the feet to the depth of my shadow box. You may at this point also sand an smooth down any imperfections that turned up from your molding process (bumps, air bubbles). Once I knew they would fit in the shadow box I brushed the excess dust off with a paintbrush.
  4. Next, I took some white acrylic paint and covered the entire surface of each foot. (Bottom first until dry and then the tops).  You may want to do two coats to ensure proper coverage. Paint will dry quickly because of the plaster being so porous.
  5. This step is optional but it will seal your feet forever... In a well-ventilated room, place your feet on some cardboard or newspaper. Spray your feet with a sealant Gloss Spray Sealant. If you don't like the gloss look there are mate sealants available. Let the feet completely dry. Once they are completely dry, you are ready to frame them! (I waited another 24 hours).

Here is a close up of the tiny foot! Not so tiny zoomed in, but you can see all his little creases and bumps on his feet. To mount them in the frame I used hot glue and adhered it to card stock.

Baby Feet Shadow Box Keepsake - DIY Tutorial

Before framing the feet I etched Cristiano's name into the glass. Click here for a tutorial of glass etching.

Baby Feet Shadow Box Keepsake - DIY Tutorial

Here is the finished Shadow Box. Love how it turned out! Aren't those little feet so precious? The possibilities are endless with these molds. Frame whatever you like, now that you know how!

Baby Feet Shadow Box Keepsake - DIY Tutorial

I hope this has inspired you to capture some of your own memories! A Keepsake that your child will treasure forever. If your kids are older, it's not too late! Make one of them now or do the whole family (Hands, feet whatever you want to frame)... years from now they will see how small they were at that point in time!

Thanks so much for stopping by!
Happy Crafting :)

Monday, October 1, 2012

Personalized Frame | Paper Pieced Baby Decor | SVGCuts

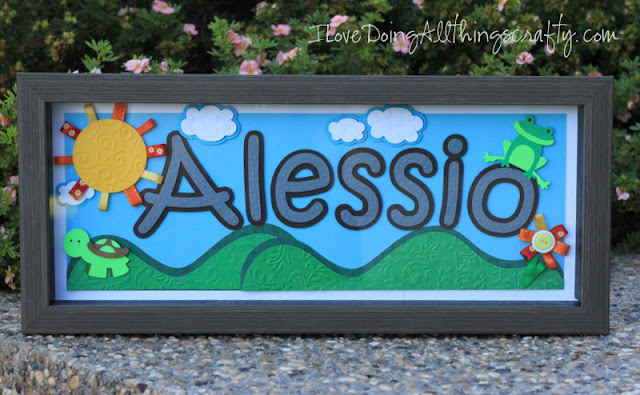
Here is a frame I made for one of my dearests friends, who recently had a baby boy. Love the unique name she chose for her little guy... Alessio. Love it! Congrats LeeAnn and Joe!
Personalized Frame | Paper Pieced Baby Decor

The files I used for this project all come from SVGCuts freebie selection. The font I used is called Kristen ITC. Added a little embossing and some ribbon and voila, a great art piece for the nursery! 

Thanks for stopping by!


Tuesday, September 18, 2012

40 Year Ruby Anniversary Explosion Box Keepsake | SVGCuts

Happy Tuesday!

So today I want to share the beautiful explosion box I made for my In-law's 40th Ruby Anniversary that they celebrated yesterday! It was the first time I ever made one of these and I love how it turned out :)  To make this did have some inspiration from one of my favorite crafty ladies, Thienly! Check out her family explosion box! Here is mine!
40 Year Ruby Anniversary Explosion Box Keepsake | SVGCuts

The file for the box comes from here, and the rose file from here.

40 Year Ruby Anniversary Explosion Box Keepsake | SVGCuts

I have made many of these roses, but I absolutely love how this one turned out with the glitter glue on the edge of the petals.

40 Year Ruby Anniversary Explosion Box Keepsake | SVGCuts

This is what the box looks like when it's all opened up! I printed the pictures in sepia to coordinate with the papers. Since it was a Ruby Anniversary I thought these papers from Recollections, Love Letters pad were perfect for the occasion. 

40 Year Ruby Anniversary Explosion Box Keepsake | SVGCuts

The file for the numbers comes from here. I was so excited to use my new epiphany shape studio tool that I recently picked up at Michaels! To create my Anniversary button, I simply just printed the wording out on white card stock and then used the Round 25 epoxy shape tool and punched it out! It was that easy! Love how that turned out!

40 Year Ruby Anniversary Explosion Box Keepsake | SVGCuts

I used 15 pictures to create this box. I'm sure if you wanted to, you could use so many more by putting them on the outside of the box as well. For this box, I used recent pictures of our vacation this summer and included a few of the kids with the grandparents! The kids also wrote in the notes in the pockets pictured above. 

40 Year Ruby Anniversary Explosion Box Keepsake | SVGCuts

Well, hope you like this little explosion box! I sure enjoyed creating and gifting it!
Happy 40th Anniversary to my wonderful Inlaws!


Thursday, July 12, 2012

DIY Party Hat, Birthday Card and 3D Number Keepsake | Olivia's 1st Bday Party | SVGCuts

My Niece Olivia is turning 1 next week! So I thought I would have some fun making her some paper goodies for her party! My Sister in law (also very crafty) is decorating the event with pink and green and turns out I just had the perfect paper stack to coordinate with for her party! I love this paper, it comes from the DCWV Cherry Limeade Stack.

DIY Party Hat, Birthday Card and 3D Number Keepsake | Olivia's 1st Bday Party | SVGCuts
 I used the files from SVG Cuts HAPPY BIRTHDAY TO YOU SVG KIT, and their 3D NUMBERS PARTY SVG KIT. I love how it all turned out! Everything was cut using my Cameo.

DIY Party Hat, Birthday Card and 3D Number Keepsake | Olivia's 1st Bday Party | SVGCuts

Pictured above is the card I made for Olivia... I combined a few files from the HAPPY BIRTHDAY TO YOU SVG KIT to create this card. I'm not much of a card maker but just love how it tuned out!!! I think I will just have to enter it in the SVG Cuts Facebook Challenge for the Summer, wish me luck! The competition is amazing :)

DIY Party Hat, Birthday Card and 3D Number Keepsake | Olivia's 1st Bday Party | SVGCuts

And here is O's party hat! Isn't it adorable?! 

DIY Party Hat, Birthday Card and 3D Number Keepsake | Olivia's 1st Bday Party | SVGCuts

Finally the number 1... a great keepsake from the party! I know she won't remember her party, but when she looks back at photos when she's older I'm sure she'll love it!

I hope this has inspired some of you to pretty up your next party!

Friday, April 27, 2012

DIY Birthday Card | Book For Birthday Keepsakes

TGIF! It's been one of those weeks! Starting off with losing pictures on my blog... can you tell I'm still a little bitter about that. Apparently, that has happened to a lot of other bloggers out there. Oh well, time to move on! Hopefully, next week will be a better week :)

So this weekend my kids have 3 birthday parties to attend! Yup, busy birthday weekend... so I thought I would share with you a little gift I made for each of the kids. I got the idea from one of my favorite bloggers Thienly Azim from her blog modpaperie, if you have not visited her yet...YOU MUST! She will inspire your socks off  :) She made a birthday book, I loved that idea. A place where you can keep all your memories of the day.

I didn't feel like going out and buying birthday themed paper so I thought I would just make my own pages using the print and cut features of the Silhouette, and use papers I already owned. For my books, I thought I would make a little box on the back to place some cards or even some of the birthday pictures. So here is my take on the birthday book, well 3 of them...

I used graphics from Lettering Delights Scribble Kids Alphabet, Banner Day Alphabet, and the Sweet Birthday SVG  kits. This is what the front covers look like.

DIY Birthday Card | Book For Birthday Keepsakes by ilovedoingallthingscrafty.com

DIY Birthday Card | Book For Birthday Keepsakes by ilovedoingallthingscrafty.com

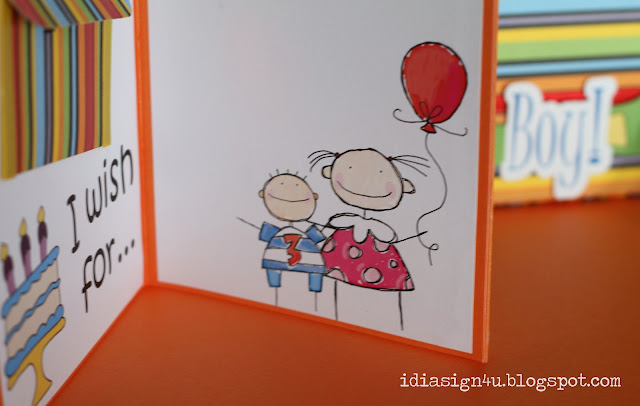
Here is what the book looks like when the book is opened up,


even a spot for the birthday girls picture.

DIY Birthday Card | Book For Birthday Keepsakes by ilovedoingallthingscrafty.com

DIY Birthday Card | Book For Birthday Keepsakes by ilovedoingallthingscrafty.com

Here is a boy's version.

DIY Birthday Card | Book For Birthday Keepsakes by ilovedoingallthingscrafty.com

DIY Birthday Card | Book For Birthday Keepsakes by ilovedoingallthingscrafty.com

DIY Birthday Card | Book For Birthday Keepsakes by ilovedoingallthingscrafty.com

A place for pictures, cards, whatever they like!

DIY Birthday Card | Book For Birthday Keepsakes by ilovedoingallthingscrafty.com

Here is a pic of a tag that I put on the back of all my crafts!

DIY Birthday Card | Book For Birthday Keepsakes by ilovedoingallthingscrafty.com

DIY Birthday Card | Book For Birthday Keepsakes by ilovedoingallthingscrafty.com

DIY Birthday Card | Book For Birthday Keepsakes by ilovedoingallthingscrafty.com

The box was just made on a score board, didn't use a cutter.


The box measured 4.5" X 6.5" X 0.5" 


Folded down the top edge and glued it. Then glued down all the rest of the edges to form a box.


Here is what it looked like all put together.


For the fan part of the book, I used the same measurements and then just glued the two sheets together. Once I had finished embellishing the pages I just adhered the last page to the box. Added some ribbon to tie it up and keep it all together. I hope the kiddos like them! I know my son already has put a request in for one!!!  Well better get busy!

Thanks for visiting!


Shared with:


Craft Junkie Too Friend