Showing posts with label vinyl. Show all posts

Tuesday, June 28, 2016

Personalized Bookmark Shakers for the Teachers


Yiiiippppeeee!

Today is the last day of school for my kids! I'm am so excited to have them home for the summer and the best part is that I don't have to worry about packing lunches for a while! Oh, the small things that excite me ;)

So for today I want to share with you the fun Bookmarks I made for the kids teachers.


I saw this idea a while ago on You Tube and thought these would be perfect for the teachers. Here is the link to the video for those interested. I did make them a little different then the video instructed.

Here is how I made mine.
First of all I personalized the inside clear bag with each teacher's name using black vinyl. Here is a link to the font I used. The vinyl was cut using my Silhouette Cameo. Next because I do not have a laminator, I used some self laminating sheets that I found at the Dollar Store and just cut them down to size. They worked well, but because I cut close to the edge of the inside bag I wasn't sure how they would hold up. For extra reinforcement, I used my fuse tool to secure the edges. I guess if you didn't have a fuse tool you could also stitch the edges with a sewing machine. Before finishing off the tops of the bookmarks I filled them with various sequin colors, chunky glitter and microbreads. To seal the tops I used clear scotch tape, then wrapped coordination washi tape along the top edge. I finished them by adding an eyelit in the center to add some decorative ribbon, this also secures the layers together.

These bookmarks are fairly large they measure approximately 9 inches long by 2 inches wide. But you can make them to suit whatever size you like.


Hope you like my Personalized Bookmark Shakers for the Teachers. They are so much fun and interactive, all you want to do is shake them! I think these would make great gifts for any reader in your life.

Thanks for stopping by!
Happy Crafting  :)


Linking up with: 

Wednesday, July 29, 2015

Using Vinyl to Create Watercolor Cards + How to Video


Recently I have seen watercolor cards popping up everywhere ! So I had to jump on board and give them a try!


Before I even got started I watched tons of you tube videos but I have to say I fell in love with Kristina Werner Design videos. What a talented artist! I even went out and purchased some masking fluid to create something like I saw from one of her tutorials. But then one night, I had a light bulb moment and thought to myself why not try making a card using vinyl rather than the masking fluid. With the fluid you need to be really steady with your hand and have great calligraphy skills. But, with vinyl all you need is a nice font and a electronic cutting machine. The designs with the Silhouette are endless!

So then came the experiment and I am pleased to say I am truly happy with the results. I have to admit I had so much fun working with watercolors that I am positive this will be the first of many projects using them!

Take a look as I flub my way through my first actual (speaking) video tutorial. I thought it would be cool for you to see as I saw my experiment come to life! Hope you enjoy it and let me know what you think :)


Here is a look at all 3 cards I made created using this same technique. Mini works of art!


Stamps I used come from Snarky Stamps found here.

Hope you enjoyed this fun and unique way of personalizing watercolor cards using vinyl :)

Thanks for stopping by!
Happy Crafting  :)


Saturday, July 18, 2015

DIY Growth Chart Ruler + Video Tutorial


Hey Everyone!

I am super excited to share with you my latest DIY project, a growth chart ruler! I have been wanting to make one forever. I can't believe it took me this long! In fact I had wood stashed in my garage for years... it is actually one piece of a bi-fold door that I kept from when we built our house over 10 years ago! Talk about hoarding, I know right!?!

A friend from work (hey Katie!) had asked me if I could cut out some numbers for her to create a growth chart ruler on my silhouette. Of course I said yes, but at the time I had way too much other stuff going on. Fast forward a couple of months and finally I had sometime this past week to work on it. So since I was making a template for her, I thought why not make one for myself.  Finally I could check it off my to do list!

There are many ways to make these growth chart rulers but I wanted mine to last forever as a family keepsake and treasure, not sure how vinyl was going to hold up over the years and that is why I chose to do it like I did. I am SO happy with how it turned out and how simple it was to make. The hardest part was being patient and waiting for things to dry! 


For this tutorial I thought I would try doing things a little differently. Rather than having tons of pictures, I decided to create a little video! Hope you find this step by step instructional video helpful on creating your own growth chart. I used the paint, vinyl, paint, peel technique all the time (PVPP) and wanted to show you exactly how it works.

I have to apologize in advance as you may need to pause the video as it is jammed packed with great tips and I didn't want the video to be super long! So with out further adieu, hope enjoy my first ever You Tube video... and as they say all the time on You Tube "please give me a thumbs up if you liked my video and leave me a comment"!


Here is the list of supplies I used:
  • Wood (piece of a bi-fold door re purposed)
  • Modpodge
  • Acrylic paint
  • Foam roller and brush (could use a paint brush as well)
  • Paper plates (for paint an Modpodge, easy clean up)
  • Measuring tape
  • Scissors
  • Vinyl (cheap kind that you can line drawers with, got mine at the dollar store)
  • Silhouette Machine (to cut out the growth chart)
  • FREE file from the Silhouette School (see details below)
  • Heat gun or blow drier (if you are impatient like me ;)
  • Hanging hardware
  • OPTIONAL: stain or paint for the wood (If you choose do this, prep your wood by using the stain or paint before starting this tutorial. VERY IMPORTANT: Make sure you sand your wood lightly if using a stain before applying the Modpodge, this will give the Modpodge something to grab on to, or it may all peel off!)

For those of you with a Silhouette Machine, Melissa from the Silhouette School has the growth chart ruler Studio cut file for FREE on her blog! While you're there check out some of her amazing tutorials and projects :)

Thanks for stopping by!
Happy Crafting  :)


PS. For those of you wondering why Modpodge? Well I had lots of it around, and it is the perfect top coat sealer. Plus it gave the wood a natural look that I was going for!


Thursday, June 18, 2015

Personalized Teacher Tumblers | SVGCuts

Are you ready for school to be over?
I know I am and so are my kids, but I can almost bet the teachers are even more excited!

Today I want to share with you the year-end treats I made for these great teachers. These personalized teacher tumblers were super easy and quick to put together. This was the first time I layered vinyl on a project and I love how simple it was to do.

Gift,SVGCuts,Silhouette Cameo,ilovedoingallthingscrafty,Personalized Teacher Tumblers,teacher gifts for Year End,I love doing all things crafty,SVG Files,layered vinyl,vinyl,Cricut,Back to School,

To make your own here is what you will need:

  1. Tumblers
  2. Black, green, red, white, gold vinyl sheets (Oracal 651)
  3. Transfer tape
  4. SVG Files from Miss Baker's Classroom SVG Kit and  Miss Karen's Back to School Bags SVG Kit
  5. Font: Bernard MT Condensed
  6. Silhouette Cameo / Electronic Cutting Machine

Gift,SVGCuts,Silhouette Cameo,ilovedoingallthingscrafty,Personalized Teacher Tumblers,teacher gifts for Year End,I love doing all things crafty,SVG Files,layered vinyl,vinyl,Cricut,Back to School,

The only alteration I made to create this project, was to add the teacher's name to the red layer of the apple. By doing that when you cut it out, the name is already cut out of that layer. This will save you from worrying about getting perfectly straight letters! The rest was layering the pieces of vinyl onto each other. Begin with the black layer of the apple, followed by the red, green leaf, gold worm, white eyes, and then the black again for the eyes and glasses. The tricky part is aligning the layers, so make sure you have great lighting to see through the transfer paper. Also, use a straight edge (credit card/ruler) to press out the air bubbles as you add each layer.


Hope this has inspired anyone still looking for that quick last-minute teacher gift. If you have any questions, I would love to hear from you!


Thanks for stopping by!
Happy Crafting  :)


 Miss Baker's Classroom SVG Kit


Monday, December 29, 2014

DIY Laundry Sign

Happy Holidays Everyone!

This year 14 of our family members and friends spent Christmas in Cuba! I do have to say I think Cuban beaches must be some of the most beautiful in the world and am SO happy we got to spend our week there. I miss the beach already! 

Here is a picture of how Santa came to Cuba! Check out that crystal clear water... sigh!!!


Sadly once the vacation is over, reality always sets in and loads of laundry need to be done. Not sure about you all but every article of clothing I pack needs to be washed (even if unworn) especially when coming from a humid climate. So for the last few days I have been tackling my least favorite chore, LAUNDRY!

Here is an iphone pic of what my laundry room looks like today :( 
And there is still more to fold in the dryer!


So lets get to the reason for today's post!!! 

Over the last few months I have been tackling various parts of my house by painting, cleaning, purging and even redecorating. Today I want to share with you the sign I made for my Laundry Room/Mud Room. Honestly I think the Laundry Room is my least favorite room in the house. Mostly because doing it is my least favorite thing to do! So I thought maybe if I prettied it up, I might enjoy the time I spend in there, well maybe a little!

Having seen various laundry signs all over Pinterest, I thought I could make my own... of course I did! Isn't that what everyone that looks on Pinterest does? LOL!  Well I am SO happy with the results! I took ideas from various signs and combined them to make my own! Well what do you think? SO true, right!?!


I used the PVPP technique to create this sign. For those that don't know what that means it's Paint, Vinyl, Paint, and Peel. Lots of tutorials on line for those of you interested. Basically I painted white a 12x24 wood board (bought at Micheal's). Cut out my Vinyl using the Silhouette Cameo, and transferred it to my board. Then, once the letters were all down I painted with the black all over the entire board. Once the paint dried, I peeled off the vinyl to reveal the white letters. I then took sandpaper and lightly sanded the edges and the top to distress it. Voila, that easy! 

The whole process took less then 30 min to make! To speed the drying time I used a blow dryer... hey what can I say, sometimes I can be a little impatient! 

TIP: If you want to avoid the bleeding of the letters, once you apply the vinyl add another white coat first, this will seal the edges around the letters. Then add the black coat. I didn't really want perfect letters as I wanted it to look more vintage and distressed!


 For all those interested in creating one for yourselves I am giving away the .studio file that I created to make the sign for FREE! Maybe it will help you enjoy the laundry room a little more as well! Enjoy!!!

Before you download...

My free files RULES!
  1. If you choose to download all I ask is you become a follower.
  2. Note my files are for personal use only! (Personal use means... only for you to use (no trading, or sharing of my files... let me do that!) 
  3. If you want to share, send your friends over to my blog for the download. 
  4. I'm OK with people sharing my files on their own sites as long as there is a direct link back to this blog...Give credit where credit is due! (a message to me would also be appreciated)
Click on the links below for your FREE download! 

Laundry Sign

If you would like to donate, (click the 👉DONATE button on the sidebar) I will happily accept any amount you see fit. No pressure at all either :) It will just make my day that someone wants to support my passion.

Click HERE to see the Laundry Bins I made earlier this year! I like when my laundry room looks this clean. Hopefully by tomorrow it will again ;)


Well this will be my last post for 2014, so I would like to wish everyone a Happy New Year!!! Here is to an amazing 2015!!! Cheers!

Thanks for stopping by!
Happy Crafting  :)


Tuesday, December 16, 2014

Portuguese Christmas Ornaments


This past weekend the Portuguese School that my kids attend celebrated their Annual Christmas Concert. This year they also had their very first silent auction. I thought I could contribute by donating some of my Portuguese themed floating ornaments.

Here are a few of my favorites!

Eu te Amo means I love you in Portuguese!


I LOVE this one... it has to be my favorite, probably because it is SO true! Good thing I kept this one for myself because I just noticed that some of the letters went on a little crooked, oops!


 This one was inspired by my daughter, who sometimes thinks she's a princess, lol!
Love it!


To watch a how to video, I found one similar to the process I did mine for those of you that are interested in how to make your own. They are actually easier than you think!

There is still plenty of time to make a few before Christmas!!! All you need is vinyl, transparency sheets, transfer tape and glass or plastic ornaments and of course a Silhouette Machine!

For those of you interested here are the Silhouette Studio Files FREE for Download!

Thanks for stopping by!
Happy Crafting  :)


Friday, November 7, 2014

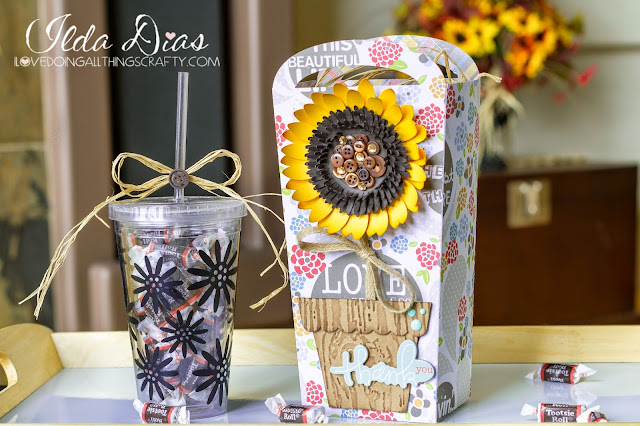
Sunflower Thank-You Gift Set | SVGCuts

Hello, my friends!!!

So here in Canada, we have already celebrated Thanksgiving, but for my American friends, it is coming right up! Today's post is perfect for those of you wanting to make a quick Thanksgiving gift or just an everyday Thank-you for someone!

Here is my Sunflower Thank-You Gift Set, and my latest SVG Cuts DT project! 

Gift,Tumbler,SVGCuts,SVGCuts,Silhouette Cameo,Thank-you,ilovedoingallthingscrafty,Fall,Sunflower,vinyl,Cricut,Paper crafts, craft, DIY

For those that want a chance of winning all the kits I used make sure you got to -> SVG Cuts FB page and leave a comment! Hurry time is limited!!!


I LOVE, LOVE Sunflowers, they are one of my favorites. They just make me happy! Isn't this one SO pretty?! I made the leaves by using some twine ribbon! Cool, right?


And, who doesn't love tumblers?
 So practical and useful! This one was super easy and quick to make!


Hope you have enjoyed this quick-to-make Sunflower Thank-You Gift Set!

Thanks for stopping by!
Happy Crafting  :)

Monday, August 4, 2014

Laundry Room Bin Organizers

Hello my crafty friends!

It's been a while since my last post. Just seems I can't get any crafting done while the kids are home for the summer. I did manage to do a quick home organizational project and thought I would share it with you all. Check out my new Laundry Room Bin Organizers!

A few years ago we installed this floating shelf above the counter in our laundry just so that the counter would stay clear of clutter when I needed the counter space for folding and ironing my laundry. For a while everyone in the house had a different coloured fabric box that sat on the shelf. With all the abuse they got, the boxes started falling apart and becoming an eye sore. Last week I found these great plastic bins at the Dollar Store. They were the perfect sized containers to store all the little seasonal accessories. The only problem I had was that they were all red and difficult to distinguish between whose bin was whose?

Vinyl to the rescue!


Here's a few pics of my process.

First, I cut out my vinyl words on the Silhouette Cameo. Then I weeded the negative space around the words. For those interested the font I used was called Kayleigh.


I didn't have any transfer paper but I did have some painters tape handy.
I placed the tape directly over the wording and pressed it just enough to lift the word off.


Below is what the wording should look like once removed from the paper backing.


I then centred the word as best as possible on the plastic bin, and voila!
Super quick and easy, and if you shop like me super cheap too!!!
(I actually bought my vinyl at the Dollar Store too, woohoo!)


Love how doing something so simple can make a space look and work better!


Hope that these Laundry Room Bin Organizers have inspired you to organize your own space with a little vinyl!

Thanks for stopping by!
Happy Crafting  :)

Wednesday, February 22, 2012

Adding Vinyl to Personalized A Iced Tumbler

Hello!

I just wanted to thank all my new followers and everyone who has visited my blog. I can't believe I've had over 600 hits in a little over a week. It doesn't sound like much but every time the counter goes up my smile gets bigger and bigger! Awwww, I feel so loved.... please keep coming back a send more friends my way... I feel the love :)


So today I'm going to share with you a very quick project. Having a very different name I never am able to find anything personalized. So this afternoon I made myself my own personalized iced tumbler. I bought this cup at the dollar store (yup, for $2 I have my own personalized cup!).


First I chose the font I wanted (Murray Hill Bold) then I cut out the vinyl with my Silhouette Cameo


I then transferred the letters to the glass, making sure that they went on as straight as possible. And there you go a simple and quick project that I already love... the best part is that I will never lose my drinking cup again at work!

Thanks for visiting!
Ilda :)