Showing posts with label tutorial. Show all posts

Friday, July 19, 2013

3D Bee Hive Treat Box | SVG Cuts

Hello! It feels like a while since I've last posted! It's been a bit chaotic and crazy busy around here, haven't had too much time to craft :(

So today I want to share with you a cute Design Team project I made a while back for the Cutting Edge Online Magazine! If you are already a subscriber you may have seen this in the March/April Issue. The magazine is dedicated to all electronic die cutting machine users and paper craft addicts like me! Make sure you check it out, they also have a Facebook page, go and like them... they are always giving away stuff or sharing new projects :)


Well, this project kind of reminds me of how what's going in on right now in my world... Busy, busy, busy, Bee!


Here are the files I used for the Beehive:
Bee file from Chamomile Friendship Cards SVG Kit and the Egg Shaped container from Poplar Street Tulips SVG Kit SVG Cuts


The container is perfect to fill with yummy goodness!


Here is a close-up of a cute little bee that I glued to a twisted wire.

To create the entrance to the beehive:
In the Silhouette SDE, load the bottom panels onto a work surface, then ungroup them. Next, I created a circle. Placed the circle over one of the bottom panels, then selected both images. Click on the Object button, select Modify then Subtract. You should be left with one panel with a circle cut out of it. Now cut out all your pieces. Follow the assembly instructions for the egg container file.


Here is a card I made to go along with the treat box. It was a perfect little gift for a dear friend of mine on her birthday. Files for the card come from CHAMOMILLE FRIENDSHIP CARDS KIT here.


Here is a quick tutorial on how I created my own Honeycomb patterned paper...

  • To do this I searched google images until I found an image I liked (Make sure it’s free to use first).
  • Copy your image and paste it onto your workspace in the Silhouette DSE
  • Next, you need to trace the image, to do that click on the trace window, select your trace area, then trace.
  • You now should have the hexagon grid skeleton.
  • Fill in the image with color and the same for the outline.
  • To create the yellow on the pattern, first I created a rectangle the size of my paper and filled it with the yellow color and outline.
  • Drag your honeycomb image over the rectangle and resize the image until it matches up with the yellow rectangle.
  • Group the two together.
  • Send to printer.
It’s that easy!

Hope you enjoyed my little projects, now I'd better get back to my busy reality! Have a great weekend everyone!

Happy Crafting  :)

Sunday, April 21, 2013

Ninjago Birthday Cake

Good Morning everyone! I have pre-scheduled this post because I'm sure I'm going to need to recover from the night's festivities!

Today I am sharing with you the cake I made for my son's 9th Ninjago themed Birthday Party!
What do you think? I love how he turned out!!! Actually, wasn't very hard to make either.

Ninjago Birthday Cake

Here's a quick pictorial on how I made "KAI's" head.

Ninjago Birthday Cake

  1. I baked, sliced and filled with icing, the centers of two 5 inch cakes. Separating the layers with a cake board.
  2. Next, I dirty iced the entire head.
  3. Rolled out my fondant pieces. For the eyebrow, I drew and cut out a shape on a piece paper first and laid it on the fondant then cut it out with the tip of a sharp knife.
  4. I placed my pieces on top of the rolled fondant I used as the face. I "glued" the pieces with a little water using a small paintbrush.
  5. Then I placed the face on the head. At this point, I placed the head on the bottom layer of the cake that I had already covered with black fondant.
  6. Finally, I wrapped the rest of the head with Kai's Ninja mask.

The top part of the cake is chocolate flavored and the bottom 10 inch layer is made out of a yellow cake. The entire cake is covered with a vanilla buttercream icing and finished with fondant.


Hope you have enjoyed this Ninjago Birthday Party Series of posts, I hopefully will have some pictures of the party to share with you all soon!

Up next...


Have a great Sunday and thanks for coming by,
Happy Crafting :)

Saturday, April 20, 2013

Ninjago Birthday Party Oreo Pops

No, you aren't seeing double! Yes, this is my second post today! Since I made two different kinds of cookies I thought I would share how I made these Oreo Pops with you all as well!

Ninjago Birthday Party Oreo Pops

Here is what you will need:

One package of Double Stuff Oreos
White Candy Melts
Lollipop sticks
Icing Colours

Directions:

Melt your Candy Melts in the microwave at 30 seconds at a time, stirring in between each increment. I added a teaspoon of shortening to make the consistency of the melts a little runnier. 

Ninjago Birthday Party Oreo Pops

Twist apart all of the Oreo cookies. With the lollipop stick make an indentation in the white filling of each cookie. Dip the end of the lollipop stick and place it into the indentation you just made in the cookie.

Ninjago Birthday Party Oreo Pops


 Place the top of the cookie back on. Once you have about half of them done place them in the freezer until you are ready for the next step.


Ninjago Birthday Party Oreo Pops

With the chilled cookies that you just removed from the freezer, dip the cookies one at a time into the melted chocolate. I used a spoon to drizzle over them, I found this way I wasn't leaving "Oreo dust" behind. Shake off the excess chocolate by tapping the side of the bowl gently. 

TIP: To keep my Candy Melts from hardening I had placed my glass bowl on top of another bowl that had been filled with boiling water.

Ninjago Birthday Party Oreo Pops

Place your dipped Oreo's on parchment paper to dry.

Ninjago Birthday Party Oreo Pops

Once the cookies were dry, I finished them off by adding their faces. See my Sugar Cookie post on how I added the Royal Icing.

Ninjago Birthday Party Oreo Pops

I hope you've enjoyed this little tutorial on Oreo Pops, a great alternative to Cake Pops. I love them both, I just wanted to try something new!

Up next...


Have a great day and thanks for coming by,
Happy Crafting :)

Ninjago Birthday Party Sugar Cookies

Hi everyone! Today is party day!!! Woohoo, I may be more excited than the Birthday Boy, LOL! Everything is ready for tonight, phewww! *sigh*  

The next thing I'm going to share with you today is how I made my sugar cookies. Guess what... this was my first time ever, and I am so happy with the results! If I can do it, you can too!

Ninjago Birthday Party Sugar Cookies

The first thing I did was look up a recipe for making sugar cookies. HERE is the one I finally used.

Ninjago Birthday Party Sugar Cookies

Next, I made Royal Icing. HERE is the recipe I used for it.

Ninjago Birthday Party Sugar Cookies

I made my icing consistency a bit on the runnier side. I wanted to pipe and flood the cookie right away. I was a little impatient, hehe!

Ninjago Birthday Party Sugar Cookies

I then outlined the outside of the cookie and the outside of the mask and went straight into flooding them.

Ninjago Birthday Party Sugar Cookies

I first did all the white and then all my red cookies. Once those were piped and flooded I then went back and flooded the center faces with yellow icing. You need to wait at least 20 minutes before adding another color. 

Ninjago Birthday Party Sugar Cookies

I finished them off by pipping on their eyes and eyebrows. Some of the black icing I used for the eyes ended up bleeding into the yellow icing... I probably was too impatient, and didn't wait for the face to harden up enough or my black icing was too runny! Either way, they still taste the same but look like they have on runny mascara, LOL! ;)

Ninjago Birthday Party Sugar Cookies

I then let these little Ninjas rest overnight. The next day I wrapped them individually and placed one in each treat bag for Tomas' guests!

Next...


Have a great day and thanks for coming by,
Happy Crafting :)


Wednesday, April 10, 2013

Planning a Ninjago Birthday Party - Invitation Tutorial


Hey all... it feels like forever since my last post, probably cause it has been a while... no worries, you're going to get post overload here soon!

So my son turned 9 yesterday. Last year he asked for a Star Wars-themed Party (it has actually been one of my most popular posts.) This year he asked if he could have a Ninjago themed party, "Of course" I said... but, in my mind I was kinda panicking, all I know is that they are little LEGO ninjas that my vacuum loves to find!

Well, no worries I thought, I'll just go to the Party place and buy the Ninjago party package... I couldn't believe they don't have such a thing (at least here in this city!) I have seen so much online I didn't think this would be a problem. Well, it's a good thing I'm crafty, lol!

So I thought I would start by sharing how I made my son's Birthday Invitations. I found this image just by doing a Ninjago search on Google images. Click here for the exact site. 


I have Photoshop, but haven't really tried using it yet... so I stuck with things I already was familiar with. I opened up Paint on the computer and pasted it on to the work surface. Since I needed a bigger surface to write on, I sized the picture to the length I wanted. Then I clicked on the paint button and colored the bottom portion black. All that is left to do is add your text. The font I used is called Shanghai. Once you are finished save your image. Open it up in whatever program you like and print it. 


Planning a Ninjago Birthday Party - Invitation Tutorial

I then used Word to create the rest of my invite. I really wanted something quick and easy to make especially for his little school friends. So I thought I would just print it all out on one sheet of paper. To do that I divided my page into 4 sections. On the bottom 2 sections of the page, I included a map and party details (see picture below). The top right section of the page I placed the image I created above, only flipped upside down. Fold the page in half and then in half again. Now they are ready to stuff in an envelope! So easy right? 


I also used these images and sent them over the internet to our friends and family! So much easier than hand-delivering ;)

I hope you like this quick tutorial on how I made these invites. Maybe next time you will make your own too :)

Stay tuned for posts coming up on...


This is at least what I have planned... we shall see much I can actually get done! 

Thanks for stopping by!
Happy Crafting :)

Monday, March 11, 2013

DIY Pin Cushion from an Old Sock


DIY Pin Cushion from an Old SockI've been meaning to share this with you all for a while and finally got to it this morning when my husband handed me another holy sock! Usually, they end up as grease rags for the garage, but a while ago I had this idea to turn one into a pincushion. So today I decided to show you how I did that. SUPER easy!!!


  • First make sure you have a clean sock... who wants to work with a dirty, smelly one! YUCK!!! Also, make sure that the hole in your sock is not in the toe area, or else it won't look as pretty!


DIY Pin Cushion from an Old Sock


  • Starting at the top of the sock, roll it inward until you reach the toe part. Should end up looking something like this! You could just leave it like this, but it doesn't look very pretty :(


DIY Pin Cushion from an Old Sock, recycled


Squeeze the sock into a small clay pot or container of your choice. I didn't even have to use glue to secure it in place it was wedged in pretty tightly! Stick your pins in it and there you have the quickest little useful project ever!


Hope you like this DIY tutorial, would love to know what you think. What do you do with your old socks?

Happy Crafting Everyone :)
Thanks again for stopping by! 

Saturday, November 17, 2012

DIY Stamp Shadows on the Silhouette! (Part 2)

Now for part two!

In the first part of this tutorial, I showed you how I created my own stamps on the Silhouette. Click here if you missed it! Now, it's time to show you how to create its shadow. This is the easy part!

I started off by opening up a new window in the Silhouette DSE and copied my image of the stamp I created in part 1. Next, I ungrouped it and deleted the writing, leaving only the outline.

DIY Stamp Shadows on the Silhouette! (Part 2)

Now it's time to create another offset of the outline. Just like below... I chose 0.1 in offset. Once you've got the offset delete the internal piece of the image.

DIY Stamp Shadows on the Silhouette! (Part 2)

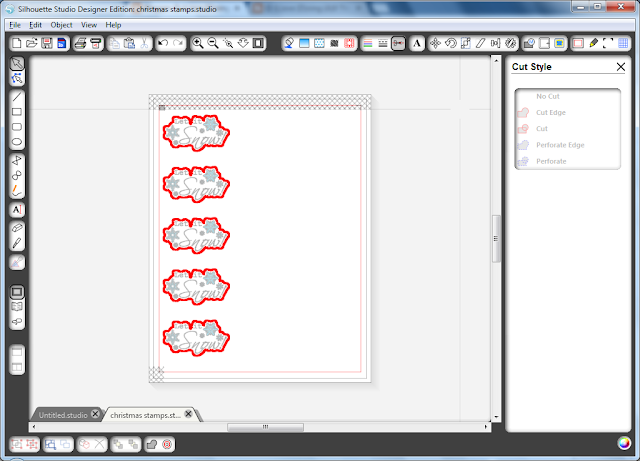
Fill up your page with as many images as you like. I will only need 5. Check you cut line settings, make sure that your images are not overlapping each other. Since I will be cutting these out of a colored card stock there is no need for the registration marks.

DIY Stamp Shadows on the Silhouette! (Part 2)

Save your work. I will call this file Christmas stamp shadows... that way I know which part needs to be printed and which part I can just cut out!

So here is the card I made using this stamp! Pretty, isn't it? I love how it turned out and how the stamp goes so well with it! For the rest of the details on this card refer to my previous post, here.

DIY Stamp Shadows on the Silhouette! (Part 2)

Hope you enjoyed this tutorial on how to make your own stamps on the Silhouette! I would love to see your creations if you do end up making any!

Happy crafting and stamp designing :)


DIY Printed Stamps on the Silhouette! (Part 1)


This one is for all of my Silhouette using friends! A few days ago I was looking for a stamp to coordinate with a card I was working on and didn't like what I had. I also didn't feel like going out and buying one... I needed it like NOW! So I had an aha moment... Why not make one digitally? I figured I had all the tools I needed. So here is how I was able to create my perfect stamp... The possibilities are endless, and it's was all at my fingertips!

Here is the card I made, the file comes from CLARA'S CHRISTMAS EVE KIT here. Isn't it pretty??? Look at the stamp! What a perfect match, don't you think?  Wanna see how I made it? Follow my instructions below. Super easy! It just looks lengthy... I probably should have made a video... not a road I want to go down right now... I'd probably crash! LOL! Ok, back to how I did it...

DIY Stamps on the Silhouette! (Part 1)

The first thing I did was go onto dafont.com. Since I was wanting to create a Christmas stamp, I needed Christmas images.  I then searched for holiday fonts or images known as wingdings. Here is the font I chose. The next thing I did was install it onto my computer, that way when I open up the Silhouette program it would automatically show up in the text box. (I chose to use a font/wingding but your possibilities are endless, use any image you have or find on the web!)

Next, I opened up my Silhouette Designer Studio Edition. Selected the text box, which brought up the text style box on the right-hand side. Scrolled down until I found the font I just installed  (Xmas tfb Christmas)
Because I had no idea of what the images were when each letter was typed I just type the whole alphabet out starting with upper case and then lower case letters.

DIY Stamps on the Silhouette! (Part 1)

Here are the images from this font. The next thing I did was change the outline color of the images to black. (I don't know why, but they look more like stamps when they are black)

DIY Stamps on the Silhouette! (Part 1)

The next thing I did was select all my images and ungroup them. Then I chose some of the images I thought I would like a stamp of. I'll just focus on a few for this post!


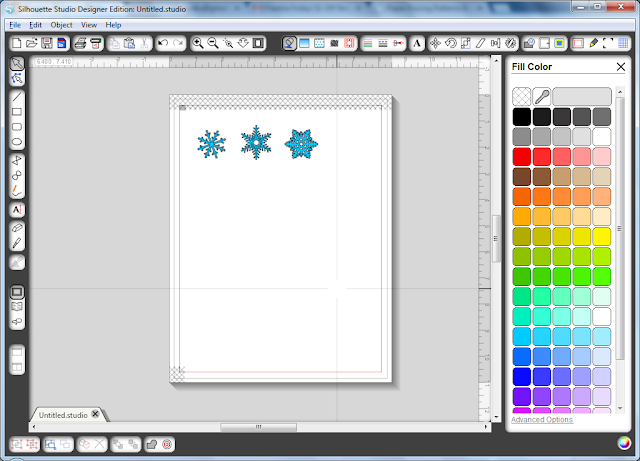
So here are some snowflakes I chose. Now, for some reason, the Silhouette software doesn't recognize this font. It will just print blank for you. All you need to do is fill the image in. Yes, it's that simple! Highlight the image and with the fill color option, change the color of the inside of your image. It won't print the outline, not sure why :( . I chose to make my snowflakes blue.

DIY Stamps on the Silhouette! (Part 1)

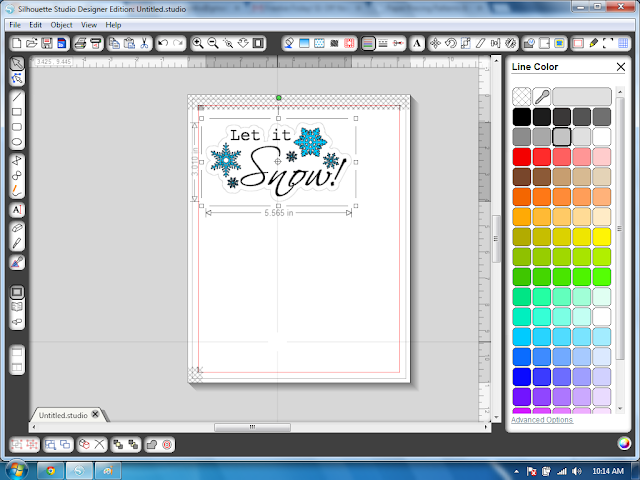
 Now you can get creative... Add other fonts, quotes, resize the images, basically do whatever you like! Here is what I did... (Remember to fill in the color your fonts or else you will end up with the outline of the letters)

DIY Stamps on the Silhouette! (Part 1)

Once you arrange your images the way you like, group them together. The next thing I did was select each image and create an off-set for them.

DIY Stamps on the Silhouette! (Part 1)

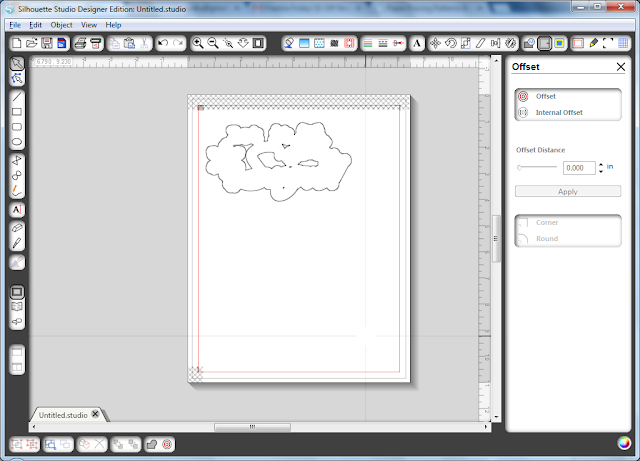
Now if you look closely you will notice that if I leave the image this way when it is sent to the cutter it will cut all the little spaces in between my image. Since I don't want that to happen, I will first highlight the inside image, right-click and copy. Then highlight it again and right-click and delete the image. (don't worry) You should be left at this point with only an outline. Look something like this...

DIY Stamps on the Silhouette! (Part 1)

Now highlight this image and right-click and select Release Compound Path. Go ahead and delete all the little pieces from the inside of the image. Like I did below.

DIY Stamps on the Silhouette! (Part 1)

Next, highlight the image again, right-click and select Paste in Front. That should bring your image back. Note! Very important... DO NOT drag your image or move it on the screen or else it might not line up. Phew!!! I managed to keep it still!  Here's what it should look like now.

DIY Stamps on the Silhouette! (Part 1)

Notice that the offset outline is black, if left this way the outline might be visible when you cut it with your machine. I changed the outline in mine by just selecting the outline portion of the image and changing it to a very light grey. Make sure you group the outline now and the image together!

DIY Stamps on the Silhouette! (Part 1)

Time to select your cut style. Since I want just the out-line cut, I've selected the cut edge option. If you wanted to at this point you could go ahead a send this to your printer. This image is actually too large at this point for my liking, so I will re-size it and I would like to make a few more copies. I only want 5, but you can fill so many more on one sheet. I will be printing on an 8.5 x 11" sheet of paper. Here is what my sheet looks like.

DIY Stamps on the Silhouette! (Part 1)

Now you are ready to send it to your printer and then cut it out with your Silhouette machine. Make sure you save your work. 

DIY Stamps on the Silhouette! (Part 1)

If you want to see how I created the shadow cutout for my stamp (blue piece behind the stamp), check out the next post. Part 2 DIY Stamp Shadows on the Silhouette

Hope this post was helpful and hopefully not too complicated to follow :) 
Thanks for following and if you like this post leave me some love in the comments below!
Happy stamp-making!


Entering this card in:

unstampabellesbutton