Showing posts with label Pictorial. Show all posts

Tuesday, June 26, 2012

DIY Credit Card Wallet | Holder for All Loyalty/Credit Cards

This one is for all the shoppers out there!!! I think your just going to love this idea! 
If you are anything like me you have a ton of cards taking up precious space in your already crowded wallet! NOT anymore!!!!

About 2 years ago now I had an idea to make a credit card wallet after working on some pockets that I had created for a mini album. I actually sold them on Etsy, but since I closed the shop down I thought I would share the idea with everybody!

Here is my original card wallet... was getting pretty worn out! Even though it was made out of paper, I'm surprised it lasted this long! You would not believe how many compliments and inquiries I've had on it!!! 

DIY Credit Card Wallet | Holder for All Loyalty/Credit Cards

While I was shopping at Home Depot on the weekend with my DH, I saw decorative duct tape... I had seen it many times before but it wasn't until then that I had my light bulb moment!  Why not line my card stock with duct tape! Brilliant... It would now last forever! Or until I get sick of the pattern, lol!

So here is how to make your own... 

DIY Credit Card Wallet | Holder for All Loyalty/Credit Cards
Supplies:
  • double-sided tape
  • duct tape (I guess if your a guy you might like the regular kind, hehe)
  • envelopes (I bought mine at the dollar store, but you could probably use recycled ones) 
  • a piece of scrap card stock
DIY Credit Card Wallet | Holder for All Loyalty/Credit Cards
  1. First I cut my envelope ends to 4.5 x 9.2 cm or for my US friends, 1 3/4 x 3 5/8 inches ( I used 25 pockets for this wallet)
  2. I then applied my double-sided tape around the outer edges of the pocket (make sure to go as close to the top and bottom edge as possible, but not the sides... come in about 3mm or 1/8 of an inch from the outer edge)
  3. Line it up with the next pocket and adhere them together, ensure it is all lined up and that the opening of the pockets is in the same direction!

DIY Credit Card Wallet | Holder for All Loyalty/Credit Cards

Repeat until all pockets are glued together.

DIY Credit Card Wallet | Holder for All Loyalty/Credit Cards

Next, take the scrap card stock, and cut it to 20 x 9.5 cm or 8 x 3 3/4 inches, then place the edge of the paper or the sticky side of the duct tape.

DIY Credit Card Wallet | Holder for All Loyalty/Credit Cards

Next cut a little slit on the duct tape where the paper ends and fold the duct over on to itself. 

DIY Credit Card Wallet | Holder for All Loyalty/Credit Cards

Then take that same piece of duct tape and adhere it to the paper. Bend over the edge of the duct tape that remains and this will create a nice clean outer edge...  (Confused yet??? I would be! lol! Hopefully, the pics are self-explanatory!) 

DIY Credit Card Wallet | Holder for All Loyalty/Credit Cards

Repeat the last step for the other side.

DIY Credit Card Wallet | Holder for All Loyalty/Credit Cards

Continue by cover the remaining paper down the middle (ensure you cut a piece long enough to cover the other side as well)

DIY Credit Card Wallet | Holder for All Loyalty/Credit Cards

Next glue the pockets to the inside bottom of the duct tape layer, making sure to align the top edges.

DIY Credit Card Wallet | Holder for All Loyalty/Credit Cards

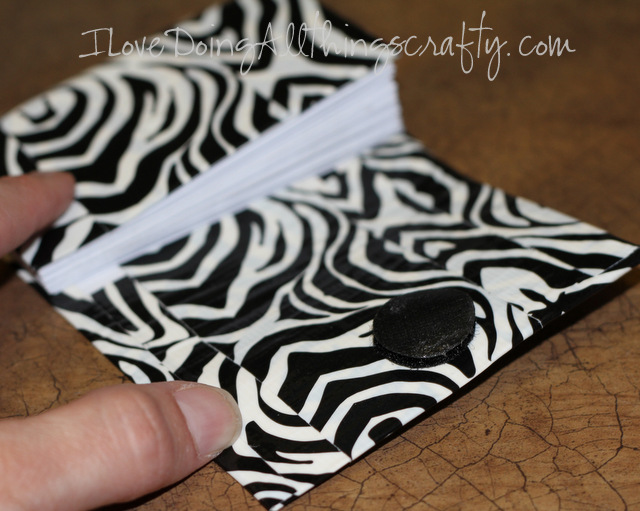
Then wrap the duct layer all the way around the pockets until it overlaps on the front of the wallet leave enough room for the wallet to expand and for the credit cards to stick out at the top. Then adhere the back of the pockets to the inside of the duct tape layer.

DIY Credit Card Wallet | Holder for All Loyalty/Credit Cards

To secure it closed I used a Velcro dot. The easiest way to ensure that the dots line up is to take both top and bottom pieces of Velcro and center it on the inner lid of the wallet, then fold it closed.

DIY Credit Card Wallet | Holder for All Loyalty/Credit Cards

Once you open it the dot will be left on the other side of the wallet! EASY right?!

DIY Credit Card Wallet | Holder for All Loyalty/Credit Cards

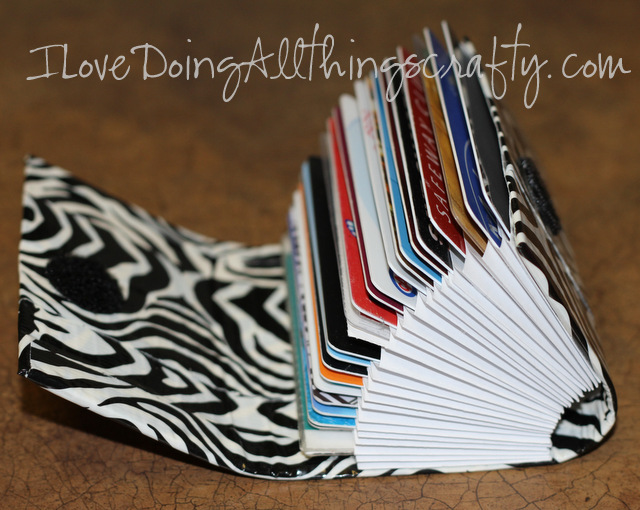
Finally, fill with all your plastic! (I use this for the cards I don't use every day, the important ones are kept in my main wallet!)

DIY Credit Card Wallet | Holder for All Loyalty/Credit Cards

There you go... just pull it out when you need to!

DIY Credit Card Wallet | Holder for All Loyalty/Credit Cards

Fits perfectly in a side pocket of my purse ;)

DIY Credit Card Wallet | Holder for All Loyalty/Credit Cards

I hope you like this tutorial and if you make one I would love to see it!

Happy crafting!


UPDATE
February 10, 2017
Check out VERSION 3 of the DIY Credit/Loyalty Card Duct Tape Wallet
or watch me make it on YouTube!


Friday, June 22, 2012

DIY Personalized Glass Etched Mugs

DIY Personalized Glass Etched Mugs by ilovedoingallthingscrafty.com

In my previous post, I had shown you the gifts I made for the teachers. So I thought I would share with you some pictures of how that was done. Also please refer to my posts on other etched glass projects I have done, here and here.

DIY Personalized Glass Etched Mugs by ilovedoingallthingscrafty.com

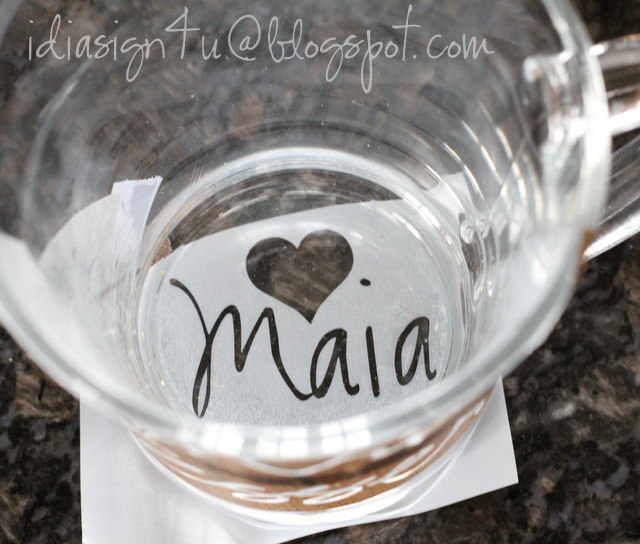
First I cut out the image I wanted from contact paper, with the Silhouette Cameo. No need to use up expensive vinyl especially if it's going to get thrown out!

DIY Personalized Glass Etched Mugs by ilovedoingallthingscrafty.com

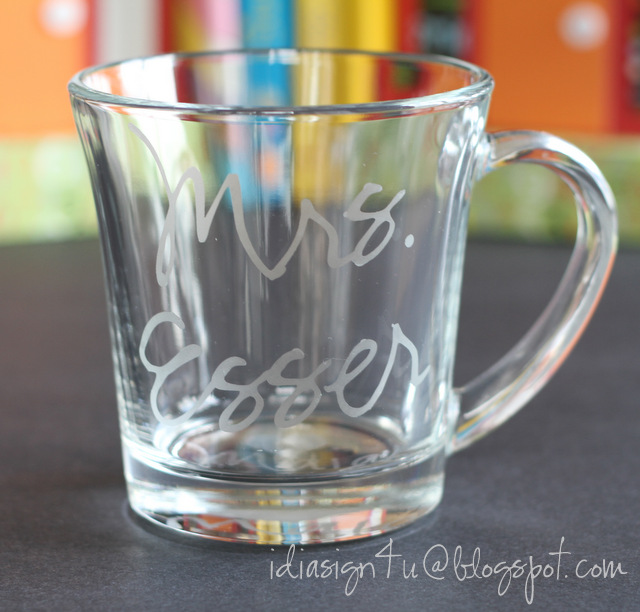
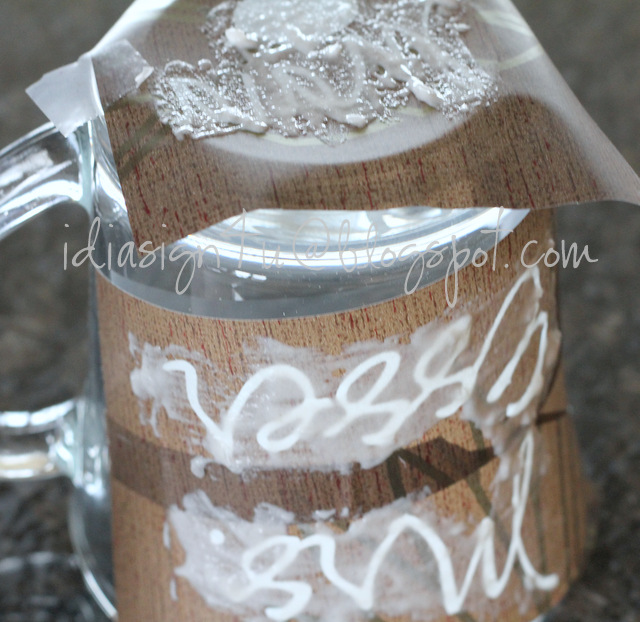
Then I applied etching cream very liberally to the exposed areas with a paintbrush. Then just followed the directions on the Armour Etch bottle. Removed the contact paper and rinsed off the cream. 

DIY Personalized Glass Etched Mugs by ilovedoingallthingscrafty.com

There you have it sooooo simple and pretty quick to make! The perfect gift for a teacher or for yourself, just add your name or whatever else you like!

 Happy crafting, have a great weekend!


Friday, June 8, 2012

3D Paper Log Cabin and Boat Treat Boxes | Father's Day SVGCuts Challenge Entry | Dad's Cabin


3D Paper Log Cabin and Boat Treat Boxes | Father's Day SVGCuts Challenge Entry | Dad's Cabin

 For the last few weeks, I have been working on my Father's Day project for SVG Cut's Facebook Challenge. I finally finished it today. Yea!!!  Isn't it so, so, so cute! I just love how it all came together :) All the files were cut using my Cameo.

3D Paper Log Cabin and Boat Treat Boxes | Father's Day SVGCuts Challenge Entry | Dad's Cabin

For the cabin, I used the  PEONY COTTAGE SVG KIT

3D Paper Log Cabin and Boat Treat Boxes | Father's Day SVGCuts Challenge Entry | Dad's Cabin

First I embossed the shingles and used a pen to curl them up before I glued them down to the roof.

3D Paper Log Cabin and Boat Treat Boxes | Father's Day SVGCuts by ilovedoingallthingscrafty.com Challenge Entry | Dad's Cabin

Dad peeking through the window comes from  KATE'S SILHOUETTES SVG COLLECTION
For the log look that I created for the cabin, I simply crumpled up some card stock and then scored and inked it. I then used my hot glue gun to adhere to the sides of the box.


3D Paper Log Cabin and Boat Treat Boxes | Father's Day SVGCuts by ilovedoingallthingscrafty.com Challenge Entry | Dad's Cabin

The chimney I added comes from the SCHOOL DAYS SVG KIT

3D Paper Log Cabin and Boat Treat Boxes | Father's Day SVGCuts by ilovedoingallthingscrafty.com Challenge Entry | Dad's Cabin

The dock was created with the files from the crate from the CARAMEL APPLE PIE SVG KIT. For the lantern, I used the CRISP DAYS OF FALL SVG KIT, and simply glued it onto a wooden dowel. 

3D Paper Log Cabin and Boat Treat Boxes | Father's Day SVGCuts by ilovedoingallthingscrafty.com Challenge Entry | Dad's Cabin

So since I didn't have a boat file, I made one up using the Silhouette Design Studio Edition software. I needed it to carry all of Dad's fishing gear! For his tackle box, I used the toolbox file from MY DAY WITH DAD SVG KIT

Dad's fishing vest, oars, fishing fly and waves are all freebies from the SVG Cuts blog... thanks, Mary! 

3D Paper Log Cabin and Boat Treat Boxes | Father's Day SVGCuts by ilovedoingallthingscrafty.com Challenge Entry | Dad's Cabin

The lifebuoy I created as well with basic shapes with the Silhouette SDE. The banner also comes from MY DAY WITH DAD SVG KIT

3D Paper Log Cabin and Boat Treat Boxes | Father's Day SVGCuts by ilovedoingallthingscrafty.com Challenge Entry | Dad's Cabin

The panfish is also a freebie from the blog. Man, they have great freebies!

3D Paper Log Cabin and Boat Treat Boxes | Father's Day SVGCuts by ilovedoingallthingscrafty.com Challenge Entry | Dad's Cabin

To make my fishing rod I used masking tape for the handle and wound the fishing line around the wire, then glued the fishing fly to the end. Easy!

3D Paper Log Cabin and Boat Treat Boxes | Father's Day SVGCuts by ilovedoingallthingscrafty.com Challenge Entry | Dad's Cabin

Here is a picture to show you the scale. So tiny, but soooo cute! It is definitely is hard to make files this small!!!

3D Paper Log Cabin and Boat Treat Boxes | Father's Day SVGCuts by ilovedoingallthingscrafty.com Challenge Entry | Dad's Cabin

I feel like a GIANT holding a tiny little boat in my hand, lol!

3D Paper Log Cabin and Boat Treat Boxes | Father's Day SVGCuts by ilovedoingallthingscrafty.com Challenge Entry | Dad's Cabin

And it all fits inside the gift box!

Hope you liked my recreation of "Dad's Cabin!" Thanks for stopping by :)

Wednesday, May 23, 2012

DIY Hair Accessory Station for Organization | Recycling Tin Cans

If you have a little girl, you must have tons of hair accessories. My 5-year-old daughter Maia has so many,  it was getting harder and harder to find anything! I finally gave up and just started pilling everything in a basket. 😒

DIY Hair Accessory Station for Organization | Recycling Tin Cans by ilovedoingallthingscrafty.com

Messy right?!

I had seen so many different ways on Pinterest to organize hairbands so I thought I should do the same. Jessica from Mom 4 Real was where I first saw the idea. Thanks for the inspiration, Jessica! So here are a few pics of the steps I took.

DIY Hair Accessory Station for Organization | Recycling Tin Cans by ilovedoingallthingscrafty.com

For this project, I used modgepodge, empty tin cans, pretty card stock, foam brush, hot glue gun, and ribbon.

DIY Hair Accessory Station for Organization | Recycling Tin Cans by ilovedoingallthingscrafty.com

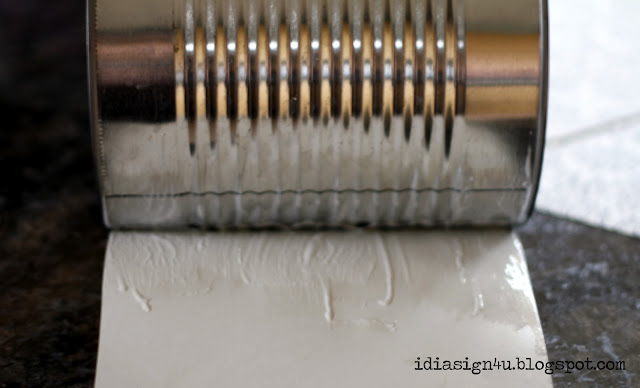
First I cut the length of the paper to the right size, then applied the glue to the back and then the front of the paper.

DIY Hair Accessory Station for Organization | Recycling Tin Cans by ilovedoingallthingscrafty.com

I then let the modgepodge completely dry overnight.

DIY Hair Accessory Station for Organization | Recycling Tin Cans by ilovedoingallthingscrafty.com

To pretty the cans up a little more, I trimmed the edges with ribbon and added a bow to the front to cover up the seem.

DIY Hair Accessory Station for Organization | Recycling Tin Cans by ilovedoingallthingscrafty.com

To finish it off, I added paper to the inside of the can and just used hot glue to secure the top edge in place.

DIY Hair Accessory Station for Organization | Recycling Tin Cans by ilovedoingallthingscrafty.com

One of the small cans is for the hair elastics, another is for combs and brushes, and the big can is for the hair bands. The top of the cans is perfect clipping the hair clips too.

DIY Hair Accessory Station for Organization | Recycling Tin Cans by ilovedoingallthingscrafty.com

And here is what it looks like with all the hair accessories organized. No more mess... well at least not yet!

Hope you enjoyed this! Thanks for stopping by :)


Wednesday, May 2, 2012

DIY Personalized Word Art Paintings


It's my very good friend's birthday today, which also happens to be my oldest friend as well. We have been friends since 1983... Whoa, that's almost 30 years! Happy Birthday Suzie!!!

So for Suzie's birthday, I thought I would surprise her with one of my paintings. For a while, I used to sell them on my Etsy store, but now I just make them for friends and family. Suzie had mentioned she would like me to paint some word art for her a while ago. I normally would ask her for a whole bunch of words that she would like that described her and her family. I'll make her subway art painting for next time when I know what words she would like. But, since I wanted it to be a surprise I thought instead of making the typical subway art type painting, I would make it look like a word search. The circled words would be her family names. I love how it turned out. I hope she will too!

DIY Personalized Word Art Paintings by ilovedoingallthingscrafty.com

Here is how I make my word art paintings. I've seen many different ways of doing this on Pinterest, so I thought I would share how I make mine.

The first thing you want to do is decide on your words. I use my Silhouette to out my word, fonts, layout. I then cut out my letters. Instead of using vinyl which is expensive and you are just going to discard it, I use contact paper. I then remove the letters from the contact paper leaving behind the negative of the letters.


Next, prepare the canvas. For this project, I chose a 16X20 frame. I like to wet down the canvas first just with water and roll it on with a foam roller.


Now it's time to give your canvas some color. I used acrylic paints. Give the canvas at least 2 coats of color.


Once the canvas is dry remove the backing on the contact paper and as straight as possible lay it on your canvas. Try to smooth it out as much as possible.


Time to start painting in your words. For this painting, I used a foam brush and dabbed the paint on a little at a time. In the past, I have just a foam roller to roll it on. (If the contact paper isn't very tacky, it's probably better not to use a roller, or the paint might bleed under your stencil)


This is what it looked like prior to the big reveal.


For this painting, I just freehanded the circled words.


Once all the paint has dried I give the painting a protective clear coating with a paint sealer. 

Here are a few more of the paintings I have made in the past for myself, friends and family. Enjoy!

DIY Personalized Word Art Paintings by ilovedoingallthingscrafty.com


DIY Personalized Word Art Paintings by ilovedoingallthingscrafty.com


DIY Personalized Word Art Paintings by ilovedoingallthingscrafty.com


DIY Personalized Word Art Paintings by ilovedoingallthingscrafty.com


DIY Personalized Word Art Paintings by ilovedoingallthingscrafty.com


Hope you've enjoyed my word art paintings! Maybe I've inspired you to make your own!

Thanks for visiting,