Showing posts with label Gift. Show all posts

Tuesday, December 2, 2014

Fallin' Pumpkins 3D Paper Centerpiece | SVG Cuts


Even though it feels like Winter, it still is technically Fall! I know it's hard to believe especially if you're from my side of the world, lol! So here is one more Fall themed project I have to share with you guys :)

Regardless of what the weather is like outside, I am excited to share with you my latest SVGCuts Design Team post! Here is my Fallin' Pumpkin Centerpiece! Probably one of the tallest creations I have made to date!

Gift,3D,treat box,Autumn,SVGCuts DT Project,SVGCuts,Silhouette Cameo,SVG file, ilovedoingallthingscrafty, Fallin' Pumpkins, paper crafts, cricut, Centerpiece,decoration,

For all those interested on the SVGCuts kits I used, here lengthy list below!


Here are a few more close-ups... top view...

Gift,3D,treat box,Autumn,SVGCuts DT Project,SVGCuts,Silhouette Cameo,SVG file, ilovedoingallthingscrafty, Fallin' Pumpkins, paper crafts, cricut, Centerpiece,decoration,

flower view,

Gift,3D,treat box,Autumn,SVGCuts DT Project,SVGCuts,Silhouette Cameo,SVG file, ilovedoingallthingscrafty, Fallin' Pumpkins, paper crafts, cricut, Centerpiece,decoration,

and a back view...

Gift,3D,treat box,Autumn,SVGCuts DT Project,SVGCuts,Silhouette Cameo,SVG file, ilovedoingallthingscrafty, Fallin' Pumpkins, paper crafts, cricut, Centerpiece,decoration,

Here is what it looks like without the bottom container, still gorgeous! I so love the Fall and its gorgeous colors!

Gift,3D,treat box,Autumn,SVGCuts DT Project,SVGCuts,Silhouette Cameo,SVG file, ilovedoingallthingscrafty, Fallin' Pumpkins, paper crafts, cricut, Centerpiece,decoration,

I have had this centerpiece on display on one of the Units at the Cross Cancer Hospital where I work! I love how something as simple as paper can become art and brighten up space, maybe even make someone smile!

Gift,3D,treat box,Autumn,SVGCuts DT Project,SVGCuts,Silhouette Cameo,SVG file, ilovedoingallthingscrafty, Fallin' Pumpkins, paper crafts, cricut, Centerpiece,decoration,

Hope you have enjoyed my Fallin' Pumpkins as much as I enjoyed creating them :)

Thanks for stopping by!
Happy Crafting  :)

Wednesday, November 19, 2014

Stacking Christmas Tree | Fleurette Bloom DT Project

Are you all getting into the Christmas Spirit yet? I can't wait!!!

Today I am sharing with you a super cute stacking Christmas Tree I made using Fleurette Bloom files. Love how it turned out and how functional it is too!

This will make one cute Christmas gift for sure... all I need to do is add some treats to the inside!


Here are the files you will need to recreate this tree and what I did...

(cut 5 and score down the center of each, glue them back to back)

Tree - Stacking Round Cake Box from Celebrations 3D SVG Kit 
(cut one extra box and enlarged it)

Tag - Party Hat Tag from Celebrations 3D SVG Kit 
(deleted cut lines, folded in half)

(cut smallest box and resized it)


How cute is that tag?
The stamp I used comes from Craftin Desert Divas Happy Celebrations Stamp Set


This gorgeous double sided paper has been sitting in my stash for a while!
It's from K&C Company.


Check out all the layers of boxes I have to fill up with goodies!

I think this would make a perfect teacher's gift, hostess gift or a great decoration for yourself! Hope this Stacking Christmas Tree has inspired you to be a little creative today :)

Thanks for stopping by!
Happy Crafting  :)

Friday, November 7, 2014

Sunflower Thank-You Gift Set | SVGCuts

Hello, my friends!!!

So here in Canada, we have already celebrated Thanksgiving, but for my American friends, it is coming right up! Today's post is perfect for those of you wanting to make a quick Thanksgiving gift or just an everyday Thank-you for someone!

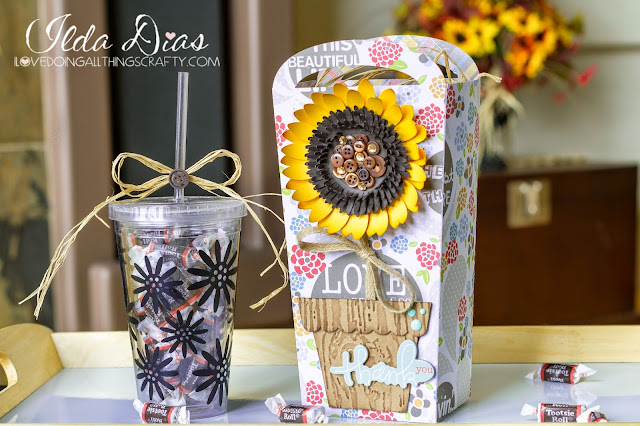
Here is my Sunflower Thank-You Gift Set, and my latest SVG Cuts DT project! 

Gift,Tumbler,SVGCuts,SVGCuts,Silhouette Cameo,Thank-you,ilovedoingallthingscrafty,Fall,Sunflower,vinyl,Cricut,Paper crafts, craft, DIY

For those that want a chance of winning all the kits I used make sure you got to -> SVG Cuts FB page and leave a comment! Hurry time is limited!!!


I LOVE, LOVE Sunflowers, they are one of my favorites. They just make me happy! Isn't this one SO pretty?! I made the leaves by using some twine ribbon! Cool, right?


And, who doesn't love tumblers?
 So practical and useful! This one was super easy and quick to make!


Hope you have enjoyed this quick-to-make Sunflower Thank-You Gift Set!

Thanks for stopping by!
Happy Crafting  :)

Tuesday, September 23, 2014

Victor + Jessica's Wedding Shadow Box and Card | SVGCuts

So excited to share with you all the latest Shadow Box! I think they just keep getting more and more beautiful! 

This Shadow Box was made as a gift for my cousin Victor and his bride Jessica who just got married this past weekend! I absolutely love how it turned out and I'm pretty sure they loved it too! Congratulations again Victor and welcome to our family Jessica!!! Had so much fun with you both and the rest of our crazy awesome family!

Gift,Roses,etched glass,SVGCuts,Silhouette Cameo,Wedding Shadow Box,ilovedoingallthingscrafty,Wedding card,heart,Cricut,Paper crafts,Framed,personalized,

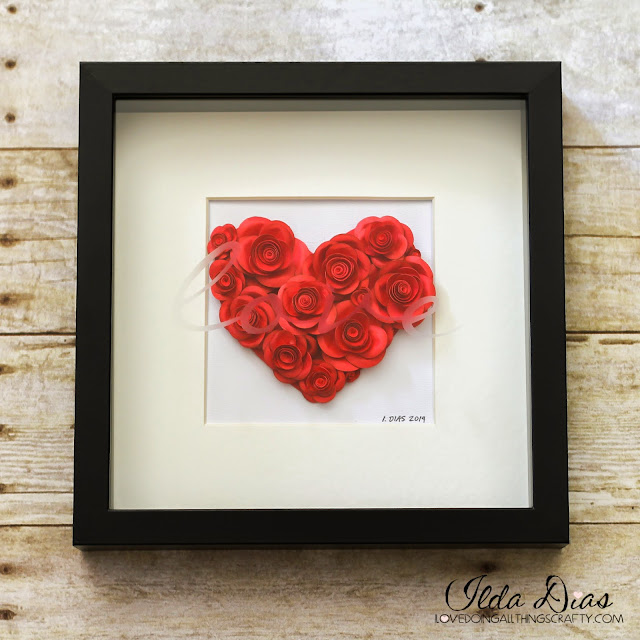
It's hard to see that I etched the glass in the above picture, so below is a closer look at the etched glass. Click here for a previous glass etching tutorial and project.

The rose file I used to create the heart of roses comes from the Crush On You Boxes SVG Kit here. They were just cut at different sizes and glued onto a heart template.

Gift,Roses,etched glass,SVGCuts,Silhouette Cameo,Wedding Shadow Box,ilovedoingallthingscrafty,Wedding card,heart,Cricut,Paper crafts,Framed,personalized,

And here is the card I made them! SO adorable, right!?
The stamp comes from the Simply Said Stamp Pack by Craftin Desert Diva's.

Gift,Roses,etched glass,SVGCuts,Silhouette Cameo,Wedding Shadow Box,ilovedoingallthingscrafty,Wedding card,heart,Cricut,Paper crafts,Framed,personalized,

The files I used to create the card come from the Love Always SVG Kit here.
(Please note that the original files have been altered to make the card using the Silhouette DSE program.)


... and here is the lovely couple's first kiss as husband and wife!


Hope you loved this project as much I loved making it!
Thanks for stopping by!

Happy Crafting  :)

Tuesday, September 9, 2014

Silhouette Tutorial - How to create your own art from a drawing

Hey Everybody!

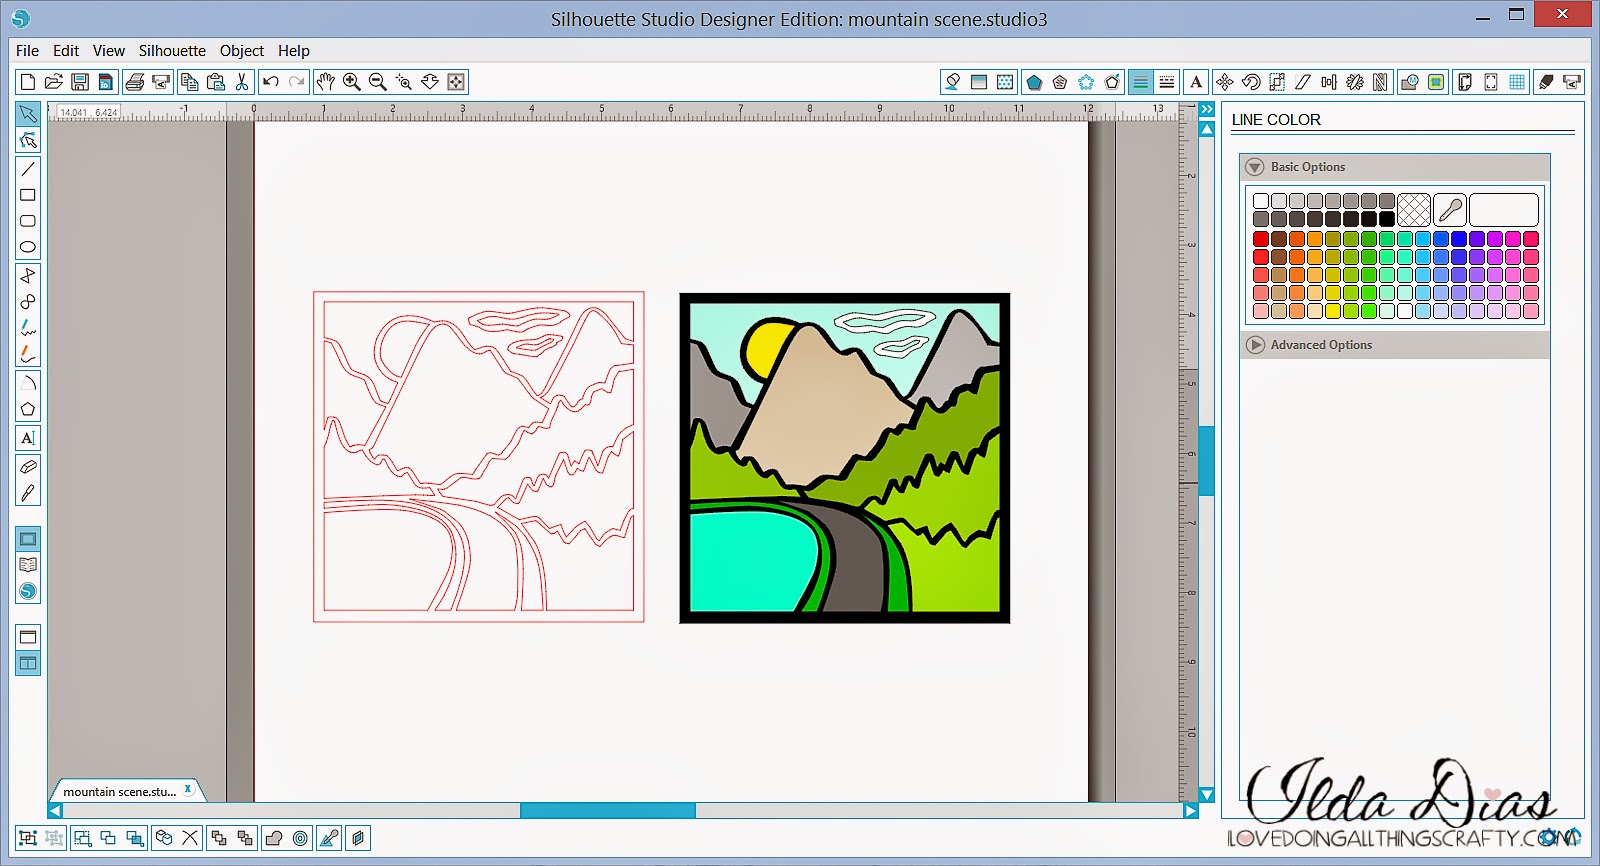
Today I want to share with you how to create your own art from a drawing! I'll show you how to go from a hand drawn sketch to the beautiful piece of art below step by step using the Silhouette Designer Edition. Super easy once you know how :)


I made this as a gift for our Cousins that travelled from Portugal to join us on a road trip we took this summer!


Here is a close up of the mountain scene, which I had hand drawn while driving through Jasper. So happy with how it turned out!


Here is the HOW TO...
  • Using a sharpie marker create any image you want (pen or pencil lines are too thin). Make sure the lines all connect with each other or it will be difficult to break each piece apart. (Maybe use a ruler, and create straight lines if possible it might save you some work!)
  • Take a picture of the drawing, as straight on top of it as possible. (I just used my cell phone, to make things easier and quicker, then email the picture to myself).
  • Locate the picture on the computer and open it up in the Silhouette's work space (see image below).

  • Next thing you need to do is trace the drawing, by highlighting the trace area (I increased the high pass filter value to 50 and then clicked on the trace function). Refer to next image.


  • Once you have traced the image you will be left with the outline of the drawing. Move the outlines off the drawing.
  • Right click on the image and select Release Compound Path. (This will break up your image in to many different pieces). 
  • Delete any unnecessary pieces. (Just like the little lines on the outside of the drawing below).
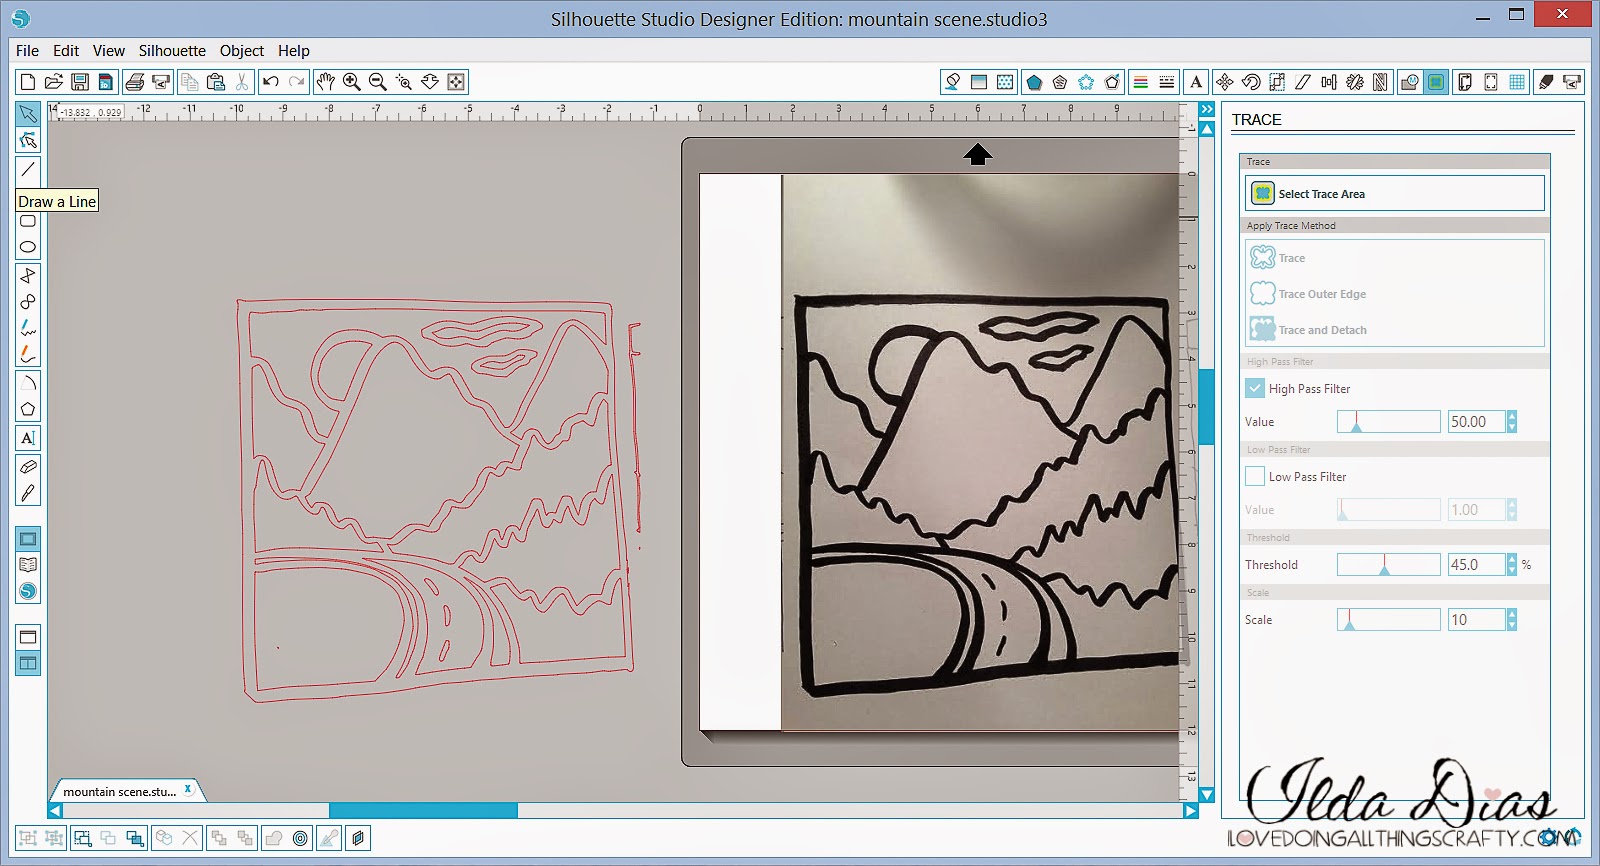

  • Next thing I did was remove the outside square of the drawing as it was all crocked, and replaced it with a square I created with the square drawing tool. (This is where using a ruler when creating your drawing may have helped a little!)
  • Now this is where the work really begins. Clean up time! Highlight each piece of the drawing and using the edit point tool (top left hand, image below) simplify and delete any points that make the lines smoother for your machine to cut. Don't worry about deleting the wrong points as you can just use the undo function and start again. Drag outside points of each piece to make the outer lines parallel to the square you created. See image below.
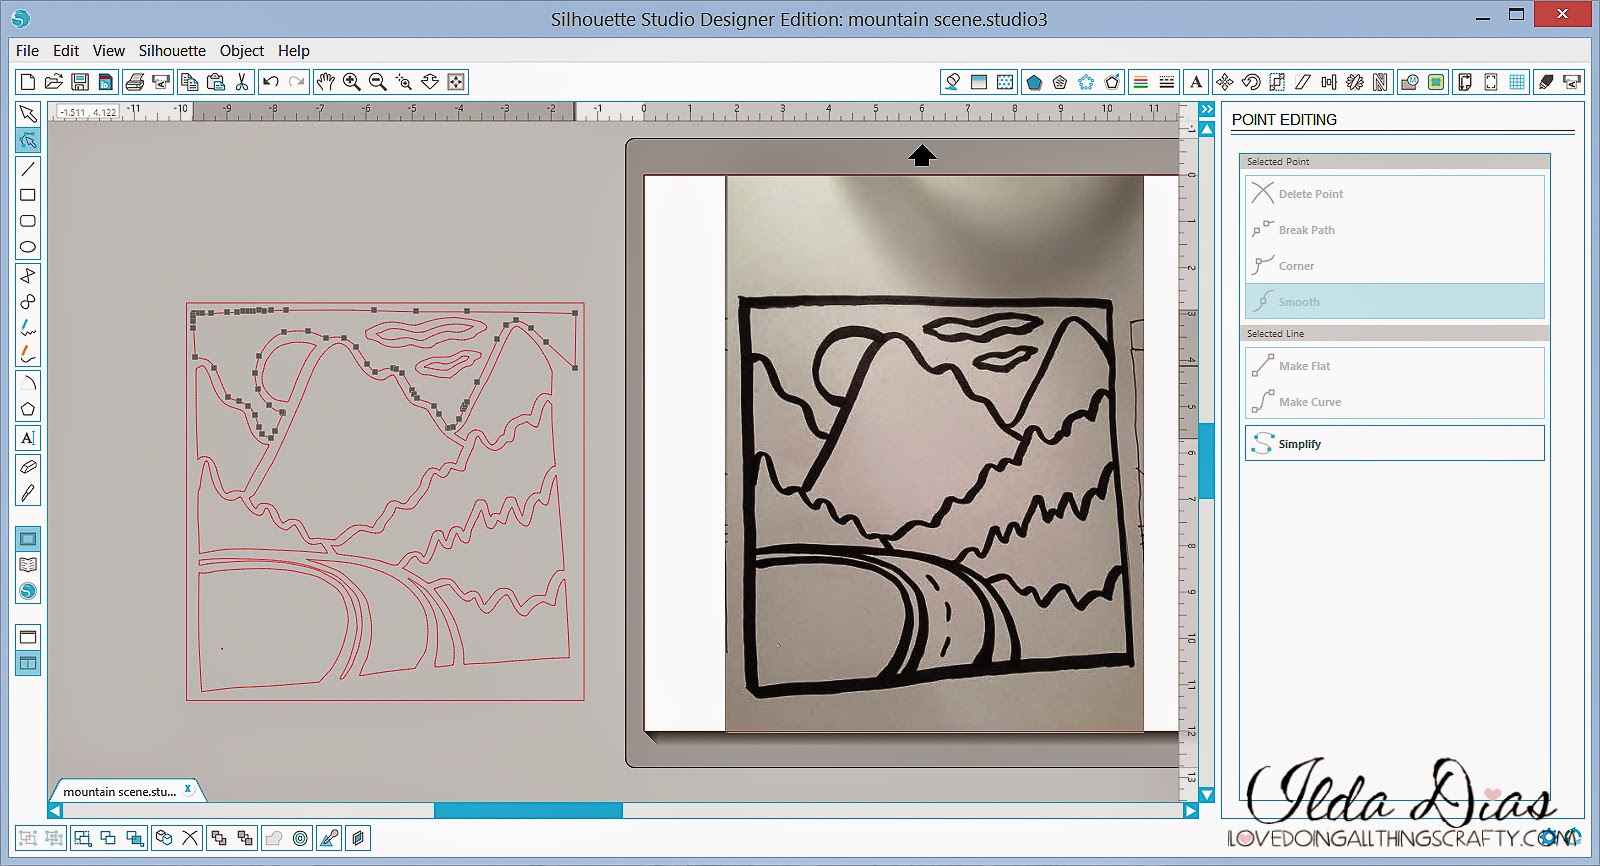

  • Once you are satisfied with the image and your lines all look fairly straight, group all pieces together and resize it to fit the frame you are going to use. 
  • Ungroup the image again.
  • Before sending each piece to be cut out, I like to visualize what it will look like with color. (This will also help you when selecting your cardstock).
  • To add color to your image, I first copied the image and pasted it it next to it. Then simply selected each piece by highlighting it and used the fill color and line function. Group the colored image together and use it refer back to it when assembling the pieces back together.
  • You are now ready to cut!
  • Once you have all the pieces cut out glue them back onto the square, reproducing the color image created below. 
  • Emboss and embellish as desired!


Hope this tutorial has inspired you to create your own art work! Now that you know how and aren't limited to files you have purchased the possibilities are endless! Sometimes the best things in life are FREE, well with a little bit of work and patience that is!

Thanks for stopping by!
Happy Crafting  :)

Sharing this with my Crafty Peeps!

Wednesday, August 27, 2014

Rose Heart Shadow Box | SVGCuts

Recently one of my high school besties Daniele was in town for a post destination wedding celebration. Haven't seen much of her in years since she moved to London, England after University. We did get to see her and her man a few summers ago when we visited London. This summer she married her best friend Benni in a gorgeous villa in Tuscany! 

Today I want to share with you the gift I made them. Since I am in love with shadowboxes, I thought I would make the happy couple a Rose Heart Shadow Box as a little wedding gift from us.

Gift,Wedding,Roses, Heart,SVGCuts,Silhouette Cameo,Rose Heart Shadow Box,ilovedoingallthingscrafty,SVG file,personalized, paper art

For examples of other shadow boxes I've made, click here, here, here and here.

Below is a close up of the roses and the word love etched on the glass. Click here for a previous etching tutorial.

Gift,Wedding,Roses, Heart,SVGCuts,Silhouette Cameo,Rose Heart Shadow Box,ilovedoingallthingscrafty,SVG file,personalized, paper art

To replicate your own Rose Heart Shadow Box you will need:

The rose file from - Crush On You Boxes SVG Kit cut at various sizes.
Cut on the Silhouette Cameo.
8 X 8 Shadow Box (purchased from IKEA.
Etching cream

Yes, that is it! Simple and easy, yet elegant results!

Once again, congratulations Daniele and Benni! It was so nice to see you both again, I really enjoyed our afternoon together! Wish you both a lifetime of love and happiness!!!

Thanks for stopping by!
Happy Crafting  :)

Tuesday, July 8, 2014

Christmas Candle Centerpiece | SVGCuts

Hello Everybody!!!

Today I have a Christmas project to share with you all. WHAT?! I know it's crazy to think about Christmas yet, especially today when the weather here is the hottest it's been all year! No, I haven't completely lost my marbles... it's my latest SVG Cuts DT project for Christmas in July! Perfect for those crafters that like to get a head start on their Christmas ideas :)

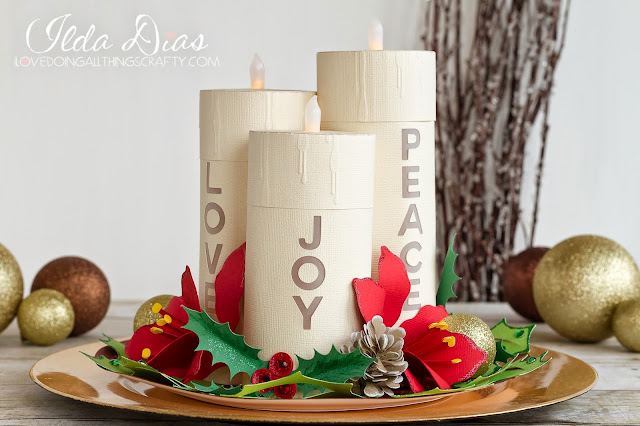
Here is my Christmas Candle Centerpiece! Isn't it purdy? 

Gift,SVGCuts,personalized candle,decor,SVGCuts,Silhouette Cameo,ilovedoingallthingscrafty,DIY 3D paper candle,Christmas Candle Centerpiece,luminaire,Paper crafts,handmade art,

For those of you that want to know what SVGCuts kits I've used, here is my list:


All cut on the Silhouette Cameo

Make the 4th Candle and you have yourself an advent wreath!

Gift,SVGCuts,personalized candle,decor,SVGCuts,Silhouette Cameo,ilovedoingallthingscrafty,DIY 3D paper candle,Christmas Candle Centerpiece,luminaire,Paper crafts,handmade art,

Ooooooo, Aaaaaaaa... just look how they light up! Beautiful!!!

Gift,SVGCuts,personalized candle,decor,SVGCuts,Silhouette Cameo,ilovedoingallthingscrafty,DIY 3D paper candle,Christmas Candle Centerpiece,luminaire,Paper crafts,handmade art,

Hey if you're not wanting to wait to make these for Christmas, make them for whatever occasion or holiday you need. Coordinate them to go with your decor and personalize them as much as you like! 

Gift,SVGCuts,personalized candle,decor,SVGCuts,Silhouette Cameo,ilovedoingallthingscrafty,DIY 3D paper candle,Christmas Candle Centerpiece,luminaire,Paper crafts,handmade art,

I hope you've enjoyed this little Christmas inspiration! If you do make this please share it over on the SVG Cuts Facebook Fan page, I would love to see your creations! :)

Thanks for stopping by,
Happy Crafting  :)

Tuesday, July 1, 2014

Summer Love Shadow Box | SVGCuts


Remember the Autumn Love Shadow Box I made last Fall? Here is the Summer Love version I recently made for a friend! Click here for detailed how-to instructions on a similar project. 

SVGCuts files,Gift,wall decor,Summer Love Shadow Box,SVGCuts,Silhouette Cameo,ilovedoingallthingscrafty,decoration,Floral Heart, Cricut,Paper crafts, Flowers, butterfly

For those interested in the files I used to create this here is your list:

3D Flowers SVG Kit
B Is For Birthday SVG Kit
Breezy Meadow Butterflies SVG Collection
Crush On You Boxes SVG Kit
Happy Birthday to You SVG Kit
Love Always SVG Kit
Mom's Garden Gifts SVG Kit

Cut out on the Silhouette Cameo.

SVGCuts files,Gift,wall decor,Summer Love Shadow Box,SVGCuts,Silhouette Cameo,ilovedoingallthingscrafty,decoration,Floral Heart, Cricut,Paper crafts, Flowers, butterfly

Love the little butterfly!

SVGCuts files,Gift,wall decor,Summer Love Shadow Box,SVGCuts,Silhouette Cameo,ilovedoingallthingscrafty,decoration,Floral Heart, Cricut,Paper crafts, Flowers, butterfly

This Summer Love Shadow Box makes a great decor piece. It also makes a great Wedding,  Anniversary, Birthday, or just because gift! Hope this inspires you to make one for yourself!

Thanks for stopping by!
Happy Crafting  :)

Saturday, June 28, 2014

Andre 3D Paper Letters | SVGCuts

Recently we had a new arrival in the family. My cousin's little guy Andre! 
Since he has been born I had been meaning to make his name using SVGCuts 3D letters. Well, I finally got around to making them! Perfect time too as today was his Baptism and they were used to help decorate for the event :)


Here are a few close-ups...


I think these papers I chose are timeless and yet still cute enough for a baby Andre to grow into a little man.


 I love this little tag in the picture... It is what I wish for Andre, I hope he always dreams big and is able to achieve all he hopes for!


These 3D Letters make great baby gifts and are the perfect touch for any nursery. I LOVE how they turned out, hope you did too!

Thanks for stopping by,
Happy Crafting  :)

Wednesday, May 28, 2014

Paper Tropical Fish Aquarium | 3D Paper Decoration | SVGCuts

I am SO super excited to share with you my latest SVGCuts project! Check out my paper Tropical Fish Aquarium, I think this has to be one my favorite SVGCuts project so far. Isn't this just the coolest Fish Tank you have ever seen!?!


Gift,finding nemo,SVG Cuts Design Team Project,SVGCuts,Silhouette Cameo,Classroom decor,3D Paper Tropical Fish Aquarium, office decor,Cricut,Paper crafts, DIY,night light,

Filled with tropical paper fish that will never die if you forget to feed them, and even better yet you will never have to change the stinky water or ever clean it! How perfect could it get?!?

Gift,finding nemo,SVG Cuts Design Team Project,SVGCuts,Silhouette Cameo,Classroom decor,3D Paper Tropical Fish Aquarium, office decor,Cricut,Paper crafts, DIY,night light,

For those of you interested in recreating the Aquarium here are the SVG Kits that you will need:


For the exact instructions and measurements, click HERE.

Gift,finding nemo,SVG Cuts Design Team Project,SVGCuts,Silhouette Cameo,Classroom decor,3D Paper Tropical Fish Aquarium, office decor,Cricut,Paper crafts, DIY,night light,

The COOLEST part is that the aquarium actually lights up! YES, it sure does!
Making this the wickedest (if that is even a word) night light for kids :) My only problem now is that I have to find time to make another one as I have two kids and only one aquarium, LOL!

Gift,finding nemo,SVG Cuts Design Team Project,SVGCuts,Silhouette Cameo,Classroom decor,3D Paper Tropical Fish Aquarium, office decor,Cricut,Paper crafts, DIY,night light,

Here are the battery-operated LEDs tucked secretly under the lid! Clever huh?!? 

Gift,finding nemo,SVG Cuts Design Team Project,SVGCuts,Silhouette Cameo,Classroom decor,3D Paper Tropical Fish Aquarium, office decor,Cricut,Paper crafts, DIY,night light,

Hope I have inspired you to create your own LOW/no-maintenance aquarium. This project would make a great gift for the classroom, the office, or your kid's room! 

Thanks for stopping by!
Happy Crafting  :)