Showing posts with label handmade art. Show all posts

Monday, October 4, 2021

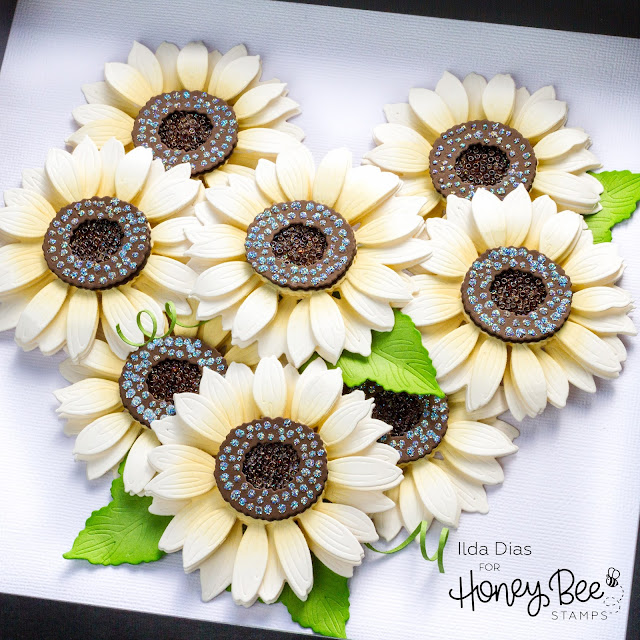
Framed White Sunflower Shadow Box | Honey Bee Stamps

Frame, White Sunflowers, Shadow Box, Honey Bee Stamps,Lovely Layers, how to, gift idea, die cut flowers,ilovedoingallthingscrafty,cardmaker,handmade art

Hello and happy Monday crafty friends!

First of all, I would like to thank all of you that left me the sweetest comments and messages over on my Instagram in regards to the last Framed Lovely Layers Floral Bouquet I made. This beauty is now in Jennifer McGuire's craft room and I could not be happier about that! 

Frame, White Sunflowers, Shadow Box, Honey Bee Stamps,Lovely Layers, how to, gift idea, die cut flowers,ilovedoingallthingscrafty,cardmaker,handmade art

Today's project was made for a friend and colleague of mine (hi Tomina👋) who asked me to make a White Sunflower shadow box for her after she saw the White Sunflower Slimline card I made. 

Here is how this beautiful frame came together.

FRAME RECIPE


Dies:
Paper: 
  • Cream, green and brown heavyweight Colored Cardstock
Frame:
  • Square 9 ¾ " Shadow Frame from IKEA (The frame I used has been discontinued, the one I linked is very similar)
Ink:

Die Cut Machine:

Adhesives:

Embellishments:

Other Tools:

Once you have put one of these flowers together, then the rest is simple. It is just a repetitive process.

Frame, White Sunflowers, Shadow Box, Honey Bee Stamps,Lovely Layers, how to, gift idea, die cut flowers,ilovedoingallthingscrafty,cardmaker,handmade art
  1. The first thing I did was cut all the layers for the 8 sunflowers I needed to form the shape of a heart. 
  2. I then ink blended up the centers of the flowers. 
  3. Curled the flower petals.
  4. Added foam to each layer of the flower to build up the petals and create dimension.
  5. To the centers, add a layer of glue to the bottom layer. 
  6. Drop the seed beads into the glue (I tried having the hole of the beads face up). Once the glue dried, I used a brown Copic Marker to color the center brown.
  7. To the top of the center, add small drops of glossy accents. While still wet sprinkle with Sparkle Glitter and piece the centers together.
  8. Glue centers to the flower petals.
Frame, White Sunflowers, Shadow Box, Honey Bee Stamps,Lovely Layers, how to, gift idea, die cut flowers,ilovedoingallthingscrafty,cardmaker,handmade art

Arrange the flowers how you like. Once you have that figured out, glue it to the paper background of the frame. Use foam to pop up some of the flowers in place. Finish by gluing the leaves in place.

Frame, White Sunflowers, Shadow Box, Honey Bee Stamps,Lovely Layers, how to, gift idea, die cut flowers,ilovedoingallthingscrafty,cardmaker,handmade art

I love how this White Sunflower Shadow Box frame turned out, and I hope you can see from this example that you do not need all the flowers to create something beautiful! 

Want to watch a quick video of how this came together. 
Ilda 🌻

SUPPLIES
Lovely Layers: Sunflower Dies
Shop at:
SSS | SB | HBS
DETAIL BLENDER BRUSHES
Shop at:
SSS | HBS
BEE CREATIVE GLUE
BEE CREATIVE GLUE
Shop at:
SSS | SB | HBS
GEMINI JR. DIE CUTTER
Shop at:
SSS | AMZ | SB
Oxide Ink Pad ANTIQUE LINEN
Shop at:
SSS | SB | HBS
SILVER DUST | SEED BEADS
Shop at:
SSS | SK
EMBELLISHMENT WAND
EMBELLISHMENT WAND
Shop at:
SSS | SK
GLOSSY ACCENTS
GLOSSY ACCENTS
Shop at:
SSS | AMZ | SB | HBS
SPARKLE GLITTER
SPARKLE GLITTER
Shop at:
SSS | SK
Foam Squares
Foam Squares
Shop at:
SSS | HBS
To make supplies easy for you to find, I have linked them above. If something is no longer available I will link to a similar product. Affiliate links may be used depending on the product linked. Please help support my blog by using these links while shopping at no additional cost to you. For more information about the affiliates I use, please visit my disclaimer here. Thanks so much for all your support!

Thursday, February 11, 2016

Valentine's Day Post Office Drop Box | 3D Paper Mail Box/Treat Box | SVGCuts

Hey everyone!

Back again with another mailbox creation for the teacher! This time this super cute Valentine's Day Post Office Drop Box comes from SVGCuts Valentine Mailboxes SVG Kit and the little letters are files from Hearts Aflame SVG Kit

This project was super easy to put together and fairly quick. I think I took longer choosing the papers than assembling it! It's a good last-minute treat box if you don't have lots of time to waste ;)

3D,SVGCuts,Silhouette Cameo,Love Stamp and Cut Set from Hero Arts,ilovedoingallthingscrafty,Simon Says Teacher die,Valentine's Day Post Office Drop Box,SVG Files,teacher Gift,handmade art,Paper crafts, Cricut

I was so excited to use my Simon Says Stamp Teacher dies, that came in a few days ago.
I'm always making teachers things and this little die will come in so handy!

3D,SVGCuts,Silhouette Cameo,Love Stamp and Cut Set from Hero Arts,ilovedoingallthingscrafty,Simon Says Teacher die,Valentine's Day Post Office Drop Box,SVG Files,teacher Gift,handmade art,Paper crafts, Cricut

The paper I used comes from My Mind's Eye - Filled with Love paper Pad

To finish the back I added a couple of die-cut hearts and stamped one of them with a sentiment from the Love Stamp and Cut Set from Hero Arts.

3D,SVGCuts,Silhouette Cameo,Love Stamp and Cut Set from Hero Arts,ilovedoingallthingscrafty,Simon Says Teacher die,Valentine's Day Post Office Drop Box,SVG Files,teacher Gift,handmade art,Paper crafts, Cricut

I wish you all a very Happy Valentine's Day! Hope my little Valentine's Day Post Office DropBox has inspired you with some creativity :)

For those of you done with Valentine's and want to move on to Spring, check out the latest SVGCuts Kit Springtime Box Cards SVG Kit. Beautiful isn't it?!


Thanks for stopping by!
Happy Crafting  :)

Tuesday, February 9, 2016

Valentine's Day Mail House | 3D Paper Valentines House/Gift Box | SVGCuts

Are you ready for Valentine's Day?! 
I most definitely am NOT :(  Still working on some last-minute projects!

Every year I like to make something special for the teachers. This year one of them will be receiving this super cute Valentine's Day Mail House! 

How CUTE is that!?! LOVE it!

Gift,3D,SVGCuts,ilovedoingallthingscrafty,3D House,Fleurette Bloom Stamps,SVG Files,Valentine's Day Mailbox,teacher Gift,Cricut,handmade art,Paper crafts,

The awesome files I used to make this beauty comes from SVGCuts Hugs and Kisses SVG Kit and the Hearts Aflame SVG Kit.

Gift,3D,SVGCuts,ilovedoingallthingscrafty,3D House,Fleurette Bloom Stamps,SVG Files,Valentine's Day Mailbox,teacher Gift,Cricut,handmade art,Paper crafts,

The stamp I used on the front door comes from Fleurette Bloom's Happy Days Stamp Set.
Paper from Pink Paislee - Pen Pals

Gift,3D,SVGCuts,ilovedoingallthingscrafty,3D House,Fleurette Bloom Stamps,SVG Files,Valentine's Day Mailbox,teacher Gift,Cricut,handmade art,Paper crafts,

As you can see I altered the house a little by adding a slit to the roof of the house from  Hugs and Kisses SVG Kit. To create this you must add the same slit line to the roof panel and each roof liner (top and inside piece). You will have to ungroup some files to be able to do this and copy the opening in the exact same spot on each piece. Regroup everything once you are done.  Really easy, just make sure the opening is wide enough for the letters!

Gift,3D,SVGCuts,ilovedoingallthingscrafty,3D House,Fleurette Bloom Stamps,SVG Files,Valentine's Day Mailbox,teacher Gift,Cricut,handmade art,Paper crafts,

There is still plenty of time to create one of these for yourself or as a gift for someone!
Hope this has inspired you to create your own Valentine's Day Mail House :)

Thanks for stopping by!
Happy Crafting  :)


Friday, October 24, 2014

Row House - House Warming Gift | 3D Paper Gift Box | SVGCuts

Friends of ours recently moved into their brand new home and thought this would make the perfect little house warming gift! Finally, I had an excuse to make a row house from SVGCuts Parkside Row SVG Kit! LOVE it!!!

SVG Cuts files,3D,treat box,SVGCuts,Silhouette Cameo,ilovedoingallthingscrafty,House Warming Gift,Paper crafts,handmade art,Cricut,

I added a cloud from Bunny Hop SVG Kit to add my sentiment to using print n cut on the Cameo. The banner was simply made by cutting out triangles and stamping a letter on each pennant.


 How cool is that all lit up? SO realistic looking!


If you loved my Row House, you are going to love SVG Cuts latest Kit "Mistletoe Manor"

Here is a peek! Amazing right!!! Perfect for Christmas :)


Thanks for stopping by!
Happy Crafting  :)

Tuesday, July 8, 2014

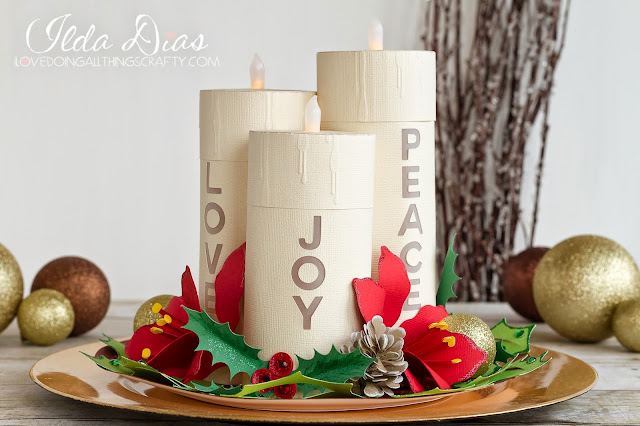
Christmas Candle Centerpiece | SVGCuts

Hello Everybody!!!

Today I have a Christmas project to share with you all. WHAT?! I know it's crazy to think about Christmas yet, especially today when the weather here is the hottest it's been all year! No, I haven't completely lost my marbles... it's my latest SVG Cuts DT project for Christmas in July! Perfect for those crafters that like to get a head start on their Christmas ideas :)

Here is my Christmas Candle Centerpiece! Isn't it purdy? 

Gift,SVGCuts,personalized candle,decor,SVGCuts,Silhouette Cameo,ilovedoingallthingscrafty,DIY 3D paper candle,Christmas Candle Centerpiece,luminaire,Paper crafts,handmade art,

For those of you that want to know what SVGCuts kits I've used, here is my list:


All cut on the Silhouette Cameo

Make the 4th Candle and you have yourself an advent wreath!

Gift,SVGCuts,personalized candle,decor,SVGCuts,Silhouette Cameo,ilovedoingallthingscrafty,DIY 3D paper candle,Christmas Candle Centerpiece,luminaire,Paper crafts,handmade art,

Ooooooo, Aaaaaaaa... just look how they light up! Beautiful!!!

Gift,SVGCuts,personalized candle,decor,SVGCuts,Silhouette Cameo,ilovedoingallthingscrafty,DIY 3D paper candle,Christmas Candle Centerpiece,luminaire,Paper crafts,handmade art,

Hey if you're not wanting to wait to make these for Christmas, make them for whatever occasion or holiday you need. Coordinate them to go with your decor and personalize them as much as you like! 

Gift,SVGCuts,personalized candle,decor,SVGCuts,Silhouette Cameo,ilovedoingallthingscrafty,DIY 3D paper candle,Christmas Candle Centerpiece,luminaire,Paper crafts,handmade art,

I hope you've enjoyed this little Christmas inspiration! If you do make this please share it over on the SVG Cuts Facebook Fan page, I would love to see your creations! :)

Thanks for stopping by,
Happy Crafting  :)

Tuesday, February 11, 2014

Illuminated 3D Paper I Love U Sign | SVGCuts

I just realized that two years ago today was my first blog post EVER! Hard to believe how far I've come... for someone technically challenged it makes me excited about all that I have learned and done these last few years! Yay me!!! Anyway, enough about me let's get to the post ;)

I'm really excited to share my latest SVGCuts DT creation with you! Inspired by the recent marquee craze, I thought I would try my hand at creating a Valentine's "I Love U" sign! This project makes a great Valentine's decor piece or a unique gift idea!

For complete instructions on how I created this project make sure you click HERE.

3D,SVG file,SVGCuts,Silhouette Cameo,ilovedoingallthingscrafty,Marquee Sign,Valentines Decor,Word Sign,papercrafts,Illuminated I Love U Sign,3D Paper Art,Paper crafts, Cricut,handmade art,

I love it when something I had envisioned actually turned out as I planned. It was actually quite easy and quick to put together too :)

Illuminated 3D Paper I Love U Sign | SVGCuts Files

Here is what it looks like when the room lights are turned off, and the LED lights are turned on.
 Love how it looks in the dark. Ooooo, Aaahhhh!

Illuminated 3D Paper I Love U Sign | SVGCuts Files

To create this look, I used a battery-operated string of LED lights, added a hole to the back panel, and strung them through! Clever right?! The coolest part is that this battery pack has a built-in timer that turns on every 24 hours and stays lit for 6 hours! I don't even have to touch it!!! A pleasant bonus as I found them at the dollar store...  Amazeballs, right?!

If you want to, the battery pack could easily be attached to the back and then the sign could be hung on the wall!

Illuminated 3D Paper I Love U Sign | SVGCuts Files

 For those interested here are the SVGCuts Kits you will need:


I hope you've enjoyed this project, maybe even inspired you to create your own LOVE or any other WORD sign for that matter!

Thanks for stopping by,
Happy Crafting  :)

Tuesday, October 22, 2013

Faux Woodblock Halloween Signs | SVGCuts

Are you all ready for Halloween yet? I thought I was, but then I had another idea for a Halloween Decoration. Then, I also remembered I still wanted to make some treat containers for the kids. These ideas in my head are never-ending, lol!

For today's project, the woodblock signs that you see all over Pinterest were my inspiration. I didn't have wood handy but I had lots of paper! 

Here it is...  "Happy HallowEEK!" 
I thought this was the perfect Halloween Phrase (a combo of files from a few SVGCuts Kits).
Like someone had scared you all of a sudden...  maybe a great big spider!

word art,SVGCuts,Silhouette Cameo,ilovedoingallthingscrafty,Halloween paper project,paper crafts,SVG Files,Faux wood block signs,Paper Block Signs,handmade art,Cricut,

I have been wanting to do this since SVGCuts released Catacomb Manor SVG Kit. I knew I could turn the tall gift bag into a block. 

When I was planning the design, I also knew I wanted to make it light up with some battery-operated tea lights. The  "happy hallow" design comes from Maple Manor SVG Kit here, "EEK" and web from Catacomb Manor SVG Kit here, and the itsy bitsy spider hanging from some trendy twine comes from Spooky Cuties SVG Collection here.

word art,SVGCuts,Silhouette Cameo,ilovedoingallthingscrafty,Halloween paper project,paper crafts,SVG Files,Faux wood block signs,Paper Block Signs,handmade art,Cricut,

To turn the bag into a block, I removed the holes that would have been for the handle. Then I created the top tabs on the box by using the point editing tool. (Making it look just like the bottom of the bag) I also created 2 circle cutouts for where I would be inserting the tea lights. 

You can make your blocks as long or as short as you like, by using the stretch function in the Silhouette Design Studio.

Faux Woodblock Halloween Signs | SVGCuts Files

To create the outline for my glowing letters I made an offset. (Pictured above at the bottom of the screen capture) 

I also wanted some light to shine through the back of the EEK block letters. To do this I just cut the letters out underneath. Pop dots were used to elevate the block letters on the vellum, allowing light to filter through. NOTE: If I did this project again I would have created an offset of the EEK. I would have liked a little more light to glow around the block letters, next time :(


Once I had the word cut out from the panels, I glued vellum to the inside.

word art,SVGCuts,Silhouette Cameo,ilovedoingallthingscrafty,Halloween paper project,paper crafts,SVG Files,Faux wood block signs,Paper Block Signs,handmade art,Cricut,

Here is what it looks like in the dark!  EEEEEK! 
Is that not COOL?

word art,SVGCuts,Silhouette Cameo,ilovedoingallthingscrafty,Halloween paper project,paper crafts,SVG Files,Faux wood block signs,Paper Block Signs,handmade art,Cricut,

Thanks so much for stopping by, hope you like this idea and maybe even been a little inspired to make your own faux woodblock signs!

 I think I might be making so many more of these for other holidays, oh the possibilities!

Happy Crafting :)