Showing posts with label Gift. Show all posts

Monday, December 23, 2013

Paper Christmas Tree Tower for Treats | SVGCuts

Happy Holidays to all my Crafty Friends! Today I'm excited to share with you the cutest Christmas Tree Treat Stand!

The perfect centerpiece to display all your Christmas goodies. For specific instructions on how to put this together, you'll want to check out my latest SVG Cuts Guest Post... "Christmas Tree of Treats"

Gift,SVGCuts,Silhouette Cameo,Treat Stand,ilovedoingallthingscrafty,Treat display,Christmas Tree of Treats,SVG file,papercrafts,guest post,Table Decor,French Macaroons, Cricut,Paper crafts,paper art, crafts

This project comes together fairly quickly. Simple, elegant, and my favorite USEFUL! Need to store some extra treats? No problem, the base of the tree is the perfect place to hide all those extra treats!

Gift,SVGCuts,Silhouette Cameo,Treat Stand,ilovedoingallthingscrafty,Treat display,Christmas Tree of Treats,SVG file,papercrafts,guest post,Table Decor,French Macaroons, Cricut,Paper crafts,paper art, crafts

Functional and Fun! 

The top of the tree is adorned with a bright star that lights up with a flick of a switch. The tea light just pokes through the center of the star to add a little twinkle!

Gift,SVGCuts,Silhouette Cameo,Treat Stand,ilovedoingallthingscrafty,Treat display,Christmas Tree of Treats,SVG file,papercrafts,guest post,Table Decor,French Macaroons, Cricut,Paper crafts,paper art, crafts

Use some fun papers and colors to coordinate your treat stand with the rest of your table and party decor. 

Gift,SVGCuts,Silhouette Cameo,Treat Stand,ilovedoingallthingscrafty,Treat display,Christmas Tree of Treats,SVG file,papercrafts,guest post,Table Decor,French Macaroons, Cricut,Paper crafts,paper art, crafts

For those interested here are the SVGCuts files you will need:

Tree bottom - December Gifts SVG Kit

Cut on the Silhouette Cameo with SSDE

I hope this has inspired you to create your own treat stand to display and serve your Holiday goodness! Make sure you stop by the SVGCuts Blog for all the how-tos and exact instructions.

Also if you are interested in the macaroons I made click here for a link to a previous post and the recipe I used :)

Thanks for stopping by, stay SAFE everyone!
Happy Crafting  :)

Friday, November 29, 2013

Winter Wonderland - A 3D Lit Winter Wall Decoration | SVGCuts

Did you have your first snowfall yet? Here in Edmonton, we've had it for about a month now! Last week it came down pretty hard. Even though we all complain about the cold weather, Winter is actually quite beautiful! It was also the inspiration for my latest project... A 3D Lit Winter Wall Decoration. 

Isn't it "Cool"?!?

Gift,Wall Art,white,Winter,SVGCuts,ilovedoingallthingscrafty,Snowflakes,Winter Wonderland - A 3D Lit Winter Wall Decoration,paper crafts,SVG Files,Personalized gift, handmade,Cricut,


In order to make it a Wall Decoration, I added a hole to the backside from which to hang it from. Also on the bottom of the back panel, I created a cut out that folds open to allow you to insert some battery operated tea lights. This frame looks just as good as a tabletop decoration if you chose not to hang it. 
This is what it looks like with a soft glow during the day. 

Gift,Wall Art,white,Winter,SVGCuts,ilovedoingallthingscrafty,Snowflakes,Winter Wonderland - A 3D Lit Winter Wall Decoration,paper crafts,SVG Files,Personalized gift, handmade,Cricut,

Here is the list of files you will need to recreate this project:

Letter O (altered, and used to make the frame) - SVGCuts - 3D Letters SVG Kit
Snowflakes - SVGCuts
Winter Wonderland - SVG Cuts - Free Designs

To create the Frame - I enlarged the letter O from the 3D Letters and altered the front and back pieces of it. (see the second image)

For the Front - I selected random snowflakes and if they didn't have an offset to them I created one. I then centered the "Winter Wonderland" within the center of the "O". Next, I placed snowflakes all around the empty spaces. Once I was happy with their placement, I welded only the offset of my snowflakes with the outside "O" frame. I then cut out all the pieces and decorated each of them with glitter and rhinestones. Each snowflake was glued onto its offset. For embellishments, I added a ribbon and sequin trim to finish it up. 

This frame measures 11.25" W x 10.5" H
All cut on the Silhouette Cameo

 TIP: Go easy on the glue when adding glitter to your snowflakes. Paper tends to curl when wet. To avoid the curl, you can also use the Xyron sticker maker to add a layer of tackiness, then glitter!

And now in complete darkness! COOL right?
I love to make things light up :)

Winter Wonderland - A 3D Lit Winter Wall Decoration | SVGCuts Files

I hope you enjoyed my Winter Wonderland Wall Decoration!

If you like this idea but want to make it more personal,  it's easy to change the Word Art in the center. It could say, "Merry Christmas" or "Happy Holidays" in English or a different language. Make it personal, with your Family's Last name or as a gift for someone else... the possibilities are endless!

Thanks for stopping by!
Happy Crafting  :)

Friday, October 25, 2013

Halloween Owl Witch Treat Box | SVGCuts

Hi Everyone!

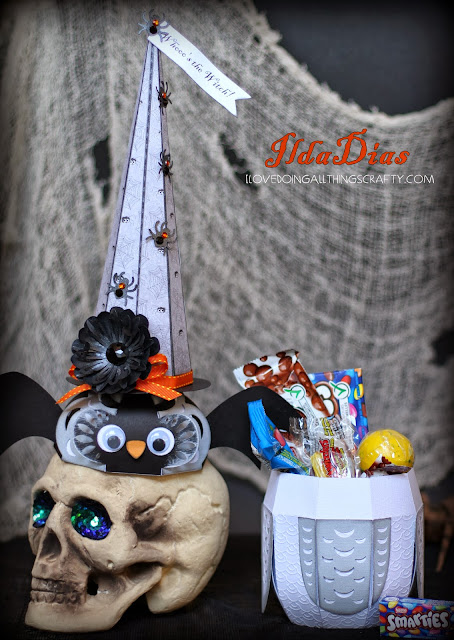
Today I want to share with you another Halloween project of mine. It's a Treat Box I made for my Daughter Maia. For now, until Halloween comes it looks like a nice decoration piece! Selfish, I know... Shhhh don't tell her!

Gift,treat box,SVGCuts,Silhouette Cameo,Fleurette Bloom Digital Paper files,ilovedoingallthingscrafty,Witch Hat,Halloween,paper crafts,SVG Files,3D Paper Owl,3D Paper Art,Cricut,handmade,

Who says only humans get dressed up for Halloween? Whoooo you!!! 
Whooo called her a Witch?!?! Boy she looks mad now, even her Bat Wings are up, LOL!

Gift,treat box,SVGCuts,Silhouette Cameo,Fleurette Bloom Digital Paper files,ilovedoingallthingscrafty,Witch Hat,Halloween,paper crafts,SVG Files,3D Paper Owl,3D Paper Art,Cricut,handmade,

Here in Edmonton, they are calling for snow this weekend... Nooooooo! I hope those weather people are wrong, at least until Halloween has passed! It's no fun Trick or Treating with snow boots on :( 
Since snow is coming I thought it would be cute to make my Owl a Snowy-looking one!

I used a few SVGCuts Kits for this project:
Witch's hat - Catacomb Manor SVG Kit

Cut using the Silhouette Cameo

Gift,treat box,SVGCuts,Silhouette Cameo,Fleurette Bloom Digital Paper files,ilovedoingallthingscrafty,Witch Hat,Halloween,paper crafts,SVG Files,3D Paper Owl,3D Paper Art,Cricut,handmade,

The pretty patterned paper I used on the hat comes from Fleurette Bloom's Howlin Halloween Digital Paper Collection. The tag was also made on my Silhouette Cameo with the Print and Cut feature.

Gift,treat box,SVGCuts,Silhouette Cameo,Fleurette Bloom Digital Paper files,ilovedoingallthingscrafty,Witch Hat,Halloween,paper crafts,SVG Files,3D Paper Owl,3D Paper Art,Cricut,handmade,

Look!!! She REALLY is a Witch! Her head just flew off, Muhahaha! 
As you can see lots of room to fill up with candy maybe even a little gift :)

Don't forget to stop by SVGCuts for their Halloween sale!

I had a Hoot making this one... I can't help myself with the Owl puns! Thanks so much for stopping by today, hope you've enjoyed this unusual Halloween Treat Box!

Happy Crafting :)

Monday, September 23, 2013

Autumn "love" Flower Shadow Box Tutorial | SVGCuts

Happy Fall Everyone!!!

Fall has always been my favorite time of year, I just love the warm colors of nature and the gorgeous flowers of the season! Today, I want to share with you a little wedding gift I made for a very special couple that celebrated their wedding this past weekend. Hope they'll like this little gift :)

Gift,Wedding,autumn paper flowers,SVGCuts,etched glass,Silhouette Cameo,Autumn love Flower Shadow box,ilovedoingallthingscrafty,tutorial,SVGCuts Files,Paper crafts,Cricut,3D Paper Art,

Here is how you can make your own... 

(You will need an electronic cutting machine, I used the Silhouette Cameo with the Silhouette Studio Designer Edition)
  • To create this shadow box, first, create a square the size of the opening of the frame. 
  • Next, select a heart SVG file, I used one from For My Valentine SVG Kit as my template. Enlarge the heart until you are happy with the size. 
  • Then select all the flowers you would like to use. With each flower, ungroup them and place each layer on top of each other so that you can see how they would look like in the end. 
  • Resize each flower then place them on top of the heart. This will give you an idea of how it will look and show you how many you may need to cut out.  
  • Next step, select your papers and cut all the flowers out. I inked some of my flower petals to add some extra colors and add dimension.
  • Once you have all your flowers assembled, arrange them on the heart template as you like. I used hot glue to secure them down to my heart template. 
  • Select the color of your background and cut it to fit your frame. Center the heart and adhere it to your background. 
  • Place the flowered heart inside your shadow box frame. If you want to you can skip the next step and you are done!
Autumn "love" Flower Shadow Box Tutorial | SVGCuts Files
  • The next thing I did was etch the glass with the word "love" written in the center of the heart. See here some of my previous tutorials.

A little bit of work but the results are amazing! Here is a close-up of the flowers... don't the flowers look so realistic!?!

Autumn "love" Flower Shadow Box Tutorial | SVGCuts Files

Want to know where these gorgeous flower files came from... SVGCuts of course! 

Here are all the kits I used for this project:


I'm so happy that what I had envisioned turned out even prettier than what I imagined! I love how it turned out so much, I think I want to make one for myself now! Hubby and I got married in the Fall as well, so this would be perfect for us... it will be 15 years in a few weeks, woohoo!

Congratulations to all getting married this Fall or celebrating an Anniversary this season... this one is for you :) I hope you enjoyed it!

Thanks so much for stopping by!
Happy Crafting :)

Wednesday, June 26, 2013

Thank you for the Music | Piano Gift Box | SVGCuts

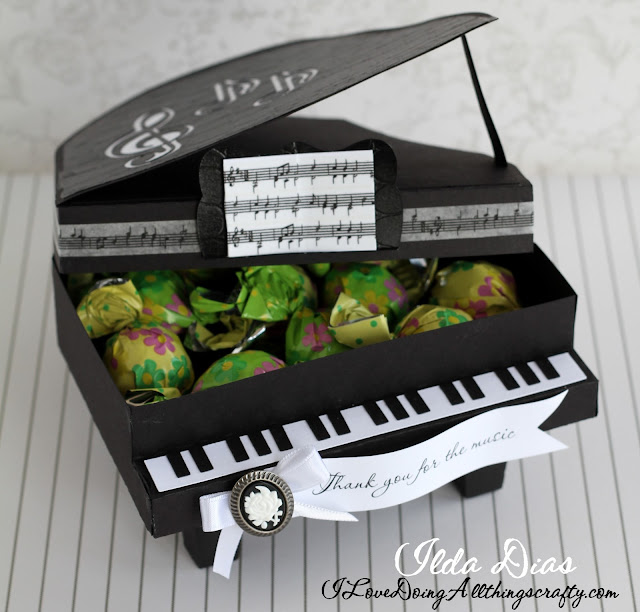
My daughter starts her summer break from piano lessons this week. So when SVGCuts came out with this piano from Thank You For the Music SVG Kit, I knew I had to make it for my daughter's piano teacher. 

Isn't it awesome?! I absolutely love how it turned out, classic and elegant!

Gift,piano teacher,3D piano treat box,ilovedoingallthingscrafty,black and white,SVG Cut Files,SVGCuts,Thank you for the Music SVG kit,Paper crafts,Cricut,

Thank you for the music... for giving it to me. Doesn't that remind you of the ABBA song??? I can't get it out of my head now (doesn't that drive you nuts when that happens?!?)

I didn't have a stamp to coordinate so I used the print n cut feature of the Silhouette to print and cut the tag. The font I used is called scriptina. On the lid of the box and book, I wrapped some musical note washi tape by Recollections. 


The best part of this piano is that it's functional... it has enough storage for treats or maybe even a little gift! LOVE it! So simple and elegant and surprisingly easy to put together :) 

Thank you for the Music | Piano Gift Box | SVGCuts by ilovedoingallthingscrafty.com

Thanks so much for stopping by, hope you like this little piano treat box. If you have a piano player in your life, surprise them with one of these beauties... I'm sure they'll love it!

Happy Crafting :)

Thursday, June 20, 2013

Pinkalicious 3D Paper Cupcake Treat Box | SVGCuts

Happy Birthday to me! Yes, today is my birthday... a few steps closer to 40! Bring it on 37... it's gonna be a great year! :) 

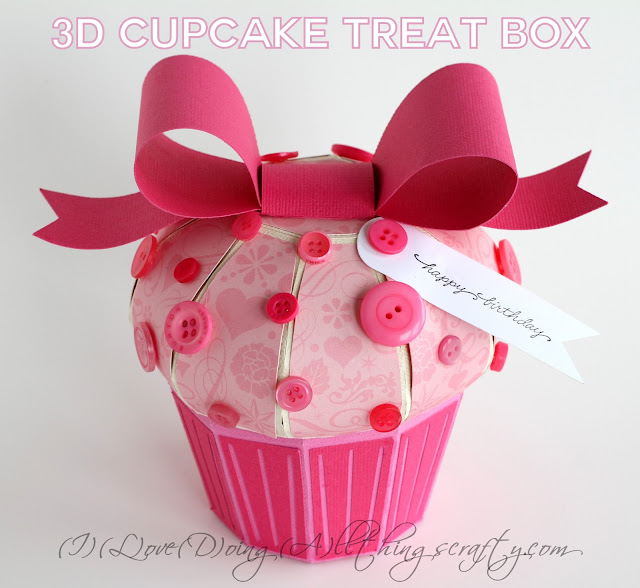
No, I didn't make this cupcake for me although I love how it turned out. I made it for a very dear friend of the family, who celebrated her Birthday this past weekend. Isn't it adorable?!

Gift,Pinkalicious,3D Cupcake,pink,buttons,Silhouette Cameo,ilovedoingallthingscrafty,Birthday treat box,SVG Cut Files,3D bow,SVGCuts,Cricut, Paper crafts

Files: (bow) from SVGCuts Gift Boxes SVG Kit
Paper: Bazzill cardstock 
Patterned Paper: Anna Griffin's Valentina Collection
Stamp: from Stampendous
Cut: with the Silhouette Cameo
I enlarged these files to fit on a 12x12 paper. I also cut little perforations to the cupcake wrap. 


This box was big enough to stuff full of chocolate treats! Want to see a few other cupcakes I've created? Click here and here :)

I hope you like this fun.... and as my daughter called it "pinkalicious" treat box as much as I enjoyed making and giving it away! 

Thanks for stopping by!
Happy Crafting :)

Saturday, March 9, 2013

St. Patty's Nail Polish Treat Bag

No likes getting pinched on St. Patrick's Day! So here is a treat I made for my daughter for that same reason. Hopefully, it will prevent a few tears! Now if for some reason she forgets to wear green at least her nails will keep those little claws away... especially her brothers!


This is a very quick and easy treat bag to make. The file comes from My Scrap Chick. I believe it may have been a freebie from last year. The tag was created with my Silhouette DSE, by welding some hearts together and a rectangle, then creating an offset. For the inside of the tag, I used the print and cut feature of the software and the font I chose was called Ma Sexy. I also added some green glitter glue to give it that extra sparkle and Voila! The perfect pinch-proof package any girl would love to receive!   

Thanks for stopping by!
Don't get pinched on St. Patty's Day :)

Tuesday, October 30, 2012

Witch Boots | Halloween Treat Boxes

Silhouette Cameo,SVGCuts File,ilovedoingallthingscrafty,witches boot file,Halloween, Cricut, treat box, gift

Happy Halloween Everyone!!!

This year for treats I thought I would make this witches boot. I had bought this file on the Silhouette Online Store and had cut all the pieces for it, but life, as usual, got busy and only tonight did I get to finish them up. Nothing like waiting until the last minute, lol! I slightly enlarged the file, but now I kind of wished I had enlarged it some more, as they are kind of tricky to put together when they are this small! Update this file is no longer available. Here is another "NANNY" boot file that could be used as a Halloween boot. 

Aren't they soooo cool?!  They actually can fit quite a bit of goodies. I also like that they can fit a full-size chocolate bar... and even extra candy in the front part of the boot :)

Here is a closer look! BOO! Did I scare you? Maybe those eyeball chocolates did, kinda creepy, aren't they?!

Silhouette Cameo,SVGCuts File,ilovedoingallthingscrafty,witches boot file,Halloween, Cricut, treat box, gift

Just put it in a treat baggy, wrap it up and it's all ready for a very special little goblin!

Silhouette Cameo,SVGCuts File,ilovedoingallthingscrafty,witches boot file,Halloween, Cricut, treat box, gift

I hope you like my "Boots!" Have a fun Halloween!
Happy Haunting & be safe!

Tuesday, October 2, 2012

3D Paper Letters for Kate | SVGCuts

Hey everyone! Hope you are all enjoying your week :)  

Here in Edmonton, it feels like Fall has finally arrived! The cold is in the air.... hopefully we can keep the snow away a little longer!

Ironically I'm going to share with you a project that reminds me a bit of Spring! I was asked to make a baby's name in 3D for a Baby Shower! Isn't it cute! I love how it all came together! Congratulations Marija on your newest family member :)

3D Paper Letters for Kate | SVGCuts

The files for the 3D letters come from here. The paper I used comes from DCWV Cherry Limeade Stack, all cut with the Cameo. Hope you like it!

Happy Crafting! :)

Monday, July 9, 2012

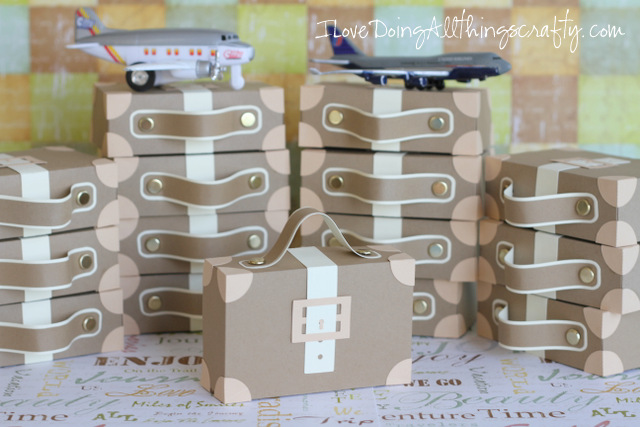
"All my bags are packed, I'm ready to go..." | 3D Paper Suitcase Treat Box Silhouette Studio File | Free Download

Every time I pack a suitcase, I think of this song... not that I'm packing, well not yet anyway. We will be leaving soon enough to visit our family in Portugal! So excited can't wait, my son is already there with my In-laws and I miss him terribly, and even though his sister hates to admit it she misses him too!

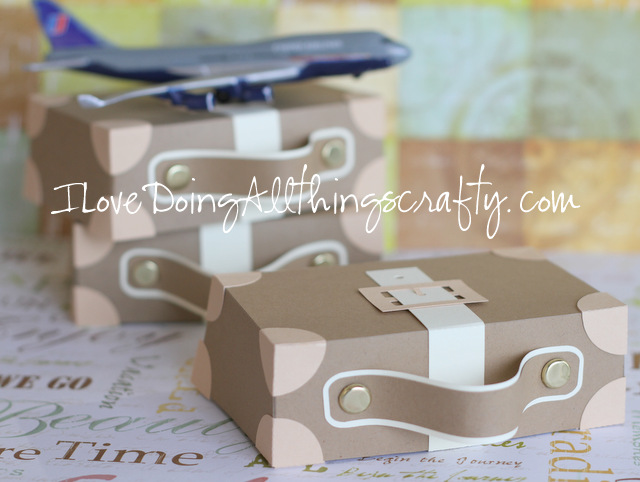
Ok, ok, now back to the fun stuff!!! My cousin Marisa, asked me if I could make her a suitcase out of paper for her son Marko's 1st Birthday Party. Her theme for his party is travel by plane, train, or car... so a suitcase is what she chose to fill as a goody bag/treat for every child! That meant I would have to make 15 of them! Wow, anything for you Marisa, good thing I love soooo much!!!

It probably would have been a lot easier if I had bought a suitcase file, but if know me I always like to do things the hard way! I made this file with the Silhouette Designer Studio Edition Software. I'm so used to using SCAL, so this was a bit more challenging for me... but I think it turned out pretty well!


"All my bags are packed, I'm ready to go..." | 3D Paper Suitcase Treat Box Silhouette Studio File | Free Download

 Cute right?!
"All my bags are packed, I'm ready to go..." | 3D Paper Suitcase Treat Box Silhouette Studio File | Free Download

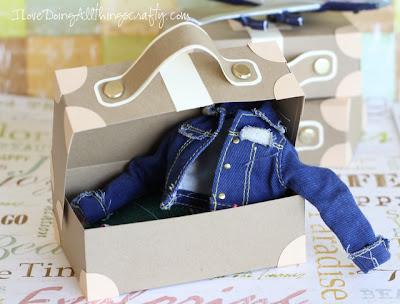
The suitcases measure
4.5x3x1.5 inches. Big enough to hold some treats for the kiddos! Or as you can see here big enough for Barbie's clothes, lol!


Hope she likes them! I love how they turned out! Too bad I'm sure they won't last more than a few minutes in kiddy hands... :(

"All my bags are packed, I'm ready to go..." | 3D Paper Suitcase Treat Box Silhouette Studio File | Free Download

So I'll finish with the end of the song, cause it still continues to play in my head! Bah!!!, don't you just hate when you can't rid of a song in your head, lol!

 "And I'm leaving on a jet plane,
I don't know when I'll be back again,
Oh, babe, I hate to go!"
I'm happy to share with you this suitcase file but,
Before you download...
My free files RULES!!!

  1. If you choose to download all I ask is you become a follower.
  2. Note my files are for personal use only! (Personal use means... only for you to use (no trading, or sharing of my files... let me do that!) 
  3. If you want to share, send your friends over to my blog for the download. 
  4. I'm OK with people sharing my files on their own sites as long as there is a direct link back to this blog...Give credit where credit is due! (a message to me would also be appreciated)
Suitcase box - .studio (Silhouette) file

Tuesday, June 12, 2012

3D Paper Cheeseburger Treat Box | Father's Day Gift for Dad | SVGCuts

While I was working on my last entry for the Father's Day SVG Cut's Facebook Challenge, I had another idea that I thought would make a cute gift for my husband from the kids. He loves cheeseburgers so I thought I could make him a gift box using SVGCuts files

 Here's how it turned out... doesn't it look yummy!

Gift,treat box,Silhouette Cameo,3D Paper Cheeseburger,SVGCuts File,ilovedoingallthingscrafty,SVG cuts Father's Day Facebook, burger, Challenge,SVGcuts,Cricut,

Here is the cheeseburger recipe.... all cooked up with my Cameo, lol!

 I used the cupcake top and the top tier from the cake box to make my hamburger patty and the bottom of the bun. 

I made my cheese layers, using the top of the graduation cap.

From the MY DAY WITH DAD SVG KIT I made the banner.

The bacon strips are a freebie file on the SVGCuts blog, and the sesame seeds were made in the Silhouette Studio DE program. WOW! That's a lot of ingredients!!! Oh yes, to make it taste and look even better I used a green ribbon to make some lettuce and hot glued it to the top of the bun. I also inked some edges and embossed a few things, et voila... Dad's cheeseburger!

Gift,treat box,Silhouette Cameo,3D Paper Cheeseburger,SVGCuts File,ilovedoingallthingscrafty,SVG cuts Father's Day Facebook, burger, Challenge,SVGcuts,Cricut,

I love that it's functional too! It has enough room for some treats and maybe even some love notes from the kids!

Gift,treat box,Silhouette Cameo,3D Paper Cheeseburger,SVGCuts File,ilovedoingallthingscrafty,SVG cuts Father's Day Facebook, burger, Challenge,SVGcuts,Cricut,

You could also make this cheeseburger with two gift compartments by turning the bottom bun into a box as well!

Gift,treat box,Silhouette Cameo,3D Paper Cheeseburger,SVGCuts File,ilovedoingallthingscrafty,SVG cuts Father's Day Facebook, burger, Challenge,SVGcuts,Cricut,

I always love to show you the scale... pretty realistic, almost good enough to eat!

Gift,treat box,Silhouette Cameo,3D Paper Cheeseburger,SVGCuts File,ilovedoingallthingscrafty,SVG cuts Father's Day Facebook, burger, Challenge,SVGcuts,Cricut,

Hope you like this project, I know my husband will love this! 

Happy crafting!
Sharing with:

Monday, April 16, 2012

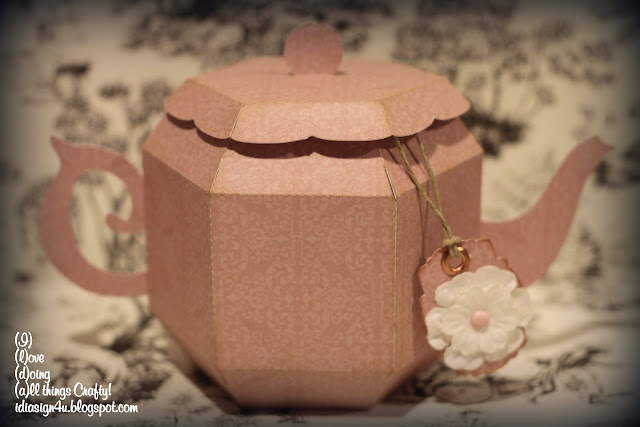
3D Paper Tea Pot | Silhouette File


Happy Monday!

It seems like its been a while since I last posted! Even though I haven't posted any projects, I have still been busy crafting! Just not enough time to post them :(

But, I wanted to make sure I made time to share a quick project that I worked on last night for a very good friend of mine. It's my friend Elaine's birthday today! Not only is she a wonderful nurse, she is also one of the kindest, sweetest and funniest persons I know! She always makes me laugh :) If she knows I'm working, she makes a point of finding me and leaves me a note or a treat! So I thought I would leave her a treat on her desk today. Since I know she always takes the day of her birthday off,  I thought I would leave her this little surprise! (I'm hoping she won't check my blog tonight!) 

3D Paper Tea Pot | Silhouette File by ilovedoingallthingscrafty.com

A few years ago Elaine invited me to go back home with her to Hong Kong, well circumstances changed for her and she was no longer able to go... but since my husband and I had already planned on going we took advantage of the trip and toured China as well as Hong Kong. It was an amazing trip and one I won't ever forget! During the China portion of our trip, I ended up buying a lot of tea, at a tea house we visited. When Elaine found out how much I paid for this tea she laughed so hard, apparently, I could buy the same stuff here in China town for a fraction of the price I paid! Oh well, it was still great tea! So I thought since she loves tea, a teapot would be fitting :)

3D Paper Tea Pot | Silhouette File by ilovedoingallthingscrafty.com

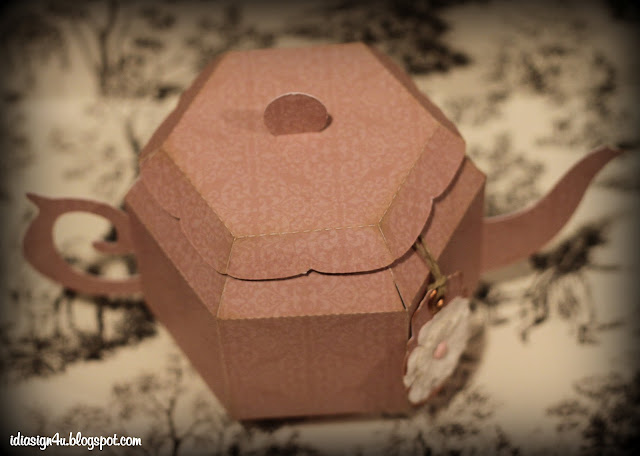
This 3D teapot file comes from the Silhouette online store. I also made this cute little tag with a frame file that comes with the Silhouette Designer Studio Edition. 

3D Paper Tea Pot | Silhouette File by ilovedoingallthingscrafty.com


3D Paper Tea Pot | Silhouette File by ilovedoingallthingscrafty.com

Here's me holding it up to show it's scale. 

I placed a few tea bags inside and a note! I hope she enjoys her next coffee break, with some of my tea... Happy Birthday, Elaine ;) 

Have a great week!
Ilda:)

Tuesday, April 3, 2012

3D Paper Letters - SADIE | & DIY Glass Buttons | SVGCuts

Wow... It feels like a while since my last post! I have been crazy busy... between work, life, and planning my son's birthday party for this weekend, I am ready to pull my hair out :(  I'll have posts on my son's "Star Wars" themed birthday crafts hopefully within the next few days! Stay tuned if you are a Star Wars fan :)

But first... I want to share with you the 3D paper name I made last week for my cousin's friend.

3D Paper Letters - SADIE | & DIY Glass Buttons by ilovedoingallthingscrafty.com

These paper 3D letters stand about 6.5" tall. They were filled with some dried beans to keep them from toppling over. The 3D letters are from SVG Cuts 3D letter kit. The butterfly is from the SCAL library. Added some buttons, bows, and a silk flower to dot the "I". Boy did I have a tough time making the "S"... I have made a few of these names in the past but never had to make an "S", maybe next time it will be easier!  The "A" and the "I" were embossed with the Cuttlebug (hard to see in this picture). The paper I purchased at Micheal's is in the open card stock paper section, sorry don't have the exact company names for them :(

Here are a few more close-ups.

3D Paper Letters - SADIE | & DIY Glass Buttons by ilovedoingallthingscrafty.com


3D Paper Letters - SADIE | & DIY Glass Buttons by ilovedoingallthingscrafty.com

I don't have an Epiphany Craft button make, but I really do like the look... I did though have glass beads and hot glue, so I made due! I think it turned out pretty cute and so simple. I found this idea on Pinterest here, so I knew I had to try it! 

So here is what I did...

3D Paper Letters - SADIE | & DIY Glass Buttons by ilovedoingallthingscrafty.com

 You need scissors, hot glue, paper, a pen, and a flattened glass bead.

3D Paper Letters - SADIE | & DIY Glass Buttons by ilovedoingallthingscrafty.com

Write your message on a scrap piece of paper, and place a fair amount of glue on the back of the glass bead.

3D Paper Letters - SADIE | & DIY Glass Buttons by ilovedoingallthingscrafty.com

Press the glass bead centered on the message.

3D Paper Letters - SADIE | & DIY Glass Buttons by ilovedoingallthingscrafty.com

Cut around the bead.

3D Paper Letters - SADIE | & DIY Glass Buttons by ilovedoingallthingscrafty.com

And there you have a new glass button to embellish your project! Hope you liked this, I love how easy it was and I'm sure I'll be making more of these!

Happy crafting!
Ilda :)