Tuesday, June 28, 2016

Personalized Bookmark Shakers for the Teachers


Yiiiippppeeee!

Today is the last day of school for my kids! I'm am so excited to have them home for the summer and the best part is that I don't have to worry about packing lunches for a while! Oh, the small things that excite me ;)

So for today I want to share with you the fun Bookmarks I made for the kids teachers.


I saw this idea a while ago on You Tube and thought these would be perfect for the teachers. Here is the link to the video for those interested. I did make them a little different then the video instructed.

Here is how I made mine.
First of all I personalized the inside clear bag with each teacher's name using black vinyl. Here is a link to the font I used. The vinyl was cut using my Silhouette Cameo. Next because I do not have a laminator, I used some self laminating sheets that I found at the Dollar Store and just cut them down to size. They worked well, but because I cut close to the edge of the inside bag I wasn't sure how they would hold up. For extra reinforcement, I used my fuse tool to secure the edges. I guess if you didn't have a fuse tool you could also stitch the edges with a sewing machine. Before finishing off the tops of the bookmarks I filled them with various sequin colors, chunky glitter and microbreads. To seal the tops I used clear scotch tape, then wrapped coordination washi tape along the top edge. I finished them by adding an eyelit in the center to add some decorative ribbon, this also secures the layers together.

These bookmarks are fairly large they measure approximately 9 inches long by 2 inches wide. But you can make them to suit whatever size you like.


Hope you like my Personalized Bookmark Shakers for the Teachers. They are so much fun and interactive, all you want to do is shake them! I think these would make great gifts for any reader in your life.

Thanks for stopping by!
Happy Crafting  :)


Linking up with: 

Wednesday, June 22, 2016

Sunshine and Rainbow Thank You Cards


Hello my Crafty Friends!

Today I want to share with you some really simple and fun Thank You cards I made. I only needed one of these cards, but sometimes I find it is easier to make multiples especially when all the same supplies are out.

I LOVE how they turned out and will definitely make some more! 


Here is a list of my supplies:

  • Stamps - Rainbow of Happiness and Coordinating Dies - My Favorite Things
  • Ink - Paintbox Pigment Inks - Colorbox
    • Peacock Feathers - Distress Ink - Tim Holtz 
    • Black Onyx - Versafine 
  • Embossing Powder - Clear Gloss - WOW!
  • Stamp Positioner - my own DIY Stamping tool
  • Dies - Stitched Rainbow - My Favorite Things
    • Puffy Clouds My Favorite Things
    • Sunny SkiesMy Favorite Things
    • Stitched Heart - Gina Marie Designs
    • hearts - Holiday Shapes - Simon Says Stamp Die
    • Stitched Rectangle - Simon Says Stamp Die
  • Sequins - Pretty Pink Posh
  • Die Cutting Machine - Big Shot - Sizzix
  • Cardstock - Neenah Solar White 80lbs


Love this sentiment. 
This stamp set is so versatile, could be used for so many reasons. 


And here is a peak at the inside of the first card.


...and here is the second card.


I just love how you can customize this stamp set to suit your needs.


Hope you enjoyed my Sunshine and Rainbow Thank You Cards today and got inspired!
I would love to hear what you think of them.

Thanks for stopping by!
Happy Crafting  :)


Linking up with: 

Gerbera Daisy Card


It's Fleurette Bloom's New Product Release Week!

Today I am featuring the Gerbera Daisy Stamp Set.
Love her flower stamps, they are so versatile and great for many occasions!


I coloured the stamped images in with my Spectrum Noir Markers and added some clear Wink of Stella to the Petals for that extra sparkle. To finished it off, I added some Pink Flower Power sequins. For fun, I also splattered some black watercolour paint on the background. 

Check out that Shine!


Hope you liked my Gerbera Daisy Card, don't forget to stop by Fleurette Bloom's Shop to check out  the rest of the Product Release! Plus, don't forget to follow Fleurette Bloom on Facebook for lots of GIVEAWAYS this week!

Thanks for stopping by!
Happy Crafting  :)

Friday, June 17, 2016

Quick and Simple Last Minute Father's Day Shirt Card


Hi All!

Thought I would share a really quick and simple Father's Day card with you today, perfect for those of you that need something last minute. Both my Father and Father in Law have to have pockets on their shirts so I though these were very fitting! 

I think these would also make great Birthday cards simply by changing the stamped sentiments.


Here are the supplies I used:

  • Stamps -(CL261) - Hero Arts (Happy Celebrations) - Craftin Desert Divas 
  • Ink Tuxedo Black - Memento
  • Stamp Positioner - my own DIY Stamping tool
  • Dies - Stitched Square - Simon Says Stamp Die
    • Stitched Rectangle - Simon Says Stamp Die
  • Die Cutting Machine - Big Shot - Sizzix
  • Cardstock - (card base & Solid cardstock) Recollections, Scrap Pattern Paper
  • Glue - Scotch Quick Dry Adhesive, Foam Tape, Tape runner
  •  Embellishments - Coordinating buttons

For those that love to watch video's, watch how easy it is to make it!
If you haven't yet, I'd love for you to subscribe too :)


Hope this as helped any of you looking for a quick and simple "guy" card to make. 
Once again, Happy Father's Day to all Daddies out there :)

Thanks for stopping by!
Happy Crafting  :)


Linking up with: 

Thursday, June 16, 2016

Dr. Who's TARDIS Telephone Box | 3D Paper Treat Box | SVGCuts

Any Dr.Who fans out there?!? 
Well if you are, I think you love this project!

Hopefully, my husband isn't paying much attention to my blog posts these days. 
Or he may just see the surprise I made him for Father's Day. 
Recognize it?

For those of you who don't, it is the TARDIS time machine and spacecraft from Dr. Who! 
Don't ask me anything else about the show though, I have no clue... in fact when I was growing up my brother would watch it and I would run away because it creeped me out. Well as it turns out my husband was also a big fan of the show, haha! 

Cool right?! 
Even for non-fans, I love how it turned out!

Gift,3D,SVG files, SVGCuts,ilovedoingallthingscrafty,Father's Day,Gift Box,Tardis,Dr. Who's TARDIS Telephone Box,Paper crafts,Treat box, Cricut,3D Paper Art,


This file is actually the London Telephone Box from a recent SVGCuts kit, Travel the World.
But with a few simple alterations, I was able to change it to the TARDIS Telephone Box.

Here is a screenshot of my alterations and panels with measurements for those interested. I did shrink the file slightly to use 8.5 x 11-inch paper as well.


I stamped the back panel with a stamp from Happy Celebrations - Craftin Desert Divas and added some fun enamel dots.

Gift,3D,SVG files, SVGCuts,ilovedoingallthingscrafty,Father's Day,Gift Box,Tardis,Dr. Who's TARDIS Telephone Box,Paper crafts,Treat box, Cricut,3D Paper Art,

Here is a closer look.
For the telephone signs, I did a print and cut on the Silhouette Cameo.

Gift,3D,SVG files, SVGCuts,ilovedoingallthingscrafty,Father's Day,Gift Box,Tardis,Dr. Who's TARDIS Telephone Box,Paper crafts,Treat box, Cricut,3D Paper Art,

The box is large enough that I will be putting a small gift inside for a bonus surprise.

Take a look at it all lit up.
I just added a string of battery-operated LED lights to the bottom. You can also secure them to the top as Mary did with the Telephone Box.

Gift,3D,SVG files, SVGCuts,ilovedoingallthingscrafty,Father's Day,Gift Box,Tardis,Dr. Who's TARDIS Telephone Box,Paper crafts,Treat box, Cricut,3D Paper Art,

Hope this project has inspired you to create Dr. Who's TARDIS Telephone Box for yourself or for that true fan in your life.

Happy early Father's Day to all Dads out there :)

Thanks for stopping by!
Happy Crafting  :)

Monday, May 30, 2016

Fairy Cottage featuring Lawn Fawn Fairy Friends | 3D paper Fairytale House | SVGCuts

Hello, my friends!

I am super excited to share with you all my latest SVG Cuts project. When Mary first released this kit I knew exactly how I was going to make it. I just needed the time to do it... finally I can show you what I have been up to the last few weeks! I know I have said this before, but I think this has to be one of my very favorite 3D projects! 

So here is my take on the SVG Cuts Fairy Cottage. How cute is that?!?
 I am SO in love with it... and the Lawn Fawn Fairy Friend Stamps are the perfect match for this piece!

magic,SVG files,SVGCuts,FREE file,cancer patients, ilovedoingallthingscrafty,papercraft,Fairy Cottage,3D Paper Art,fairy tale,3D House,Lawn Fawn Fairy Friends Stamp set,hospital,decoration, handmade,Paper crafts,

Like some of my recent larger projects, this Fairy Cottage will be displayed on one of the Hospital Units I work on. I think the sentiments and the whole fairy theme is perfect for the patients at our hospital. Even if it is just to make someone smile, I have done my job and all the work was worth it!


So let me give you a tour of this little cottage...

As you can see I used a lot of different embossing folders, this adds a lot of interest and added detail to the cottage without a lot of work. I also thought it would be fun to continue the twig railing down the steps. I think that has to be one of my favorite touches! I loved how Mary added the spinners on her cottage and I happened to have the same ones in my stash, so I thought if I added a clock face it would look cool too!


The back of the fairy cottage has a large opening for plugging in a string of lights or as I did by adding a LED battery-powered pack. I chose to use a multicolored string that I had purchased around Christmas time. The different color of lights just makes the cottage look magical!

Along the bottom of the cottage, I added floral stamps that I colored and cut out from the same Lawn Fawn Fairy Friends Stamp set. To do that, I used Tuxedo Black Memento ink and my Spectrum Noir markers then used my Silhouette PixScan to do the trace and cut them out.   


Also, to the perimeter of the cottage I used this grass file that comes from the FREE Design section, just welded the files together to create longer strips. 

I stuck to plain colored card stock, simply because I have lots of supplies and find it difficult sometimes to coordinate patterned papers with projects this size.  I like to let patterned paper inspire the project rather than the other way around. 


The only alteration I did to the original file of the house was to add some circle cutouts on the mushroom-like roof.  I think it would have looked good with the solid panels, but I guess this is how my mind thinks a fairy tail mushroom looks like ;)


To create the stain glass appearance I used my Spectrum Noir Markers and colored the velum sections of the window in various colors. I also added Wink of Stella for that extra sparkle to the window and all of the fairies' wings. 


With white pigment ink and a Studio G Alphabet set, I stamped various "fairy" like sentiments on the steps and the rock. I thought of my patients going through their cancer treatments when I was doing this part and words that would motivate them to get through it.


For fun, I thought it would look cool to make the fairies look like they were flying around their house. I used some red wire and attached them with hot glue. 

I thought the fairy holding this stamped phrase was the perfect finishing touch!


Well, thanks for stopping by! Let me know what you think of this project 
:)

I hope you all enjoyed my take of the SVG Cuts Fairy Cottage featuring Lawn Fawn Fairy Friends. Hopefully, it has inspired you to create one for yourself or for someone else!

and like the Fairies said, "have a magical day!"
Happy Crafting  :)

Tuesday, May 24, 2016

Creating Coordinating Digital Dies for Stamps Using the Silhouette PixScan - Video Tutorial


Hi everyone!

Today I want to share with you how to make your own coordinating Digital Dies for stamps you have but do not own the coordination dies for. The process is not that complicated if you are already familiar using the Silhouette PixScan. For those of you that aren't, I have put together a step by step video of how to do it. 

Here is a sympathy card I made using the Digital Dies I created. The stamps come from Fleurette Bloom's Pawsatively Fabulous Stamp Set. Super cute stamps, perfect for the dog lover in your life!


The best thing about these digital die files is that you can cut out a whole bunch on plain white card stock (whatever you use for stamping) and save them for a different time. Just put the cut blank dies in a baggy and when want to create with the coordinating stamps you are ready to go! If you run out of them just cut some more out from your saved file. 

NO more fussy cutting!

I used my Spectrum Noir markers to color this pup and added Wink of Stella for some shine!
To the eyes, nose and the dog bone, I added some glossy accents.
I used Tuxedo Black Memento Ink and Walnut Stain distress ink. 
Stamped the sentiment with Versafine Onyx and embossed the sentiment with WOW clear powder.


The inside stamps come from here.


So for those wanting to know the how to's, I invite you all to watch my video :)


Hope the video was informative and helped you save some money on coordinating dies ;)

Thanks for stopping by!
Happy Crafting  :)


Linking up with:

Tuesday, May 17, 2016

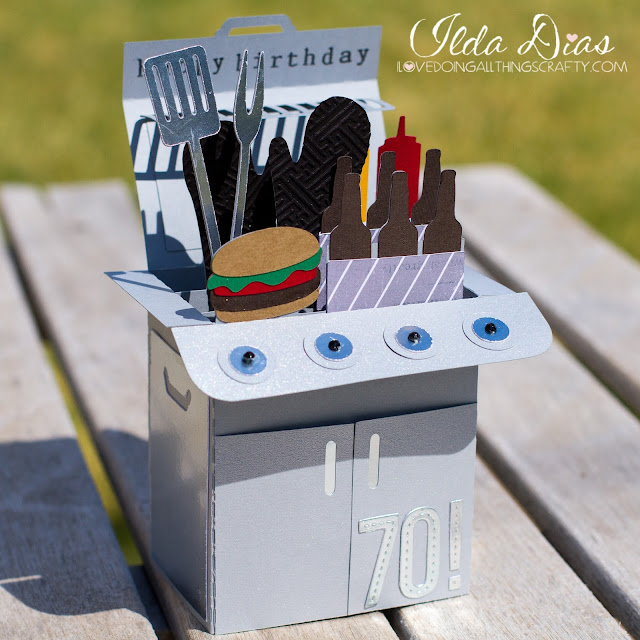
BBQ Shaped Box Card | Father's Day Card | SVGCuts

Hope you all aren't tired of all the Box Cards recently?!

This BBQ Box Card comes from SVGCuts Father's Day Box Card Kit. It's the perfect kit for those who want to get started on making cards for Father's Day.  I made this card for my father-in-law, who celebrated his 70th Birthday a few weekends ago. I used the stitched number dies from MFT to add the 70! to the bottom of the card. The stamps I used come from Snarky Stamps by Paper Issues.

How cool is that, the perfect card for the guy who loves to BBQ, or girl ;)

BBQ Box Card,SVGCuts,Silhouette Cameo,silhouette america,ilovedoingallthingscrafty,guy,Birthday Card,SVG Files,Box card,Father's Day Box Card, Cricut,handmade card,Paper crafts,

Here is a closer look.
Looking at it now, I wish I had added some more detail to the burger, and maybe added glossy accents to the beer bottles. Oh, well... maybe next time. This card was super quick and easy to put together!

BBQ Box Card,SVGCuts,Silhouette Cameo,silhouette america,ilovedoingallthingscrafty,guy,Birthday Card,SVG Files,Box card,Father's Day Box Card, Cricut,handmade card,Paper crafts,

Hope you were inspired to go and make your own BBQ Box Card for the BBQ'er in your life!

Thanks for stopping by!
Happy Crafting  :)


Tuesday, May 10, 2016

Morning Glory Box Card | Mother's Day Card | SVGCuts

Hi all!

As promised yesterday, today I am sharing with you the card I made for my Mother-in-law for Mother's Day. This beautiful SVG file comes from the SVGCuts Country Market SVG Kit. I thought this box card was the perfect Mother's Day card for someone who loves flowers, which my MIL does! 

Difficult to see but I added some clear Wink of Stella to the centers of flowers. So sparkly in person, this picture doesn't do them justice! The stamps I used on the sign come from Hero Arts.

Love how it turned out!

birthday,SVG files,Mother's Day Card, SVGCuts,Silhouette Cameo,silhouette america,ilovedoingallthingscrafty,Morning Glory Box Card,Box card, Cricut, stamping,handmade card,Paper crafts,

Always amazes me how these box cards fold flat to squeeze into an envelope!

birthday,SVG files,Mother's Day Card, SVGCuts,Silhouette Cameo,silhouette america,ilovedoingallthingscrafty,Morning Glory Box Card,Box card, Cricut, stamping,handmade card,Paper crafts,

Thanks for stopping by! Hope you liked my version of the SVGCuts Morning Glory Box Card.

Happy Crafting Everyone  :)


Monday, May 9, 2016

Mother's Day Retro Oven Box Card | SVGCuts

Happy Belated Mother's Day to all who celebrated Mother's Day yesterday!

I really thought about posting my cards last week but then I would have spoiled it for my mom and MIL. (I'll post my MIL card next)


SVGCuts files,Mother's Day Card,#SVGCuts,Silhouette Cameo,Carta Bella,ilovedoingallthingscrafty,Mother's Day Retro Oven Box Card,Box card,ilovedoingallthingscrafty


So here is the card I made for my mother. How cool is that Retro Oven?


As soon as I saw SVGCuts latest Kit, World's Best Mom I had to have it!


The tea kettle is SO cute and those burners, OMG! It reminds me so much of my childhood, back in the '80s in my mom's kitchen!


The paper I used comes from Carta Bella's Homemade with Love Collection. I think they match the retro theme perfectly!

Here are a few pics from the sides and how I embellished them.


Love how the oven door opens up to the pies baking in the oven :)


To finish off the back, I added a few stamps from Hero Arts.  


Hope you like my Mother's Day Retro Oven Box Card, I think this card and the rest of the cards that come from this amazing kit could be used for so many other occasion and aren't limited to Mother's Day. SO make sure you check it out!

World's Best Mom SVG Kit

Thanks for stopping by!
Happy Crafting  :)