Thursday, March 24, 2016

Some Bunny Loves Me Easter Card | SVGCuts

Happy Easter to Everyone! 
A little early I know, but somewhere in the world, it's already Friday :)

Been a little while since I last shared anything... took a little trip to San Francisco with my hubby last week and got back Sunday to a couple of really sick kids. They picked up a nasty stomach virus and seems so did the rest of the family. I guess it was a good thing we were gone. They are all better now, but my daughter lost 7 lbs and my son lost 5 lbs in one day! Crazy!!!

Anyway back to my post! 
Today I want to share some really cute Easter cards I made to share with the kiddies in our lives. 

SVG files, SVGCuts, ilovedoingallthingscrafty, Easter Card, stamping, pastel colors, cute, cricut, handmade card,Paper crafts,

The files for the card come from SVGCuts.
The card base I used comes from the latest FREE SVG file -> click HERE for the FREE download
The bunny comes from the Spring Bunnies SVG Collection.

These cards were fairly easy and quick to put together!

SVG files, SVGCuts, ilovedoingallthingscrafty, Easter Card, stamping, pastel colors, cute, cricut, handmade card,Paper crafts,

 The Stamp I used on the inside comes from Craftsmart (Micheal's Dollar Bin)

SVG files, SVGCuts, ilovedoingallthingscrafty, Easter Card, stamping, pastel colors, cute, cricut, handmade card,Paper crafts,

Wish you all a very blessed Easter Weekend!
Hope you liked my simple Some "Bunny" Loves Me Easter Cards.

Thanks for stopping by!
Happy Crafting  :)


Tuesday, March 8, 2016

Magical Birthday Rainbow Shaker Card


I think I may have some card issues! 
I just can't stop making them! 
It feels good having a little card collection ready go go for when I need one :)

Today I want to share with you a really fun interactive card.
How cute did this Magical Birthday Rainbow Shaker Card turn out?!


Soon as I saw this rainbow die, I just had to have it. Then I thought I can't have a rainbow without clouds so I had to get some too!

I think I may have to start picking up some more shifts at the hospital since I can't stop spending money at Simon's!


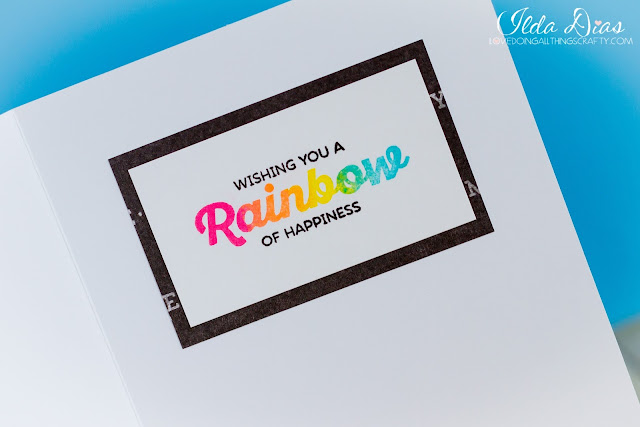
Here is how I finished the inside.


For those interested in the supplies I used here is my Recipe:

  • Stamps - Rainbow of Happiness - My Favorite Things
  • Ink - Paintbox Pigment Inks - Colorbox
    • Salty Ocean - Distress Ink - Tim Holtz 
    • Tuxedo Black - Memento
  • Stamp Positioner - my own DIY Stamping tool
  • Dies - Stitched Rainbow - My Favorite Things
    • Puffy Clouds - My Favorite Things
    • hearts - Holiday Shapes - Simon Says Stamp Die
    • Stitched Rectangle - Simon Says Stamp Die
  • Die Cutting Machine - Big Shot - Sizzix
  • Cardstock - Neenah Solar White 80lbs
    • Black Layer - Hello Sunshine -Pink Paislee
  • Shaker Mixsequins Pretty Pink Posh, Martha Stewart Glitter, Recollections Microbeads and Clear Seed beads.


Hope this card has inspired you today.
I have the perfect person in mind for this card and I hope they will love it :)


Thanks for stopping by!
Happy Crafting  :)


Linking up with: 

Friday, March 4, 2016

Sending Love - Watercolour Smooshing


I am having so much fun trying out different card techniques. 

I had no idea what watercolour/ink smooshing was until until I saw Kristina Werner do it in one of her videos. If you want to learn more about it, there are lots of great videos on You Tube. 
SO easy to do and the results look amazing! 

Just love this!


Here is the recipe for this card:
  • Stamps (hearts) - Stampology - Autumn Leaves (old set, maybe discontinued)
    • (YOU, Love, small hearts) - Love Stamp and Cut - Hero Arts
    • (Hugs and) - Prayers - Simon Says Stamp Coordinating Set
  • Ink - distress inks - Seedless Preserves, Picked Rasberry, Fired Brick - Tim Holtz
    • Tuxedo Black - Memento
  • Embossing Powder - Gold - Recollections
  • Stamp Positioner - my own DIY Stamping tool
  • Dies  (black craft foam) - Sending - Simon Says Stamp Wafer Die 
  • Die Cutting Machine - Big Shot - Sizzix
  • Cardstock - Neenah Solar White 80lbs

As you can see I used a variety of different stamps to create the card sentiment I wanted. Mix and match all your supplies, don't be afraid to do that. I have always done that with any of my projects, it's a great way to stretch out your supply stash and creating something totally new!

Here is what the inside looks like.


This card really didn't take long to make. I'm sure I will be making more cards using Watercolour Smooshing technique in the future! Hope this has inspired you to give it a try.

Thanks for stopping by!
Happy Crafting  :)


Linking up with:
Simon Says Stamp Wednesday Challenge - Simon Says: Touchy Feely

Tuesday, March 1, 2016

DIY Flower Vase Shaker Card


Hey everyone!

I have a bunch of birthdays coming up, so I wanted to stock up and make a few cards to have on hand using supplies that I have been hoarding and hadn't tried out yet! Anyone else have that problem? LOL!

Today I want to share with you a really cute DIY Flower Vase Shaker Card.
This will make the perfect birthday card for one of the ladies in my life!
Who doesn't love flowers?!


The first thing I did for this card was stamp and clear ink emboss with WOW! embossing powder onto some 80lb Neenah cardstock. The stamps I used for this card come from Stampendous - Bouquet for you set. I then water coloured the images in staying with the wells of the embossed areas. Once I was happy with the colouring I loaded the paper onto my Silhouette PixScan mat, scanned it and did the trace of the image and then cut them out!

Here is a cell phone pic I took after the cut (sorry for the bad quality).
I can't tell you how much I LOVE, LOVE my PixScan mat! No fussy cutting required!!!
Click HERE for previous tutorial on the PixScan.


Want to know where I got the vase cut out?!
It is actually a die piece to cut out bows from American Crafts - Dear Lizzy - Fine and Dandy (the banner also came from this die set). When I cut out the top layer of the card I made sure that my big shot would stop cutting the bow by having the top plate end where the bottom of the vase would be. I then just used a craft knife to cut the piece out. So easy right? Sometimes you just have to look at the supplies you have in a different way to stretch out your collection!


The rest of the shaker was assembled like any other shaker card. I used some sequins from Pretty Pink Posh, Martha Stewart Glitter and some Recollections Microbeads. I then added the top layer of the card to a piece of coordinating green scrap I had and mounted it onto A-6 Card base.

Hope this DIY Flower Vase Shaker Card, has inspired you to create something similar and maybe look at supplies you have in a whole different way!

Thanks for stopping by!
Happy Crafting  :)


Monday, February 22, 2016

Spring Thank You Card


Hello crafty friends!

Today I have another sweet and simple Spring Thank You card to share with you.

I keep getting inspired by all the crafty goodness from the FB Stamping Enablers Group. If you are at all interested in stamping you need to join their group! BTW I'm not affiliated with them at all, but if you are looking to get inspired they are a truly an enabling group :)

What better way to say thank you then with flowers!
At least these ones will last forever ;)


Here is the recipe for this card:
  • Stamps - Spring Hello by Lia - Hero Arts
  • Ink - distress inks - Tim Holtz
    • Tuxedo Black - Memento
  • Blending tool - 1 Inch Round - Ranger
  • Stamp Positioner - my own DIY Stamping tool
  • Dies - Wonky Stiched Rectangles Stax- My Favorite Things Die-Namics 
    • Flower pot (present) - Party Dies - Craftin Desert Divas
  • Cardstock - Neenah Solar White 80lbs
    • Craft - Recollections
  • Twine - hemp twine

The flower and leaf stamps once stamped were then cut on the Silhouette PixScan mat using a scanner. Click HERE for a previous tutorial on the pixscan/scanner method.

The hardest part of the card was piecing and layering the flower arrangement!


 Hope you've enjoyed my card today :)

Thank YOU all for stopping by!
Happy Crafting  :)


Linking up with:

Simon Says Stamp - Work it Wednesday February 2016
Simon Says Stamp - Simon Says: Anything Goes

Friday, February 19, 2016

Hello Spring Celtic Card | SVGCuts

Hello Everyone!!!

I cannot remember the last time we have had such a mild winter. The little snow that we had is almost all gone! Every year it feels like we only get a few weeks of Spring and then go straight into summer because of our extremely long winters! This year I think we will see it fairly soon (fingers crossed). I cannot wait for Spring to arrive!

When I first saw the latest FREE Celtic Card file from SVGCuts, I immediately was inspired to create a Spring/Easter card. Look just how beautiful it turned out! 

Easter,SVG files,free svg file,SVGCuts,Silhouette Cameo,PixScan Mat,ilovedoingallthingscrafty,Spring,Card,Hello Spring Celtic Card,Simon Says Stamp,dies,Hero Arts, Cricut,handmade,Paper crafts,

Here is a close up of these dainty little flowers and the stamped sentiment.

Easter,SVG files,free svg file,SVGCuts,Silhouette Cameo,PixScan Mat,ilovedoingallthingscrafty,Spring,Card,Hello Spring Celtic Card,Simon Says Stamp,dies,Hero Arts, Cricut,handmade,Paper crafts,

and a peek at the inside!

Easter,SVG files,free svg file,SVGCuts,Silhouette Cameo,PixScan Mat,ilovedoingallthingscrafty,Spring,Card,Hello Spring Celtic Card,Simon Says Stamp,dies,Hero Arts, Cricut,handmade,Paper crafts,

For those interested...
Here is the recipe for this card:
The Hello stamp was stamped then cut using the Silhouette PixScan mat using a scanner. Click HERE for a previous tutorial on the pixscan/scanner method.

Hope my Hello Spring Celtic Card has inspired you to create something beautiful today! 
I think this card can be made to suit whatever theme you want. It's a great card base to have in your collection! Don't forget to download it for FREE and check out all of the other FREE files in the FREE Design Section

Also, check out Mary's latest SVG Kit
Springtime Box Cards SVG Kit 

Thanks for stopping by!
Happy Crafting  :)

Thursday, February 11, 2016

Valentine's Day Post Office Drop Box | 3D Paper Mail Box/Treat Box | SVGCuts

Hey everyone!

Back again with another mailbox creation for the teacher! This time this super cute Valentine's Day Post Office Drop Box comes from SVGCuts Valentine Mailboxes SVG Kit and the little letters are files from Hearts Aflame SVG Kit

This project was super easy to put together and fairly quick. I think I took longer choosing the papers than assembling it! It's a good last-minute treat box if you don't have lots of time to waste ;)

3D,SVGCuts,Silhouette Cameo,Love Stamp and Cut Set from Hero Arts,ilovedoingallthingscrafty,Simon Says Teacher die,Valentine's Day Post Office Drop Box,SVG Files,teacher Gift,handmade art,Paper crafts, Cricut

I was so excited to use my Simon Says Stamp Teacher dies, that came in a few days ago.
I'm always making teachers things and this little die will come in so handy!

3D,SVGCuts,Silhouette Cameo,Love Stamp and Cut Set from Hero Arts,ilovedoingallthingscrafty,Simon Says Teacher die,Valentine's Day Post Office Drop Box,SVG Files,teacher Gift,handmade art,Paper crafts, Cricut

The paper I used comes from My Mind's Eye - Filled with Love paper Pad

To finish the back I added a couple of die-cut hearts and stamped one of them with a sentiment from the Love Stamp and Cut Set from Hero Arts.

3D,SVGCuts,Silhouette Cameo,Love Stamp and Cut Set from Hero Arts,ilovedoingallthingscrafty,Simon Says Teacher die,Valentine's Day Post Office Drop Box,SVG Files,teacher Gift,handmade art,Paper crafts, Cricut

I wish you all a very Happy Valentine's Day! Hope my little Valentine's Day Post Office DropBox has inspired you with some creativity :)

For those of you done with Valentine's and want to move on to Spring, check out the latest SVGCuts Kit Springtime Box Cards SVG Kit. Beautiful isn't it?!


Thanks for stopping by!
Happy Crafting  :)

Tuesday, February 9, 2016

Valentine's Day Mail House | 3D Paper Valentines House/Gift Box | SVGCuts

Are you ready for Valentine's Day?! 
I most definitely am NOT :(  Still working on some last-minute projects!

Every year I like to make something special for the teachers. This year one of them will be receiving this super cute Valentine's Day Mail House! 

How CUTE is that!?! LOVE it!

Gift,3D,SVGCuts,ilovedoingallthingscrafty,3D House,Fleurette Bloom Stamps,SVG Files,Valentine's Day Mailbox,teacher Gift,Cricut,handmade art,Paper crafts,

The awesome files I used to make this beauty comes from SVGCuts Hugs and Kisses SVG Kit and the Hearts Aflame SVG Kit.

Gift,3D,SVGCuts,ilovedoingallthingscrafty,3D House,Fleurette Bloom Stamps,SVG Files,Valentine's Day Mailbox,teacher Gift,Cricut,handmade art,Paper crafts,

The stamp I used on the front door comes from Fleurette Bloom's Happy Days Stamp Set.
Paper from Pink Paislee - Pen Pals

Gift,3D,SVGCuts,ilovedoingallthingscrafty,3D House,Fleurette Bloom Stamps,SVG Files,Valentine's Day Mailbox,teacher Gift,Cricut,handmade art,Paper crafts,

As you can see I altered the house a little by adding a slit to the roof of the house from  Hugs and Kisses SVG Kit. To create this you must add the same slit line to the roof panel and each roof liner (top and inside piece). You will have to ungroup some files to be able to do this and copy the opening in the exact same spot on each piece. Regroup everything once you are done.  Really easy, just make sure the opening is wide enough for the letters!

Gift,3D,SVGCuts,ilovedoingallthingscrafty,3D House,Fleurette Bloom Stamps,SVG Files,Valentine's Day Mailbox,teacher Gift,Cricut,handmade art,Paper crafts,

There is still plenty of time to create one of these for yourself or as a gift for someone!
Hope this has inspired you to create your own Valentine's Day Mail House :)

Thanks for stopping by!
Happy Crafting  :)


Friday, February 5, 2016

Love is in the Hot Air Balloon Shaker Card


Hey everyone!

Finally got around to creating something for Valentines Day! YAY for LOVE! Riding a Hot Air Balloon is still on my bucket list... maybe one day soon I will get to do that!

These cute hot air balloons and cloud stamps I used come from Fleurette Bloom's Up, Up and Away Stamp Set. I used my Spectrum Noir markers to vividly colour them in. The arched banner is a PnC (print and cut) file from her Love is in the Air Hot Air Balloon SVG Kit done with the Silhouette Cameo. I also used the Spellbinder pierced Rectangle dies to create the Shaker portion of the card. 


To finish off the card, I added another stamped sentiment to inside panel. The hearts are also from the Up, Up and Away Stamp Set and the sentiment comes from the Happy Day Stamp Set.


 Hope you "LOVE" my Love is in the Hot Air Balloon Shaker Card and are inspired to create one of your own!

FOR A CHANCE TO WIN the Up, Up, and Away Stamp Set 
leave a comment on my FB page under the corresponding post and in Fleurette Bloom's FB Page... Good LUCK!

Thanks for stopping by!
Happy Crafting  :)

Friday, January 29, 2016

Simple DIY Stamping Tool


Hey All!

Today I want to share with you this quick stamping tool I whipped up in under 10 minutes!
What does this tool do you may ask? Well, it allows you to stamp an image multiple times in the exact same spot, just in case the ink didn't go on dark enough or crisp enough that first time!


I have wanted to get myself the MISTI tool for the longest time. But, with the plummeting Canadian Dollar and the outrageous shipping costs I thought I would hold off for now.  In the mean time the DIYer in me decided to make something that could get me started. For the amount of stamping I do this is perfect for me and it is for my own personal use! So with supplies I had around the house I made my self this really Simple DIY Stamping Tool.

I have put together a video tutorial for those that would like to make something similar :)


Here are the supplies I used in case you missed it in the video:
CD case
grid paper
page protector or/laminator
craft fun foam
adhesive
pliers
scissors
paper slicer

Hope this has inspired you to try stamping and maybe even create you own little stamping tool!

Thanks for stopping by!
Happy Crafting  :)


Friday, January 22, 2016

50th Wedding Anniversary Card


Today I have another simple Wedding Card to share with you all. This time it is a Golden 50th Anniversary Card for some dear family friends of ours. Congratulations to the Golden couple, wishing them many more happy years together. So honoured to have been a part of their day!


To recreate this card I used a white 5 x 6.5 inch card base.
Gold Signature Foil Glitter Paper from Recollections.
The quilted embossing folder I used comes from We r Memory Keepers.
Rubber Mounted Stamp by Kelli Panacci from Hampton Art (Micheal's).
Orchid Die from Spellbinders.
Versamark Stamp Pad.


I have to tell you guys a funny story... well at the time I just about cried! 
When it was time to heat and melt the embossing powder that I had stamped, I went to switch on my Martha Stewart Heat Gun and the dang thing was dead! I quickly went into panic mode...  I thought I had to scrap it and start again just using regular ink. Then I had a light bulb moment!!! I remembered my husband telling me that he had bought a heat gun for himself a while ago. So I quickly ran to the garage and flung all his cabinets open until I found it, the Black and Decker 1350 Dual Temp Heat Gun.

A little overkill for my purposes but holy, did I fall in love! The embossing powder melted instantly, didn't even need to preheat the thing and I even had in on the lowest setting. I since have told my husband I was keeping it in the craft room, LOL! So ladies, you may want to see if your husband's have one of these puppies in their stash and test it out... you may not want to give it back ;)

Here is a closer look at the embossed gold lettering which almost which almost didn't happen!


Hope this simple Wedding card has inspired you to create one of your own. This would also make a great Valentine's Day card by changing up the colours and maybe using some hearts and a rose.

Thanks for stopping by!
Happy Crafting  :)


Monday, January 18, 2016

Karen's Quilted Wedding Cake and Card


Hi Everyone :)

Sorry it has been a while since my last post... I was starting to feel a bit of blogger's guilt! I have been doing quite a bit of crafting lately but haven't had much time to post any of it. Hopefully I will be able to soon ;)

So today I want to share with you all my first EVER wedding cake! My friend Karen, (the bride who I've worked with for many years) had asked me for a simple quilted ivory cake with a hot pink rose. Well, what the bride wants is what the bride must get! I must admit I was a bit nervous with this one as there is very little room for error when working with white cakes, plus it's a WEDDING cake! Eeek, talk about pressure! That's why I could never do this full time... too stressful, lol! But in the end I was very pleased with how it turned out!


For those interested in what is actually inside the cake 
Top layers- Vanilla & Chocolate flavoured - baked in two 6 inch round pans.
Bottom layer - Vanilla & Chocolate flavoured - baked in a 10 inch round pans.
Entire cake was frosted with vanilla butter cream icing and covered with fondant.
Topper from Precious Moments.


To go along with the cake I also made Karen and Alan a simple card.
The quilted embossing folder I used comes from We r Memory Keepers.
Stamp from Studio G
Orchid Die from Spellbinders


Congratulations Karen and Alan, I wish you both the very best in your future lives together.
Hope you enjoyed and devoured the cake!

Thanks for stopping by Everyone!
Hope this Simple Wedding Cake and Card has inspired you as well :)


Happy Crafting!