Wednesday, August 19, 2015

Yellowstone Vacation Pictures


 Hi Guys :)

Sorry I have been a bit MIA, haven't had too much time for crafting lately... So I guess I have to share some other fun I have been up too!

Last week we got back from a little road trip we took down to Yellowstone National Park. What a beautiful place to visit. SO much to see down there, we really had a great time :)

Here are a few of my faves... had to narrow them down from the 1000+ pictures I took ;)


Here we are, minus my daughter who is on  vacation with the Grand Parents in Portugal.


Thought these dead trees were cool looking!


These Hot Spring colours were amazing!


We were very lucky to see lots of wildlife around...  I'd show you all of my animal shots, but then National Geographic might want to hire me and I just don't have time for them right now, lol!


My son's favourite geyser of the trip... Old Faithful!


Grand Canyon of the Yellowstone.


Mammoth Hot Springs. 


We also drove down to see the beautiful vistas of the Grand Tetons.


One of the highlights of the road trip for me was stopping in Calgary and having dinner with this talented lady and her beautiful family... Thienly Azim from Mod Paperie an amazing crafter and for some time a fellow SVG Cuts DT member! She was one of the very first paper artist's I followed out there that inspired my own start in the paper crafting journey! What a beautiful person inside and out, can't say enough good things about her!


Hope you have enjoyed a little glimpse into my summer vacation. Hope to be back crafting pretty things with you soon!


Thanks for stopping by!
Happy Crafting  :)


Wednesday, July 29, 2015

Using Vinyl to Create Watercolor Cards + How to Video


Recently I have seen watercolor cards popping up everywhere ! So I had to jump on board and give them a try!


Before I even got started I watched tons of you tube videos but I have to say I fell in love with Kristina Werner Design videos. What a talented artist! I even went out and purchased some masking fluid to create something like I saw from one of her tutorials. But then one night, I had a light bulb moment and thought to myself why not try making a card using vinyl rather than the masking fluid. With the fluid you need to be really steady with your hand and have great calligraphy skills. But, with vinyl all you need is a nice font and a electronic cutting machine. The designs with the Silhouette are endless!

So then came the experiment and I am pleased to say I am truly happy with the results. I have to admit I had so much fun working with watercolors that I am positive this will be the first of many projects using them!

Take a look as I flub my way through my first actual (speaking) video tutorial. I thought it would be cool for you to see as I saw my experiment come to life! Hope you enjoy it and let me know what you think :)


Here is a look at all 3 cards I made created using this same technique. Mini works of art!


Stamps I used come from Snarky Stamps found here.

Hope you enjoyed this fun and unique way of personalizing watercolor cards using vinyl :)

Thanks for stopping by!
Happy Crafting  :)


Saturday, July 18, 2015

DIY Growth Chart Ruler + Video Tutorial


Hey Everyone!

I am super excited to share with you my latest DIY project, a growth chart ruler! I have been wanting to make one forever. I can't believe it took me this long! In fact I had wood stashed in my garage for years... it is actually one piece of a bi-fold door that I kept from when we built our house over 10 years ago! Talk about hoarding, I know right!?!

A friend from work (hey Katie!) had asked me if I could cut out some numbers for her to create a growth chart ruler on my silhouette. Of course I said yes, but at the time I had way too much other stuff going on. Fast forward a couple of months and finally I had sometime this past week to work on it. So since I was making a template for her, I thought why not make one for myself.  Finally I could check it off my to do list!

There are many ways to make these growth chart rulers but I wanted mine to last forever as a family keepsake and treasure, not sure how vinyl was going to hold up over the years and that is why I chose to do it like I did. I am SO happy with how it turned out and how simple it was to make. The hardest part was being patient and waiting for things to dry! 


For this tutorial I thought I would try doing things a little differently. Rather than having tons of pictures, I decided to create a little video! Hope you find this step by step instructional video helpful on creating your own growth chart. I used the paint, vinyl, paint, peel technique all the time (PVPP) and wanted to show you exactly how it works.

I have to apologize in advance as you may need to pause the video as it is jammed packed with great tips and I didn't want the video to be super long! So with out further adieu, hope enjoy my first ever You Tube video... and as they say all the time on You Tube "please give me a thumbs up if you liked my video and leave me a comment"!


Here is the list of supplies I used:
  • Wood (piece of a bi-fold door re purposed)
  • Modpodge
  • Acrylic paint
  • Foam roller and brush (could use a paint brush as well)
  • Paper plates (for paint an Modpodge, easy clean up)
  • Measuring tape
  • Scissors
  • Vinyl (cheap kind that you can line drawers with, got mine at the dollar store)
  • Silhouette Machine (to cut out the growth chart)
  • FREE file from the Silhouette School (see details below)
  • Heat gun or blow drier (if you are impatient like me ;)
  • Hanging hardware
  • OPTIONAL: stain or paint for the wood (If you choose do this, prep your wood by using the stain or paint before starting this tutorial. VERY IMPORTANT: Make sure you sand your wood lightly if using a stain before applying the Modpodge, this will give the Modpodge something to grab on to, or it may all peel off!)

For those of you with a Silhouette Machine, Melissa from the Silhouette School has the growth chart ruler Studio cut file for FREE on her blog! While you're there check out some of her amazing tutorials and projects :)

Thanks for stopping by!
Happy Crafting  :)


PS. For those of you wondering why Modpodge? Well I had lots of it around, and it is the perfect top coat sealer. Plus it gave the wood a natural look that I was going for!


Tuesday, July 7, 2015

Pocket Watch Treat Box


Hey Everyone!

Lately my life has been a bit crazy busy, with the kids at home and summer activities there never seems to be enough time. I think you will agree today's project is perfect for what is going on in my life right now and probably in many of yours too! So, without further adieu, check out this cool little pocket watch treat box... my latest Fleurette Bloom Design Team Project. 


Here is the list of files I used to create this cutie!

Box - Hooked on Fishing SVG Kit
Rosette - Lush Flowers SVG Collection
Pocket Watch SVG File

I used the reel box to create the base of the box. The pocket watch elements were then resized to match up with the base of the reel box. For fun I used a clear acetate circle to create the face on the watch. I then I also used some Tim Holtz Game spinners to create the hands. Finished it off by attaching a metal chain to the pocket watch handle and embellishing it with a couple rosettes.


This stamp couldn't be more perfect for this project. 
It comes from Craftin Desert Diva's - Blooming for you
The paper I used comes from Fancy Pants Designs - The Good Life 


 I think this would make a really great birthday gift for someone. It would also make a a really cool guys gift or maybe even a retirement treat. So many possibilities for this, you just need a little imagination and think about who you are making it for :)

Hope you enjoyed my Pocket Watch Treat Box, now go take time to smell the flowers!

Thanks for stopping by!
Happy Crafting  :)


Thursday, June 18, 2015

Personalized Teacher Tumblers | SVGCuts

Are you ready for school to be over?
I know I am and so are my kids, but I can almost bet the teachers are even more excited!

Today I want to share with you the year-end treats I made for these great teachers. These personalized teacher tumblers were super easy and quick to put together. This was the first time I layered vinyl on a project and I love how simple it was to do.

Gift,SVGCuts,Silhouette Cameo,ilovedoingallthingscrafty,Personalized Teacher Tumblers,teacher gifts for Year End,I love doing all things crafty,SVG Files,layered vinyl,vinyl,Cricut,Back to School,

To make your own here is what you will need:

  1. Tumblers
  2. Black, green, red, white, gold vinyl sheets (Oracal 651)
  3. Transfer tape
  4. SVG Files from Miss Baker's Classroom SVG Kit and  Miss Karen's Back to School Bags SVG Kit
  5. Font: Bernard MT Condensed
  6. Silhouette Cameo / Electronic Cutting Machine

Gift,SVGCuts,Silhouette Cameo,ilovedoingallthingscrafty,Personalized Teacher Tumblers,teacher gifts for Year End,I love doing all things crafty,SVG Files,layered vinyl,vinyl,Cricut,Back to School,

The only alteration I made to create this project, was to add the teacher's name to the red layer of the apple. By doing that when you cut it out, the name is already cut out of that layer. This will save you from worrying about getting perfectly straight letters! The rest was layering the pieces of vinyl onto each other. Begin with the black layer of the apple, followed by the red, green leaf, gold worm, white eyes, and then the black again for the eyes and glasses. The tricky part is aligning the layers, so make sure you have great lighting to see through the transfer paper. Also, use a straight edge (credit card/ruler) to press out the air bubbles as you add each layer.


Hope this has inspired anyone still looking for that quick last-minute teacher gift. If you have any questions, I would love to hear from you!


Thanks for stopping by!
Happy Crafting  :)


 Miss Baker's Classroom SVG Kit


Wednesday, June 10, 2015

Wedding Cake Box Cards | SVGCuts

It's Wedding Season!
 And today I have a few Wedding Box Cards to share with you all :)

Take a look at these beauties... Oooooo, ahhhhh! Looks so good I could almost eat it! 
The recipients will love their card for sure! 

Wedding,Wedding Cake Box Cards,SVGCuts,Silhouette Cameo,ilovedoingallthingscrafty,Box card,Card, SVG File,Paper crafts,handmade card, Cricut

Love how these cards fold flat. Oh, and check out the coordinating envelope, love it! Mary from SVGCuts thinks of everything!

Wedding,Wedding Cake Box Cards,SVGCuts,Silhouette Cameo,ilovedoingallthingscrafty,Box card,Card, SVG File,Paper crafts,handmade card, Cricut

This card comes from SVGCuts Autumn Box Cards SVG Kit. So simple and yet it looks so complicated to make. Watch the step-by-step video to see exactly how!


Here is another version of the same card... 

Wedding,Wedding Cake Box Cards,SVGCuts,Silhouette Cameo,ilovedoingallthingscrafty,Box card,Card, SVG File,Paper crafts,handmade card, Cricut

and coordinating envelope!

Wedding,Wedding Cake Box Cards,SVGCuts,Silhouette Cameo,ilovedoingallthingscrafty,Box card,Card, SVG File,Paper crafts,handmade card, Cricut

Hope you liked my Wedding Cake Box Cards and remember them the next time you need to make a Wedding card ;)

Thanks for stopping by!
Happy Crafting  :)


Sunday, May 24, 2015

Smile for the Camera Shadow Box


Smile for the camera!!!

Today I have a fun project to share with you all! I've been wanting to create something with the camera file for a while and this shadow box from Fleurette Bloom's I'm Wishing Kit inspired me to create something with it!

How cute is this!?! Doesn't it make you want to smile!?!
I think this would make great little gift for the young photographer in your life!


These fun papers I used come from Studio Calico's Printshop Collection.
The Smile stamp is from Craftin' Desert Divas, Simply Said Set.


To recreate a shadow box like this you will need these awesome Fleurette Bloom kits/collections!

I'm Wishing 3D SVG Kit


Hope this project has inspired you to make your own fun Shadow boxes :)

Thanks for stopping by!
Happy Crafting  :)


Thursday, May 21, 2015

Keyhole Housewarming Cards and Tutorial


Hi Guys!

I've been a little behind on sharing some projects. Just seems there is never enough time these days! 

Today I want to share with you all a few housewarming cards I made for some friends and family that moved in to their homes a few weeks ago. I also thought I would share exactly how simple they were to make too!


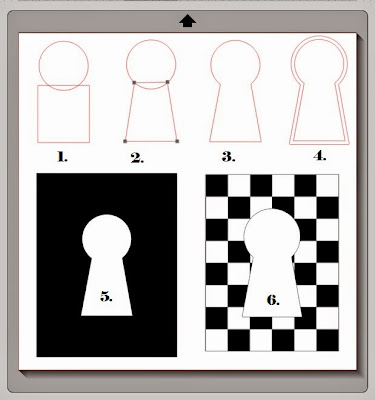
Housewarming Card Tutorial  
(See screenshot below)

  1. Draw a circle. Below the circle draw a rectangle. Center the two down the middle.
  2. With the edit point tool, highlight the rectangle and drag the top two points to the bottom of the circle. 
  3. Weld the two shapes together.
  4. Create an offset of the keyhole.
  5. Draw a rectangle to the size of the card you want to make. Create a smaller inset rectangle set it aside (for step 6).  Drag the first (smaller) keyhole and center it with the (larger) rectangle. Highlight the two shapes and create a compound path.
  6. Repeat step 5 using the larger keyhole and the smaller rectangle. This will become your top layer.
  7. Piece card together onto a card base.


Here are a few more shaker versions of the same card! I've been kind of obsessed with shakers recently. 


I thought some Snarky Stamps be perfect with theses cards. You can find your own Snarky stamps here!


Hope these DIY cards and tutorial help inspire you the next time you're looking to make a simple housewarming card!

Thanks for stopping by!
Happy Crafting  :)


Saturday, May 9, 2015

Mother's Day Cards | SVGCuts

Happy Mother's Day to all Mothers reading this post!

Today I wanted to share with you all the fun cards I made for the moms in my life. Since I was making some for myself, I thought I would make a few more for my children's school Auction that took place this weekend. The cards are all same with a few different embellishments. Love how they turned out and hope you do too!

Sewing,SVGCuts,Silhouette Cameo,Carta Bella,ilovedoingallthingscrafty,Mother's Day Cards,SVG Files,Baking,Craftin Desert Divas Stamp,Simple, handmade, cricut, stamping,Paper crafts,

These first cards are perfect for the mom who sews. 

Sewing,SVGCuts,Silhouette Cameo,Carta Bella,ilovedoingallthingscrafty,Mother's Day Cards,SVG Files,Baking,Craftin Desert Divas Stamp,Simple, handmade, cricut, stamping,Paper crafts,


I stamped the inside of the cards with a stamp from Craftin Desert Divas -Happy Celebrations stamp set.
Sewing,SVGCuts,Silhouette Cameo,Carta Bella,ilovedoingallthingscrafty,Mother's Day Cards,SVG Files,Baking,Craftin Desert Divas Stamp,Simple, handmade, cricut, stamping,Paper crafts,


The papers I used comes from Carta Bella's Sew Lovely Paper Collection. Love this paper!!!


Here is the same card with a different Carta Bella Collection. The papers for this one comes from Homemade with Love.


This paper is perfect for the Baking Mom in your life!


The files for this card all come from SVGCuts Cards for Mom Kit.

I used pieces from 3 different cards in the kit to come up with this design. Sweet and simple.... especially when making multiples!

SVGCuts files,Sewing,#SVGCuts,Silhouette Cameo,Carta Bella,Mother's Day Cards,Baking,Craftin Desert Divas Stamp,Simple,ilovedoingallthingscrafty,

Hope you liked my Mother's Day Cards! I think this design could also be used as a Valentine's Day card or even an Anniversary card.

Thanks for stopping by!
Happy Crafting  :)


Monday, May 4, 2015

Mother's Day Shadow Box | SVGCuts

Hey All!

 Are you all ready for Mother's Day?!? Today I want to share with you another one of my Shadowbox creations, another commissioned project for my friend and fan Tomina! Hope her mother loves it ;)

Gift,Roses,etched picture frame,SVGCuts,Silhouette Cameo,ilovedoingallthingscrafty,Mother's Day Shadow Box,SVG Files, Cricut,paper art, handmade

It's hard to see that I etched the glass in the above picture, so below is a closer look at the etched glass. Click here for a previous glass etching tutorial and project.

Gift,Roses,etched picture frame,SVGCuts,Silhouette Cameo,ilovedoingallthingscrafty,Mother's Day Shadow Box,SVG Files, Cricut,paper art, handmade

To replicate your own Rose Heart Shadow Box you will need:
The rose file from - Crush On You Boxes SVG Kit cut at various sizes.
8 X 8 Shadow Box (purchased from IKEA).
Etching cream

Happy Mother's Day to all my Crafty Friends and Followers! Hope you are all spoiled by your loved ones this Mother's day!

Thanks for stopping by!
Happy Crafting  :)