Hi Guys!
I've been a little behind on sharing some projects. Just seems there is never enough time these days!
Today I want to share with you all a few housewarming cards I made for some friends and family that moved in to their homes a few weeks ago. I also thought I would share exactly how simple they were to make too!
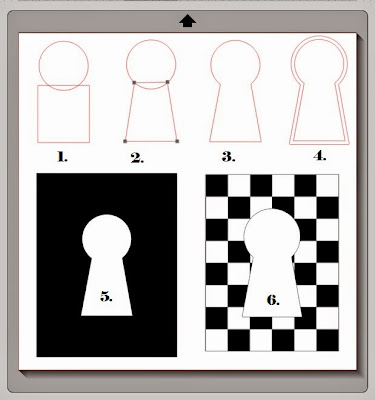
Housewarming Card Tutorial
(See screenshot below)
- Draw a circle. Below the circle draw a rectangle. Center the two down the middle.
- With the edit point tool, highlight the rectangle and drag the top two points to the bottom of the circle.
- Weld the two shapes together.
- Create an offset of the keyhole.
- Draw a rectangle to the size of the card you want to make. Create a smaller inset rectangle set it aside (for step 6). Drag the first (smaller) keyhole and center it with the (larger) rectangle. Highlight the two shapes and create a compound path.
- Repeat step 5 using the larger keyhole and the smaller rectangle. This will become your top layer.
- Piece card together onto a card base.

Here are a few more shaker versions of the same card! I've been kind of obsessed with shakers recently.
I thought some Snarky Stamps be perfect with theses cards. You can find your own Snarky stamps here!
Hope these DIY cards and tutorial help inspire you the next time you're looking to make a simple housewarming card!
Thanks for stopping by!
Happy Crafting :)


Great step by step tutorial. I've never made a shaker card - may have to give it a try after seeing your fabulous versions.
ReplyDelete