Wednesday, November 19, 2014

Stacking Christmas Tree | Fleurette Bloom DT Project

Are you all getting into the Christmas Spirit yet? I can't wait!!!

Today I am sharing with you a super cute stacking Christmas Tree I made using Fleurette Bloom files. Love how it turned out and how functional it is too!

This will make one cute Christmas gift for sure... all I need to do is add some treats to the inside!


Here are the files you will need to recreate this tree and what I did...

(cut 5 and score down the center of each, glue them back to back)

Tree - Stacking Round Cake Box from Celebrations 3D SVG Kit 
(cut one extra box and enlarged it)

Tag - Party Hat Tag from Celebrations 3D SVG Kit 
(deleted cut lines, folded in half)

(cut smallest box and resized it)


How cute is that tag?
The stamp I used comes from Craftin Desert Divas Happy Celebrations Stamp Set


This gorgeous double sided paper has been sitting in my stash for a while!
It's from K&C Company.


Check out all the layers of boxes I have to fill up with goodies!

I think this would make a perfect teacher's gift, hostess gift or a great decoration for yourself! Hope this Stacking Christmas Tree has inspired you to be a little creative today :)

Thanks for stopping by!
Happy Crafting  :)

Friday, November 7, 2014

Sunflower Thank-You Gift Set | SVGCuts

Hello, my friends!!!

So here in Canada, we have already celebrated Thanksgiving, but for my American friends, it is coming right up! Today's post is perfect for those of you wanting to make a quick Thanksgiving gift or just an everyday Thank-you for someone!

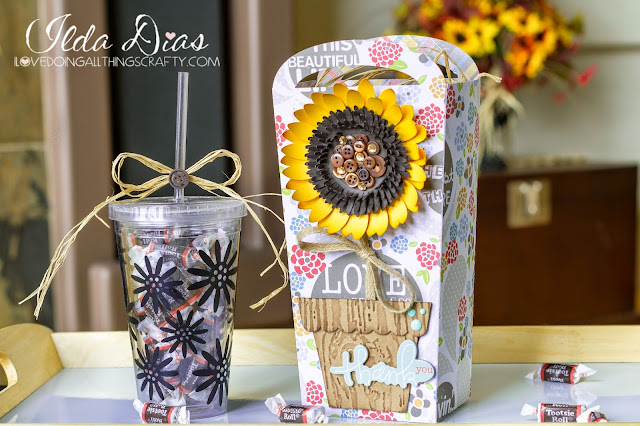
Here is my Sunflower Thank-You Gift Set, and my latest SVG Cuts DT project! 

Gift,Tumbler,SVGCuts,SVGCuts,Silhouette Cameo,Thank-you,ilovedoingallthingscrafty,Fall,Sunflower,vinyl,Cricut,Paper crafts, craft, DIY

For those that want a chance of winning all the kits I used make sure you got to -> SVG Cuts FB page and leave a comment! Hurry time is limited!!!


I LOVE, LOVE Sunflowers, they are one of my favorites. They just make me happy! Isn't this one SO pretty?! I made the leaves by using some twine ribbon! Cool, right?


And, who doesn't love tumblers?
 So practical and useful! This one was super easy and quick to make!


Hope you have enjoyed this quick-to-make Sunflower Thank-You Gift Set!

Thanks for stopping by!
Happy Crafting  :)

Friday, October 24, 2014

Row House - House Warming Gift | 3D Paper Gift Box | SVGCuts

Friends of ours recently moved into their brand new home and thought this would make the perfect little house warming gift! Finally, I had an excuse to make a row house from SVGCuts Parkside Row SVG Kit! LOVE it!!!

SVG Cuts files,3D,treat box,SVGCuts,Silhouette Cameo,ilovedoingallthingscrafty,House Warming Gift,Paper crafts,handmade art,Cricut,

I added a cloud from Bunny Hop SVG Kit to add my sentiment to using print n cut on the Cameo. The banner was simply made by cutting out triangles and stamping a letter on each pennant.


 How cool is that all lit up? SO realistic looking!


If you loved my Row House, you are going to love SVG Cuts latest Kit "Mistletoe Manor"

Here is a peek! Amazing right!!! Perfect for Christmas :)


Thanks for stopping by!
Happy Crafting  :)

Tuesday, October 21, 2014

3D Halloween Skull Treat Box/Luminary


Have you all seen Fleurette Blooms latest SVG Kit, Dia De Los Muertos? It is SO cool!
The 3D Skulls, the gorgeous flowers, and the banner... love it all! For those of you that don't know about Dia De Los Muertos or Day of the Dead, this holiday focuses on family and friends gathering to pray for and remember those who have died. While we in North America celebrate Halloween, many other countries throughout the world celebrate this holiday on October 31 and November 1.

So today I want to share with my Halloween version, a 3D Skull Treat Box/Luminary. How cool is that, love how this file could be so versatile!


To the skull I added a few little cute spiders from here. The stitches I added come from the mouth of the one piece Skull Box from here.


Here it is all lit up, the perfect Halloween decoration! This Skull is also perfect for filling up with some Halloween treats and giving it away to your favorite little monster.


Hope you all enjoyed my 3D Halloween Skull Treat Box/Luminary. Maybe even inspired to make your own skulls for Halloween or Dia De Los Muertos!

Thanks for stopping by!
Happy Crafting  :)

Sunday, October 19, 2014

Scaredy 3D Paper Cat Treat Box and Card | SVGCuts

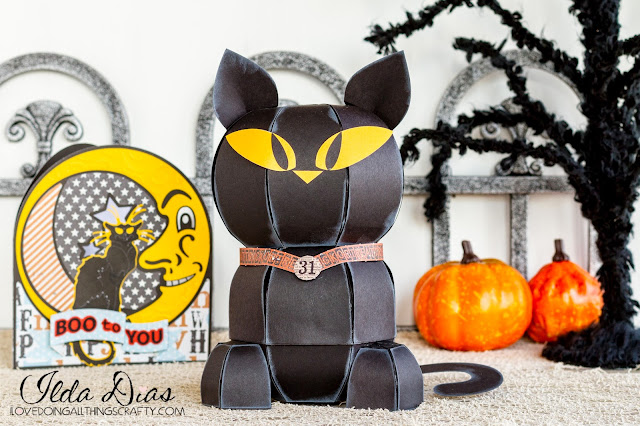
"Meeeoooow" says Scaredy Cat!

With Halloween around the corner, I thought it would be cool to make a Scaredy Cat Treat Box for my latest SVGCuts Design team project!

SVG Cuts files,3D,SVGCuts,Silhouette Cameo,ilovedoingallthingscrafty,Halloween Card,Halloween decorating,Scaredy Cat Treat Box and Card, SVG File,Paper crafts,Cricut

For those interested in all SVGCuts kits I used to create kitty, here it my long list!
Want to win all these kits? Leave a comment on SVG Cuts Facebook feed where you see the Scaredy Cat post! Hurry this is for a limited time!

Kitty has been eating lots of Halloween candy lately! 
Here he is with a belly full of treats ;)

SVG Cuts files,3D,SVGCuts,Silhouette Cameo,ilovedoingallthingscrafty,Halloween Card,Halloween decorating,Scaredy Cat Treat Box and Card, SVG File,Paper crafts,Cricut

SVG Cuts files,3D,SVGCuts,Silhouette Cameo,ilovedoingallthingscrafty,Halloween Card,Halloween decorating,Scaredy Cat Treat Box and Card, SVG File,Paper crafts,Cricut

and to go with the Scaredy Cat Treat Box, I thought it would be cute to make a coordinating card. Such an easy card to make, love this paper from My Mind’s Eye - Mischievous Collection.

SVG Cuts files,3D,SVGCuts,Silhouette Cameo,ilovedoingallthingscrafty,Halloween Card,Halloween decorating,Scaredy Cat Treat Box and Card, SVG File,Paper crafts,Cricut

Hope this has inspired you to create your own Scaredy Cat treat boxes for Halloween or other animal lover occasions! I think he would also make a great centerpiece for a cat-loving party!

Thanks for stopping by!
Happy Crafting  :)

Monday, October 6, 2014

Frozen Themed Birthday Cake and Card | SVGCuts

Alright! Prepare yourself for some cuteness overload!!!

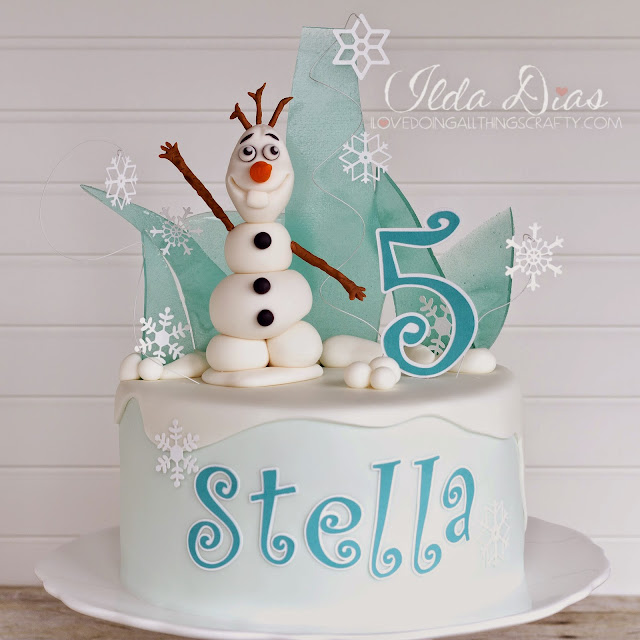
Today I am sharing with you the cutest Birthday cake I think I have made so far!!! I am super happy with how it turned out :)

Sugar Shards, SVGCuts files,Silhouette Cameo,Olaf,ilovedoingallthingscrafty,Frozen Themed Birthday Cake, handmade Card,Birthday party planning,Ice,Box card,Cricut,Paper crafts, DIY

I made this cake for my little Goddaughter Stella who celebrated her 5th Birthday this weekend! Happy Birthday, Stella!

OK! How cute is Olaf!?!

Sugar Shards, SVGCuts files,Silhouette Cameo,Olaf,ilovedoingallthingscrafty,Frozen Themed Birthday Cake, handmade Card,Birthday party planning,Ice,Box card,Cricut,Paper crafts, DIY

I also incorporated my love for paper crafting into the cake. I don't think I could ever get fondant letters perfectly cut like that. When wet, the fondant is pretty sticky which acts like glue. Doing it with paper saved me tons of time too!

Sugar Shards, SVGCuts files,Silhouette Cameo,Olaf,ilovedoingallthingscrafty,Frozen Themed Birthday Cake, handmade Card,Birthday party planning,Ice,Box card,Cricut,Paper crafts, DIY

The snowflakes are also paper cut using my Silhouette Cameo. The files for the snowflakes come from the Christmas Box Cards SVG Kit here.

This cake made up of 2, 10" rounds. The bottom layer is chocolate flavored and the top is a vanilla cake. The entire cake was frosted with vanilla buttercream icing, covered and decorated with fondant.


Below is a side view.

Oh, and the "ice" is just sugar shards.
So easy to make... just takes 1 cup sugar, 1/2 cup corn syrup, and a touch of food coloring.
Heat it up to melt on medium heat (simmer about 5 minutes), add your color (whisk together), then pour it onto a Silpat to harden. Once hardened crack away!


To coordinate with the cake I thought I would make the Birthday Girl a matching Frozen Card.
With a few minor alterations, this card worked perfectly with the Frozen theme. It could totally be used as a birthday invite too! For more details on the card click Christmas Box Cards SVG Kit here!


The Stamp I used comes from Craftin Desert Diva's - Simply Said.

And here is a closer look at the Frozen wonderland ;)


Hope you have enjoyed the "coolest" Frozen themed cake and coordinating card that I made!

Thanks for stopping by!
Happy Crafting  :)

Friday, October 3, 2014

21st Birthday Box Card


Hi Guys!

So this week my baby sister Catarina celebrated her 21st Birthday! I can't believe it. Feels like it was yesterday I was in the delivery room with my mom!!! Yes I was, and was also the first person to see her... I was 17 when she was born and that experience was the reason I went into Nursing school! 

So today I want to share with you the cute birthday box card I made her. The files come from Fleurette Bloom's Celebrations SVG Kit. I love that the kit includes various elements that you can use and play with.


Instead of adding a cake, I thought it would be cute to make the 21 as a candle.


The stamp comes from Craftin Desert Divas - Happy Celebrations.
The bright paper I used comes from Doodlebug Designs Springtime paper pad.
Love this collection!


Here is a pic of me and my baby sister. 
This photo was taken a few weeks ago at our cousin's wedding. 
Happy Birthday Cat! Love you :)


Hope you enjoyed my post today and got to know me a little more!

Thanks for stopping by!
Happy Crafting  :)


Tuesday, September 23, 2014

Victor + Jessica's Wedding Shadow Box and Card | SVGCuts

So excited to share with you all the latest Shadow Box! I think they just keep getting more and more beautiful! 

This Shadow Box was made as a gift for my cousin Victor and his bride Jessica who just got married this past weekend! I absolutely love how it turned out and I'm pretty sure they loved it too! Congratulations again Victor and welcome to our family Jessica!!! Had so much fun with you both and the rest of our crazy awesome family!

Gift,Roses,etched glass,SVGCuts,Silhouette Cameo,Wedding Shadow Box,ilovedoingallthingscrafty,Wedding card,heart,Cricut,Paper crafts,Framed,personalized,

It's hard to see that I etched the glass in the above picture, so below is a closer look at the etched glass. Click here for a previous glass etching tutorial and project.

The rose file I used to create the heart of roses comes from the Crush On You Boxes SVG Kit here. They were just cut at different sizes and glued onto a heart template.

Gift,Roses,etched glass,SVGCuts,Silhouette Cameo,Wedding Shadow Box,ilovedoingallthingscrafty,Wedding card,heart,Cricut,Paper crafts,Framed,personalized,

And here is the card I made them! SO adorable, right!?
The stamp comes from the Simply Said Stamp Pack by Craftin Desert Diva's.

Gift,Roses,etched glass,SVGCuts,Silhouette Cameo,Wedding Shadow Box,ilovedoingallthingscrafty,Wedding card,heart,Cricut,Paper crafts,Framed,personalized,

The files I used to create the card come from the Love Always SVG Kit here.
(Please note that the original files have been altered to make the card using the Silhouette DSE program.)


... and here is the lovely couple's first kiss as husband and wife!


Hope you loved this project as much I loved making it!
Thanks for stopping by!

Happy Crafting  :)

Thursday, September 11, 2014

Pumpkin Carriage Shaped Card - Fleurette Bloom DT Project


Hey Everybody!

Today I want to share with you my latest Fleurette Bloom DT Project! A super sweet Pumpkin Carriage Shaped Card. Really easy to do and today I will show you how :)

But first, have you noticed Fleurette has been giving away a ton of files for FREE? Keep your eyes pealed for Fleurette's Freebies, FREE for a limited time when she releases them! SO go download them while you can! Quick Tip: Just look on my side bar, I will usually have a direct link to it there for you! 

The file I used for this Pumpkin Carriage was one of this week's Freebies, now it's in the store for $0.99! 


How to make your own Shaped Card:


1. Start by creating an offset/shadow of the shape you want to use. In this case the bottom layer of the pumpkin carriage.


2. Move the pumpkin layer off to the side. Make a copy of the offset/shadow you created above.


3. Using the draw a line tool. Select the area where you want to create the fold for your card. Hold down the shift key and drag the line across the top of one of the offset/shadow layers, this will create a straight line. This layer will become the base of your card.


4. Highlight the line you just created and change the style of line to a dash line. Group the dash line to the base of the card. 

5. Copy and create another pumpkin layer. Drag it on to the center of the base of the card you just created. Select the knife tool and again by holding down the shift key and the knife tool drag it over the pumpkin layer just above the dash line you created on the base of the card.


 6. Drag the bottom part of the pumpkin to the side. Delete the top piece.

7. If you want to create some writing space for the inside of the card, create a shape like I did using the draw an ellipse tool. You are now ready to cut out all the pieces for your shaped card! To assemble the card: Just add glue above the dash line on the base of the card, continue by gluing the remaining pieces to the top and inside. Embellish as desired! 


Here is a peek at what the inside should look like. I chose to add the orange and green layer to the inside of the card. This is not necessary! You can just leave it blank , but in doing this you will make a sturdier card... and it looks cuter! ;)


Hope you have enjoyed this card and tutorial! 
If you have any questions feel free to ask me :) 


Don't forget to look out for Fleurette's FREEbies!

Thanks for stopping by!
Happy Crafting  :)