Showing posts with label Birthday party planning. Show all posts

Monday, October 6, 2014

Frozen Themed Birthday Cake and Card | SVGCuts

Alright! Prepare yourself for some cuteness overload!!!

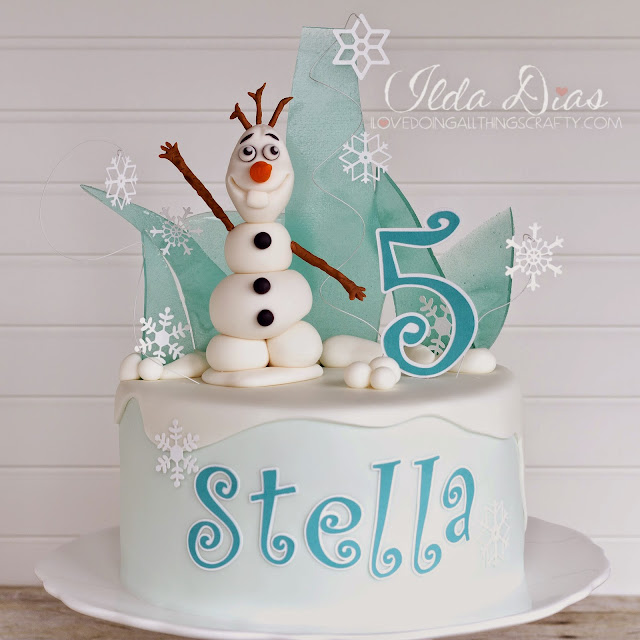
Today I am sharing with you the cutest Birthday cake I think I have made so far!!! I am super happy with how it turned out :)

Sugar Shards,SVG Cuts files,#SVGCuts,Silhouette Cameo,Olaf,Frozen Themed Birthday Cake and Card,Birthday party planning,Ice,Box card,ilovedoingallthingscrafty,

I made this cake for my little Goddaughter Stella who celebrated her 5th Birthday this weekend! Happy Birthday, Stella!

OK! How cute is Olaf!?!


I also incorporated my love for paper crafting into the cake. I don't think I could ever get fondant letters perfectly cut like that. When wet, the fondant is pretty sticky which acts like glue. Doing it with paper saved me tons of time too!


The snowflakes are also paper cut using my Silhouette Cameo. The files for the snowflakes come from the Christmas Box Cards SVG Kit here.

This cake made up of 2, 10" rounds. The bottom layer is chocolate flavored and the top is a vanilla cake. The entire cake was frosted with vanilla buttercream icing, covered and decorated with fondant.


Below is a side view.

Oh, and the "ice" is just sugar shards.
So easy to make... just takes 1 cup sugar, 1/2 cup corn syrup, and a touch of food coloring.
Heat it up to melt on medium heat (simmer about 5 minutes), add your color (whisk together), then pour it onto a Silpat to harden. Once hardened crack away!


To coordinate with the cake I thought I would make the Birthday Girl a matching Frozen Card.
With a few minor alterations, this card worked perfectly with the Frozen theme. It could totally be used as a birthday invite too! For more details on the card click Christmas Box Cards SVG Kit here!


The Stamp I used comes from Craftin Desert Diva's - Simply Said.

And here is a closer look at the Frozen wonderland ;)


Hope you have enjoyed the "coolest" Frozen themed cake and coordinating card that I made!

Thanks for stopping by!
Happy Crafting  :)

Friday, April 19, 2013

Ninja Throwing Stars


Well, the Birthday Party is tomorrow!!! I have been so busy with work and catching up with everything else around the house that I haven't had time to put up any of my recent Ninjago projects!

Today I want to share with you the Ninja Stars I made for the kids. I remember making many of them as a kid but have since forgotten. Click here for the pictorial I used to make mine. There are also a lot of YouTube videos on them as well! Hopefully, we will have time to play a little game with them. If any of the kids at the party want to learn how to make one themselves I will take some extra paper with me to teach them how.  

Ninja Throwing Stars

Up next ...


Have a great day and thanks for coming by,
Happy Crafting :)

Monday, April 15, 2013

Ninjago Cupcake Toppers - Free Print and Cut Silhouette File


Hey everyone are you tired of Ninjago yet? I'm getting really close... It feels like I've been eating, sleeping, breathing all things Ninja! I can't wait to see it all come together already! :)

Today I want to share with you the Ninjago cupcake toppers I made. I'm still not sure I will be using them like that. I may just use them as food picks and sporadically place them on the food trays.

I created them again using the Silhouette software. I printed them and then cut them out on the Cameo. Here is what they look like once they were cut out.

Ninjago Cupcake Toppers - Free Print and Cut Silhouette File

They come together in a matter of minutes. All that is left to do is fold and glue them down onto a toothpick. I just used a dab of hot glue and pinched the two pieces of paper together onto the toothpick. Really easy!

Ninjago Cupcake Toppers - Free Print and Cut Silhouette File

The image I used comes from here. Make sure to stop by, she also had some great ideas on the theme. If you have a Silhouette machine and would like to have a copy of this file click on the link below :)

Before you download...
My free files RULES!!!

  1. If you choose to download all I ask is you become a follower.
  2. Note my files are for personal use only! (Personal use means... only for you to use (no trading, or sharing of my files... let me do that!) 
  3. If you want to share, send your friends over to my blog for the download. 
  4. I'm OK with people sharing my files on their own sites as long as there is a direct link back to this blog...Give credit where credit is due! (a message to me would also be appreciated)

Ninjago Ninja Cupcake Toppers - (Silhouette - Print and Cut) .studio file

If you would like to donate, (click the đŸ‘‰DONATE button on the sidebar) I will happily accept any amount you see fit. No pressure at all either :) It will just make my day that someone wants to support my passion.

Coming up...


Have a great day and thanks for coming by,
Happy Crafting :)

 Sharing this with my Crafty Peeps!

Sunday, April 14, 2013

DIY Ninjago Birthday Party Photo Booth

Now that you have seen the photo props, it's time to show you how I made the background for the Ninja photo booth, which will also double as a signature board keepsake. 

I first joined two pieces of poster board and taped them to each other, leaving a seam down the middle. I used the seam as a guide and just penciled the drawing in first.

DIY Ninjago Birthday Party Photo Booth

I then just painted the picture in with a paintbrush and some red acrylic paint. You could also probably use a marker if you didn't feel comfortable painting. Here's a closer look... not bad for not being a traced image!  

DIY Ninjago Birthday Party Photo Booth

I added thank you to each side so that when our guests receive the picture it will also be a thank you to them as well! I am also hoping to get each guest to sign their names on it. This way Tomas can keep it as a keepsake from the party! It folds in half very easily and can be rolled up for storage.

DIY Ninjago Birthday Party Photo Booth

Here is Tomas once again posing with his weapons... 

DIY Ninjago Birthday Party Photo Booth

and his sister Maia telling Tomas he's "Dead Meat!" Oh, can you feel the love!

DIY Ninjago Birthday Party Photo Booth

I got my inspiration from here, please make sure to stop by and see all of the amazing ideas from her sons' Ninjago Party.

I hope you're enjoying all the Ninjago fun as much as I am!

Up next...


Have a great day and thanks for coming by,
Happy Crafting :)

Friday, April 12, 2013

Ninjago Birthday Party Lanterns - Free Silhouette Studio file


Today I am going to share with you how I made some little lanterns to go with my son's Ninjago themed party.

Do you remember making these in Elementary School??? I sure do! I really like how these turned out and how quickly they came together! 

Since I wanted to make a few of these lanterns, I thought rather than cutting them out by hand I would create a file for them with my Silhouette program. Now I can share it with you all!

Before you download...
My free files RULES!!!

  1. If you choose to download all I ask is you become a follower.
  2. Note my files are for personal use only! (Personal use means... only for you to use (no trading, or sharing of my files... let me do that!) 
  3. If you want to share, send your friends over to my blog for the download. 
  4. I'm OK with people sharing my files on their own sites as long as there is a direct link back to this blog...Give credit where credit is due! (a message to me would also be appreciated)

Click here for the Lantern (Silhouette) .studio file

If you would like to donate, (click the đŸ‘‰DONATE button on the sidebar) I will happily accept any amount you see fit. No pressure at all either :) It will just make my day that someone wants to support my passion.

Ninjago Birthday Party Lanterns - Free Silhouette Studio file

Here is a quick pictorial on how simple they came together. Pretty self-explanatory I think!

Ninjago Birthday Party Lanterns - Free Silhouette Studio file


Easy right?  Coming up...


Have a great day and thanks for stopping in,
Happy Crafting :)