Showing posts with label SVG cuts. Show all posts

Saturday, November 17, 2012

DIY Printed Stamps on the Silhouette! (Part 1)


This one is for all of my Silhouette using friends! A few days ago I was looking for a stamp to coordinate with a card I was working on and didn't like what I had. I also didn't feel like going out and buying one... I needed it like NOW! So I had an aha moment... Why not make one digitally? I figured I had all the tools I needed. So here is how I was able to create my perfect stamp... The possibilities are endless, and it's was all at my fingertips!

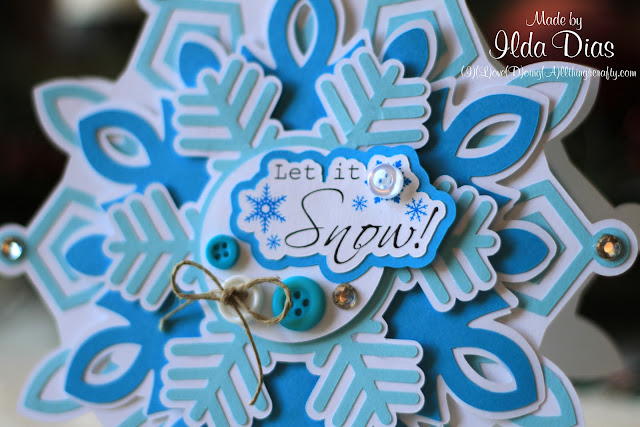
Here is the card I made, the file comes from CLARA'S CHRISTMAS EVE KIT here. Isn't it pretty??? Look at the stamp! What a perfect match, don't you think?  Wanna see how I made it? Follow my instructions below. Super easy! It just looks lengthy... I probably should have made a video... not a road I want to go down right now... I'd probably crash! LOL! Ok, back to how I did it...

DIY Stamps on the Silhouette! (Part 1)

The first thing I did was go onto dafont.com. Since I was wanting to create a Christmas stamp, I needed Christmas images.  I then searched for holiday fonts or images known as wingdings. Here is the font I chose. The next thing I did was install it onto my computer, that way when I open up the Silhouette program it would automatically show up in the text box. (I chose to use a font/wingding but your possibilities are endless, use any image you have or find on the web!)

Next, I opened up my Silhouette Designer Studio Edition. Selected the text box, which brought up the text style box on the right-hand side. Scrolled down until I found the font I just installed  (Xmas tfb Christmas)
Because I had no idea of what the images were when each letter was typed I just type the whole alphabet out starting with upper case and then lower case letters.

DIY Stamps on the Silhouette! (Part 1)

Here are the images from this font. The next thing I did was change the outline color of the images to black. (I don't know why, but they look more like stamps when they are black)

DIY Stamps on the Silhouette! (Part 1)

The next thing I did was select all my images and ungroup them. Then I chose some of the images I thought I would like a stamp of. I'll just focus on a few for this post!


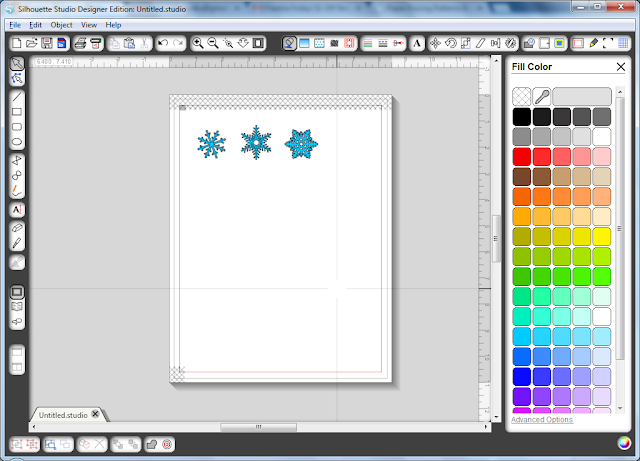
So here are some snowflakes I chose. Now, for some reason, the Silhouette software doesn't recognize this font. It will just print blank for you. All you need to do is fill the image in. Yes, it's that simple! Highlight the image and with the fill color option, change the color of the inside of your image. It won't print the outline, not sure why :( . I chose to make my snowflakes blue.

DIY Stamps on the Silhouette! (Part 1)

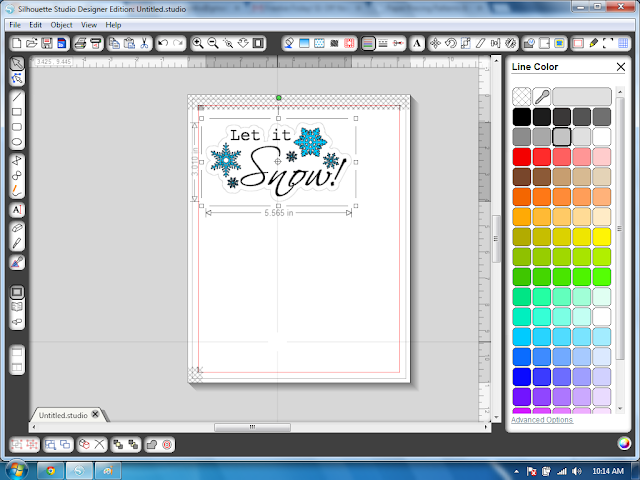
 Now you can get creative... Add other fonts, quotes, resize the images, basically do whatever you like! Here is what I did... (Remember to fill in the color your fonts or else you will end up with the outline of the letters)

DIY Stamps on the Silhouette! (Part 1)

Once you arrange your images the way you like, group them together. The next thing I did was select each image and create an off-set for them.

DIY Stamps on the Silhouette! (Part 1)

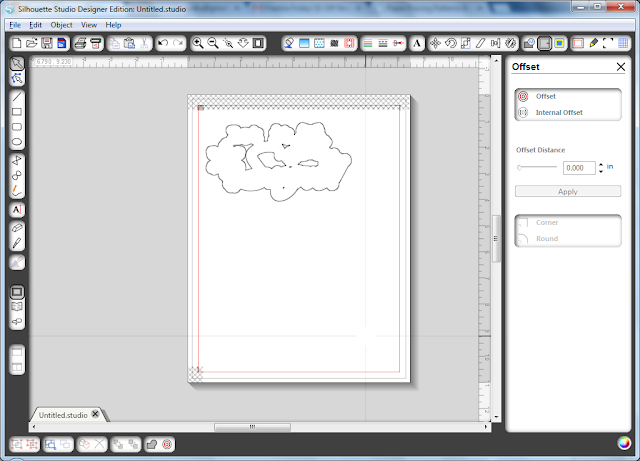
Now if you look closely you will notice that if I leave the image this way when it is sent to the cutter it will cut all the little spaces in between my image. Since I don't want that to happen, I will first highlight the inside image, right-click and copy. Then highlight it again and right-click and delete the image. (don't worry) You should be left at this point with only an outline. Look something like this...

DIY Stamps on the Silhouette! (Part 1)

Now highlight this image and right-click and select Release Compound Path. Go ahead and delete all the little pieces from the inside of the image. Like I did below.

DIY Stamps on the Silhouette! (Part 1)

Next, highlight the image again, right-click and select Paste in Front. That should bring your image back. Note! Very important... DO NOT drag your image or move it on the screen or else it might not line up. Phew!!! I managed to keep it still!  Here's what it should look like now.

DIY Stamps on the Silhouette! (Part 1)

Notice that the offset outline is black, if left this way the outline might be visible when you cut it with your machine. I changed the outline in mine by just selecting the outline portion of the image and changing it to a very light grey. Make sure you group the outline now and the image together!

DIY Stamps on the Silhouette! (Part 1)

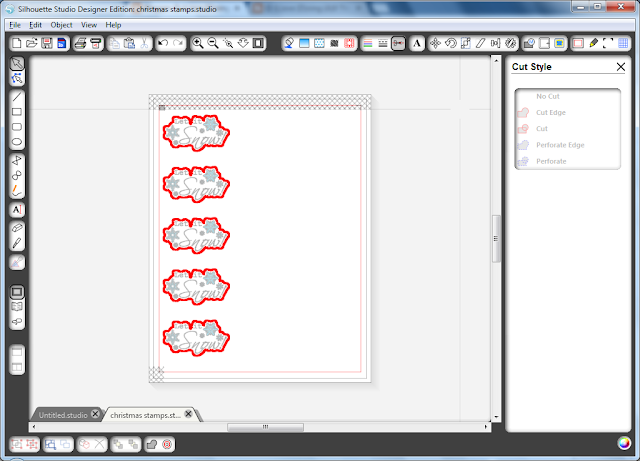
Time to select your cut style. Since I want just the out-line cut, I've selected the cut edge option. If you wanted to at this point you could go ahead a send this to your printer. This image is actually too large at this point for my liking, so I will re-size it and I would like to make a few more copies. I only want 5, but you can fill so many more on one sheet. I will be printing on an 8.5 x 11" sheet of paper. Here is what my sheet looks like.

DIY Stamps on the Silhouette! (Part 1)

Now you are ready to send it to your printer and then cut it out with your Silhouette machine. Make sure you save your work. 

DIY Stamps on the Silhouette! (Part 1)

If you want to see how I created the shadow cutout for my stamp (blue piece behind the stamp), check out the next post. Part 2 DIY Stamp Shadows on the Silhouette

Hope this post was helpful and hopefully not too complicated to follow :) 
Thanks for following and if you like this post leave me some love in the comments below!
Happy stamp-making!


Entering this card in:

unstampabellesbutton

Tuesday, May 8, 2012

SVG Paper Drum Treat Box Birthday Gift | SVGCuts

Happy Tuesday everyone!

We've been so crazy busy lately! Birthdays, events, work, school, soccer, and the weather is finally nice I need to get some yard work done. There just doesn't seem to be enough time... oh well, one thing at a time!

I wanted to share this with you all last week when I finished this but never had the chance to post it until today. So here is a drum I made for a very fun 5 years old. He, like his Daddy, love the drums, so I thought this would be perfect for him. Happy Birthday, Antonio, hope you had a fun-filled day!

SVG Paper Drum Treat Box Birthday Gift | SVGCuts by ilovedoingallthingscrafty.com

The drum file comes from SVG cuts SANTA'S VISIT SVG KIT. I used black card stock for the drum base and embellished it with tin foil tape to give it a chrome look. 


I laid out the tape on the silhouette mat and cut the foil with my Cameo.

For some texture, I ran the accent drum pieces through the Cuttlebug


Here is a closer look. 

SVG Paper Drum Treat Box Birthday Gift | SVGCuts by ilovedoingallthingscrafty.com

I hope you loved this little drum. It will make the perfect little gift for the drummer boy in your life!

Happy crafting!

Friday, February 24, 2012

Monkey Themed Baby Shower 3D Letters and Banner | SVGCuts

Happy weekend everyone! 

So today I am going to share a project with you that I made for my friend Kristina. Her sister recently had a baby boy and she is throwing her a "little monkey" themed baby shower. 

Monkey Themed Baby Shower 3D Letters and Banner by ilovedoingallthingscrafty.com

The banner was created with basic shapes from the SCAL library and cut with the Silhouette Cameo. The bottom layer is an elongated triangle with a scalloped edge, topped off with another rounded corner triangle. I made the rosette by using my Martha Stewart scoring board. For each rosette, I used two 1.5" x 12" piece of paper the scored the paper every 0.25". Folded the paper like an accordion, then glue the ends to each other. To cover the center of the rosette I used just a simple white circle. The font that I chose for the letters was Arial Black. If you would like the SVG file for the banner, email me and I will gladly send it to you. 

Monkey Themed Baby Shower 3D Letters and Banner by ilovedoingallthingscrafty.com


These paper 3D letters stand about 6.5" tall. They were filled with some dried beans to keep them from toppling over. The 3D letters are from SVG Cuts 3D letter kit and so is the hanging little monkey (freebie on their blog). I had so much fun making this and love how it turned out. I can't wait to make some more 3D letters!

Monkey Themed Baby Shower 3D Letters and Banner by ilovedoingallthingscrafty.com

Now how cute is that going to look at the shower...  better yet how cute will that look in his Nursery!
God bless you, Luca!!!


Thanks for visiting and have a great weekend!
Ilda :)

Thursday, February 16, 2012

Etched Shadow Box Picture Frame for a Baby Boy | SVGCuts

Hello Everyone!

I didn't think I would be posting again so soon! I keep making changes to the blog as I go... I've go so much to learn! Any advice about blogging would be very appreciated :)

Today I'm going to be sharing with you a shadow box picture frame I made for a 1-month-old baby boy. This past weekend we had the privilege of meeting him and celebrating his arrival with all of his friends and family. I really love how it turned out!


Etched Shadow Box Picture Frame for a Baby Boyby ilovedoingallthingscrafty.com


The frame is an 8x8 shadow box that was purchased at IKEA.  It's hard to see the etching on the above picture because of the glare on the glass :(


Etched Shadow Box Picture Frame for a Baby Boyby ilovedoingallthingscrafty.com

The first thing I did was take the frame apart so that I could work with only the glass. I then cut the name out of vinyl using the Silhouette Cameo Cutter. Then I positioned the vinyl on top of the glass, ensuring that the vinyl around the letters were completely adhered to the glass and that it was level. Next, I took armour etching cream and flooded the exposed glass. Follow the instructions on the the bottle and rinse off the cream once your time is up. This technique can be used for so many projects!


Etched Shadow Box Picture Frame for a Baby Boyby ilovedoingallthingscrafty.com

The last thing I did was add the embellishments to the mat. The roses are from SVG Cuts Crush on you kit, I just scaled them down. The butterfly comes from SVG Shop (sorry no longer available). I simply cut out two butterflies one slightly larger than the other, inked the edges with brown ink, and glued them in the center. I finished the butterfly by using glitter glue in its body and then folded up the wings to give it some dimension. Added some buttons, pearls, and some twine and then put the frame back together again... and voila a beautiful personalized picture frame!

I hope you enjoyed this and thanks for stopping by!

Ilda :)

Saturday, February 11, 2012

Cake Pop Gift Box - FREE DOWNLOAD

Hello and welcome to my blog! This is my first official post!!! Today I am sharing with you a cake box that I've created in SCAL2. I decided to enter it in the SVG Cuts Valentine challenge. I had such great feedback from SVG Cuts Facebook followers, and many requests to share the file. So I thought the easiest way would be to create a blog. I have been putting that off for so long but I finally caved! Not sure how often I will be posting...  life is so crazy busy right now! 

Anyways back to the post... here is my Cake Pop Gift Box! It is tall enough for a 6-inch stick, you can also use a 4-inch stick but the cake pop will sit on the paper. Hope you love it as much as I do! The Rose comes from SVG Cuts Crush on you kit , the chocolate truffle and borders come from their Free Designs on their Blog.

Cake Pop Gift Box - FREE DOWNLOAD by ilovedoingallthingscrafty.com

Click on the link below to get your own box. Please remember I am not a graphic designer, nor do I claim to be one. This file was done in SCAL2 and cut with the Cricut Expression machine (yes I know!) So I'm pretty sure it will work with the SCAL programs. Not so sure it will work with other software! But let me know if it does or if you know how to make it work. Thanks for understanding. Enjoy!

Ilda :)

My free files RULES!!!

  1. If you choose to download all I ask is you become a follower.
  2. Note my files are for personal use only! (Personal use means... only for you to use (no trading, or sharing of my files... let me do that!) 
  3. If you want to share, send your friends over to my blog for the download. 
  4. I'm OK with people sharing my files on their own sites as long as there is a direct link back to this blog...Give credit where credit is due! (a message to me would also be appreciated)
Cake Pop Gift Box

If you would like to donate, (click the 👉DONATE button on the sidebar) I will happily accept any amount you see fit. No pressure at all either :) It will just make my day that someone wants to support my passion.