Showing posts with label black and white. Show all posts

Monday, June 3, 2019

Simple Piano Cards | Honey Bee Stamps


Simple Piano Cards for Honey Bee Stamps by ilovedoingallthingscrafty.com

Hello Everyone!

Today I have made a few examples of how to create some simple Piano Cards for any occasion.

CARD DETAILS
For my first Piano card, I decided to make it into a Birthday Card.

To begin all off these cards I stamped out the piano keys from the MUSIC SPEAKS multiple times onto a card panel and then used my trimmer to cut them along the stamped edge. You can make these cards horizontal or vertical, either way, all you do is glue the keys along the bottom of a black card base. The horizontal keys fit perfectly onto an A2 card base, on a vertical card base, I just trimmed off the excess as I did in the next few cards.

The next thing I did was stamp the musical notes from the MUSIC SPEAKS set onto black cardstock and then heat set them in using white embossing powder. For this birthday card, I also stamped out the "Happy To You" using stamps from the HAPPY BIRTHDAY set.

To finish the greeting on the center of this card I stamped out the scripted Birthday and then used the coordinating HAPPY BIRTHDAY HONEY CUTS to die cut it out and then colored the dotted shadow layer using Copic markers in rainbow colors.

Simple Piano Cards for Honey Bee Stamps by ilovedoingallthingscrafty.com

Once the top panels were done I added foam tape to pop up the card panel and then trimmed off the excess.

TIP: When creating cards with a black card base it looks nicer if you don't see a white foam tape from a side view angle. So to fix that I use the broad tip of my black Copic marker and run it along the foam tape while it's still on the roll. I then just color the snipped end it is visible from the side of the card.

Simple Piano Cards for Honey Bee Stamps by ilovedoingallthingscrafty.com

These two cards were made exactly the same way as the birthday one but vertically. To these, I stamped a few greetings from the ROCKSTAR SENTIMENTS stamp set. I also added a couple of white satin bows and some CRYSTAL PRISM GEM stickers for shine.

For a little pop of color, I added a couple of die cut hearts that I had previously die cut from the BUSY BEE set. To the hearts, I added some Liquid Pixie Dust and then finished them off with a layer of glossy accents.

Simple Piano Cards for Honey Bee Stamps by ilovedoingallthingscrafty.com

I hope you were inspired by these Musical Piano Cards. I think these would also make great cards for a music teacher or any music lover in your life. For more inspiration using these products visit the Honey Bee Stamps Blog.

Thank you for stopping by 😊
Until next time... Happy Crafting 👋

SUPPLIES


MUSIC SPEAKS
MUSIC SPEAKS
Shop at:
HBS
HAPPY BIRTHDAY
HAPPY BIRTHDAY
Shop at:
HBS
ROCKSTAR SENTIMENTS
ROCKSTAR SENTIMENTS
Shop at:
HBS
HAPPY BIRTHDAY | HONEY CUTS
Shop at:
HBS
BUSY BEE | CUTS
BUSY BEE | CUTS
Shop at:
SSS | SB | HBS
CRYSTAL PRISM GEM STICKERS
Shop at:
HBS
Mini Misti Tool
Mini Misti Tool
Shop at:
SSS | AMZ | SB | SK
Black Cardstock 110bs
Shop at:
AMZ
Juicy  Ink
Juicy Ink
Shop at:
SSS | IO3
Arctic White Ultra Powder
Shop at:
SSS | IO3
Blackout Ink
Blackout Ink
Shop at:
SSS | IO3
Liquid Pixie Dust
Liquid Pixie Dust
Shop at:
SSS | IO3
Glossy Accents
Glossy Accents
Shop at:
SSS | AMZ | SB | HBS
GUILLOTINE PAPER TRIMMER
Shop at:
SSS | AMZ | SB

To make supplies easy for you to find, I have linked them above. If something is no longer available I will link to a similar product. Affiliate links may be used depending on the product linked. By shopping through my links you help keep my blog running at no extra cost to you. So thank you in advance for supporting my creations!

Thursday, January 11, 2018

Sending Hugs and Prayers Sympathy Card


Today was a sad day for me...
I said my goodbye to a long time friend, colleague and mentor. I had worked with Jan for almost 20 years. She was super smart, so funny and sarcastic, beautiful, and one the best Nurses I've ever worked with. She was for a very long time our Charge Nurse and go to person for all our questions and always someone I looked up to and admired.  When I first started at the hospital one day at lunch, I remember a comment Jan made to me. She said that I looked like I was just a kid and that I could be her daughter, (she probably would of had to have me at 16, lol) but from that point on she became my work mom. Today was her celebration of life and though she left us too soon, she had a beautiful one. I will miss her terribly as we all will at work 😪 

So on to today's card...
As sad as the situation is, I always like to look for the beauty in things, and as I made this card I thought of Jan. I think Jan would of loved this card and hopefully her family will too.

Sending Hugs and Prayers Sympathy Card

The card was actually quite simple to put together. I began by stamping out the background with versamark ink and then added some Raven embossing powder and heat set it, then die cut my panel.
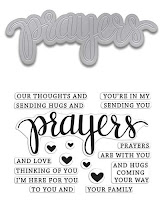
Next, I cut out the prayers word die 4 times. To the top prayer die I stamped the coordinating stamp on top again using versamark ink and this time used gold embossing powder and heat set it. I then stacked and glued 3 of the word dies together. Finally I cut out the velum layer, stamped and heat set the images and then glued the prayers in place. Right behind where I had glued the prayers stacked dies, I then glued the last die cut behind the vellum. This created a larger surface area to adhere the vellum layer to the front panel and it also lifted the vellum off the card ever so slightly.

Sending Hugs and Prayers Sympathy Card

To the inside, I just finished the card with this simple sentiment.


Hope this card Sending Hugs and Prayers Sympathy Card has inspired you today.
Goodbye Jan 💔

Thanks for stopping by!
Happy Crafting  :)

SUPPLIES
To make supplies easy to find, I have linked them below. If something I used is no longer available I will link to a similar product.
Affiliate links may be used depending on the product. Your purchases help keep my blog running, so thanks in advance for the support!
EMMA BACKGROUND Hey Love
Shop at:
SSS
HA Stamp And Cuts PRAYERS Coordinating Set
Shop at:
SSS | AMZ
VersaMark Watermark Stamp Pad
Shop at:
SSS | AMZ

Vellum Value Pack 8.5"X11" 50/Pkg
Shop at:
AMZ
Spellbinders PIERCED RECTANGLES
Shop at:
SSS | AMZ
Sizzix Big Shot
Sizzix Big Shot
Shop at:
SSS | AMZ
Sizzix Big Shot Magnetic Platform
Shop at:
AMZ
STANDARD CUTTING PADS
Shop at:
SSS | AMZ
ZIG Glue Pen FINE TIP Two Way Acid Free
Shop at:
SSS | AMZ
Simon Says Stamp 2.5 Inch ACRYLIC BLOCK
Shop at:
SSS
Ranger Embossing Powder, Super Fine Gold
Shop at:
SSS | AMZ
Brutus Monroe Ultra Fine Embossing Powder Raven
Shop at:
SSS
Inkadinkado Embossing Magic
Shop at:
SSS | AMZ
Black & Decker HG1300 Dual Temperature Heat Gun
Shop at:
AMZ
Recollections White Heavyweight Cardstock 110bs
Shop at:
AMZ
Recollections Black Heavyweight Cardstock 110bs
Shop at:
AMZ
Elmers X-Acto 12” Base Guillotine
Shop at:
AMZ
Martha Stewart Crafts Scoring Board 12x12
Shop at:
AMZ

Wednesday, June 26, 2013

Thank you for the Music | Piano Gift Box | SVGCuts

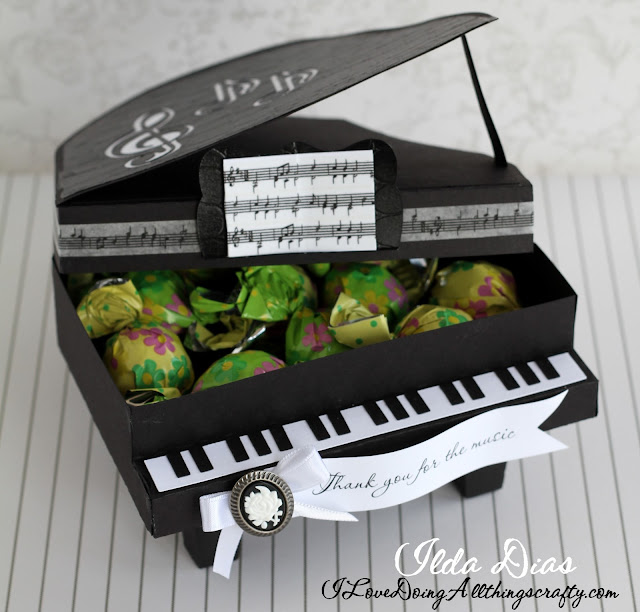
My daughter starts her summer break from piano lessons this week. So when SVGCuts came out with this piano from Thank You For the Music SVG Kit, I knew I had to make it for my daughter's piano teacher. 

Isn't it awesome?! I absolutely love how it turned out, classic and elegant!

Gift,piano teacher,3D piano treat box,ilovedoingallthingscrafty,black and white,SVG Cut Files,SVGCuts,Thank you for the Music SVG kit,Paper crafts,Cricut,

Thank you for the music... for giving it to me. Doesn't that remind you of the ABBA song??? I can't get it out of my head now (doesn't that drive you nuts when that happens?!?)

I didn't have a stamp to coordinate so I used the print n cut feature of the Silhouette to print and cut the tag. The font I used is called scriptina. On the lid of the box and book, I wrapped some musical note washi tape by Recollections. 


The best part of this piano is that it's functional... it has enough storage for treats or maybe even a little gift! LOVE it! So simple and elegant and surprisingly easy to put together :) 

Thank you for the Music | Piano Gift Box | SVGCuts by ilovedoingallthingscrafty.com

Thanks so much for stopping by, hope you like this little piano treat box. If you have a piano player in your life, surprise them with one of these beauties... I'm sure they'll love it!

Happy Crafting :)

Sunday, April 21, 2013

Ninjago Birthday Cake

Good Morning everyone! I have pre-scheduled this post because I'm sure I'm going to need to recover from the night's festivities!

Today I am sharing with you the cake I made for my son's 9th Ninjago themed Birthday Party!
What do you think? I love how he turned out!!! Actually, wasn't very hard to make either.

Ninjago Birthday Cake

Here's a quick pictorial on how I made "KAI's" head.

Ninjago Birthday Cake

  1. I baked, sliced and filled with icing, the centers of two 5 inch cakes. Separating the layers with a cake board.
  2. Next, I dirty iced the entire head.
  3. Rolled out my fondant pieces. For the eyebrow, I drew and cut out a shape on a piece paper first and laid it on the fondant then cut it out with the tip of a sharp knife.
  4. I placed my pieces on top of the rolled fondant I used as the face. I "glued" the pieces with a little water using a small paintbrush.
  5. Then I placed the face on the head. At this point, I placed the head on the bottom layer of the cake that I had already covered with black fondant.
  6. Finally, I wrapped the rest of the head with Kai's Ninja mask.

The top part of the cake is chocolate flavored and the bottom 10 inch layer is made out of a yellow cake. The entire cake is covered with a vanilla buttercream icing and finished with fondant.


Hope you have enjoyed this Ninjago Birthday Party Series of posts, I hopefully will have some pictures of the party to share with you all soon!

Up next...


Have a great Sunday and thanks for coming by,
Happy Crafting :)