Showing posts with label distress oxide inks. Show all posts

Tuesday, January 14, 2025

If You Were a Carrot: A Charming Piggie-Themed Card | Picket Fence Studios

A handmade card featuring a pig pulling a carrot, with a colorful stenciled background, sparkly clouds, and sequins. Includes the sentiment "If you were a carrot, I'd always pick you."

Welcome to the blog! Today, I’m sharing an adorable handmade card featuring the Big Piggie Hugs Stamp and Die Set from the January Release by Picket Fence Studios. This playful and heartfelt design is perfect for brightening someone’s day with a sweet and creative sentiment: "If you were a carrot, I’d always pick you!"

Before we dive into the details, make sure you head over to my 👉Instagram and join the HOP, for the MEGA giveaway celebrating the first Hop of the Year!

Let’s dive into how this card came to life and highlight the fantastic products and techniques used.

CARD RECIPE
  1. Stamp and Die Set: Big Piggie Hugs Stamps and coordinating dies
  2. Stencil Set: Scene Building A2 Stencil Set: Layers of Adventure
  3. Sequin Mix: Blissful Beauties
  4. Other Essentials:
A handmade card featuring a pig pulling a carrot, with a colorful stenciled background, sparkly clouds, and sequins. Includes the sentiment "If you were a carrot, I'd always pick you.

The cute piggie image from the Big Piggie Hugs Stamp Set is the star of this card. I stamped it using the PFS Black Hybrid Ink, colored it with Copic Markers, and added finishing highlights using a white gel pen. The basket of vegetables and oversized carrot bring the scene to life with their bright, playful colors.

The sky was ink-blended with soft pastel tones using Distress Oxide Inks and the Life-Changing Blender Brushes. I used the Scene Building A2 Stencil Set to shape the fluffy clouds, which were embellished with Chunky Glitter for added sparkle. This touch gives the card a whimsical and dreamy vibe.

A handmade card featuring a pig pulling a carrot, with a colorful stenciled background, sparkly clouds, and sequins. Includes the sentiment "If you were a carrot, I'd always pick you.

If you’re inspired to create your own piggie-themed card, make sure to check out the latest release from Picket Fence Studios. Their innovative tools and high-quality products make crafting fun and enjoyable. Let your creativity flow and share your unique take on this design!

I hope you enjoyed this card and feel inspired to create your own. Thank you for stopping by and until next time... Happy Crafting! 
Ilda 💖

To make supplies easy for you to find, I have linked them above. If something is no longer available I will link to a similar product. Affiliate links may be used depending on the product linked. Please help support my blog by using these links while shopping at no additional cost to you. For more information about the affiliates I use, please visit my disclaimer here. Thanks so much for all your support!

Enjoyed this post? Never miss out on future posts by Following this Blog

Monday, December 16, 2024

Life is Better with a Furry Friend Card | Picket Fence Studios

A colorful handmade card featuring two adorable puppies sitting on a teal pillow with the sentiment "Life is better with a friend" in rainbow colors. The background has rainbow paw prints and shiny bone patterns.

Hello, crafty friends! I am so excited to share a delightful card made with some amazing products from Picket Fence Studios' December release. This card combines adorable designs, bright colors, and a touch of sparkle for a truly joyful creation. And guess what? If you'd like to see this card come together step by step, I’ve got a REEL over on my Instagram page—be sure to check it out! Let’s dive into the details!

CARD RECIPE

For this project, I played with the following fabulous Picket Fence Studios products:

Staple Products/Tools: 

Creating the Background

The base of the card features a colorful background with paw prints and bones, and here’s how I achieved it:

  1. Stenciling the Rainbow Paws: I used Life Changing Blender Brushes with Distress Oxide Inks in Squeezed Lemonade, Picked Raspberry, and Broken China. These blend beautifully to create a cheerful gradient across the paw prints.
  2. Adding the Twinkling Bones: Using the bones layer of the Fetch Layering Stencil Set, I applied Twinkle Lights Clear Glaze for a subtle shine. This glaze adds dimension while keeping the background clean and playful.
A colorful handmade card featuring two adorable puppies sitting on a teal pillow with the sentiment "Life is better with a friend" in rainbow colors. The background has rainbow paw prints and shiny bone patterns.

The Dome Panel

To create the focal point for the card:

  1. I die-cut the dome shape using the Basic Die Cutting Set 1.
  2. For the shadow under the pillow, I masked the area with a sticky note and blended Black Soot Distress Oxide Ink using a Life Changing Blender Brush.
  3. I layered the adorable puppy duo from the Happy Paws Stamp and Die Set on top of the shadow, popping them up with foam for dimension. These sweet friends were colored with Copic markers and enhanced with white and gold gel pens for highlights and tiny details.
A colorful handmade card featuring two adorable puppies sitting on a teal pillow with the sentiment "Life is better with a friend" in rainbow colors. The background has rainbow paw prints and shiny bone patterns.

Sentiment and Color Coordination

The sentiment, “Life is better with a friend,” perfectly matches the cozy scene. To keep the theme vibrant:

  • Once the sentiment was positioned in the Misti, I then added the Squeezed Lemon to the middle of the stamp and diffused the edges of the ink using a Pint-sized Paper Pouncer to blend it out. I then moved on to the Picked Raspberry on top and the Broken China on the bottom. Diffusing each color with the coordinating Pint-sized Paper Pouncer. This colorful sentiment mirrors the rainbow tones from the background.
  • This cohesive approach ties the entire design together beautifully!

Crafty Tip: Seamless Die Cuts

When working with multiple die-cut images that have white border edges, you can create the illusion of a seamless join by following this trick:

  1. Die-cut your images and arrange them to determine where they overlap.
  2. Fussy cut the white edge off one of the images where it overlaps with the other.
  3. To clean up the cut edge, run a black marker along it to mimic the stamped outline.
  4. Glue the two pieces together, and voilà! Your die-cut images will look like one continuous piece.

This tip works perfectly for the adorable puppy duo on this card!

Finishing Touches

To assemble:

  1. I adhered the stenciled background to a card base.
  2. The dome panel was popped up with foam tape for added depth.
  3. For the final touch, I scattered Celestial Skies Gems around the design, adding a hint of sparkle.
A colorful handmade card featuring two adorable puppies sitting on a teal pillow with the sentiment "Life is better with a friend" in rainbow colors. The background has rainbow paw prints and shiny bone patterns.

This card is bursting with personality, from the happy pups to the rainbow hues and sparkling details. It’s a heartwarming reminder that life truly is better with friends—especially the furry ones!

Have you tried the new Picket Fence Studios December release yet? Let me know your favorite products and creations in the comments. And don’t forget to watch the reel on Instagram for all the behind-the-scenes crafty fun. Until next time, happy crafting! 
Ilda🐾✨

To make supplies easy for you to find, I have linked them above. If something is no longer available I will link to a similar product. Affiliate links may be used depending on the product linked. Please help support my blog by using these links while shopping at no additional cost to you. For more information about the affiliates I use, please visit my disclaimer here. Thanks so much for all your support!

Enjoyed this post? Never miss out on future posts by Following this Blog

Thursday, October 24, 2024

Let’s Get Lost Together – A HeroScape Inspired Card | Hero Arts + Ralph Tyndall

A handmade card featuring a cityscape with tall buildings on both sides of a road, stamped in black ink, with vibrant colors blending on the buildings, a couple holding hands walking down the street, a sentiment that reads "let's get lost together" at the bottom, black gems as embellishments, and clouds in the sky.

Hello Crafty Friends,

There’s something magical about getting lost in new places with someone you love. That sense of adventure, the thrill of exploration—it’s what inspired this card using the latest release from Hero Arts + Ralph Tyndall's Fall 2024 Collection. Every element of this card brings to life those moments of wandering together, discovering the unknown, and embracing the journey.

CARD RECIPE
  • HA + RT Street-view HeroScape Bundle (stamps and dies): I used these for the cityscape backdrop and that adorable couple silhouette.
  • Intens-ified Black Ink Pad: Perfect for stamping those bold city lines.
  • Unicorn Pigment Ink: Added delicate details like the painted road lines on black cardstock for a real urban vibe.
  • City Park HeroScape Frame Cuts (clouds): These were borrowed from an older, discontinued set to give the skyline some depth and a touch of the open sky.
  • Distress Oxide Inks: Squeezed Lemon, Picked Raspberry, and Broken China blended beautifully to create colorful city reflections.
  • Embellishments: Finished the card with black gem details, adding just the right amount of sparkle.

  • Card Process:

    I started by using the Distress Oxide Inks (Squeezed Lemon, Picked Raspberry, Broken China) and randomly added ink to the solid background stamps to create the reflective tones on the buildings. These soft, yet vibrant colors mimic the essence of a fresh city, reflecting all the excitement of an evening stroll.

    Next, I stamped the street view using the Street-view HeroScape Bundle, filling in the skyline with the layered stamps to create the depth of the urban setting. The black lines were stamped with the Intens-ified Black Ink Pad, which brought out the bold contrast I needed for the buildings and road.

    To create the road, I stamped on black cardstock and used the Unicorn Pigment Ink to draw in the lane dividers—this small detail made the scene come to life. I then trimmed the cardstock and built the scene around the road.

    A handmade card featuring a cityscape with tall buildings on both sides of a road, stamped in black ink, with vibrant colors blending on the buildings, a couple holding hands walking down the street, a sentiment that reads "let's get lost together" at the bottom, black gems as embellishments, and clouds in the sky.

    For the finishing touches, I added the City Park HeroScape Frame Cuts clouds from a retired set (Hero Kit DECEMBER 2021), softly placing them in the sky to contrast with the bustling city. To the sky, I added a soft blending of Broken Chin DO ink. A sprinkle of black gems added a little shimmer to the scene, completing the design.

    The sentiment, "Let’s Get Lost Together," from the same HeroScape Bundle, speaks to my personal connection with this card. It reminds me of the times my husband and I have wandered new cities together, letting the streets lead us to unexpected adventures. There’s something so special about sharing those quiet moments in unfamiliar places.

    A handmade card featuring a cityscape with tall buildings on both sides of a road, stamped in black ink, with vibrant colors blending on the buildings, a couple holding hands walking down the street, a sentiment that reads "let's get lost together" at the bottom, black gems as embellishments, and clouds in the sky.

    This card not only reflects my love for urban landscapes but also the joy of exploring the unknown with a loved one by your side. Whether you’re a fan of cityscapes or just want to create a card with a meaningful sentiment, this HeroScape set offers endless possibilities.

    What places have you explored with your loved ones?

    Thank you for stopping by and until next time... Happy Crafting!
    Ilda🏙

    To make supplies easy for you to find, I have linked them above. If something is no longer available I will link to a similar product. Affiliate links may be used depending on the product linked. Please help support my blog by using these links while shopping at no additional cost to you. For more information about the affiliates I use, please visit my disclaimer here. Thanks so much for all your support!

    Enjoyed this post? Never miss out on future posts by Following this Blog

    Wednesday, October 23, 2024

    Hero Arts + Ralph Tyndall Fall 2024 Release | Rockettes-Inspired Christmas Card

    Hero Arts, Ralph Tyndall, Fall 2024 Release, Christmas Card, Rockettes Inspired Card, DF186 Stage Curtain Fancy Die, SA264 Color Layering Stage Curtain Stencils, SB416 Holiday Marquee Messages Bundle, SB414 Sparkling Holiday Stage Bundle, Copic Markers, Liquid Applique, Gel Pens, Distress Oxide Inks, Holiday Cardmaking, Handmade Cards

    Hello, creative friends! Today, I'm excited to share a festive and fabulous card inspired by the iconic Rockettes, featuring some amazing new products from the Hero Arts + Ralph Tyndall Fall 2024 Release! This card showcases the glamorous holiday spirit, complete with a marquee message, stage curtains, and a trio of high-kicking dancers. For those of you who want a chance to win one of two $50 gift cards from Hero Arts, click HERE to join the IG Hop.


    Let’s take a closer look at how I brought this holiday scene to life.

    CARD RECIPE

    How I Created the Card:

    Creating the Stage: The star of this card is the DF186 HA + RT Stage Curtain Fancy Die, which cuts a beautiful stage curtain, framing the scene. I used the SA264 HA + RT Color Layering Stage Curtain Stencils to ink blend the stage with rich reds and oranges, giving it that theater feel. The distress oxide inks were perfect for blending out a smooth and vibrant backdrop.

    Hero Arts, Ralph Tyndall, Fall 2024 Release, Christmas Card, Rockettes Inspired Card, DF186 Stage Curtain Fancy Die, SA264 Color Layering Stage Curtain Stencils, SB416 Holiday Marquee Messages Bundle, SB414 Sparkling Holiday Stage Bundle, Copic Markers, Liquid Applique, Gel Pens, Distress Oxide Inks, Holiday Cardmaking, Handmade Cards

    Stamping & Coloring the Dancers: I stamped the dancers from the SB414 HA + RT Sparkling Holiday Stage Bundle using India Black Ink. These fabulous ladies were brought to life with Copic Markers, keeping their costumes classic in red and white. I added dimension to their Santa hats and outfits with Liquid Applique, which puffed up to create a fluffy texture once heat set.

    Spotlights and Marquee Sign: The SB416 HA + RT Holiday Marquee Messages Bundle was perfect for the large, bold “Merry Christmas” sign. After die-cutting the marquee, I colored it in and added small details with a gold gel pen to mimic the lights around the sign. I also glued down two small gems to act as spotlights shining down on the stage.

    Finishing Touches: I used foam adhesive to pop up the dancers and marquee for added dimension. For extra sparkle, I used a sparkle gel pen on small details like the wreath and presents, and added highlights with a white gel pen to give the scene a polished look.

    Hero Arts, Ralph Tyndall, Fall 2024 Release, Christmas Card, Rockettes Inspired Card, DF186 Stage Curtain Fancy Die, SA264 Color Layering Stage Curtain Stencils, SB416 Holiday Marquee Messages Bundle, SB414 Sparkling Holiday Stage Bundle, Copic Markers, Liquid Applique, Gel Pens, Distress Oxide Inks, Holiday Cardmaking, Handmade Cards

    Inside: To complete this card, I used a sentiment from the SB414 HA + RT Sparkling Holiday Stage Bundle.

    Hero Arts, Ralph Tyndall, Fall 2024 Release, Christmas Card, Rockettes Inspired Card, DF186 Stage Curtain Fancy Die, SA264 Color Layering Stage Curtain Stencils, SB416 Holiday Marquee Messages Bundle, SB414 Sparkling Holiday Stage Bundle, Copic Markers, Liquid Applique, Gel Pens, Distress Oxide Inks, Holiday Cardmaking, Handmade Cards

    This Rockettes-inspired card brings a fun and festive holiday spirit, showcasing the wonderful products from the Hero Arts + Ralph Tyndall Fall 2024 Release. The stage curtain die and layered stencils really brought depth to the scene, while the marquee and dancers give it that Broadway Christmas feel. I hope this card inspires you to create your own holiday-themed stage scenes!

    Don’t forget to check out the full Hero Arts + Ralph Tyndall collection to see all the amazing new releases. Let me know in the comments what is your favorite product from this release—I’d love to see your projects!

    Happy Holidays and Merry Crafting!

    Ilda 🕺

    To make supplies easy for you to find, I have linked them above. If something is no longer available I will link to a similar product. Affiliate links may be used depending on the product linked. Please help support my blog by using these links while shopping at no additional cost to you. For more information about the affiliates I use, please visit my disclaimer here. Thanks so much for all your support!

    Enjoyed this post? Never miss out on future posts by Following this Blog

    Monday, April 1, 2024

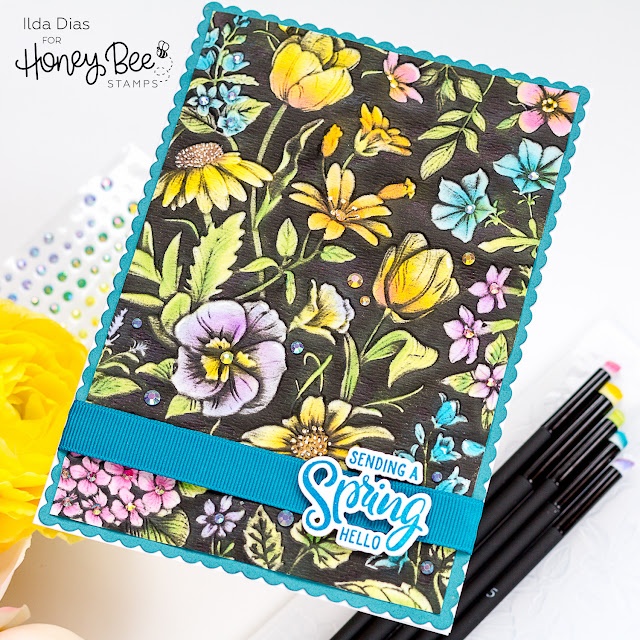
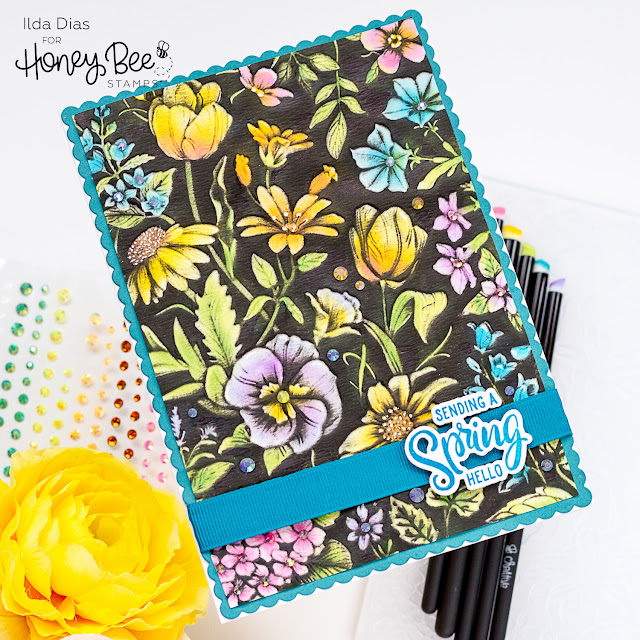
    Spring Hello Card - 3D Blackout Embossing Folder Technique | Honey Bee Stamps

    Spring, Hello Card, 3D Blackout Embossing Folder Technique, Honey Bee Stamps, Sandie's Garden, ink  blending, distress oxide inks, how to, hand made card, Stamps, stamping, die cutting, card making, ilovedoingallthingscrafty,

    ***Please note links in the post are no longer active, if you are looking for something specific use this link here to 👉 HONEY BEE STAMPS and search for the product listed. My apologies for the inconvenience ***

    Hello, my friends, and Happy Easter Monday!

    Have you checked out the Celebrate Release from Honey Bee Stamps yet!? It is to date my favorite release! Lots of  Spring and birthday-themed awesomeness. Plus some pretty cool tools, including the shaker pockets inspired by me! 👧

    For my card today I had to try again the 3D Blackout Embossing Folder Technique I shared a few weeks ago, this time using the new Sandie's Garden - 3D Embossing Folder. If you aren't the best colorist or have visual issues (like me🙋) and prefer ink blending, this is an easy way to color a background. 

    CARD RECIPE


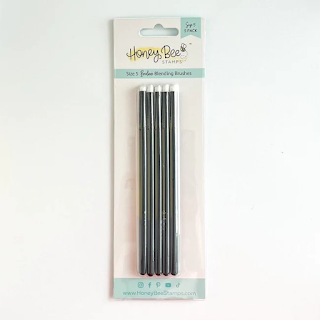
    Remember the cool tools I mentioned earlier, well now Honey Bee has new Beeluxe Detail Blending Brushes! They come in sizes 5, 7, and 10 and are angled to blend into all the small creases and crevasses, making them ideal for a detailed project like this one!

    • Place a piece of watercolor cardstock between the Sandie's Garden - 3D Embossing Folder. I gave it a light mist before running it through an embossing/die-cutting machine. The water just helps mold the paper and prevents any tearing.
    • Add ink to the recessed side/debossed side of the embossed design. I used the new Beeluxe Detail Blending Brushes and distress oxide inks. Don't worry too much about getting a perfect blend or leaving some white areas.

    Spring, Hello Card, 3D Blackout Embossing Folder Technique, Honey Bee Stamps, Sandie's Garden, ink  blending, distress oxide inks, how to, hand made card, Stamps, stamping, die cutting, card making, ilovedoingallthingscrafty,
    • Rub a juicy black ink pad all over the colored recessed side of the panel. In hindsight, I would have used a Bristol Paper rather than the watercolor one I used to make the surface smoother for the ink application. That just means I will have to try this technique again, lol 😉
    • Trim down the panel. This finished card measures 5x7.
    • Glue to the largest Scallop A7 Frame
    Spring, Hello Card, 3D Blackout Embossing Folder Technique, Honey Bee Stamps, Sandie's Garden, ink  blending, distress oxide inks, how to, hand made card, Stamps, stamping, die cutting, card making, ilovedoingallthingscrafty,
    • Wrap coordinating ribbon across the bottom of the card and secure ends to the back using tape.
    • Glue panel onto a side folding A7 Card Base.
    • Stamp out the sentiment from the Storybook Spring stamp set using a matching ink color. I then heat-set it using clear embossing powder.
    • Die cut using coordinating Storybook Spring - Honey Cuts.
    • Add coordinating gems from the Let's Party Gem Stickers.
    • Finish by adding white pen details.
    Spring, Hello Card, 3D Blackout Embossing Folder Technique, Honey Bee Stamps, Sandie's Garden, ink  blending, distress oxide inks, how to, hand made card, Stamps, stamping, die cutting, card making, ilovedoingallthingscrafty,

    If you have not tried this technique yet, now's the perfect time to dive in with the gorgeous new Sandie's Garden - 3D Embossing Folder! And for a visual treat, stay tuned for a Reel on Instagram where I'll showcase the mesmerizing process of creating this card.

    Thank you for stopping by and until next time... Happy Crafting!
    Ilda 🎕

    SUPPLIES
    Sandie's Garden - 3D Embossing Folder
    Sandie's Garden - 3D Embossing Folder
    Shop at:
    HBS
    Scallop A7 Frame Dies
    Scallop A7 Frame Dies
    Shop at:
    SSS | SB | HBS
    Storybook Spring
    Storybook Spring
    Shop at:
    HBS
    Storybook Spring Coordinating Stencils
    Storybook Spring Coordinating Stencils
    Shop at:
    HBS
    Beeluxe Detail Blending Brushes Size 5
    Beeluxe Detail Blending Brushes Size 5
    Shop at:
    HBS
    Beeluxe Detail Blending Brushes Size 7
    Beeluxe Detail Blending Brushes Size 7
    Shop at:
    HBS
    Beeluxe Detail Blending Brushes Size 10
    Beeluxe Detail Blending Brushes Size 10
    Shop at:
    HBS
    Let's Party Gem Stickers
    Let's Party Gem Stickers
    Shop at:
    HBS
    Honey Bee Reverse Tweezers
    Honey Bee Reverse Tweezers
    Shop at:
    HBS
    Bee Creative Glue
    Bee Creative Glue
    Shop at:
    SSS | SB | HBS
    5.5x8.5 Grip Mat
    5.5x8.5 Grip Mat
    Shop at:
    SB | HBS | WF
    Kitsch Flamingo Distress Oxide Ink
    Kitsch Flamingo Distress Oxide Ink
    Shop at:
    SSS | SB | HBS
    Oxide Ink Pad PICKED RASPBERRY
    Oxide Ink Pad PICKED RASPBERRY
    Shop at:
    SSS | SB | HBS
    MUSTARD SEED DISTRESS OXIDE
    MUSTARD SEED DISTRESS OXIDE
    Shop at:
    SSS | SB | HBS
    Squeezed Lemonade Distress Oxide Ink
    Squeezed Lemonade Distress Oxide Ink
    Shop at:
    SSS | SB | HBS
    CARVED PUMPKIN Oxide Ink
    CARVED PUMPKIN Oxide Ink
    Shop at:
    SSS | SB | HBS
    Oxide Ink Pad TWISTED CITRON
    Oxide Ink Pad TWISTED CITRON
    Shop at:
    SSS | SB | HBS
    Mowed Lawn Oxide Ink
    Mowed Lawn Oxide Ink
    Shop at:
    SSS | SB | HBS
    Broken China Oxide Ink
    Broken China Oxide Ink
    Shop at:
    SSS | SB | HBS
    Mermaid Lagoon Oxide Ink
    Mermaid Lagoon Oxide Ink
    Shop at:
    SSS | AMZ | SB | HBS
    Oxide Ink Pad WILTED VIOLET
    Oxide Ink Pad WILTED VIOLET
    Shop at:
    SSS | SB | HBS
    Oxide Ink SHADED LILAC
    Oxide Ink SHADED LILAC
    Shop at:
    SSS | SB | HBS
    WALNUT STAIN DISTRESS OXIDE
    WALNUT STAIN DISTRESS OXIDE
    Shop at:
    SSS | SB | HBS
    VersaFine ONYX BLACK Ink
    VersaFine ONYX BLACK Ink
    Shop at:
    SSS | AMZ | SB | HBS
    Platinum 6 Die Cutting Platform
    Platinum 6 Die Cutting Platform
    Shop at:
    SSS | SB
    CRYSTAL CLEAR Emb Pwd
    CRYSTAL CLEAR Emb Pwd
    Shop at:
    SSS | IO3
    White Gelly Roller Pen
    White Gelly Roller Pen
    Shop at:
    SSS | AMZ | SB | HBS
    To make supplies easy for you to find, I have linked them above. If something is no longer available I will link to a similar product. Affiliate links may be used depending on the product linked. Please help support my blog by using these links while shopping at no additional cost to you. For more information about the affiliates I use, please visit my disclaimer here. Thanks so much for all your support!

    Enjoyed this post? Never miss out on future posts by Following this Blog

    Monday, October 16, 2023

    Fall Forrest Friends Friendship Card | Honey Bee Stamps

    Fall,Heart Hugs Dies, Friendship Card, Honey Bee Stamps, how to,handmade card,Stamps,ilovedoingallthingscrafty,stamping, diecutting,cardmaking,Autumn Delight, Stencil,Ink Blending,distress oxide inks,

    ***Please note links in the post are no longer active, if you are looking for something specific use this link here to 👉 HONEY BEE STAMPS and search for the product listed. My apologies for the inconvenience ***

    Hello, my friends, and Happy Monday!

    I have the cutest forest friends' friendship card to share with you today featuring some new and a few classic products from Honey Bee Stamps, so let's get started on all the details.

    CARD RECIPE

    • Die cut and piece together the cuties from the Heart Hugs Dies set. I added shading on the necks using the flip side of their coordinating die as a mask. I also added white gel highlights for fun. 

    Fall,Heart Hugs Dies, Friendship Card, Honey Bee Stamps, how to,handmade card,Stamps,ilovedoingallthingscrafty,stamping, diecutting,cardmaking,Autumn Delight, Stencil,Ink Blending,distress oxide inks,

    Fall,Heart Hugs Dies, Friendship Card, Honey Bee Stamps, how to,handmade card,Stamps,ilovedoingallthingscrafty,stamping, diecutting,cardmaking,Autumn Delight, Stencil,Ink Blending,distress oxide inks,
    I hope this super cute card inspired you. Thank you for stopping by and until next time... Happy Crafting!

    Ilda 🐻🦊

    SUPPLIES

    Autumn Delight Background Stencils
    Autumn Delight Background Stencils
    Shop at:
    SSS | SB | HBS
    Kind People
    Kind People
    Shop at:
    SSS | SB | HBS
    Kind People Dies
    Kind People Dies
    Shop at:
    SSS | SB | HBS
    Heart Hugs Dies
    Heart Hugs Dies
    Shop at:
    SSS | SB | HBS
    Detail Blender Brushes
    Detail Blender Brushes
    Shop at:
    SSS | HBS
    Background Blender Brushes
    Background Blender Brushes
    Shop at:
    SSS | HBS
    Bee Creative Brilliant White Pigment Ink
    Bee Creative Brilliant White Pigment Ink
    Shop at:
    SSS | SB | HBS
    Harvest Pearl Stickers
    Harvest Pearl Stickers
    Shop at:
    SSS | SB | HBS
    Stamping Pressure Tool
    Stamping Pressure Tool
    Shop at:
    HBS
    Bee Creative Bitty Buzz Cutter
    Bee Creative Bitty Buzz Cutter
    Shop at:
    HBS
    Bee Creative Glue
    Bee Creative Glue
    Shop at:
    SSS | SB | HBS
    Honey Bee Reverse Tweezers
    Honey Bee Reverse Tweezers
    Shop at:
    SSS | HBS
    White Foam Dots
    White Foam Dots
    Shop at:
    HBS
    5.5x8.5 Grip Mat
    5.5x8.5 Grip Mat
    Shop at:
    SSS | SB | WF
    Oxide Ink Pad TATTERED ROSE
    Oxide Ink Pad TATTERED ROSE
    Shop at:
    SSS | SB
    GATHERED TWIGS Oxide Ink
    GATHERED TWIGS Oxide Ink
    Shop at:
    SSS | SB | HBS
    CARVED PUMPKIN Oxide Ink
    CARVED PUMPKIN Oxide Ink
    Shop at:
    SSS | SB | HBS
    FESTIVE BERRIES Oxide Ink
    FESTIVE BERRIES Oxide Ink
    Shop at:
    SSS | SB | HBS
    CANDIED APPLE Oxide Ink
    CANDIED APPLE Oxide Ink
    Shop at:
    SSS | SB | HBS
    PEELED PAINT Oxide Ink
    PEELED PAINT Oxide Ink
    Shop at:
    SSS | SB | HBS
    Mowed Lawn Oxide Ink
    Mowed Lawn Oxide Ink
    Shop at:
    SSS | SB | HBS
    New Mini Misti
    New Mini Misti
    Shop at:
    SSS | SB | HBS
    Bearly Art Precision Glue
    Bearly Art Precision Glue
    Shop at:
    SSS | AMZ | HBS
    White Gelly Roller Pen
    White Gelly Roller Pen
    Shop at:
    SSS | AMZ | SB |
    HBS
    To make supplies easy for you to find, I have linked them above. If something is no longer available I will link to a similar product. Affiliate links may be used depending on the product linked. Please help support my blog by using these links while shopping at no additional cost to you. For more information about the affiliates I use, please visit my disclaimer here. Thanks so much for all your support!

    Enjoyed this post? Never miss out on future posts by Following this Blog