Showing posts with label Autumn. Show all posts

Monday, October 14, 2019

3-D Die Cut Autumn/Thanksgiving Cards | Studio Katia

3-D Die Cut Autumn/Thanksgiving Cards | Studio Katia by ilovedoingallthingscrafty.com

Hello, and Happy Thanksgiving to all my Canadian Friends!

It is only fitting that I share with you some Thanksgiving Cards today featuring a bunch of products from Studio Katia's last release.

CARD DETAILS

As you can see the focal point of these cards is done in 3D. So let me break down how each card came together.

3-D Die Cut Autumn/Thanksgiving Cards | Studio Katia by ilovedoingallthingscrafty.com

For the acorn version of the card, I began by die cutting the pieces of the SHAKER ACORN die 4 times. I then scored and folded each piece down the middle and applied a thin bead a glue down the crease and glued each layer in place.

Next, I glued the bottom acorn flat to the card panel that I had die cut using the large frame from the DARLING RIBBON AND FRAMES DIES set. I then die cut the outline of the acorn from black cardstock and glued it around the 3D acorn.

3-D Die Cut Autumn/Thanksgiving Cards | Studio Katia by ilovedoingallthingscrafty.com

The sentiment on this cute card comes from the AUTUMN BORDERS stamp set. I then finished it off by adding some EXOTIC ONYX PEARLS and adding an orange bow to the stem.

3-D Die Cut Autumn/Thanksgiving Cards | Studio Katia by ilovedoingallthingscrafty.com

For this next card, I repeated the same process as the previous card only this time I used the SHAKER APPLE DIE set.

3-D Die Cut Autumn/Thanksgiving Cards | Studio Katia by ilovedoingallthingscrafty.com

Here again, I used the AUTUMN BORDERS stamp set for the greeting only this time I embellished with ARCTIC BREEZE PEARLS.

3-D Die Cut Autumn/Thanksgiving Cards | Studio Katia by ilovedoingallthingscrafty.com

For this last card, I used the SHAKER PUMPKIN DIE set to make the 3D pumpkin. I then glued it on to a background panel that I had die cut using the HALFTONE DOTS CIRCLE DIES and the large frame from the DOTTED PATTERNS SET 3.

3-D Die Cut Autumn/Thanksgiving Cards | Studio Katia by ilovedoingallthingscrafty.com

I then glued the panel to a Kraft card base, stamped out the sentiment from the AUTUMN BORDERS stamp set and finished it off by adding some RIPE PERSIMMON PEARLS.

3-D Die Cut Autumn/Thanksgiving Cards | Studio Katia by ilovedoingallthingscrafty.com

And as you can see from this next photo, all the cards all fold flat for sending them through the mail.

3-D Die Cut Autumn/Thanksgiving Cards | Studio Katia by ilovedoingallthingscrafty.com

I hope these 3-D Die Cut Autumn/Thanksgiving Cards inspired you today. They are actually quite simple to make and the results look amazing.  I'd encourage you to give these a try!

Thank you for stopping by 😊
Until next time... Happy Crafting 👋


SUPPLIES
AUTUMN BORDERS
AUTUMN BORDERS
Shop at:
SSS | SK
SHAKER ACORN DIES
SHAKER ACORN DIES
Shop at:
SSS | SK
SHAKER APPLE DIES
SHAKER APPLE DIES
Shop at:
SSS | SK
SHAKER PUMPKIN DIES
SHAKER PUMPKIN DIES
Shop at:
SSS | SK
DARLING RIBBON AND FRAMES DIES
Shop at:
SSS | SK
DOTTED PATTERNS SET 3 CREATIVE DIES
Shop at:
SSS | SK
HALFTONE DOTS CIRCLE DIES
Shop at:
SSS | SK
EXOTIC ONYX PEARLS
EXOTIC ONYX PEARLS
Shop at:
SSS | SK
ARCTIC BREEZE PEARLS
Shop at:
SSS | SK
RIPE PERSIMMON PEARLS
Shop at:
SSS | SK
TRIANGLE TRAY
TRIANGLE TRAY
Shop at:
SSS | SK
STUDIO KATIA GLUE
STUDIO KATIA GLUE
Shop at:
SSS | SK
Gemini Jr Die Cutting/Embossing Machine
Shop at:
SSS | AMZ | SB
Mini Misti Tool
Mini Misti Tool
Shop at:
SSS | AMZ | SB | SK
Blackout Ink
Blackout Ink
Shop at:
SSS | IO3
To make supplies easy for you to find, I have linked them above. If something is no longer available I will link to a similar product. Affiliate links may be used depending on the product linked. By shopping through my links you help keep my blog running at no extra cost to you. So thank you in advance for supporting my creations!

Tuesday, December 2, 2014

Fallin' Pumpkins 3D Paper Centerpiece | SVG Cuts


Even though it feels like Winter, it still is technically Fall! I know it's hard to believe especially if you're from my side of the world, lol! So here is one more Fall themed project I have to share with you guys :)

Regardless of what the weather is like outside, I am excited to share with you my latest SVG Cuts Design Team post! Here is my Fallin' Pumpkin Centerpiece! Probably one of the tallest creations I have made to date!

Gift,3D,treat box,Autumn,SVG Cuts DT Project,#SVGCuts,Silhouette Cameo,SVG Cuts file,Fallin' Pumpkins Centerpiece,decoration,ilovedoingallthingscrafty,

For all those interested on the SVG Cuts kits I used, here lengthy list below!


Here are a few more close-ups... top view...


flower view,


and a back view...


Here is what it looks like without the bottom container, still gorgeous! I so love the Fall and its gorgeous colors!


I have had this centerpiece on display on one of the Units at the Cross Cancer Hospital where I work! I love how something as simple as paper can become art and brighten up space, maybe even make someone smile!


Hope you have enjoyed my Fallin' Pumpkins as much as I enjoyed creating them :)

Thanks for stopping by!
Happy Crafting  :)

Tuesday, September 24, 2013

Fallen Leaves Card

Yay... The fall is here! My favorite season, the leaves outside are starting to turn colors! Here in my part of Canada, we get a very early and quick season... who knows we could get snow next week, lol! :( I sure hope NOT! Well while it's here I plan to enjoy it!

This month Fleurette Bloom and Trendy Twine have teamed up! So, today I want to share with you another one of my design team projects :)

Fallen Leaves Card

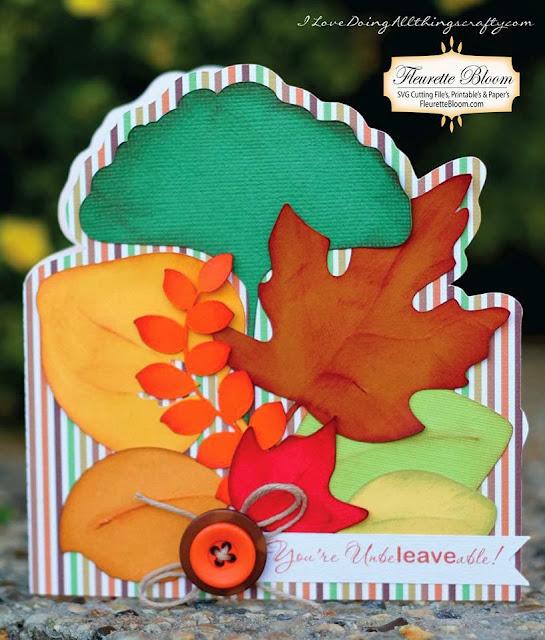
Here is a really fun Fallen Leaves Card I made. Isn't she purty? 

Here is the recipe:
Electronic Cutting Machine (I used the Silhouette Cameo with the SSDE)

Fallen Leaves Card

I created the shaped card by laying out my leaves in the Silhouette's workspace and then created an offset of the grouped image I had laid out. Then I welded a square to the bottom of the offset image to create the base of the card. The next thing you need to do is create a copy of that image and flip horizontally. Line it up at the center, slightly overlapping the image, and then weld them together (make sure the bottom is lined up first). This will become your crease line. Flood your image with the Digi paper of your choice, then use the print and cut feature of your machine. I also created the sentiment tag, using print and cut on the Silhouette. 

I hope you were able to follow along. Feel free to ask questions if you didn't ;)

Thanks so much for stopping by! Make sure you stop by Fleurette Bloom's blog to see some more fun creations from the design team!

Happy Crafting :)