Showing posts with label SCAL. Show all posts

Friday, June 15, 2012

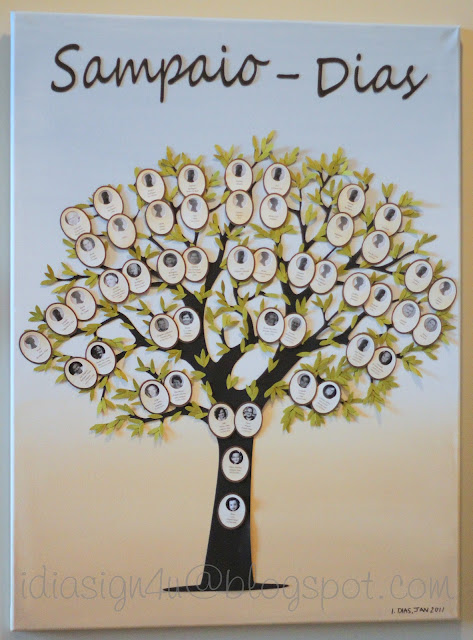
Our Family Tree | DIY Mixed Media Canvas Art Piece

For a while now, well I guess ever since I started the blog I've been wanting to share one of the first crafts I made using my Cricut! It hangs as a piece of art in our hallway, it is such a unique piece. I always love to stop and stare at it!

For those that don't know I am of Portuguese descent. My parents immigrated to Canada from Portugal when I was 2 in 1978. My husband's family is also Portuguese, so for my children, I thought it would be interesting to create this so that they could see their roots.

I guess this project was many years in the making,  every time we had gone back to visit our grandparents I would gather more data for the family tree.  So here is how it turned out!  (I did not include any siblings, because as you can imagine there would not be enough room on the canvas!) 

WARNING... this is a LONG WINDED POST! LOL!!!

Our Family Tree | DIY Mixed Media Canvas Art Piece by ilovedoingallthingscrafty.com

Since I made this piece a while ago and had no blog at the time, I didn't take pictures of the steps it took to make this. I will try my best to explain what I did though. 

The first thing I did was paint my canvas, this one measures 32X24. I really wanted a washed out antique look, so I sprayed water all over the canvas and applied my acrylic paints to it. Light blue for the sky and a light brown for the ground. Once I had both the colors on the canvas I blended the two colors where they met in the middle to create the horizon.

Next came the fun stuff! I found the image of this tree on Google (sorry don't remember exactly where). I then traced the image with the SCAL program. Then I enlarged it to the size I wanted. Since the canvas was way larger than the cutting mat, the tree was made by cutting 4 pieces and overlapping them in some areas. I adhered all the pieces of the tree to the canvas using hot glue. Once my tree was all assembled and glued down I cut out the leaves. The leaves I created from the basic shapes library. When I glued down my leaves I strategically placed them to cover up the paper joints of the tree. 

Our Family Tree | DIY Mixed Media Canvas Art Piece by ilovedoingallthingscrafty.com

The next part was the hardest... Since both sides of our families have the name "Oliveira", I wanted to make the tree look like an olive tree since Oliveira means olive in English. So I thought it would look cute if the frame of the picture looked like an olive, well kinda, sort of maybe not really!! ;) 

To do this I cut out two ovals, one larger than the other. In SCAL I  created a template for the top part of the frame which turned out to be 5 olives/line and 4 rows of them for a total of 20 frames per sheet. Then in using Microsoft Word, I did my best to place the names at the bottom of the frames. (Took a few tries to line it all up... I would place the template on top of the sheet I printed to make sure it all lined up.) Once everything was in line I cut out the paper I had just printed on... 

***This would of all just been so much easier if the Silhouette Cameo had been invented...  I guess I was just ahead of my time, LOL! ;)***

Our Family Tree | DIY Mixed Media Canvas Art Piece by ilovedoingallthingscrafty.com
Once all the frames were cut out, I glued the top of the olive to the bottom brown oval. I only applied glue to the bottom part of the olive frame. 

Our Family Tree | DIY Mixed Media Canvas Art Piece by ilovedoingallthingscrafty.com

This left the top part accessible to change pictures... especially of the kids as they get older, I can stay this age for a while, cause I never age! Muhahaaa!!!

Our Family Tree | DIY Mixed Media Canvas Art Piece by ilovedoingallthingscrafty.com

For those family members that I had no picture for I just used a silhouette. The gentleman with thick sideburns would be my Great, Great, Grand Father, and my Great, Great, Grand Mother just below him. So cool that I had found a picture of them! 

Hope the instructions weren't too confusing for you...
I hope I've inspired you to create your own Family Tree Canvas Art Piece! I would love to see it if you did make one!

Have a great weekend and Happy Father's Day to all the Dad's in your lives!

Sharing this project with Scrap it Girls - November "Tree" Challenge

Tuesday, April 3, 2012

3D Paper Letters - SADIE | & DIY Glass Buttons | SVGCuts


Wow... It feels like a while since my last post! I have been crazy busy... between work, life and planning my sons birthday party for this weekend, I am ready to pull my hair out :(  I'll have posts on my sons "Star Wars" themed birthday crafts hopefully within the next few days! Stay tuned if you are a Star Wars fan :)

But first... I want to share with you the 3D paper name I made last week for my cousins' friend.

3D Paper Letters - SADIE | & DIY Glass Buttons by ilovedoingallthingscrafty.com

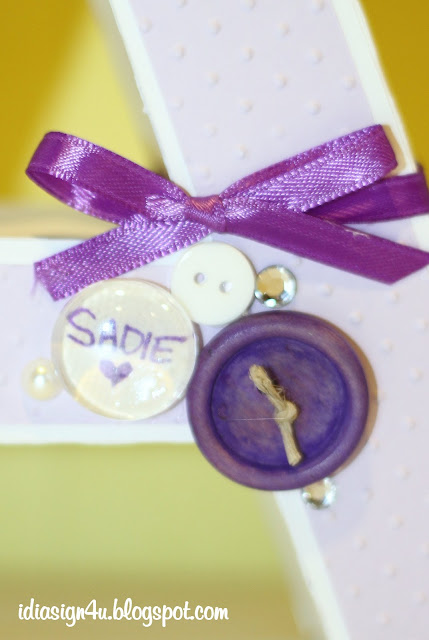
These paper 3D letters stand about 6.5" tall. They were filled with some dried beans to keep them from toppling over. The 3D letters are from SVG Cuts 3D letter kit. The butterfly is from the SCAL library. Added some buttons, bows and a silk flower to dot the "I". Boy did I have a tough time making the "S"... I have made a few of these names in the past but never had to make an "S", maybe next time it will be easier!  The "A" and the "I" were embossed with the Cuttlebug (hard to see in this picture). The paper I purchased at Micheal's in the open card stock paper section, sorry don't have the exact company names for them :(

Here are a few more close-ups.

3D Paper Letters - SADIE | & DIY Glass Buttons by ilovedoingallthingscrafty.com


3D Paper Letters - SADIE | & DIY Glass Buttons by ilovedoingallthingscrafty.com

I don't have an Epiphany Craft button make, but I really do like the look... I did though have glass beads and hot glue, so I made due! I think it turned out pretty cute and so simple. I found this idea on Pinterest here, so I knew I had to try it! 

So here is what I did...

3D Paper Letters - SADIE | & DIY Glass Buttons by ilovedoingallthingscrafty.com

 You need scissors, hot glue, paper, pen, and a flattened glass bead.

3D Paper Letters - SADIE | & DIY Glass Buttons by ilovedoingallthingscrafty.com

Write your message on a scrap piece of paper, and place a fair amount of glue on the back of the glass bead.

3D Paper Letters - SADIE | & DIY Glass Buttons by ilovedoingallthingscrafty.com

Press the glass bead centered on the message.

3D Paper Letters - SADIE | & DIY Glass Buttons by ilovedoingallthingscrafty.com

Cut around the bead.

3D Paper Letters - SADIE | & DIY Glass Buttons by ilovedoingallthingscrafty.com

And there you have a new glass button to embellish your project! Hope you liked this, I love how easy it was and I'm sure I'll be making more of these!

Happy crafting!
Ilda :)

Friday, March 23, 2012

Flower Pot Pocket Card Freebie

Yeah, it's the weekend! Happy Friday everyone!

Flower Pot Pocket Card Freebie by ilovedoingallthingscrafty.com

Here as promised yesterday is my Flower Pot Pocket Card SVG file... hope you love it...  Just open it up in SCAL and cut away! Very quick and easy to make. A perfect card for Mother's Day!

Have a great weekend!
Ilda :)

My free files RULES!!!

  1. If you choose to download all I ask is you become a follower.
  2. Note my files are for personal use only! (Personal use means... only for you to use (no trading, or sharing of my files... let me do that!) 
  3. If you want to share, send your friends over to my blog for the download. 
  4. I'm OK with people sharing my files on their own sites as long as there is a direct link back to this blog...Give credit where credit is due! (a message to me would also be appreciated)
If you would like to donate, (click the 👉DONATE button on the sidebar) I will happily accept any amount you see fit. No pressure at all either :) It will just make my day that someone wants to support my passion.

Monday, February 27, 2012

3D Milk Carton | FREE SVG Download

Wow!!! I can't believe I have had over 1000 views on my blog! Crazy... it's only been 2 weeks since starting this blogging journey. Not quite sure what normal stats are but I think that's pretty cool! Thank you all for coming back to visit!

So I decided that I would share with you the file I made for the 8" Milk Carton... The files are in SVG format so you should be able to use them with the SCAL and MTC software. As a bonus, I also will give you the file for a 4.5" Milk Carton Treat Box as well :)

Enjoy!

3D Milk Carton | FREE SVG Download by ilovedoingallthingscrafty.com

Ilda
My free files RULES!!!

  1. If you choose to download all I ask is you become a follower.
  2. Note my files are for personal use only! (Personal use means... only for you to use (no trading, or sharing of my files... let me do that!) 
  3. If you want to share, send your friends over to my blog for the download. 
  4. I'm OK with people sharing my files on their own sites as long as there is a direct link back to this blog...Give credit where credit is due! (a message to me would also be appreciated)

If you would like to donate, (click the 👉DONATE button on the sidebar) I will happily accept any amount you see fit. No pressure at all either :) It will just make my day that someone wants to support my passion.


Friday, February 24, 2012

Monkey Themed Baby Shower 3D Letters and Banner | SVGCuts

Happy weekend everyone! 

So today I am going to share a project with you that I made for my friend Kristina. Her sister recently had a baby boy and she is throwing her a "little monkey" themed baby shower. 

Monkey Themed Baby Shower 3D Letters and Banner by ilovedoingallthingscrafty.com

The banner was created with basic shapes from the SCAL library and cut with the Silhouette Cameo. The bottom layer is an elongated triangle with a scalloped edge, topped off with another rounded corner triangle. I made the rosette by using my Martha Stewart scoring board. For each rosette, I used two 1.5" x 12" piece of paper the scored the paper every 0.25". Folded the paper like an accordion, then glue the ends to each other. To cover the center of the rosette I used just a simple white circle. The font that I chose for the letters was Arial Black. If you would like the SVG file for the banner, email me and I will gladly send it to you. 

Monkey Themed Baby Shower 3D Letters and Banner by ilovedoingallthingscrafty.com


These paper 3D letters stand about 6.5" tall. They were filled with some dried beans to keep them from toppling over. The 3D letters are from SVG Cuts 3D letter kit and so is the hanging little monkey (freebie on their blog). I had so much fun making this and love how it turned out. I can't wait to make some more 3D letters!

Monkey Themed Baby Shower 3D Letters and Banner by ilovedoingallthingscrafty.com

Now how cute is that going to look at the shower...  better yet how cute will that look in his Nursery!
God bless you, Luca!!!


Thanks for visiting and have a great weekend!
Ilda :)

Wednesday, February 22, 2012

Adding Vinyl to Personalized A Iced Tumbler

Hello!

I just wanted to thank all my new followers and everyone who has visited my blog. I can't believe I've had over 600 hits in a little over a week. It doesn't sound like much but every time the counter goes up my smile gets bigger and bigger! Awwww, I feel so loved.... please keep coming back a send more friends my way... I feel the love :)


So today I'm going to share with you a very quick project. Having a very different name I never am able to find anything personalized. So this afternoon I made myself my own personalized iced tumbler. I bought this cup at the dollar store (yup, for $2 I have my own personalized cup!).


First I chose the font I wanted (Murray Hill Bold) then I cut out the vinyl with my Silhouette Cameo


I then transferred the letters to the glass, making sure that they went on as straight as possible. And there you go a simple and quick project that I already love... the best part is that I will never lose my drinking cup again at work!

Thanks for visiting!
Ilda :)


Monday, February 20, 2012

Heart Shaped Favor Boxes

Hello and hope everybody had a great weekend. Here in Edmonton, we celebrated Family Day long weekend! A fun time to do things with family, and even get some crafting done :)

Last week I was asked to help the make treat boxes for the upcoming Scrapbook Tea Party at my children's school for all the Kindergarten students.  My daughter is in Kindergarten this year and is so looking forward to that afternoon. She can't wait to show us her scrapbook filled with all her artwork and projects... I think she got my creative gene :)

The file I used came from "Loves little surprises" theme set from ScrappingTable.com (Sorry this file no longer exists for download :( )


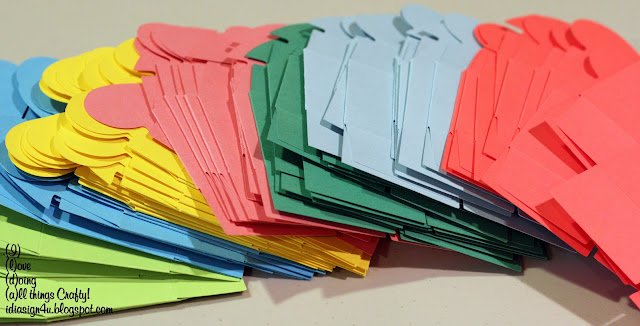
I cut them out, scored the lines with my Martha Stewart scoring board, and glued down the corner of the box. Here's is what they started off like...

Heart Shaped Favor Boxes by ilovedoingallthingscrafty.com

Time to fill them up... I'll let the Scrapbook Committee deal with that ;)

Heart Shaped Favor Boxes by ilovedoingallthingscrafty.com

And here is what they will look like once they are closed up. Done in white, I think this would make an awesome treat box for someone's wedding!

Heart Shaped Favor Boxes by ilovedoingallthingscrafty.com

I'm sure the Kindergartners are going to love this little surprise...Hope you've enjoyed this as well!

Ilda :)


UPDATE: Looks like the link I posted above to the Scrapping Table.com is no longer working and is under redevelopment. I'm sorry for any inconvenience!

Thursday, February 16, 2012

Etched Shadow Box Picture Frame for a Baby Boy | SVGCuts

Hello Everyone!

I didn't think I would be posting again so soon! I keep making changes to the blog as I go... I've go so much to learn! Any advice about blogging would be very appreciated :)

Today I'm going to be sharing with you a shadow box picture frame I made for a 1-month-old baby boy. This past weekend we had the privilege of meeting him and celebrating his arrival with all of his friends and family. I really love how it turned out!


Etched Shadow Box Picture Frame for a Baby Boyby ilovedoingallthingscrafty.com


The frame is an 8x8 shadow box that was purchased at IKEA.  It's hard to see the etching on the above picture because of the glare on the glass :(


Etched Shadow Box Picture Frame for a Baby Boyby ilovedoingallthingscrafty.com

The first thing I did was take the frame apart so that I could work with only the glass. I then cut the name out of vinyl using the Silhouette Cameo Cutter. Then I positioned the vinyl on top of the glass, ensuring that the vinyl around the letters were completely adhered to the glass and that it was level. Next, I took armour etching cream and flooded the exposed glass. Follow the instructions on the the bottle and rinse off the cream once your time is up. This technique can be used for so many projects!


Etched Shadow Box Picture Frame for a Baby Boyby ilovedoingallthingscrafty.com

The last thing I did was add the embellishments to the mat. The roses are from SVG Cuts Crush on you kit, I just scaled them down. The butterfly comes from SVG Shop (sorry no longer available). I simply cut out two butterflies one slightly larger than the other, inked the edges with brown ink, and glued them in the center. I finished the butterfly by using glitter glue in its body and then folded up the wings to give it some dimension. Added some buttons, pearls, and some twine and then put the frame back together again... and voila a beautiful personalized picture frame!

I hope you enjoyed this and thanks for stopping by!

Ilda :)

Tuesday, February 14, 2012

"Love is in the air" | 3D Hot Air Balloon | Free Download


Happy Valentine's Day everyone!!! Hope you are feeling loved today :)

Today I thought I would share with you another project I made for the Valentine's day challenge over at SVG Cuts on their Facebook site. It's going to be hard to decide on the winners. There are so many amazing entries! This is my "Love is in the air" 3D hot air balloon gift box! Cute right?! I really love how it turned out... I'm hoping this one is a winner! Wish me luck :)

"Love is in the air" | 3D Hot Air Balloon | Free Download by ilovedoingallthingscrafty.com

"Love is in the air" | 3D Hot Air Balloon | Free Download by ilovedoingallthingscrafty.com

This file was created in SCAL2, and cut with the Cricut Expression cutter. The rose is from SVG Cuts "Crush on you" kit, and the clouds are from the SCAL shapes library. Tip... to make a 3D image like the clouds, simply cut out 4 of the same image, score theme town the middle and then glue them back to back! 

Have a "love"ly day!
Ilda

I have since made this file for FREE. Click → HERE if you want the FREE Download!

Saturday, February 11, 2012

Cake Pop Gift Box - FREE DOWNLOAD

Hello and welcome to my blog! This is my first official post!!! Today I am sharing with you a cake box that I've created in SCAL2. I decided to enter it in the SVG Cuts Valentine challenge. I had such great feedback from SVG Cuts Facebook followers, and many requests to share the file. So I thought the easiest way would be to create a blog. I have been putting that off for so long but I finally caved! Not sure how often I will be posting...  life is so crazy busy right now! 

Anyways back to the post... here is my Cake Pop Gift Box! It is tall enough for a 6-inch stick, you can also use a 4-inch stick but the cake pop will sit on the paper. Hope you love it as much as I do! The Rose comes from SVG Cuts Crush on you kit , the chocolate truffle and borders come from their Free Designs on their Blog.

Cake Pop Gift Box - FREE DOWNLOAD by ilovedoingallthingscrafty.com

Click on the link below to get your own box. Please remember I am not a graphic designer, nor do I claim to be one. This file was done in SCAL2 and cut with the Cricut Expression machine (yes I know!) So I'm pretty sure it will work with the SCAL programs. Not so sure it will work with other software! But let me know if it does or if you know how to make it work. Thanks for understanding. Enjoy!

Ilda :)

My free files RULES!!!

  1. If you choose to download all I ask is you become a follower.
  2. Note my files are for personal use only! (Personal use means... only for you to use (no trading, or sharing of my files... let me do that!) 
  3. If you want to share, send your friends over to my blog for the download. 
  4. I'm OK with people sharing my files on their own sites as long as there is a direct link back to this blog...Give credit where credit is due! (a message to me would also be appreciated)
Cake Pop Gift Box

If you would like to donate, (click the 👉DONATE button on the sidebar) I will happily accept any amount you see fit. No pressure at all either :) It will just make my day that someone wants to support my passion.