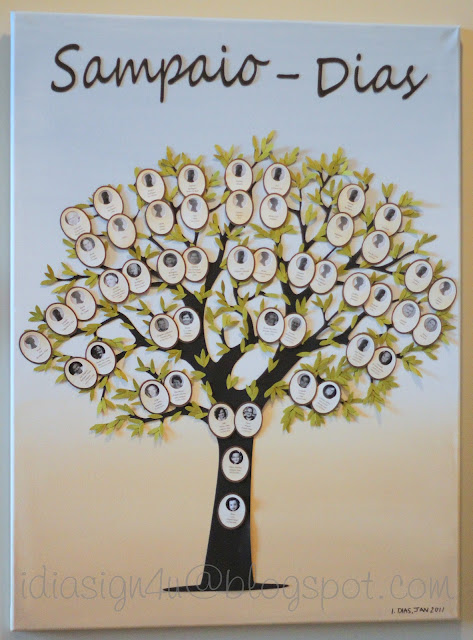
For a while now, well I guess ever since I started the blog I've been wanting to share one of the first crafts I made using my Cricut! It hangs as a piece of art in our hallway, it is such a unique piece. I always love to stop and stare at it!
For those that don't know I am of Portuguese descent. My parents immigrated to Canada from Portugal when I was 2 in 1978. My husband's family is also Portuguese, so for my children, I thought it would be interesting to create this so that they could see their roots.
I guess this project was many years in the making, every time we had gone back to visit our grandparents I would gather more data for the family tree. So here is how it turned out! (I did not include any siblings, because as you can imagine there would not be enough room on the canvas!)
WARNING... this is a LONG WINDED POST! LOL!!!
Since I made this piece a while ago and had no blog at the time, I didn't take pictures of the steps it took to make this. I will try my best to explain what I did though.
The first thing I did was paint my canvas, this one measures 32X24. I really wanted a washed out antique look, so I sprayed water all over the canvas and applied my acrylic paints to it. Light blue for the sky and a light brown for the ground. Once I had both the colors on the canvas I blended the two colors where they met in the middle to create the horizon.
Next came the fun stuff! I found the image of this tree on Google (sorry don't remember exactly where). I then traced the image with the SCAL program. Then I enlarged it to the size I wanted. Since the canvas was way larger than the cutting mat, the tree was made by cutting 4 pieces and overlapping them in some areas. I adhered all the pieces of the tree to the canvas using hot glue. Once my tree was all assembled and glued down I cut out the leaves. The leaves I created from the basic shapes library. When I glued down my leaves I strategically placed them to cover up the paper joints of the tree.
The next part was the hardest... Since both sides of our families have the name "Oliveira", I wanted to make the tree look like an olive tree since Oliveira means olive in English. So I thought it would look cute if the frame of the picture looked like an olive, well kinda, sort of maybe not really!! ;)
To do this I cut out two ovals, one larger than the other. In SCAL I created a template for the top part of the frame which turned out to be 5 olives/line and 4 rows of them for a total of 20 frames per sheet. Then in using Microsoft Word, I did my best to place the names at the bottom of the frames. (Took a few tries to line it all up... I would place the template on top of the sheet I printed to make sure it all lined up.) Once everything was in line I cut out the paper I had just printed on...
***This would of all just been so much easier if the Silhouette Cameo had been invented... I guess I was just ahead of my time, LOL! ;)***
Once all the frames were cut out, I glued the top of the olive to the bottom brown oval. I only applied glue to the bottom part of the olive frame.
This left the top part accessible to change pictures... especially of the kids as they get older, I can stay this age for a while, cause I never age! Muhahaaa!!!
For those family members that I had no picture for I just used a silhouette. The gentleman with thick sideburns would be my Great, Great, Grand Father, and my Great, Great, Grand Mother just below him. So cool that I had found a picture of them!
Hope the instructions weren't too confusing for you...
I hope I've inspired you to create your own Family Tree Canvas Art Piece! I would love to see it if you did make one!
Have a great weekend and Happy Father's Day to all the Dad's in your lives!
Sharing this project with Scrap it Girls - November "Tree" Challenge


