Monday, December 23, 2013

Paper Christmas Tree Tower for Treats | SVGCuts

Happy Holidays to all my Crafty Friends! Today I'm excited to share with you the cutest Christmas Tree Treat Stand!

The perfect centerpiece to display all your Christmas goodies. For specific instructions on how to put this together, you'll want to check out my latest SVG Cuts Guest Post... "Christmas Tree of Treats"

Gift,SVGCuts,Silhouette Cameo,Treat Stand,ilovedoingallthingscrafty,Treat display,Christmas Tree of Treats,SVG file,papercrafts,guest post,Table Decor,French Macaroons, Cricut,Paper crafts,paper art, crafts

This project comes together fairly quickly. Simple, elegant, and my favorite USEFUL! Need to store some extra treats? No problem, the base of the tree is the perfect place to hide all those extra treats!

Gift,SVGCuts,Silhouette Cameo,Treat Stand,ilovedoingallthingscrafty,Treat display,Christmas Tree of Treats,SVG file,papercrafts,guest post,Table Decor,French Macaroons, Cricut,Paper crafts,paper art, crafts

Functional and Fun! 

The top of the tree is adorned with a bright star that lights up with a flick of a switch. The tea light just pokes through the center of the star to add a little twinkle!

Gift,SVGCuts,Silhouette Cameo,Treat Stand,ilovedoingallthingscrafty,Treat display,Christmas Tree of Treats,SVG file,papercrafts,guest post,Table Decor,French Macaroons, Cricut,Paper crafts,paper art, crafts

Use some fun papers and colors to coordinate your treat stand with the rest of your table and party decor. 

Gift,SVGCuts,Silhouette Cameo,Treat Stand,ilovedoingallthingscrafty,Treat display,Christmas Tree of Treats,SVG file,papercrafts,guest post,Table Decor,French Macaroons, Cricut,Paper crafts,paper art, crafts

For those interested here are the SVGCuts files you will need:

Tree bottom - December Gifts SVG Kit

Cut on the Silhouette Cameo with SSDE

I hope this has inspired you to create your own treat stand to display and serve your Holiday goodness! Make sure you stop by the SVGCuts Blog for all the how-tos and exact instructions.

Also if you are interested in the macaroons I made click here for a link to a previous post and the recipe I used :)

Thanks for stopping by, stay SAFE everyone!
Happy Crafting  :)

Tuesday, December 17, 2013

Personalized Paper Christmas Ball Ornaments for the Teachers | SVGCuts

I can't believe there are only a few more days of school left before the holidays begin!

Every year I like to treat the teachers with something homemade and unique. This year I decided to make them an ornament... Yes, I know not very original but when it's made and personalized by your own hands... it is! 

Super cute and simple, right? Something a teacher can treasure for many years and hopefully they will think about the child that gave it to them!

Paper craft,SVG files,3d Paper Christmas Ball Ornaments,SVGCuts,Teacher gifts for Christmas, ilovedoingallthingscrafty,Ornaments,paper crafts, personalized ornaments, Cricut, handmade

For the ornaments, I selected school-themed papers from DCWV's Grade School Stack.  

Here are 3 of the ornaments I made. I actually made 5 in total but that was just too much to squeeze into one photo, lol!

Paper craft,SVG files,3d Paper Christmas Ball Ornaments,SVGCuts,Teacher gifts for Christmas, ilovedoingallthingscrafty,Ornaments,paper crafts, personalized ornaments, Cricut, handmade

Just in case you are  interested, here is the list of files you will need to recreate one of these gifts:

(names were done using the Print and Cut feature of the Silhouette)
Box - Classic Gift Boxes SVG Kit (altered by adding and window to the front)
Poinsettias - 3D Wintergreens SVG Kit
All cut on the Silhouette Cameo using SSDE

I resized the box so that the ornament would fit perfectly inside it :)

TIP: Shred some green and red card stock for the bottom of the box... this will keep the ornament from rolling around and it will add a little extra to the presentation!

Paper craft,SVG files,3d Paper Christmas Ball Ornaments,SVGCuts,Teacher gifts for Christmas, ilovedoingallthingscrafty,Ornaments,paper crafts, personalized ornaments, Cricut, handmade

The card stock I used for the boxes comes from Heidi Swapp's Believe Paper Pad. I really like her papers!

Paper craft,SVG files,3d Paper Christmas Ball Ornaments,SVGCuts,Teacher gifts for Christmas, ilovedoingallthingscrafty,Ornaments,paper crafts, personalized ornaments, Cricut, handmade

I hope you were inspired to create some personalized ornamental gifts for the teachers, or anyone else that you may want to surprise. They actually come together fairly quickly if you still need to make some before Christmas!

Also if you are an SVGCuts fan, don't forget to check out their 12 Days of Christmas Giveaway on Facebook! Still, SO many amazing prizes to be won!

Thanks for stopping by!
Happy Crafting  :)

Monday, December 16, 2013

DIY Christmas Labels on the Silhouette with Fleurette Bloom Designs | Ink On 3 Files

My favorite projects are quick and useful! Today I want to walk you through how to make your own Christmas labels using Fleurette Bloom files. Once you know-how, you'll be making labels for everything :) 


DIY Christmas Labels on the Silhouette with Fleurette Bloom Designs | Ink On 3 Files

For this project I used:

Avery Sticker Project Paper (Silhouette Brand Printable Sticker paper is also available, but did not have any on hand)
Silhouette Cameo with SSDE

Instructions:
  1. The first thing you will need to do is select the PNG images and the SVG files you want to use.
  2. Open them up onto your workspace.
  3. With the SVG's you have selected to use as labels, click on each SVG and change the cut style to "cut". 
  4. Group one PNG design with one SVG file. (Play with the PNG sizes until you like the look and placement on each label). 
  5. I chose to include "to: and a from:" If you do that ensure you change the cut style setting on the font to "no cut". Copy and paste it into each label and group them.
  6. I don't like to waste paper, so once my labels were created I tried to fit as many as possible on to one sheet. You will notice I changed some of them in size to fit more! Variety in sizes is good to have because all gifts come in different sizes too ;)

Since I had set my line color to transparent, it was hard to visually see the labels when working on the white workspace. To solve for this I just worked on the side of my workspace (see image below) You could also in the Page setting, set it to reveal your cutting mat.

DIY Christmas Labels on the Silhouette with Fleurette Bloom Designs | Ink On 3 Files
  • Slide the labels back onto your workspace. Turn on the cut line setting and align your shapes within your registration marks. Make sure that the only cut lines you see are only on the edges of the labels. 
DIY Christmas Labels on the Silhouette with Fleurette Bloom Designs | Ink On 3 Files
  • Now you are ready to send it to the printer.
  • Before cutting out your shapes, change the pressure setting on your cutting machine, I set my pressure setting to 2. This is just enough to cut through the top layer leaving the backing intact. 
That's it! Easy right!?

Here is a little treat box I made with one of the labels I cut out! Since you already know who the gift is from you could also have the names already printed on there too :)

DIY Christmas Labels on the Silhouette with Fleurette Bloom Designs | Ink On 3 Files

I hope you find this tutorial useful! This was so easy and quick to do on the Silhouette, that I have so many ideas for other labels I want to make now! If you have any questions I'd be happy to answer them for you :)

Also check out Fleurette's latest release!
Perfect for any occasion "Nesting Gift Box" SVG Collection.

Thanks so much for stopping by!
Happy Crafting  :)

Wednesday, December 11, 2013

Christmas Paper Cake Floral Toppers | Cake a la SVGCuts | DIY Cakes

I am SOOOOO super excited today to be sharing with you my first guest post for SVGCuts, WHOOP, WHOOP! If I could do a backflip I would, lol ;) 

If you didn't know it before, you should know now that I LOVE SVGCuts and have been a huge fan since finding them back in 2011! In fact they were one of the reasons I started blogging. I have always loved to craft and after making some of the coolest things out of paper with their files, I was hooked and I knew I had to share it with others!

So for this project I thought it would be awesome to mash up two of my favorite crafts... Paper and cake decorating! Well, what do you think of my Christmas Cake a la SVGCuts? It almost looks too good to eat doesn't it?!

Please check out my guest post on the SVGCuts blog for complete instructions :)

SVGCuts,Silhouette Cameo, Cricut, DIY cakes,ilovedoingallthingscrafty, Christmas Cake,Fondant cake with Paper flowers, Paper Cake Toppers,paper crafts,SVGCuts Files, Crafting,

SVGCuts,Silhouette Cameo, Cricut, DIY cakes,ilovedoingallthingscrafty, Christmas Cake,Fondant cake with Paper flowers, Paper Cake Toppers,paper crafts,SVGCuts Files, Crafting,
I would have never been able to create these gorgeous flowers out of fondant, but paper... piece of cake, haha!

When I was a little girl, the kids in the family would always fight over the sugar flowers on the cake. Did anyone else do that? Maybe we were just weird?

I'm sure if you make some like these out of paper, the moms might have to fight the kids for them, lol!

If any of you have ever made a fondant flower, you will know how time-consuming and difficult it can be. Even when they are done they can be quite fragile. That's why you pay cake decorators the big bucks! But why pay them when you can do it yourself?! If you already are a paper crafter all you need now is a cake! If you can't make a fondant cake, don't worry bake your favorite cake and sprinkle some icing sugar over it, or even easier buy one and just embellish it!

Just think of the cakes you could make using paper toppers, the possibilities are endless!

SVGCuts,Silhouette Cameo, Cricut, DIY cakes,ilovedoingallthingscrafty, Christmas Cake,Fondant cake with Paper flowers, Paper Cake Toppers,paper crafts,SVGCuts Files, Crafting,

Make the flowers like you would for any other project. Then all you have to do is hot glue them to the end of a toothpick or a skewer. By doing this, you elevate the flowers and protect the papers from any grease absorption that may happen when using paper. See the image below.

SVGCuts,Silhouette Cameo, Cricut, DIY cakes,ilovedoingallthingscrafty, Christmas Cake,Fondant cake with Paper flowers, Paper Cake Toppers,paper crafts,SVGCuts Files, Crafting,

Here's what the cake looks like from the side...

SVGCuts,Silhouette Cameo, Cricut, DIY cakes,ilovedoingallthingscrafty, Christmas Cake,Fondant cake with Paper flowers, Paper Cake Toppers,paper crafts,SVGCuts Files, Crafting,

SVGCuts,Silhouette Cameo, Cricut, DIY cakes,ilovedoingallthingscrafty, Christmas Cake,Fondant cake with Paper flowers, Paper Cake Toppers,paper crafts,SVGCuts Files, Crafting,


and here's a peek inside the cake! Add some food coloring to the cake batter and you'll end up with a fun and festive Christmas Cake! Yummy!!!


If you are interested in making this project, here are the SVGCuts files you will need:

Make sure you stop by the SVGCuts blog for more tips and all the instructions on how to make your own Cake a la SVGCuts! I hope you loved this project as much as I enjoyed creating it... Oh, and eating it too!

Don't forget to check out SVGCut's 12 Days of Christmas Giveaway on Facebook! SO many amazing prizes to be won!

Thanks for stopping by!
Happy Crafting  :)

Friday, December 6, 2013

Print and Cut Nativity Scene Tri-fold Card | SVGCuts

Are you ready for Christmas yet? I just looked at the calendar and swear I felt some heart palpitations... Eeeeek! So much I still want to do and hopefully enough time to get it all done!!!

Today I want to share a Nativity Scene Card I made using only the Print and Cut feature on the Silhouette Cameo. When you are making more than one card, Print and Cut can save you many hours of piecing all the cut-outs together!


Christmas Card,SVGCuts,Print and Cut,Silhouette Cameo,ilovedoingallthingscrafty,Paper crafts,Nativity Scene Tri-fold Card,SVG Files,handmade card,Cricut,


Well what you think of my super cute Nativity tri-fold Card? Sweet and simple, just how I like it! Reminds me of the cards my parents would receive when I was a little girl, except those where pop up cards... I did love those! I'll stick to tri-fold for now... pop up cards are way over my head!

To make this card you will need:

SVG Cuts files from O Holy Night SVG Collection
White Card stock to print on
Silhouette Cameo with DSE software
Adhesive

Here is a screenshot of my images before I printed them.
Before this step, I had ungrouped then regrouped all the individual layers together, then I moved them around to create the folds for each layer of the card. (This step is a little time-consuming but will save you more time in the long run!)
 To make my images more visible, I chose to line each piece with a black outline.
Also, below you see the base of the card I created...  pretty simple!

 I made this card to fit in a standard 5 X 7 envelope.

Print and Cut Nativity Scene Tri-fold Card | SVGCuts Files

The inside opens to reveal your message! Plus there is enough space to handwrite a personal note.

Christmas Card,SVGCuts,Print and Cut,Silhouette Cameo,ilovedoingallthingscrafty,Paper crafts,Nativity Scene Tri-fold Card,SVG Files,handmade card,Cricut,

Hopefully, you liked my Nativity Scene Trifold Card and saw how easy it was to create a complete Print and Cut Project. If you have any questions I would be happy to help :) 

Thanks for stopping by!
Happy Crafting  :)

Friday, November 29, 2013

Winter Wonderland - A 3D Lit Winter Wall Decoration | SVGCuts

Did you have your first snowfall yet? Here in Edmonton, we've had it for about a month now! Last week it came down pretty hard. Even though we all complain about the cold weather, Winter is actually quite beautiful! It was also the inspiration for my latest project... A 3D Lit Winter Wall Decoration. 

Isn't it "Cool"?!?

Gift,Wall Art,white,Winter,SVGCuts,ilovedoingallthingscrafty,Snowflakes,Winter Wonderland - A 3D Lit Winter Wall Decoration,paper crafts,SVG Files,Personalized gift, handmade,Cricut,


In order to make it a Wall Decoration, I added a hole to the backside from which to hang it from. Also on the bottom of the back panel, I created a cut out that folds open to allow you to insert some battery operated tea lights. This frame looks just as good as a tabletop decoration if you chose not to hang it. 
This is what it looks like with a soft glow during the day. 

Gift,Wall Art,white,Winter,SVGCuts,ilovedoingallthingscrafty,Snowflakes,Winter Wonderland - A 3D Lit Winter Wall Decoration,paper crafts,SVG Files,Personalized gift, handmade,Cricut,

Here is the list of files you will need to recreate this project:

Letter O (altered, and used to make the frame) - SVGCuts - 3D Letters SVG Kit
Snowflakes - SVGCuts
Winter Wonderland - SVG Cuts - Free Designs

To create the Frame - I enlarged the letter O from the 3D Letters and altered the front and back pieces of it. (see the second image)

For the Front - I selected random snowflakes and if they didn't have an offset to them I created one. I then centered the "Winter Wonderland" within the center of the "O". Next, I placed snowflakes all around the empty spaces. Once I was happy with their placement, I welded only the offset of my snowflakes with the outside "O" frame. I then cut out all the pieces and decorated each of them with glitter and rhinestones. Each snowflake was glued onto its offset. For embellishments, I added a ribbon and sequin trim to finish it up. 

This frame measures 11.25" W x 10.5" H
All cut on the Silhouette Cameo

 TIP: Go easy on the glue when adding glitter to your snowflakes. Paper tends to curl when wet. To avoid the curl, you can also use the Xyron sticker maker to add a layer of tackiness, then glitter!

And now in complete darkness! COOL right?
I love to make things light up :)

Winter Wonderland - A 3D Lit Winter Wall Decoration | SVGCuts Files

I hope you enjoyed my Winter Wonderland Wall Decoration!

If you like this idea but want to make it more personal,  it's easy to change the Word Art in the center. It could say, "Merry Christmas" or "Happy Holidays" in English or a different language. Make it personal, with your Family's Last name or as a gift for someone else... the possibilities are endless!

Thanks for stopping by!
Happy Crafting  :)

Tuesday, November 19, 2013

Parisian Armoire - DIY Paper Jewelry Display Stand and Storage | SVGCuts

Today I want to share with you a project I made for the July/August issue of the Cutting Edge Magazine.

Paper craft,SVGCuts,Silhouette Cameo,Jewelry Storage,ilovedoingallthingscrafty,Jewelry Stand,Eiffel Tower Jewelry display,paper crafts,DIY Parisian Armoire,SVG Files,Paper crafts,Cricut,

Isn't it pretty?! One would never guess this beautiful armoire is completely made out of paper! Who wouldn’t love their jewelry displayed this way? This would make the perfect gift for a friend this Christmas or maybe even yourself ;)  I love when paper can be decorative and functional at the same time!

Paper craft,SVGCuts,Silhouette Cameo,Jewelry Storage,ilovedoingallthingscrafty,Jewelry Stand,Eiffel Tower Jewelry display,paper crafts,DIY Parisian Armoire,SVG Files,Paper crafts,Cricut,

Here is what I used:

The files for this project all come from SVGCuts Amelie's Accessories SVG Kit
AC Cardstock 
Me and My Big Ideas Black and White Paper Pad
Alphabet stamps by Studio G
White Inkpad
Epiphany Crafts Shape Studio Tool (Round 25)

Cut on the Silhouette Cameo using the Silhouette Studio Designer Edition.


Follow PDF assembly instructions on how to create the Armoire and Flower. SVGCuts also provides great video assembly tutorials!


Paper craft,SVGCuts,Silhouette Cameo,Jewelry Storage,ilovedoingallthingscrafty,Jewelry Stand,Eiffel Tower Jewelry display,paper crafts,DIY Parisian Armoire,SVG Files,Paper crafts,Cricut,

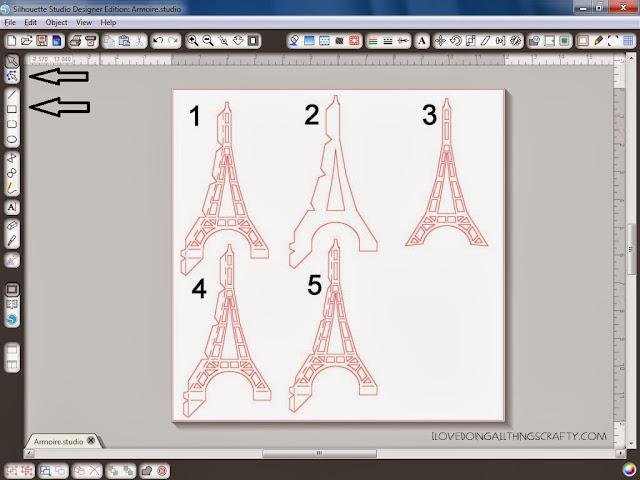
I modified the Eiffel Tower file that is provided in the SVG Kit in order to hang the jewelry. To do this requires a bit of work. I have provided a screenshot to explain what and how I got to the end results.


Parisian Armoire - DIY Paper Jewelry Display Stand and Storage | SVGCuts Files


  1. The first thing I did was import the image that I was going to modify. Then I highlighted the image and made it a compound path and then released the compound path. The image shows you one of four sides of the Eiffel Tower. The original image is solid. There are no cutouts in the image. So, the next thing I did was create little shapes inside the tower by using the draw rectangle tool. (You might want to zoom in on your image at this point, much easier to see.) To modify your shapes, and angle the squares and triangles you will need to use the point editing tool. (See the above two arrows). Once you are satisfied with your shapes move on to step 2.
  2. Grab the outside outline of the Eiffel Tower from image one, copy and paste it. Highlight your copied image, select the point editing tool again, and delete all the points until you are left with an image that has no tabs (like the outline of image 3).
  3. Group all the little squares and triangles created in the first step, and copy them. (The easiest way is to hold the shift key and click on all the images you want to group.) Drag your grouped copied images and center them onto the image you created in step 2. Group them all together. You should be left with the image in step 3 at this point. This creates the top layer to the Eiffel Tower that will add strength and reinforcement. (You will need to cut 4 of these out, one for each side)
  4. Next, with the other copied squares and triangles you grouped in the above step, drag them into the original cut file that you imported. 
  5. Group those together. This will make up the bottom layer of your Eiffel Tower.


Two of the sides of the Eiffel Tower are slightly different. The same technique above was used to create the other two sides. There is no need to change the top layer piece. I know it seems like a lot of steps, but is less complicated than it sounds. Let me know if you have any further questions, I'd be glad to answer them :)

Once all pieces of the tower are cut it is easier to glue the top layer on first before assembling the tower. I used Scotch quick dry adhesive and with a paintbrush sealed the entire tower. This not only adds protection to the piece it also strengthens it.

Thanks so much for stopping by! I hope you have enjoyed this functional and yet very decorative project as much as I enjoyed making it!

Happy Crafting :)

Friday, November 15, 2013

Sympathy Card | SVGCuts


Death and dying are part of my work life.  It's hard to run from it as an Oncology nurse. I hope, in the very least, to provide comfort to those I do care for as they pass and console those who are left behind. 

A very good friend of mine recently lost a loved one, so I thought I would make her a card just to let her know I was thinking of her.

death,SVGCuts,dove,ilovedoingallthingscrafty,Sympathy Card,SVGCuts Files,paper crafts, handmade card,Cricut,

For this project, I used a few SVGCuts files that I have altered to come up with this card. Click on the links below to see which kits the files came from.

Dove FREE DESIGNS
Flag from Toil and Trouble SVG Kit
Card from Everyday Winter Cards SVG Kit

Nobody likes to lose someone they've loved. A handmade card like this, may put a smile on their face or at least let them know how much you care for them.

Thanks so much for stopping by,

Thursday, November 7, 2013

Celestial Twin Baby Shower Cake and Decor | DIY Cakes and Party Decor | SVGCuts

This weekend I had the privilege of making the sweetest cake for my friend Emilia's baby sister Gabriella, who is expecting TWINS! If you are planning a baby shower hopefully this post might help give you some more ideas :)

The cake turned out super CUTE!  

SVGCuts,Blue and yellow,DIY cakes,ilovedoingallthingscrafty,Moon Star Clouds Baby Shower Theme,Baby Shower party ideas,Moon Star Clouds Cake,fondant,Twin Shower,Twins,paper crafts, Cricut

The color theme for the Shower was blue and yellow. So the first thought that came to my mind was the sky and the moon, then came the set of twin baby feet hiding under the clouds. 

Aren't those little feet adorable? And what about those ruffled diapers...  double the diapers, double the fun!

SVGCuts,Blue and yellow,DIY cakes,ilovedoingallthingscrafty,Moon Star Clouds Baby Shower Theme,Baby Shower party ideas,Moon Star Clouds Cake,fondant,Twin Shower,Twins,paper crafts, Cricut

By far my favorite part of the cake was making the swirly clouds! 
So easy and fun to make :) 

SVGCuts,Blue and yellow,DIY cakes,ilovedoingallthingscrafty,Moon Star Clouds Baby Shower Theme,Baby Shower party ideas,Moon Star Clouds Cake,fondant,Twin Shower,Twins,paper crafts, Cricut

Here are some cake details...

Bottom baked in an 11-inch round form - chocolate cake
Top baked in an 11-inch round form - white cake
Frosted with vanilla buttercream icing
Covered in fondant

Since I had a hand in helping my friend Emilia set up for the party, here are a few more pics I thought I would share.  I can't and won't take credit for all the work because this was definitely a team effort, my part was the cake table and its decorations. The rest was done by Emilia and the family of the mother-to-be. They took care of the centerpiece diaper cakes and table decor, Thank you gifts, games, prizes, desserts, and food... great job ladies!

SVGCuts,Blue and yellow,DIY cakes,ilovedoingallthingscrafty,Moon Star Clouds Baby Shower Theme,Baby Shower party ideas,Moon Star Clouds Cake,fondant,Twin Shower,Twins,paper crafts, Cricut

Everything was amazing, thanks for allowing me to be a part of this day!

For those interested, here are some links to the papercrafts I created using the Silhouette Cameo for the party.

Gift Tag from BOXES AND BAGS
Moon from FREE DESIGNS
Banner from TOIL AND TROUBLE KIT
3D Baby Shoes and Safety Pin on Banner from BUNDLE OF JOY SVG KIT
Pedestal from POPULAR STREET TULIPS SVG KIT

Congratulations Gabriella and Chris! Can't wait to meet those little boys of yours... should be any day now... Eeeeek!

I hope you enjoyed and maybe picked up a few ideas for your next party.

Thanks for stopping by!
Happy Crafting and Party Planning :)

Monday, November 4, 2013

Darth Vader Cake | DIY Cakes

Any Star Wars fans out there? If so, this one is for you! 

Today I want to share with you a Darth Vader cake I made for a friend of mines'  husband.

Darth Vader Cake | DIY Cakes

Happy Birthday John... May the 40th be with you! 
I wonder how many times he heard that this weekend?LOL! 

Here is the side view of Darth's head

Darth Vader Cake | DIY Cakes

Cake details...

I used 1, 10-inch cake pan to bake the bottom layer
The top layer was baked in a Pyrex bowl
Measured 7 inches tall
Flavor chocolate
 Frosted with a vanilla buttercream icing
Covered with black fondant

I hope you liked my Darth Vader Cake if you are planning a Star Wars Party make sure you check out this and this link for more ideas.

Stay tuned for a baby shower cake I also made for this weekend.

Thanks so much for stopping by, 
Happy Cake Decorating :)

Tuesday, October 29, 2013

Spiderweb Pillow Treat Boxes | Ink On 3 Files


Need some last-minute quick Halloween treat boxes for the kiddos? 

I have the perfect Spiderweb Pillow Boxes for you, just released today by Fleurette Bloom! On SALE for $0.49. These will take you around 5 minutes to cut out and assemble!

Spiderweb Pillow Treat Boxes | Ink On 3 Files

I enlarged the file to 8x10 inches. This way I could fit lots of goodies inside!

Spiderweb Pillow Treat Boxes | Ink On 3 Files

Recipe for my boxes:
This fun paper comes from and Company Spooktacular Collection
Trendy Twine - Lime Grapesicle and Limeade
Epiphany Shape Round 25 Tool and bubble caps
Black Ink Pad
Ribbon

Cut on the Silhouette Cameo using the Silhouette Studio Designer Edition

Embellish these however you like, or not! They look good as they are!

Spiderweb Pillow Treat Boxes | Ink On 3 Files

Make sure you stop by Fleurette Bloom's Facebook Page and give her some love! Like her Page, if you haven't already and leave her a comment to win her latest "Anytime Pillow Box" Collection! These boxes are gorgeous and they are perfect for so many occasions!


Thanks so much for stopping by! 
Happy Crafting :)