Today I want to share with you a project I made for the July/August issue of the Cutting Edge Magazine.
Isn't it pretty?! One would never guess this beautiful armoire is completely made out of paper! Who wouldn’t love their jewelry displayed this way? This would make the perfect gift for a friend this Christmas or maybe even yourself ;) I love when paper can be decorative and functional at the same time!
Here is what I used:
The files for this project all come from SVGCuts Amelie's Accessories SVG Kit.
AC Cardstock
Me and My Big Ideas Black and White Paper Pad
Epiphany Crafts Shape Studio Tool (Round 25)
Cut on the Silhouette Cameo using the Silhouette Studio Designer Edition.
Follow PDF assembly instructions on how to create the Armoire and Flower. SVGCuts also provides great video assembly tutorials!
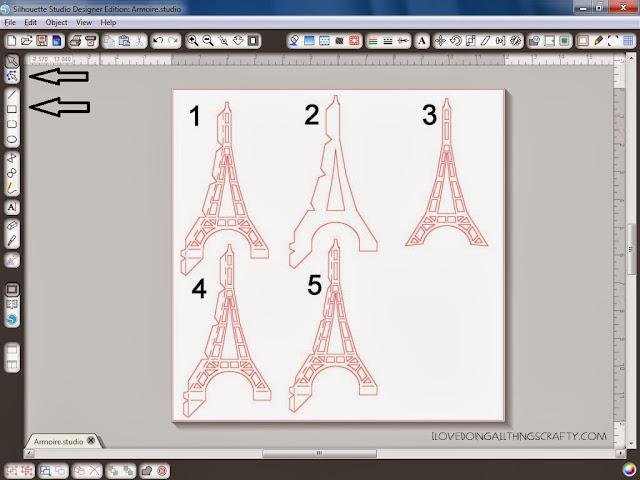
I modified the Eiffel Tower file that is provided in the SVG Kit in order to hang the jewelry. To do this requires a bit of work. I have provided a screenshot to explain what and how I got to the end results.
- The first thing I did was import the image that I was going to modify. Then I highlighted the image and made it a compound path and then released the compound path. The image shows you one of four sides of the Eiffel Tower. The original image is solid. There are no cutouts in the image. So, the next thing I did was create little shapes inside the tower by using the draw rectangle tool. (You might want to zoom in on your image at this point, much easier to see.) To modify your shapes, and angle the squares and triangles you will need to use the point editing tool. (See the above two arrows). Once you are satisfied with your shapes move on to step 2.
- Grab the outside outline of the Eiffel Tower from image one, copy and paste it. Highlight your copied image, select the point editing tool again, and delete all the points until you are left with an image that has no tabs (like the outline of image 3).
- Group all the little squares and triangles created in the first step, and copy them. (The easiest way is to hold the shift key and click on all the images you want to group.) Drag your grouped copied images and center them onto the image you created in step 2. Group them all together. You should be left with the image in step 3 at this point. This creates the top layer to the Eiffel Tower that will add strength and reinforcement. (You will need to cut 4 of these out, one for each side)
- Next, with the other copied squares and triangles you grouped in the above step, drag them into the original cut file that you imported.
- Group those together. This will make up the bottom layer of your Eiffel Tower.
Two of the sides of the Eiffel Tower are slightly different. The same technique above was used to create the other two sides. There is no need to change the top layer piece. I know it seems like a lot of steps, but is less complicated than it sounds. Let me know if you have any further questions, I'd be glad to answer them :)
Once all pieces of the tower are cut it is easier to glue the top layer on first before assembling the tower. I used Scotch quick dry adhesive and with a paintbrush sealed the entire tower. This not only adds protection to the piece it also strengthens it.


.jpg)


