Showing posts with label Print and Cut. Show all posts

Thursday, August 27, 2015

First Day of School Signs/ Props for Back to School Pictures


Hey Everyone!

Finally getting back into some crafting! Can't believe that the summer is almost over and my kiddies are headed back to school in a few short weeks. I know many schools have already started but I'm thankful for the late start this year :)

So today I want to share with you my latest Fleurette Bloom DT project. 
First day of school signs I made for my kids. I will be using them to take photos of them when they head back to school. (I'll post those pics when they happen). They are super simple to make and put together!


Here is what you will need to make your own:

Fonts:
Chalk Hand Lettering
Return to Sender
Travelling Typewriter

SVG Files:
Apple and Pencil - from School Days Kit - files were grouped together and resized.
The apple was then added to the top of the sign and grouped on to the top circle layer of the tag file. Then both the finished circle (sign) and pencil were just print and cut using the Silhouette Cameo.
Tag file (from coffee mug) - from Valentine Be Mine SVG Kit - Enlarged and cut (bottom layer only).

Paper:
Recollections card stock for the Print and Cut.
The bottom layer paper comes from the Simple Stories - Smarty Pants Paper Pack.

To Assemble:
Glue top 3 layers of the sign together, I used my ATG tape runner for that.
Attach the top of the pencil to the bottom of the sign with some glue.
To the back of the pencil, I glued a Popsicle stick. This adds strength to the paper and something for the kids to hold on to. Add a ribbon to the handle and embellish as you like ;)

For those of you that are visual people like me,
here is a video that I filmed while putting one of the signs together. Enjoy and if you haven't yet subscribe! I'm going to try an film more future projects ;)


Hope this post isn't too late for you, and it inspires you to make some of your own back to school First day signs!

For a limited time, you can get the School Days collection AND the ABC and 123 digi paper pack FREE with a purchase of $8.98 or more at Fleurette Bloom! So get them while you can :)

UPDATE... Here is super cute pic of the kids with their signs on their first day Back to School!


Thanks SO much for stopping by!
Happy Crafting  :)


Saturday, January 25, 2014

3D Paper Guitar Gift Box | SVGCuts

Have you seen the latest Vintage Valentine SVG Cuts Kit? If you haven't, you must... it is awesome!!! I couldn't wait to make the guitar that Mary created! Super cute and so easy to put together :)

SVGCuts files,3D Paper Guitar, Gift Box,music,Cricut, Print and Cut,Silhouette Cameo,ilovedoingallthingscrafty,Treat Box, paper crafts,guitar, music lover,Valentine's Day Project

This guitar makes the perfect gift box for the music lover in your life.. a great Valentine's treat too!

SVGCuts files,3D Paper Guitar, Gift Box,music,Cricut, Print and Cut,Silhouette Cameo,ilovedoingallthingscrafty,Treat Box, paper crafts,guitar, music lover,Valentine's Day Project

Instead of twine, I used 22 gauge metal wire for my guitar strings. It took a little effort but I am really happy with the results :)

SVGCuts files,3D Paper Guitar, Gift Box,music,Cricut, Print and Cut,Silhouette Cameo,ilovedoingallthingscrafty,Treat Box, paper crafts,guitar, music lover,Valentine's Day Project

To create this project you will need:

Card stock
Wire
Embellishments
Silhouette Cameo with the SSDE

I used the Print and Cut feature of the Silhouette Cameo to add the roses to the front panel of my guitar.

SVGCuts files,3D Paper Guitar, Gift Box,music,Cricut, Print and Cut,Silhouette Cameo,ilovedoingallthingscrafty,Treat Box, paper crafts,guitar, music lover,Valentine's Day Project

Hope my guitar has inspired you to create your own musical Masterpiece :) 

Thanks for stopping by!
Happy Crafting  :)

Saturday, December 28, 2013

Snowman Gift Box | Ink On 3 Files

Hi Everyone!

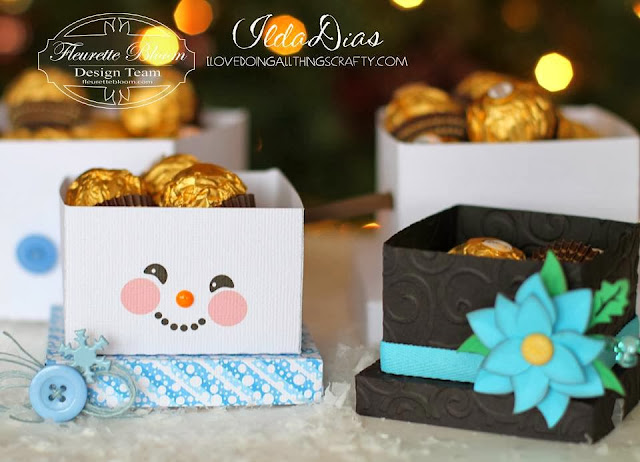
Today I have the cutest Snowman gift box to share with you. The files all come from Fleurette Bloom Designs.

Isn't he SOOOO cute? "HELLO" he says :)

Snowman Gift Box | Ink On 3 Files

To recreate this, here are the files you will need:

This project was all cut and created on the Silhouette Cameo using SSDE.


Is that not the most adorable face? Those cheeks look so pinch-able!

Snowman Gift Box | Ink On 3 Files

This box is perfect for holding a lot of great little surprises. Also, would make a great box for a Winter Birthday or just to cheer someone up... that face would make anyone smile and melt their heart!  

When opened all up,  it kinda looks like the snowman is all melting... Awww  :(  poor thing, LOL!

Snowman Gift Box | Ink On 3 Files

Here he is again... sharing HUGS with you all!

Snowman Gift Box | Ink On 3 Files

I had so much fun creating this little Snowman Gift Box, hopefully it has inspired you to create one too! If you do make sure you share it on Fleurette Bloom's Facebook Page. Would love to see your take on it :)


Thanks for stopping by!
Happy Crafting  :)

Friday, December 6, 2013

Print and Cut Nativity Scene Tri-fold Card | SVGCuts

Are you ready for Christmas yet? I just looked at the calendar and swear I felt some heart palpitations... Eeeeek! So much I still want to do and hopefully enough time to get it all done!!!

Today I want to share a Nativity Scene Card I made using only the Print and Cut feature on the Silhouette Cameo. When you are making more than one card, Print and Cut can save you many hours of piecing all the cut-outs together!


Christmas Card,SVGCuts,Print and Cut,Silhouette Cameo,ilovedoingallthingscrafty,Paper crafts,Nativity Scene Tri-fold Card,SVG Files,handmade card,Cricut,


Well what you think of my super cute Nativity tri-fold Card? Sweet and simple, just how I like it! Reminds me of the cards my parents would receive when I was a little girl, except those where pop up cards... I did love those! I'll stick to tri-fold for now... pop up cards are way over my head!

To make this card you will need:

SVG Cuts files from O Holy Night SVG Collection
White Card stock to print on
Silhouette Cameo with DSE software
Adhesive

Here is a screenshot of my images before I printed them.
Before this step, I had ungrouped then regrouped all the individual layers together, then I moved them around to create the folds for each layer of the card. (This step is a little time-consuming but will save you more time in the long run!)
 To make my images more visible, I chose to line each piece with a black outline.
Also, below you see the base of the card I created...  pretty simple!

 I made this card to fit in a standard 5 X 7 envelope.

Print and Cut Nativity Scene Tri-fold Card | SVGCuts Files

The inside opens to reveal your message! Plus there is enough space to handwrite a personal note.

Christmas Card,SVGCuts,Print and Cut,Silhouette Cameo,ilovedoingallthingscrafty,Paper crafts,Nativity Scene Tri-fold Card,SVG Files,handmade card,Cricut,

Hopefully, you liked my Nativity Scene Trifold Card and saw how easy it was to create a complete Print and Cut Project. If you have any questions I would be happy to help :) 

Thanks for stopping by!
Happy Crafting  :)

Wednesday, May 22, 2013

Lily Pad Shape Card | Ink On 3

HELLO!!! I am so excited to share with you my first Fleurette Bloom Design Team project today!

Here is a very quick card I made using some elements from Fleurette Bloom's latest Swan Lake Element Collection. The coolest part was making the coordinating envelope with the Swan Lake Digital Paper Collection. Love how turned out, so elegant... if a card can be that, lol!


I have owned my Silhouette Cameo for over a year now but had not really been using the machine to it's fullest potential! For some reason, I was always intimidated to use the fill pattern option of the program... well not anymore! All it took was one time and I am hooked! I will be using a lot more digital papers now!!! SO easy, can't believe it took me this long! Just look at how pretty the envelope is! I think it adds so much and, makes the card just that much more special! Don't forget to stop by Fluerette Bloom's Shop and check out all of her beautiful digital coordinating papers!  

Here it is again from a different angle. Isn't it SO pretty? It looks so much like the real thing! 


Take a look inside. I added a white inset layer... this adds a little extra strength and stability to the card... also makes it easier to see what is written when a darker color is used.


Here is a screenshot of how I turned the lily pad element into a shape card. If you are a visual person (like me) you'll appreciate this! It's true... a picture IS worth a thousand words!


To make this simple, I placed all my steps in one screenshot. I'll start of with the top left image of the lily pad and work clockwise.

  1. Import your lily pad base, this will then become the bottom part of the front of your card.
  2. To create the back of my card, first I copied and pasted the lily pad. Next, I drew a straight line down the side of the card and then changed the style of the line to a dash. Group them together. 
  3. Copy and paste image 2. Take your knife tool and cut the piece off just after the dash line you just created. Delete the piece with the dash line. 
  4. To create the piece that lines the inside of the card, click on the image you created in step 3, and select the internal offset option. I set my offset at 0.1 inches.

And that is how easy it is to create a shape card! Now all that is left to do is cut out all your pieces and assemble. 

Dimensions:
  • Envelope - 9.910" H x 6.380" W
  • Lily Pad - 4.425" H x 4.620" W 
  • Lily Pad top layer - 4.355" H x 4.555" W
  • Large Flower layer - 4.080" H x 4.270" W (highlight all flower layers when adjusting the measurements to keep them all proportional)
  • Sentiment Base - 0.940" H x 2.895" W
NOTE:
  • You could stop after step 2,  if you don't want to create the liner for the inside of your card. If you do, simply just cut the pieces out and place glue to the left of the dash line. Line up with the front piece of the card and press together! 
  • Don't forget you can also use the print and cut option to create the lily pad and flower if you decided not to make it 3 dimensional! 

I hope you liked my Lily Pad shape card, and have learned how to make your own... at least the way I do. I'm sure there are so many other ways! Make sure you stop by Fleurette's Blog or Facebook page today because she has got some exciting news to share with her fans!


Thanks for stopping by, leave me a comment... love to hear from you! 

Monday, April 15, 2013

Ninjago Cupcake Toppers - Free Print and Cut Silhouette File


Hey everyone are you tired of Ninjago yet? I'm getting really close... It feels like I've been eating, sleeping, breathing all things Ninja! I can't wait to see it all come together already! :)

Today I want to share with you the Ninjago cupcake toppers I made. I'm still not sure I will be using them like that. I may just use them as food picks and sporadically place them on the food trays.

I created them again using the Silhouette software. I printed them and then cut them out on the Cameo. Here is what they look like once they were cut out.

Ninjago Cupcake Toppers - Free Print and Cut Silhouette File

They come together in a matter of minutes. All that is left to do is fold and glue them down onto a toothpick. I just used a dab of hot glue and pinched the two pieces of paper together onto the toothpick. Really easy!

Ninjago Cupcake Toppers - Free Print and Cut Silhouette File

The image I used comes from here. Make sure to stop by, she also had some great ideas on the theme. If you have a Silhouette machine and would like to have a copy of this file click on the link below :)

Before you download...
My free files RULES!!!

  1. If you choose to download all I ask is you become a follower.
  2. Note my files are for personal use only! (Personal use means... only for you to use (no trading, or sharing of my files... let me do that!) 
  3. If you want to share, send your friends over to my blog for the download. 
  4. I'm OK with people sharing my files on their own sites as long as there is a direct link back to this blog...Give credit where credit is due! (a message to me would also be appreciated)

Ninjago Ninja Cupcake Toppers - (Silhouette - Print and Cut) .studio file

If you would like to donate, (click the 👉DONATE button on the sidebar) I will happily accept any amount you see fit. No pressure at all either :) It will just make my day that someone wants to support my passion.

Coming up...


Have a great day and thanks for coming by,
Happy Crafting :)

 Sharing this with my Crafty Peeps!

Saturday, April 13, 2013

Ninjago Balloon Stickers - Free Silhouette Print and Cut Studio File


Ninjago Balloon Stickers - Free Silhouette Print and Cut Studio File

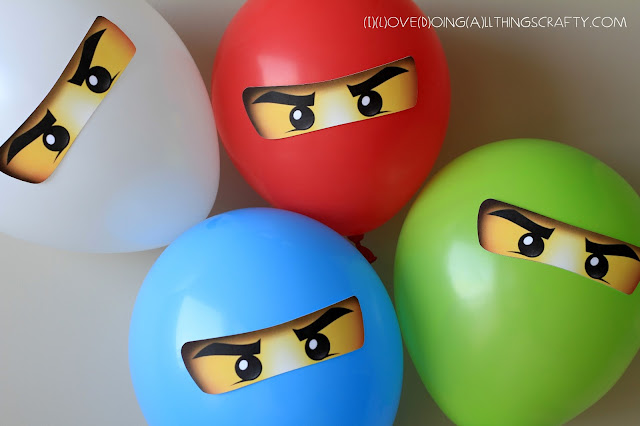
Here is a really quick and simple project I made for my son's Ninjago party. I created the Ninja eyes with the print and cut feature of the Silhouette software. For those of you with a Silhouette machine, all that is left to do is Print and Cut. 

You can print it onto an adhesive lined sheet of paper and just stick them on your balloons. I didn't have any adhesive paper, so I just printed them out on regular card stock and taped them to the balloons! You can use these eyes on pretty much anything for your party! I'm sure I'll be using them for a few more things! Just have fun with them :)


Click on the link below for your free file!

Before you download...
My free files RULES!!!

  1. If you choose to download all I ask is you become a follower.
  2. Note my files are for personal use only! (Personal use means... only for you to use (no trading, or sharing of my files... let me do that!) 
  3. If you want to share, send your friends over to my blog for the download. 
  4. I'm OK with people sharing my files on their own sites as long as there is a direct link back to this blog...Give credit where credit is due! (a message to me would also be appreciated)
Ninjago Bday Balloon Stickers (Silhouette, print and cut) .studio file (image came from here)

If you would like to donate, (click the 👉DONATE button on the sidebar) I will happily accept any amount you see fit. No pressure at all either :) It will just make my day that someone wants to support my passion.

Coming up...


Have a great day and thanks for stopping in,
Happy Crafting :)

 Sharing this with my Crafty Peeps!