Showing posts with label Shadow box. Show all posts

Tuesday, September 9, 2014

Silhouette Tutorial - How to create your own art from a drawing

Hey Everybody!

Today I want to share with you how to create your own art from a drawing! I'll show you how to go from a hand drawn sketch to the beautiful piece of art below step by step using the Silhouette Designer Edition. Super easy once you know how :)


I made this as a gift for our Cousins that travelled from Portugal to join us on a road trip we took this summer!


Here is a close up of the mountain scene, which I had hand drawn while driving through Jasper. So happy with how it turned out!


Here is the HOW TO...
  • Using a sharpie marker create any image you want (pen or pencil lines are too thin). Make sure the lines all connect with each other or it will be difficult to break each piece apart. (Maybe use a ruler, and create straight lines if possible it might save you some work!)
  • Take a picture of the drawing, as straight on top of it as possible. (I just used my cell phone, to make things easier and quicker, then email the picture to myself).
  • Locate the picture on the computer and open it up in the Silhouette's work space (see image below).

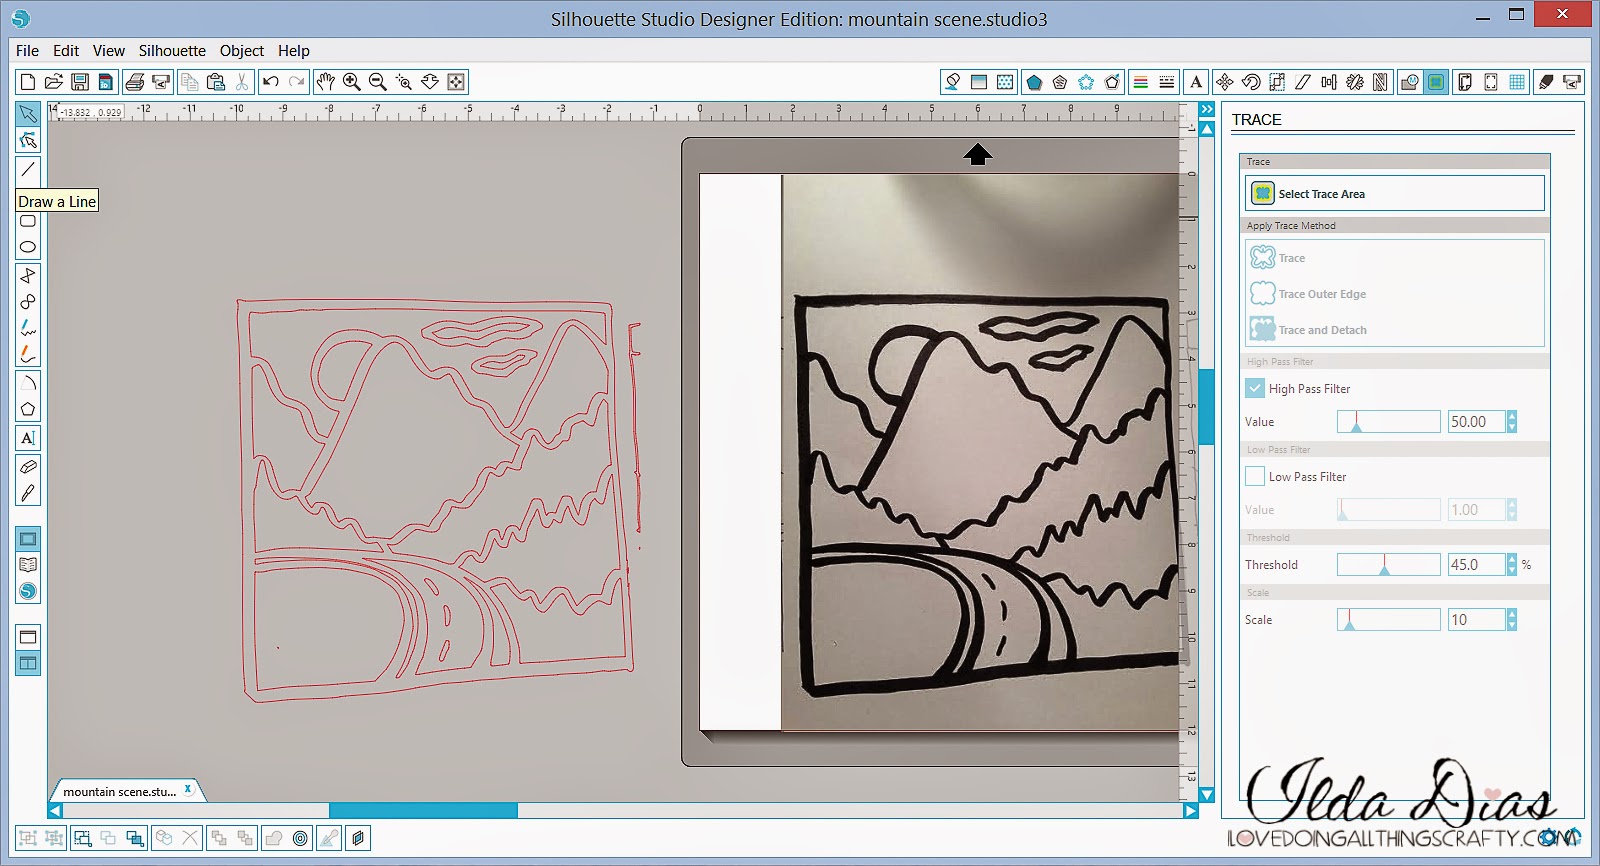
  • Next thing you need to do is trace the drawing, by highlighting the trace area (I increased the high pass filter value to 50 and then clicked on the trace function). Refer to next image.


  • Once you have traced the image you will be left with the outline of the drawing. Move the outlines off the drawing.
  • Right click on the image and select Release Compound Path. (This will break up your image in to many different pieces). 
  • Delete any unnecessary pieces. (Just like the little lines on the outside of the drawing below).


  • Next thing I did was remove the outside square of the drawing as it was all crocked, and replaced it with a square I created with the square drawing tool. (This is where using a ruler when creating your drawing may have helped a little!)
  • Now this is where the work really begins. Clean up time! Highlight each piece of the drawing and using the edit point tool (top left hand, image below) simplify and delete any points that make the lines smoother for your machine to cut. Don't worry about deleting the wrong points as you can just use the undo function and start again. Drag outside points of each piece to make the outer lines parallel to the square you created. See image below.
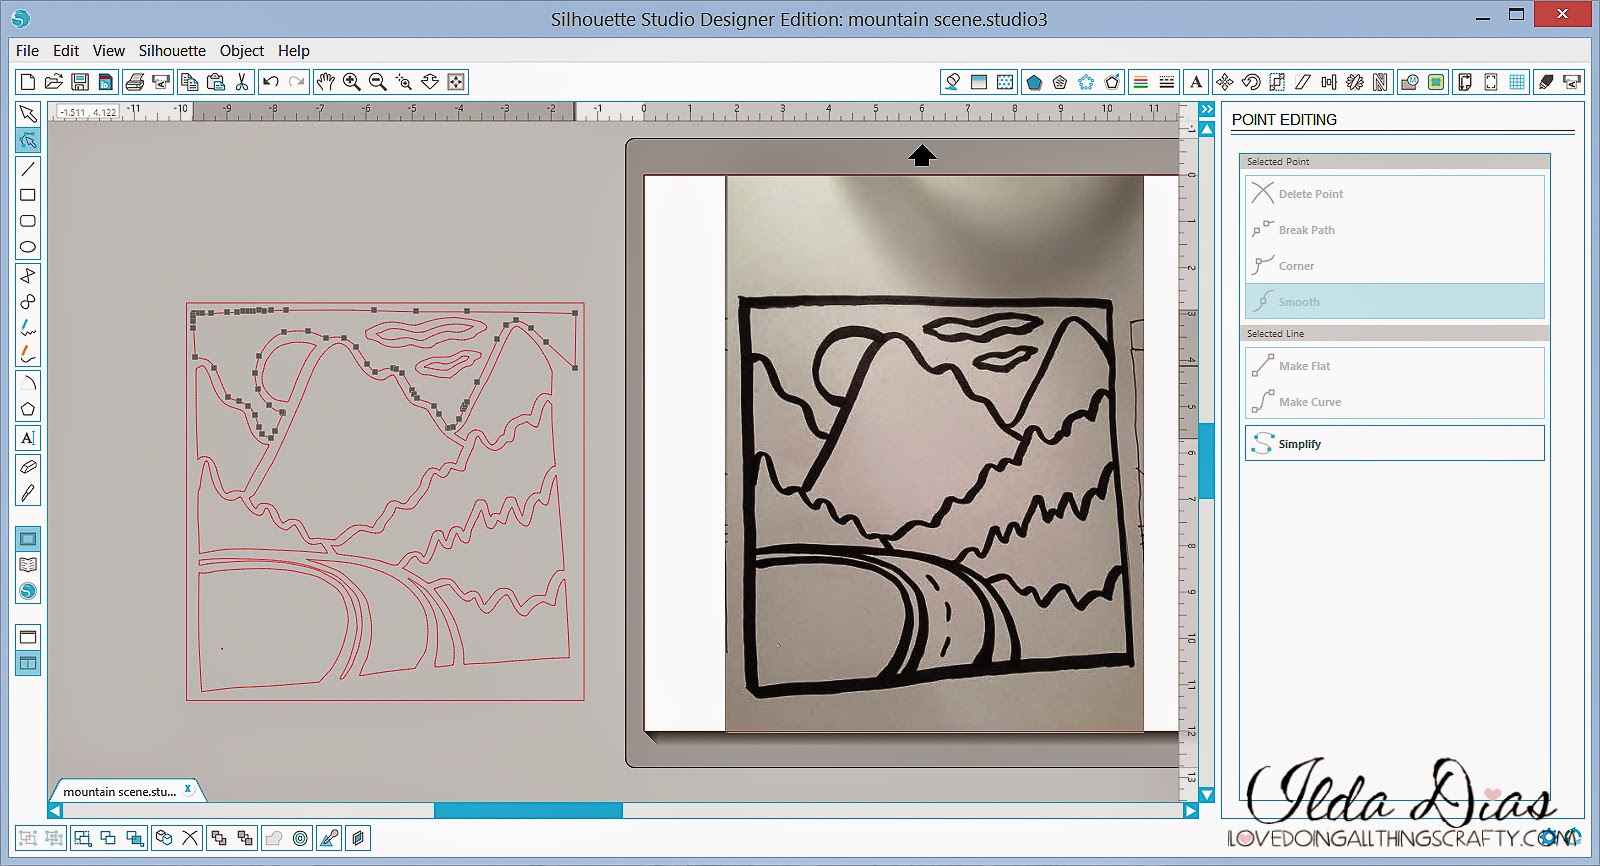

  • Once you are satisfied with the image and your lines all look fairly straight, group all pieces together and resize it to fit the frame you are going to use. 
  • Ungroup the image again.
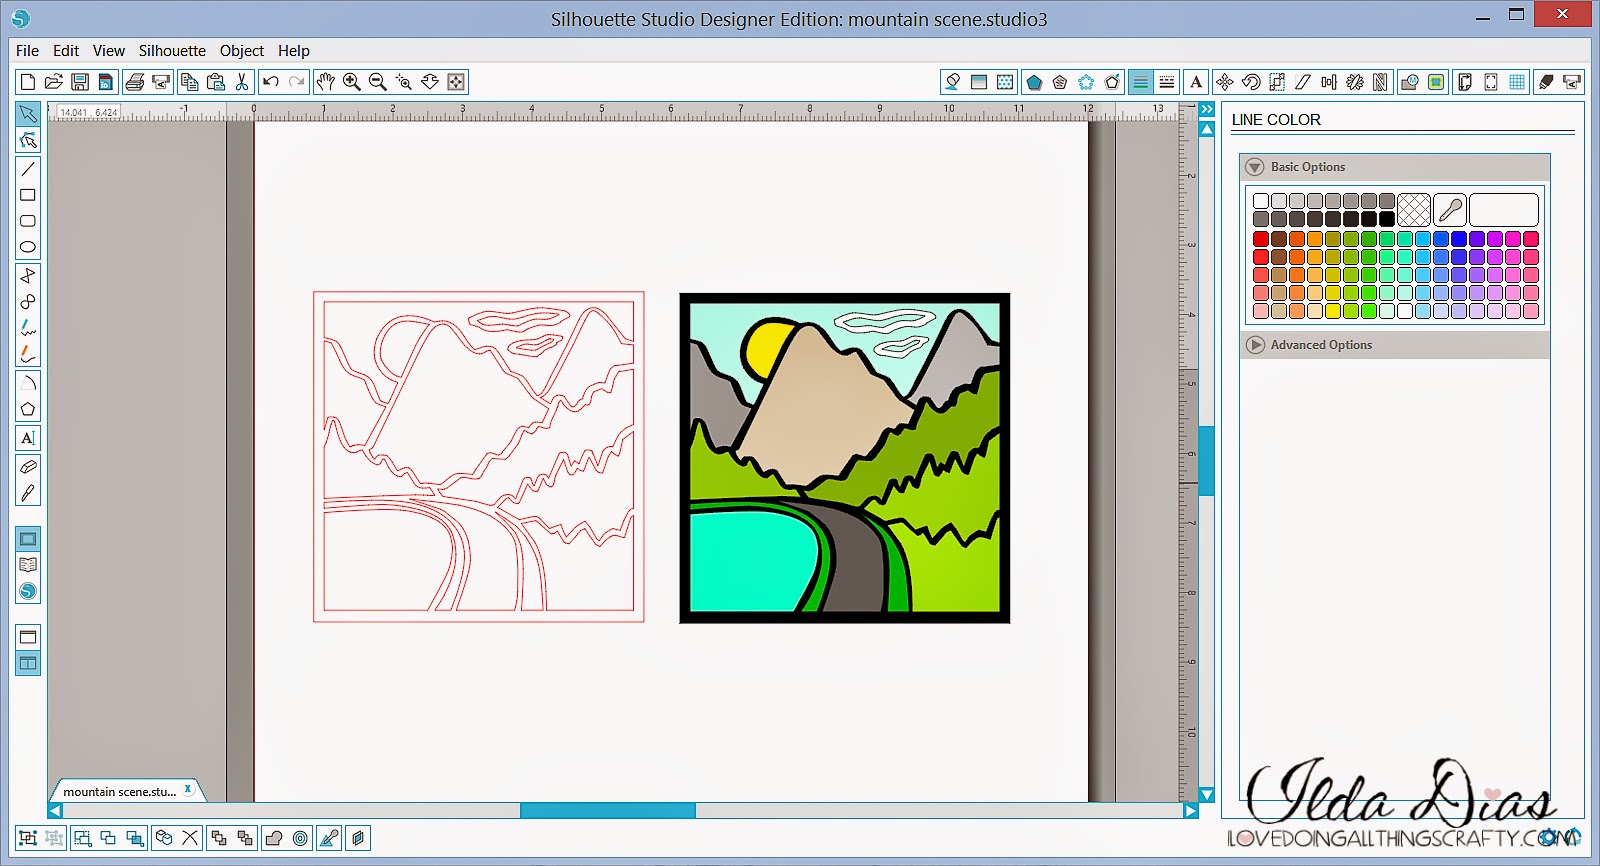
  • Before sending each piece to be cut out, I like to visualize what it will look like with color. (This will also help you when selecting your cardstock).
  • To add color to your image, I first copied the image and pasted it it next to it. Then simply selected each piece by highlighting it and used the fill color and line function. Group the colored image together and use it refer back to it when assembling the pieces back together.
  • You are now ready to cut!
  • Once you have all the pieces cut out glue them back onto the square, reproducing the color image created below. 
  • Emboss and embellish as desired!


Hope this tutorial has inspired you to create your own art work! Now that you know how and aren't limited to files you have purchased the possibilities are endless! Sometimes the best things in life are FREE, well with a little bit of work and patience that is!

Thanks for stopping by!
Happy Crafting  :)

Sharing this with my Crafty Peeps!

Thursday, December 26, 2013

Framed Paper Christmas Wreaths | SVGCuts Files


Happy Boxing Day to all that celebrate the Holiday today! For us Canadians, it's kinda like the US Black Friday, lots of crazy shopping and SALES ;) I hope you all had a very Merry Christmas and enjoyed some time with your friends and family! 

Today I want to share with you these awesome framed Paper Christmas Wreaths I created. I purposely didn't share this post sooner as I didn't want to spoil the surprise as they were given as gifts.

Back in the Fall, I had created something similar but on a much smaller scale as a Wedding gift for Mary and Leo of SVG Cuts. The post was titled Autumn "love". Since then, I had thought of making a similar project, only this time as a Christmas gift.

Here is my "White and Gold" Framed Wreath. Isn't it beautiful?!


To add some gold touches, I inked the edges of the flowers with a gold stamp pad and added a little gold glitter to the tips.


A little time-consuming and messy when working with the glitter, but so worth the end results! LOVE how they came together. The picture doesn't do the glitter justice... it is so vibrant and sparkly in person!


For those interested here is how I planned it out on the SSDE.
  1. First I grouped all the layers of my flowers together. 
  2. Next, I created a circle (not shown as covered up by the flowers below) the size I wanted my wreath to be. (As you can see the wreath is larger than the cutting mat)
  3. Resize the flowers as you like and arrange them on top of the circle you created (this will give you an idea of what the finished project will look like and how many flowers you will need to cut out).
  4. Ungroup each flower and cut. 

Here is the list of supplies and files I used to create both frames:

poinsettias - 3D Wintergreens SVG Kit
RIBBA Shadow Box Frame from IKEA - 19 ¾x19 ¾x1 ¾"
Embellished with glitter, gemstones, beads, buttons, pearls, and Ribbon
Brown and gold ink
 Hot glue and a glue gun
Scotch Quick Dry glue
White poster board 
Cut and created on the Silhouette Cameo using SSDE.

Here is a more traditional colored Christmas Wreath. I don't know which one I LOVE more!?
I guess it all depends on the rest of your Christmas decor and what would look best in your home! Don't the poinsettias look SO realistic?


By far the poinsettias from the 3D Wintergreens SVG Kit have been my most used file this Holiday Season! I LOVE how easy and beautiful they turn out each time! They are so stunning!!! I'm always amazed as to what we can make out of plain old paper these days!


For these photos, I have removed the glass from the frames. I wanted to get great pictures and avoid all the glare you get when taking pictures of a reflective surface. With the glass on, these frames look just as amazing!

Another option if you chose to do so, is to etch something across the middle of the glass. If etching intimidates you, use vinyl! Click here for an example.


I hope you enjoyed my Framed Christmas Wreaths. My Family LOVED them by the way!

It is a little late to create this as a gift for someone this year... but you can sure get an early start for next year, or why not make one for yourself  ;)

Enjoy your holidays everyone! EAT, DRINK, and stay SAFE!

Thanks for stopping by!
Happy Crafting  :)

Wednesday, March 14, 2012

DIY Monogrammed Iced Tumblers and Picture Frame


 Hello!

DIY Monogrammed Iced Tumblers and Picture Frame by ilovedoingallthingscrafty.com

I had a busy crafting morning today. I was able to get a lot done... I have been getting many requests for the personalized tumblers I've made recently on the blog. So with no kiddos at home this morning I was able to make some using the Silhouette. Sneak peek for those of you that wanted one and a surprise for the others that weren't expecting one! 


Click here for how I made the Shadowbox.
Click here for how I made the tumblers.

Short post today, got to run and get ready for work!
Ilda :)


Thursday, February 16, 2012

Etched Shadow Box Picture Frame for a Baby Boy | SVGCuts

Hello Everyone!

I didn't think I would be posting again so soon! I keep making changes to the blog as I go... I've go so much to learn! Any advice about blogging would be very appreciated :)

Today I'm going to be sharing with you a shadow box picture frame I made for a 1-month-old baby boy. This past weekend we had the privilege of meeting him and celebrating his arrival with all of his friends and family. I really love how it turned out!


Etched Shadow Box Picture Frame for a Baby Boyby ilovedoingallthingscrafty.com


The frame is an 8x8 shadow box that was purchased at IKEA.  It's hard to see the etching on the above picture because of the glare on the glass :(


Etched Shadow Box Picture Frame for a Baby Boyby ilovedoingallthingscrafty.com

The first thing I did was take the frame apart so that I could work with only the glass. I then cut the name out of vinyl using the Silhouette Cameo Cutter. Then I positioned the vinyl on top of the glass, ensuring that the vinyl around the letters were completely adhered to the glass and that it was level. Next, I took armour etching cream and flooded the exposed glass. Follow the instructions on the the bottle and rinse off the cream once your time is up. This technique can be used for so many projects!


Etched Shadow Box Picture Frame for a Baby Boyby ilovedoingallthingscrafty.com

The last thing I did was add the embellishments to the mat. The roses are from SVG Cuts Crush on you kit, I just scaled them down. The butterfly comes from SVG Shop (sorry no longer available). I simply cut out two butterflies one slightly larger than the other, inked the edges with brown ink, and glued them in the center. I finished the butterfly by using glitter glue in its body and then folded up the wings to give it some dimension. Added some buttons, pearls, and some twine and then put the frame back together again... and voila a beautiful personalized picture frame!

I hope you enjoyed this and thanks for stopping by!

Ilda :)