Showing posts with label Gift Box. Show all posts

Thursday, June 16, 2016

Dr. Who's TARDIS Telephone Box | 3D Paper Treat Box | SVGCuts

Any Dr.Who fans out there?!? 
Well if you are, I think you love this project!

Hopefully, my husband isn't paying much attention to my blog posts these days. 
Or he may just see the surprise I made him for Father's Day. 
Recognize it?

For those of you that don't, it is the TARDIS time machine and spacecraft from Dr. Who! 
Don't ask me anything else about the show though, I have no clue... in fact when I was growing up my brother would watch it and I would run away because it creeped me out. Well as is turns out my husband was also a big fan of the show, haha! 

Cool right?! 
Even for non-fans, I love how it turned out!

Gift,3D,SVG Cuts files,#SVGCuts,Father's Day,Gift Box,Tardis,Dr. Who's TARDIS Telephone Box,ilovedoingallthingscrafty,


This file is actually the London Telephone Box from a recent SVGCuts kit, Travel the World.
But with a few simple alterations, I was able to change it to the TARDIS Telephone Box.

Here is a screenshot of my alterations and panels with measurements for those interested. I did shrink the file slightly to use 8.5 x 11-inch paper as well.


I stamped the back panel with a stamp from Happy Celebrations - Craftin Desert Divas and added some fun enamel dots.


Here is a closer look.
For the telephone signs, I did a print and cut on the Silhouette Cameo.


The box is large enough that I will be putting a small gift inside for a bonus surprise.

Take a look at it all lit up.
I just added a string of battery-operated led lights to the bottom. You can also secure them to the top as Mary did with the Telephone Box.


Hope this project has inspired you to create Dr. Who's TARDIS Telephone Box for yourself or for that true fan in your life.

Happy early Father's Day to all Dads out there :)

Thanks for stopping by!
Happy Crafting  :)

Thursday, December 3, 2015

SVG Cuts Merry Maple Manor | 3D Paper House/Gift Box | SVGCuts

Hey everyone!
Are you all ready for Christmas? I'm not even close... eeek! I have been so busy with these crafty projects that I'm starting to panic because I haven't started my Christmas shopping yet :(

Anyways, let me tell you a little about today's project... This house comes from SVGCuts Maple Manor SVG Kit. If you saw the last house I did (HERE) you may have noticed it was inspired by Thienly Azim's Home For Christmas Project.... same goes for this house! This particular house is now displayed on one of the hospital units I work on. Hopefully, it will bring some JOY and smiles to the patients, visitors, and the staff I work with! I really love how this one turned out and hope they do too :)

Christmas decoration,SVG Cuts "Merry" Maple Manor,#SVGCuts,Silhouette Cameo,ilovedoingallthingscrafty,3D House,Gift Box,

Once again, for those interested in all the files I used here is the long list!

House - Maple Manor SVG Kit
Patio fence - Country Market SVG Kit
Windows - Townhouse Windows SVG Mini Pack
 Fence - For My Valentine SVG Kit
 Chimney - December Gifts SVG Kit
Greens - 3D Wintergreens  &  Spirits of Christmas Past SVG Kit
Chandelier (modified candelabra) - Gothic Flourishes SVG Collection 


Here is a list of the alterations I made to the original house:

  • Windows (See Home For Christmas for instructions).
  • Added poke holes around the roofline to poke Christmas lights through.
  • Added all the files listed above to embellish the house and make it my own. You can do the same using any files you may have!
Cut out black Silhouettes and add them in front of the windows. When the house is lit up it will actually look like there are little people living inside it... Super cool!!!


Love the silhouette of this little girl with her present at the window... and how pretty is this wreath too! I'm always amazed when I am able to cut out small intricate pieces, check out these small leafy cuts, cut out perfectly on the Silhouette Cameo.


Here is a side shot of the Merry Maple Manor.

For the snow along the roofline, I used Snow-tex from DecoArt that I purchased at Micheal's. This stuff is great and dries in a few hours!


Thanks for stopping by, hope you liked my take on the Maple Manor turned Merry!
I still have a few more Christmas projects to make and post about! Hopefully, I will get to them soon :)


Happy Crafting Everyone :)


Friday, October 16, 2015

Halloween Bewitched Cabin | 3D Halloween Treat Box Decoration | SVGCuts

Hello, my crafty Friends!
It's been a while since I had taken on a bigger project. Sometimes all I need is an excuse to craft ;) My Excuse this time was that I needed something to display on one of the hospital units I work.

So here is what I created for them! 
How cool is this Bewitched Cabin?!


Not only does this make a cool decoration piece, but it can also be used as a treat or gift box!

SVGCuts files,treatbox,#SVGCuts,Silhouette Cameo,Bewitched Cabin,work,ilovedoingallthingscrafty,3D,my mind's eye,Gift Box,Halloween,decoration,

For those of you that don't know I am a Nurse and have worked in Oncology for the past 18+ years. So recently I took my House of Haunts to work. Usually, it's displayed in my craft room all year long, but this year I thought it would be cool to take it to work and share it with all the staff, patients, and visitors on one of the Units. Here's a shout-out to Station 40 at the CCI! You would not believe the comments it has received and the amazement it gets when people find out it's made of paper and that it was done by someone that works there! There is no better reward than to see someone smile because of something you made :)

The only issue was that I also work on Station 30 and they were wondering why they didn't get one? The only logical solution I saw was to get busy creating a Halloween decoration for them! See Station 30, I love you guys too!

Welcome to my Bewitched Cabin! Muhahahaha!!!

The files for this amazing creation all come from SVGCuts!

Here are the kits I used:
Bats, Ghosts & Moon - Spooky Cuties SVG Collection
Other supplies used:
Pattern Paper - My Mind's Eye
Black cardstock - Recollections
Vellum
A string of indoor orange lights
Wooden dowel 
Black twine
White, black, green Ink Pads
Hot Glue
Scotch Quick dry glue
Black rhinestones & enamel dot
Cotton ball
Precision Knife
Embossing folders 
Crop a Dile Big Bite Punch
Sizzix Big Shot
Silhouette Cameo 

Here is a closer look at the side of the house. Love the little vellum ghosts!


Here is the other side of the house.
To add the lights I used my crop-a-dile big bite punch to create some holes along the roofline of the house, and then pushed the lights through each hole.


 Kind of difficult to see here, but on the bottom left corner of the house I created a flap using a sharp precision knife. I then fed the plug end of the string of lights through the opening to allow it to get plugged in. You could also skip the string of lights and just add some electric tea lights instead.


Below are a few iPhone pics I took at work yesterday, sorry not the greatest quality :(


Here is the Bewitched Cabin as it's now displayed on  Station 30 (with one of my co-worker's hiding behind it). She did pose for another picture afterward but it was really blurry! Thanks anyway Jill!


And, here is the House of Haunts, which was my 2013 creation for the SVG Cuts Halloween Challenge now displayed on Station 40.


Oh, and see the stacked pumpkins on the top right, I made those last year as one of my SVG Cuts DT projects and gave them to Kim, our Unit Clerk. She now proudly displays them on the Unit every Fall!


 I love being able to share my work and inspire others. I hope this post has inspired you to share your work and creations with others as well! Take your beautiful creations out of your craft rooms and display them for others to enjoy!

Thanks for stopping by!
Happy Crafting  :)


Wednesday, December 3, 2014

3D Paper Snowy House Treat Box | SVGCuts

I finally got around to making the 3D Snowy house box from Winter's Chill SVG Kit, and I absolutely love how it turned out! How cute is that!?! I've had this file in my SVG stash forever, and I can't believe it took me this long to make it!!!

Christmas Gift,SVG Cuts files,treat box,#SVGCuts,Gift Box,luminary,decoration,Christmas Decor,3D Snowy House Box,ilovedoingallthingscrafty,

This little house is a gift in itself but it's also big enough to add some gifts or goodies. Add a tea light to the inside and watch it glow! Make a few more and you have the beginnings of a paper Christmas village!


To add a more Christmasy look to it, I added a wreathe to the front of the house from the latest Santa's Surprises SVG Kit and shrunk it down quite a bit. I love how festive the house looks!


Hope you like my take on this SVG Cuts 3D Snowy House Box, hopefully, will have some time to tackle the Mistletoe Manor soon!

Thanks for stopping by!
Happy Crafting  :)


Saturday, January 25, 2014

3D Paper Guitar Gift Box | SVGCuts

Have you seen the latest Vintage Valentine SVG Cuts Kit? If you haven't, you must... it is awesome!!! I couldn't wait to make the guitar that Mary created! Super cute and so easy to put together :)

3D Paper Guitar Gift Box | SVGCuts Files

This guitar makes the perfect gift box for the music lover in your life.. a great Valentine's treat too!

3D Paper Guitar Gift Box | SVGCuts Files

Instead of twine, I used 22 gauge metal wire for my guitar strings. It took a little effort but I am really happy with the results :)

3D Paper Guitar Gift Box | SVGCuts Files

To create this project you will need:

Card stock
Wire
Embellishments
Silhouette Cameo with the SSDE

I used the Print and Cut feature of the Silhouette Cameo to add the roses to the front panel of my guitar.

3D Paper Guitar Gift Box | SVGCuts Files

Hope my guitar has inspired you to create your own musical Masterpiece :) 

Thanks for stopping by!
Happy Crafting  :)

Tuesday, January 21, 2014

3D Paper Floral Centerpiece | Ink On 3 Files

Today I want to share with you my latest Fleurette Bloom Design Team Project "3D Paper Floral Centerpiece."  Aren't those flowers GORGEOUS?! Hard to believe that they are made out of paper!

Have you ever thought of paper floral arrangements as centerpieces for your next event? Why not!?! Yes, they are a little more work but so worth it! They are less expensive to make than buying real flowers, they will last you forever, and are just as beautiful! Plus, your guests will be amazed that you made them too :)

3D Paper Floral Centerpiece | Ink On 3 Files

To make this beautiful 3D Paper Floral Centerpiece you will need SVG files from Fleurette Bloom's Valentine Be Mine 3D SVG Kit and Lush Flowers 3D SVG Collection

Other supplies I used to create this include:

Card stock
Inks
Hot glue and a glue gun
Scotch Quick Dry Adhesive
Decorative Burlap Ribbon
Toothpicks
2" Styrofoam ball 
Decorative green moss

Cut on the Silhouette Cameo with SSDE

3D Paper Floral Centerpiece | Ink On 3 Files

The coolest part is that the Flower Pot (modified coffee mug) opens up to reveal a little surprise! 

 This arrangement would also make a great gift for someone. Think Valentine's Day, Mothers's Day, and upcoming Friend's Birthday... the possibilities go on and on! Also, the treats you fill the base with will act as a weight, keeping it from tipping over! If you chose to make it for yourself just fill the base with stones, beans, whatever you have handy will work ;)

3D Paper Floral Centerpiece | Ink On 3 Files

I absolutely LOVE how this 3D Paper Floral Centerpiece turned out!!! I hope you love it too! If you do make this project make sure you share it on Fleurette Blooms Facebook Page :)

Thanks for stopping by!
Happy Crafting  :)

Thursday, October 17, 2013

House of Haunts Halloween Decor | Facebook Challenge Entry | SVGCuts


Muhahahahahahah! Scared yet? You should be... this post is going to freak you out! WARNING, run if you don't like pictures... this is a very picture heavy post!

Today I'm so excited to share with you what I've been working on the past week! SVG Cuts is having another Facebook Challenge this time it's Halloween-themed. Of course, I can't resist a good challenge... they are so much fun! I LOVE to create, and with SVGCuts files, the possibilities are endless! For this challenge, I wanted to create a little street scene.

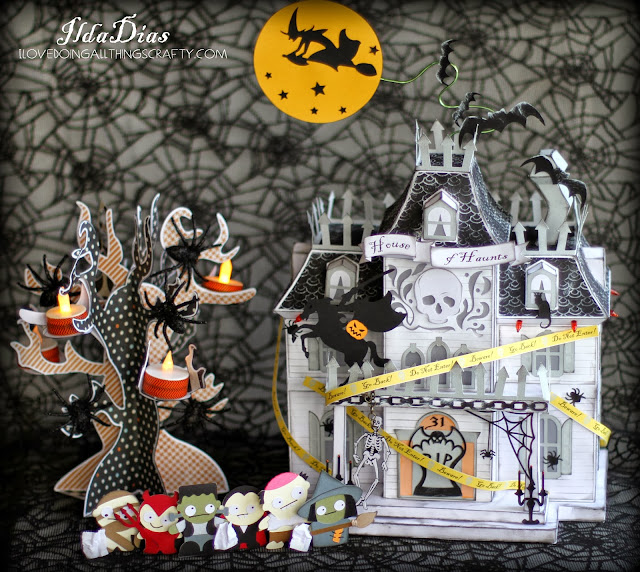
Wait until you see it all lit up!
  
House of Haunts | Facebook House of Haunts Halloween Decor | Facebook Challenge Entry | SVGCuts FilesChallenge Entry | SVGCuts Files


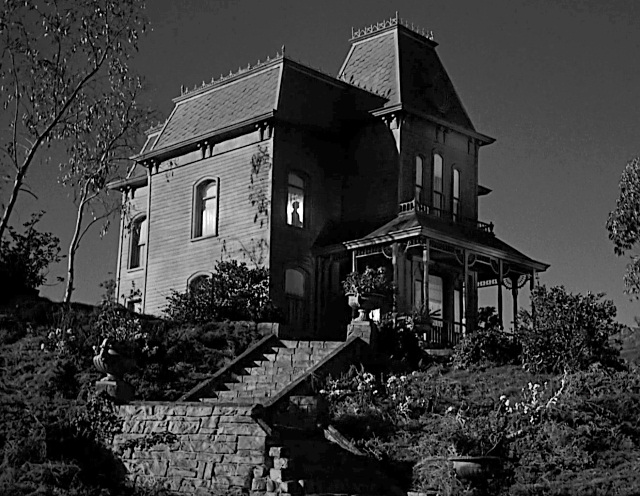
Since I wanted to create a spooky house, the first one I thought of was the Bates House from the movie Psycho. When I looked it up I knew it was the perfect inspiration I needed for my House of Haunts! 

Creepy isn't it!

So how did I do?  Looks a bit like the Bates house, doesn't it? OK well, maybe minus Norman!


For those that are interested, here are all the SVG Cuts Kits I used:


All cut out on the Silhouette Cameo

WOW, right! Love how it looks all lit up... I think this has to be one of my favorite paper projects to date and one of my most challenging for sure!

House of Haunts Halloween Decor | Facebook Challenge Entry | SVGCuts Files

Look at those little faces on the Trick or Tr-eaters! The Witch looks like she's ready to beat someone with her broom... leave it to the boys to send in the girl first, LOL!

House of Haunts Halloween Decor | Facebook Challenge Entry | SVGCuts Files

I can see why they are so scared... the skeleton, the headless horseman, the spiders, creepy tombstone door! These little cuties are working hard for their candy!

To make these little guys stand, I used a strip of paper and created score lines at different depths, essentially creating steps. Then adhered each one of them to a step.

House of Haunts Halloween Decor | Facebook Challenge Entry | SVGCuts Files

Poor Witch, she looks terrified! And, just for some scale, the skeleton measures 3 inches tall! I'm sure she can take him on!!!

House of Haunts Halloween Decor | Facebook Challenge Entry | SVGCuts Files

Did you notice the lights? It's a modern-day Victorian, complete with outdoor lighting, hehe! 

To add the string of lights, all I did when I cut out my house panels was add a couple of circle cutouts just underneath the roofline to poke my mini lights through. 

House of Haunts Halloween Decor | Facebook Challenge Entry | SVGCuts Files

Because I also wanted the top of the house to light up I also created two more holes in the top roof tower as shown below. Still, plenty of room to fill with goodies if you wanted to give a house like this away!

House of Haunts Halloween Decor | Facebook Challenge Entry | SVGCuts Files

I wanted to make the house look Evil, so another modification I did to the house was to remove the top window from the tower and add the Skull and flames. The banner was made using Print and Cut, and the file comes from TOIL AND TROUBLE KIT here

House of Haunts Halloween Decor | Facebook Challenge Entry | SVGCuts Files

To the rooftop, I added iron roof trim from ELMHURST HOLLOW here. To attach it, I added a score line to make a bend and then I adhered it to the edge of the roofline and porch. I also added the crooked chimney from the same kit. 

House of Haunts Halloween Decor | Facebook Challenge Entry | SVGCuts Files

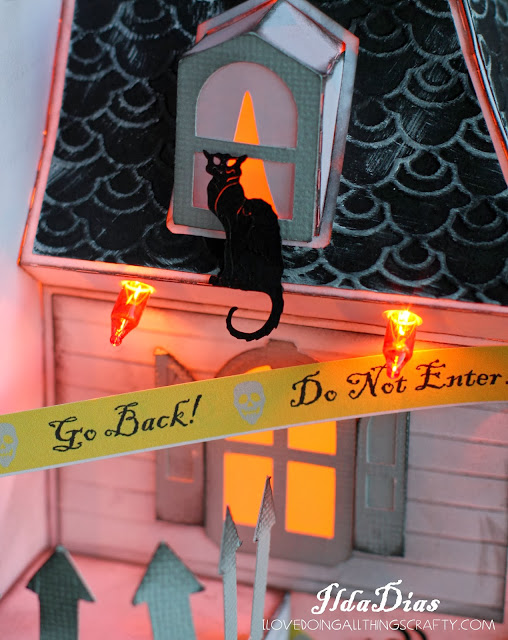
Is that not the scariest-looking cat? He has no eyes... EEK! The file comes from MAPLE MANOR KIT.

The yellow tape you see I created with the Print and Cut feature of the Silhouette. The name of the font I used is Blackadder ITC. For the roof, I used a Japanese Scale embossing folder and ran them through the Cuttlebug. Then distressed them with a white ink pad.

House of Haunts Halloween Decor | Facebook Challenge Entry | SVGCuts Files

For my tree of spiders comes from the Spooky Soiree SVG Kit, I used a white card stock base and inked the edges black.  The patterned paper comes from My Mind's Eye Mischievous Paper Kit. To make my tea lights coordinate with the rest of the scene I wrapped Washi tape (Recollections) around them.

House of Haunts Halloween Decor | Facebook Challenge Entry | SVGCuts Files

Here is what the inside looks like with the string of lights through it... You could secure them all the top part of the roof but I found the lighting better when some of the lights were on the base of the house. This would also be a great idea for a Christmas Themed house, with all the lights around the house!

House of Haunts Halloween Decor | Facebook Challenge Entry | SVGCuts Files

To close it up, I just created a little slit with my scissors and pulled the end of the cord through.

House of Haunts Halloween Decor | Facebook Challenge Entry | SVGCuts Files

Did you notice the siding? I didn't have an embossing folder that looked like a siding of any kind, so I thought I would make my own.  I did it by creating score lines on my panels with my scoreboard. What took me forever was the ink distressing and "dirtying" of the house! But all so worth it, I absolutely love how it all came together :) Now I just have to clean up my dirty craft room :(

Here's one last look at the House of Haunts. Oh, almost forgot the flying witch comes from Midnight Jamboree SVG Kit here and the bats from Party On Elm Street SVG Kit here. I used some floral wiring and poked a hole through the top of the roof tower and used hot glue to secure it. 

House of Haunts Halloween Decor | Facebook Challenge Entry | SVGCuts Files

I hope you have enjoyed my House of Haunts! I have had so much fun coming up with it, and if you haven't entered there are still a few days left! Good luck to all that are participating, there are already many great entries.

Wish me luck on the Challenge, I sure would love to win a Sizzix Eclipse or anything else for that matter!

Thanks so much for stopping by, would love to hear what you think :)
Happy Crafting Everyone!