Thursday, March 28, 2013

Vacation Pictures of Peru | Travel

Hi Everyone!

I finally had a chance to put together some pictures of our trip to Peru to share with you all! Not my usual kind of crafty post, but I think photography is an art and I love to practice it when I can. I tried to capture our experience, the people, the culture and of course the breathtaking views. Here are some of my favorite shots. 

Vacation Pictures of Peru | Travel

The worried man. Sitting outside a church... wonder what's on his mind? 

Vacation Pictures of Peru | Travel

This poor man was passed on the steps - One too many Pisco Sours!

Vacation Pictures of Peru | Travel

Peruvians have their bases covered... Rooftop offerings both Gods! 

Vacation Pictures of Peru | Travel

This beautiful lady showed us how they weave and make their very colorful lama and alpaca yarn.

Vacation Pictures of Peru | Travel

Rescued Ox! Jose our driver stopped the van to untangle this Ox from the fence.

Vacation Pictures of Peru | Travel

One of the most beautiful places I have ever seen and stayed during our trip. Arawana Sacred Valley Hotel.

Vacation Pictures of Peru | Travel

Another one of my favorite pictures... when I took this picture I never noticed the man sitting in the bush!

Vacation Pictures of Peru | Travel

Prickly pears... so delicious, had no idea they grew on a cactus!

Vacation Pictures of Peru | Travel

Beautiful Bloom!

Vacation Pictures of Peru | Travel

The three Caballeros...
put on a traditional horse show and dance for us!

Vacation Pictures of Peru | Travel

Peruvian Moma and her baby at the local market! Aren't they gorgeous!?! Love the colors!

Vacation Pictures of Peru | Travel

Can you tell we are a bit excited! That... or we chewed a few too many coca leaves, lol! 
Thank you to our friends Luis and Isabel for the fun times and wonderful memories!

Vacation Pictures of Peru | Travel

One more checkmark on our Bucket List!


Vacation Pictures of Peru | Travel

Machu Picchu the highlight of our trip! Literally breathtaking!!!

Vacation Pictures of Peru | Travel

I hope you enjoyed my very condensed version of our trip... 1500 pics thought might be a bit too much for you all... If you really want to see more I recommend you go visit this majestic place!

Tuesday, March 26, 2013

DIY Paper Luminary/Luminaire Sleeves


Hi Guys!!! We are finally back from our amazing trip to Peru! Actually got back on Sunday but been crazy busy trying to get things back in order and come back to reality! Hopefully will be able to get some pics of our trip up soon :)

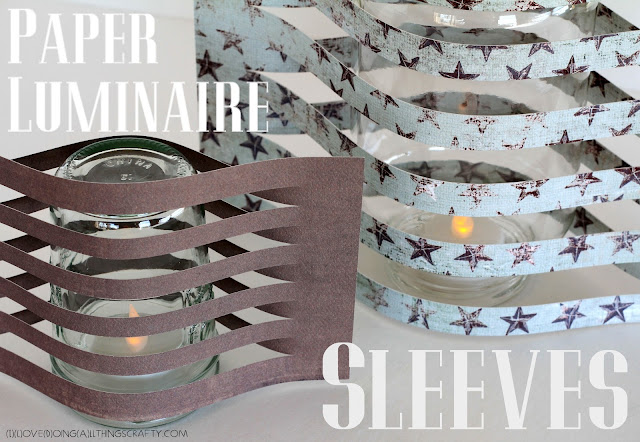
For today I want to share with you a really easy project. A few weeks ago I saw some Deewa Candles by Karve Design. Basically, they are candles that have been accented by thin, hand-carved plywood. I thought they were so cool looking that I thought I could replicate them using recycled jars and paper. Initially, I thought of using candles but quickly changed my mind once I actually gave it a little thought and realized what a fire hazard that would be! Had a brain fart there for a second :(

Click here to see where I got this inspiration! 

DIY Paper Luminary/Luminaire Sleeves

Here is what my empty jars started off like...
DIY Paper Luminary/Luminaire Sleeves

I then created a rectangle with evenly spaced cut lines across it leaving about 1-inch space on each end. I made the rectangle to measure the height of each jar. This was done in the Silhouette Studio DE and cut on the Cameo. Although I did use an electronic cutter for this it could easily be done by hand with a ruler, a blade and some patience!
DIY Paper Luminary/Luminaire Sleeves

 Here is what the jars look like once they are fitted with the paper sleeves. 
DIY Paper Luminary/Luminaire Sleeves

Here they are all lit up... So pretty in the dark. They would make such a cute, inexpensive centerpiece for a party or lighting for a romantic dinner! Wink, wink!
DIY Paper Luminary/Luminaire Sleeves

Pretty simple right? You could also use a wave pattern or maybe even a chevron... so many possibilities! I hope you've enjoyed this little idea and maybe even get a chance to make it.  Beautify your space or wow your guests at your next nighttime event!

Thanks again for coming by!
Happy Crafting :)

Thursday, March 14, 2013

Carrot Patch Paper Garden | Easter Treat Boxes

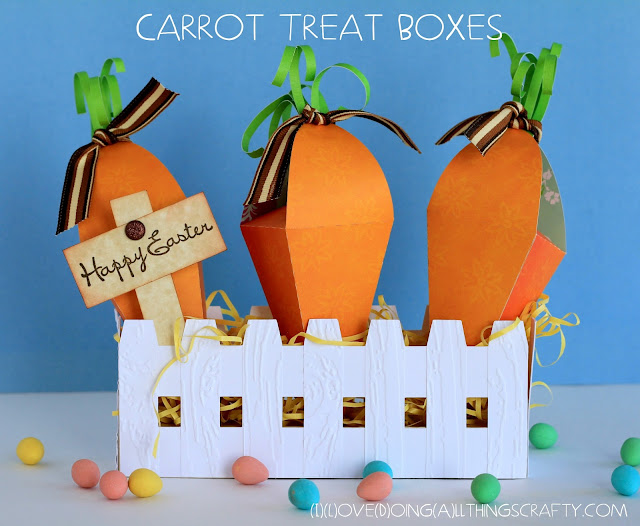
Are you all ready for Easter? Here are the perfect little treat bags for the little bunnies in your life! Aren't they so cute?!? They are the perfect size to fill with just enough goodies :P

Carrot Patch Paper Garden | Easter Treat Boxes

Here is the recipe:

Paper - Memory Stor and plain paper from Recollections 
Stamp - from Micheal's dollar bin Craft Smart
Cuttlebug - wood grain folder
Cut with the Silhouette Cameo

Hope you like my little carrot patch, thanks for coming by!

Happy Crafting :)

Monday, March 11, 2013

DIY Pin Cushion from an Old Sock


DIY Pin Cushion from an Old SockI've been meaning to share this with you all for a while and finally got to it this morning when my husband handed me another holy sock! Usually, they end up as grease rags for the garage, but a while ago I had this idea to turn one into a pincushion. So today I decided to show you how I did that. SUPER easy!!!


  • First make sure you have a clean sock... who wants to work with a dirty, smelly one! YUCK!!! Also, make sure that the hole in your sock is not in the toe area, or else it won't look as pretty!


DIY Pin Cushion from an Old Sock


  • Starting at the top of the sock, roll it inward until you reach the toe part. Should end up looking something like this! You could just leave it like this, but it doesn't look very pretty :(


DIY Pin Cushion from an Old Sock, recycled


Squeeze the sock into a small clay pot or container of your choice. I didn't even have to use glue to secure it in place it was wedged in pretty tightly! Stick your pins in it and there you have the quickest little useful project ever!


Hope you like this DIY tutorial, would love to know what you think. What do you do with your old socks?

Happy Crafting Everyone :)
Thanks again for stopping by! 

Saturday, March 9, 2013

St. Patty's Nail Polish Treat Bag

No likes getting pinched on St. Patrick's Day! So here is a treat I made for my daughter for that same reason. Hopefully, it will prevent a few tears! Now if for some reason she forgets to wear green at least her nails will keep those little claws away... especially her brothers!


This is a very quick and easy treat bag to make. The file comes from My Scrap Chick. I believe it may have been a freebie from last year. The tag was created with my Silhouette DSE, by welding some hearts together and a rectangle, then creating an offset. For the inside of the tag, I used the print and cut feature of the software and the font I chose was called Ma Sexy. I also added some green glitter glue to give it that extra sparkle and Voila! The perfect pinch-proof package any girl would love to receive!   

Thanks for stopping by!
Don't get pinched on St. Patty's Day :)

Wednesday, March 6, 2013

Rocking Horse Shaped Baby Card | SVGCuts

Here is a card I made recently to add to my card collection, I'm trying to be prepared for upcoming occasions! It seems you can never have too many cards handy!

Silhouette Cameo,Rocking Horse,ilovedoingallthingscrafty,baby card,Bundle of Joy Kit,SVGCuts,SVG file, Cricut,handmade card,

The file for this card comes from SVGCuts Bundle of Joy Kit. Instead of creating the Rocking Horse bag from which this image comes from, I decided I would turn into a card. To do that, before I cut out the back part of the horse I created a fold line on the upper top portion of the cutout by grouping a dashed line to it. Then glued the front of the card to the top part of the backside, above the fold line. I also created an internal offset of the inside of the card to give it extra strength and stability.

Rocking Horse Shaped Baby Card | SVGCuts

This is what the inside of the card looks like when opened up. Unfortunately, I can't tell you where this stamp came from as I may have thrown out its info :(

Well, hope you like this cute little card I created. If you're in the need of baby files Bundle of Joy Kit is definitely one you might want to check out!


Happy Crafting!

Saturday, March 2, 2013

3D Easter Daffodil Vase Framed Paper Art | SVGCuts

It's time again for the SVG Cuts Spring Facebook Challenge! The Challenge is to use elements from the chosen kits/collections ONLY and create a 2D or 3D project. 

This time I wanted to keep my project clean and simple! Here is what I came up with! Isn't it pretty!?! I used a RIBBA frame from IKEA, removed the glass and the mat, and just placed it in behind the art for later use... smart right? You could use this frame over and over again and change it with your holidays! 

Here it is sitting in our wall alcove...


Easter Decor,SVGCuts files,ilovedoingallthingscrafty,RIBBA frame from IKEA,SVGCuts Facebook Spring Challenge,Daffodil Vase,3D Paper Art, Cricut,Paper crafts,

This project is perfect for Spring and the upcoming Easter Holiday! The daffodils that Mary (designer of these files from SVGCuts) created are so gorgeous and realistic! Who knew that simple plain paper could look this amazing! These flowers come from the 3D Flowers SVG Kit here.

3D Easter Daffodil Vase Framed Paper Art | SVGCuts

Here is a closer look! Can you say WOW!!! And yet so easy to create!

3D Easter Daffodil Vase Framed Paper Art | SVGCuts

And how about the vase that the flowers are in? I would have never guessed it came from a Halloween Apothecary jar from TOIL AND TROUBLE KIT here! I adjusted the sizes of my files so that the finished results would fit nicely in the frame. I also cut a few panels off the file so that I could mount it flat. The vase stands 5" tall. 

3D Easter Daffodil Vase Framed Paper Art | SVGCuts

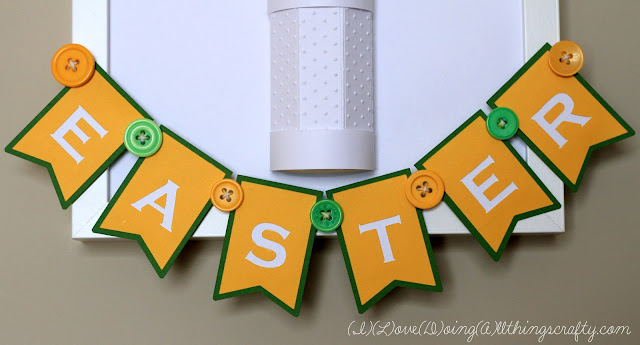
And this banner, how adorable is it? Love the buttons! The banner comes from here.

Easter Decor,SVGCuts files,ilovedoingallthingscrafty,RIBBA frame from IKEA,SVGCuts Facebook Spring Challenge,Daffodil Vase,3D Paper Art, Cricut,Paper crafts,

The picture above shows you what it looks like hanging on a wall. 

Here are the kits and supplies I used for this project...

RIBBA frame from IKEA
Twine from American Crafts
Paper from Recollections
Green Floral Wire
Cuttlebug and Polka Dot embossing folder
Scotch Quick Dry Adhesive
Hot Glue and Gun
Cut on the Silhouette Cameo

Well, hope you like my little Spring project! I LOVE how it all came together, wish me luck!!! And, if you haven't entered there’s still time to get your entry in! Good luck! Thanks for stopping by.

Happy Crafting :)

Friday, February 22, 2013

3D Hot Air Balloon Treat Box File | SVG /.Studio Freebie File

Hello everybody! I'm am so excited to share with you today's post, especially with those of you that have the paper crafting bug! Remember my Hot Air Balloon I created last year? No?!? Click here to jog your memory! 

Recently, I have a lot of interest in the request of this file. Thanks to a lovely lady that recently requested it and used it on her blog. Thanks, Dawn from Dawns Designs that Delight! Check out her version of the balloon here!  

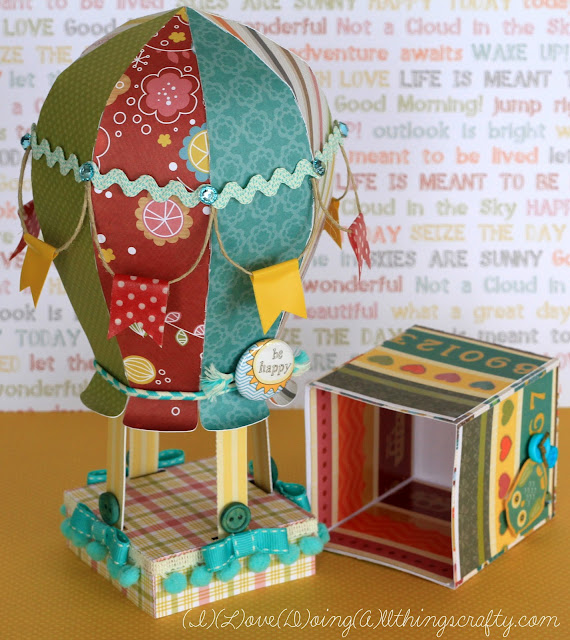
Unfortunately for many electronic users out there, this was not an SVG file, rather I had made it with the Sure Cuts A Lot software. Since receiving so much recent interest I thought I would share it with the rest of you die-hard SVG lovers! Also, since I just celebrated 1 year that I started my blog last week, I thought this would be the perfect gift for all my followers! I also made the .studio file for Silhouette users. The files have been slightly modified and improved from the original SCAL file. I used the .studio file to create the balloon displayed below.

3D Hot Air Balloon Treat Box File | SVG /.Studio Freebie File

Here you see the balloon opened up... great for little treats! This would make the perfect summertime gift for someone special! This would also make a great table centerpiece for a birthday party or baby shower! Enlarge the pieces and fill the bottom portion with some weights to keep it from being knocked over!

3D Hot Air Balloon Treat Box File | SVG /.Studio Freebie File

The paper I used comes from DCWV The Kidlet Stack, all cut on the Silhouette  Cameo.

3D Hot Air Balloon Treat Box File | SVG /.Studio Freebie File

Embellish to your liking! Buttons, twine, ribbon, tape... whatever you like... it's hard to go wrong! I love the little Flair button I used here "be happy" from Paper Play Studio. Too cute! 

3D Hot Air Balloon Treat Box File | SVG /.Studio Freebie File

I hope I've inspired you all to create your own. Can't wait to see what you come up with!

3D Hot Air Balloon Treat Box File | SVG /.Studio Freebie File

Before you download...
My free files RULES!!!

  1. If you choose to download all I ask is you become a follower.
  2. Note my files are for personal use only! (Personal use means... only for you to use (no trading, or sharing of my files... let me do that!) 
  3. If you want to share, send your friends over to my blog for the download. 
  4. I'm OK with people sharing my files on their own sites as long as there is a direct link back to this blog...Give credit where credit is due! (a message to me would also be appreciated)
Click HERE for your free download! 
The zip file includes the SVG, .studio file and an instructional PDF.
Please take into consideration that I am no professional, but if it worked for me I'm sure it will work for you. Let me know if you have any issues with it though!

If you would like to donate, (click the 👉DONATE button on the sidebar) I will happily accept any amount you see fit. No pressure at all either :) It will just make my day that someone wants to support my passion.

Have a fantastic day! Can't wait for the snow to melt and for Hot Balloon weather again! 

Thanks for coming by! 
Happy Crafting!

Monday, February 18, 2013

DIY Desk Organizer | Using Recycled Tin Cans


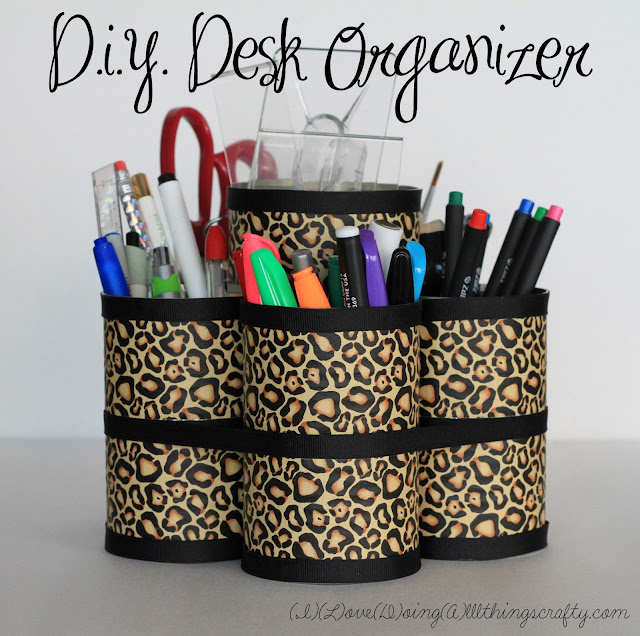
I love quick and easy projects! For today's post, I want to share with you all the coolest stationary desktop organizer!

 Rrrrrrrrrrrrrrrrrrrrr, isn't it WILD! Love leopard print don't you?!!!

DIY Desk Organizer | Using Recycled Tin Cans

I was so excited when I found this printed duct tape at the Dollar Store. I couldn't believe it! I picked up the last leopard print roll!

DIY Desk Organizer | Using Recycled Tin Cans

Supplies:
Duct tape
Ribbon
Empty tin cans
Hot Glue Gun 
Velcro dots

DIY Desk Organizer | Using Recycled Tin Cans

This project is so easy I really don't think it needs much explanation. I used two strips of duct tape on each can, aligning the edge of the tape to the top and the bottom edges on the can. This left a gap right in the center on the can. Perfect and the exact size I needed for the ribbon I used. I finished each can by hot-gluing ribbon to the tops and bottoms of the cans. Once all the cans were finished I secured them all together with another ribbon.

DIY Desk Organizer | Using Recycled Tin Cans

For the top tuna can, I did the same but then used some Velcro dots to secure to the top center of the other cans.

I hope this inspires you to create and organize your own desk using some recycled cans and cool print duct tape!

Thanks for stopping by!
Happy Crafting :)

Thursday, February 14, 2013

Love Grows Tree Card | Silhouette File Card

Happy Valentine's Day Everybody! 

I hope you are all are showered with love today! Speaking of love, I wanted to share with you a quick card I made for my hubby! Isn't it so pretty?! LOVE it :)

The design comes from the Silhouette Online Store and it's the FREE shape of the week, this week! Yes,  free I said, this week only! Wow, that sounded like an infomercial, lol! 

Love Grows Tree Card | Silhouette File Card

I cut a few extra hearts out and scored them down the center and glued them onto another heart to give the card some dimension.

Paper from Recollections
Cut with the Silhouette Cameo


Thanks for coming by... XOXO :)