Friday, July 19, 2013

3D Bee Hive Treat Box | SVG Cuts

Hello! It feels like a while since I've last posted! It's been a bit chaotic and crazy busy around here, haven't had too much time to craft :(

So today I want to share with you a cute Design Team project I made a while back for the Cutting Edge Online Magazine! If you are already a subscriber you may have seen this in the March/April Issue. The magazine is dedicated to all electronic die cutting machine users and paper craft addicts like me! Make sure you check it out, they also have a Facebook page, go and like them... they are always giving away stuff or sharing new projects :)


Well, this project kind of reminds me of how what's going in on right now in my world... Busy, busy, busy, Bee!


Here are the files I used for the Beehive:
Bee file from Chamomile Friendship Cards SVG Kit and the Egg Shaped container from Poplar Street Tulips SVG Kit SVG Cuts


The container is perfect to fill with yummy goodness!


Here is a close-up of a cute little bee that I glued to a twisted wire.

To create the entrance to the beehive:
In the Silhouette SDE, load the bottom panels onto a work surface, then ungroup them. Next, I created a circle. Placed the circle over one of the bottom panels, then selected both images. Click on the Object button, select Modify then Subtract. You should be left with one panel with a circle cut out of it. Now cut out all your pieces. Follow the assembly instructions for the egg container file.


Here is a card I made to go along with the treat box. It was a perfect little gift for a dear friend of mine on her birthday. Files for the card come from CHAMOMILLE FRIENDSHIP CARDS KIT here.


Here is a quick tutorial on how I created my own Honeycomb patterned paper...

  • To do this I searched google images until I found an image I liked (Make sure it’s free to use first).
  • Copy your image and paste it onto your workspace in the Silhouette DSE
  • Next, you need to trace the image, to do that click on the trace window, select your trace area, then trace.
  • You now should have the hexagon grid skeleton.
  • Fill in the image with color and the same for the outline.
  • To create the yellow on the pattern, first I created a rectangle the size of my paper and filled it with the yellow color and outline.
  • Drag your honeycomb image over the rectangle and resize the image until it matches up with the yellow rectangle.
  • Group the two together.
  • Send to printer.
It’s that easy!

Hope you enjoyed my little projects, now I'd better get back to my busy reality! Have a great weekend everyone!

Happy Crafting  :)

Tuesday, July 9, 2013

Clutch Purse Treat Box | SVG Cuts

Hello, my crafty friends! Did you know SVG Cuts is giving away gift cards valued at $6.99! All you have to do is download this free handbag, make it, and submit your photo! Hurry offer expires on 7/12/2013. They are also giving away BONUS $25.00 gift cards... click HERE for all the details!

free-handbag-promo


As you all know I'm a huge SVG Cuts fan, so I couldn't pass up this opportunity... I had to make my own! Isn't it pretty?! This file was so simple and easy to put together... it took me longer to pick out the papers than to assemble it!


The papers come from DCWV's  Bella Armoire Stack. The flower comes from AMELIE's ACCESSORIES KIT here. The sentiment I made using the Print n Cut feature on the Silhouette.


This Clutch purse will make the perfect little gift box for one of my girlfriends! Hmmm, who's birthday is coming up???  And aren't those tassels darling? They are so cute! 

Also, don't forget to check out the new kit SVG Cuts has out this week! Maple Manor SVG Kit It's this week's FREE gift this with a purchase $9.98! Just think you will already have $6.99 in your pocket if you make the purse! Boy, I'm starting to sound like one of those infomercials, haha!

madhouse-hero

Well, hope you like my take on the Clutch Purse. Now go grab and make your own for FREE! Thanks for stopping by!

Happy Crafting  :)

DIY Paint Theme Birthday Party

My daughter Maia will be 7 if a few more weeks but because her birthday always falls on the August long weekend here in Canada, her little school friends always seem to be away on vacation. Last year it was she who was on vacation, so she never did get to celebrate with her little friends. This year we thought we would celebrate it earlier to avoid disappointments.

Since Maia loves art, we thought it would be a great idea to have her party at a local art studio. Turns out the owner of the studio's son was in Maia's class last year... what a small world! If you are an art lover, you should definitely check out 4 Cats Art Studio. This fun little franchise started here in Canada and is spreading all over the world! Here are some pictures of the party... I'm warning you, there are quite a few! 

This was such a fun place, here is the cake table all set up. I love all the art on the walls, so bright and colorful!


Here is Maia surprised to see her name upon the board!


Pictured below are some of the girls quietly coloring while they wait for all the guests to arrive.


The Birthday girl showing off her pastel drawing.


Look at all those paints... an artists dream *swoon* ;)


Maia's ready to start on her version of Picasso's flower paintings!


 What a bunch of great little artists!


Clean up time!


After all that work they deserved a little snack!


Yay! Cake time, my favorite ;)
Don't they look so excited?! LOVE those little smiles!


Sit back, it's sparkler time! Happy Birthday to you, Happy Birthday to you...


Maia couldn't blow out the last two candles, but I love how she got some help from her friend Elise!


Cake anyone? If you would like to see more details on the cake click here.


Here are our future little artists posing by their masterpieces! Beautiful job girls! So much fun!


As our little guests left the party, they each received a goody bag. Here is what was inside... more crafty goodness and some candy to keep them going, hehe!


Thanks so much to Maha from 4 Cats Art Studio for making this such a fun Party, everything ran on time and very smoothly. Also, thanks to all the little girls that were able to come out and join Maia on her"early" Bday!

I hope I've inspired you with some ideas for your next birthday party! Thanks so much for stopping by!

Happy Crafting and Party Planning :)

Monday, July 8, 2013

Paint Palette Cake | DIY Cake


Yesterday we celebrated my daughter's 7th birthday party will all her little school friends. Her actual birthday is still a few weeks away but because it ends up being in the middle of the summer, many of her friends are going on vacation. Since my daughter Maia loves art, we decided to book her party at an art studio. To match the theme I created a paint palette cake! I was really happy with how it turned out and she loved it!


The coolest part about the cake was the inside! Here is how you can make your own...


You will need 2 white cake mix boxes. Follow the directions on the packaging. Once your batter is ready, divide it into as many colors as you want to make by pouring it into smaller bowls. (I made six) Next add gel food color to each bowl, a little at a time until you've reached your desired shade.


Pour your cake batter into your tins, alternating colors as you like (I used two 10 inch round cake pans.) Bake as per box instructions. Cool and ice your cake, decorate as desired! 

Here is a photo of the inside of the cake, isn't it so cool!


Since I like to use fondant to decorate my cakes, I freeze my cake until I am ready to decorate it. This way they are much easier to ice.  


Thanks for visiting today... I hope I have inspired you to add a little color to your next cake! It sure was fun to make and even better to eat! It will surely be a hit at your party :) Stay tuned for more details on the Paint Party!

Happy Crafting or in this case Baking :)

Wednesday, June 26, 2013

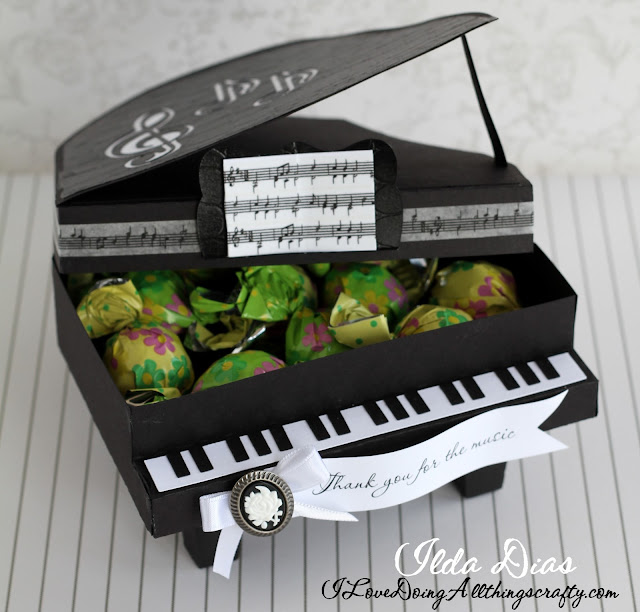
Thank you for the Music | Piano Gift Box | SVGCuts

My daughter starts her summer break from piano lessons this week. So when SVGCuts came out with this piano from Thank You For the Music SVG Kit, I knew I had to make it for my daughter's piano teacher. 

Isn't it awesome?! I absolutely love how it turned out, classic and elegant!

Thank you for the Music | Piano Gift Box | SVGCuts by ilovedoingallthingscrafty.com

Thank you for the music... for giving it to me. Doesn't that remind you of the ABBA song??? I can't get it out of my head now (doesn't that drive you nuts when that happens?!?)

I didn't have a stamp to coordinate so I used the print n cut feature of the Silhouette to print and cut the tag. The font I used is called scriptina. On the lid of the box and book, I wrapped some musical note washi tape by Recollections. 


The best part of this piano is that it's functional... it has enough storage for treats or maybe even a little gift! LOVE it! So simple and elegant and surprisingly easy to put together :) 

Thank you for the Music | Piano Gift Box | SVGCuts by ilovedoingallthingscrafty.com

Thanks so much for stopping by, hope you like this little piano treat box. If you have a piano player in your life, surprise them with one of these beauties... I'm sure they'll love it!

Happy Crafting :)

Friday, June 21, 2013

DIY Custom Canvas Bags | Teacher Gifts

With the end of the school year quickly approaching, I thought I better get busy making some teacher appreciation gifts! The kids were very blessed to have amazing teachers once again this year. As a little thanks for all that they have done for my children, I always like to make something personal that will remind them of the kids. I hope they like them as much as I had fun making them!

This was my very first time creating something with the heat transfer material. I have to say I LOVE it! I want to create more with it! It was super easy!!!

Here is the front side of the bag, I'm not sure if I will ever get tired of seeing variations of this phrase... for now, I still love it! I think the teachers will too! Click here to see another project I made using the "Craft On" version.  


DIY Custom Canvas Bags | Teacher Gifts

To the other side of the bag, I added the teacher's name. Mrs. Archer and Mrs. Attema are awesome!

DIY Custom Canvas Bags | Teacher Gifts

When they open look on the inside, they will see the kids' names... hopefully, when they see that, they will have only good memories of them... lol!

DIY Custom Canvas Bags | Teacher Gifts

The next few pics are of my daughter's bag for her teacher.

DIY Custom Canvas Bags | Teacher Gifts


DIY Custom Canvas Bags | Teacher Gifts

Here is a better look at the front design on the bag! Love those little book worms ;)

DIY Custom Canvas Bags | Teacher Gifts

Want to know how to make your own?

You will need...
Silhouette Machine and SDE software
Files (worm and apple) SVGCuts 
Silhouette Heat Transfer Material
Canvas bag (Tulip - Grab & Tote)
Iron


  • First, create the image you want to be cut on the Silhouette... here is how I did it...
    • For the image I created, I used a Couture font. Wrote the out phrase and lined it up as pictured above.
    • Next, I worked with the apple and worm file to create a border around the images by grouping different layers together and using the offset and modify functions. 
    • Once I was satisfied with the images, I resized them and positioned them next to the phrase, and made sure everything was lined up properly.
    • Group all your images together.

  • Now all that is left to do is follow the directions for the heat transfer material. Ensuring that you flip your image horizontally so that your image looks backward and setting blade depth is set correctly for the transfer material. I would advise you do a test cut first to make sure your settings are all correct. Iron on as directed. 
That is it... it's that easy! Hope you've enjoyed this DIY tutorial and project, let me know what you think and if you have any questions.

Thanks for stopping by!
Happy Crafting :)

Thursday, June 20, 2013

Pinkalicious 3D Paper Cupcake Treat Box | SVGCuts

Happy Birthday to me! Yes, today is my birthday... a few steps closer to 40! Bring it on 37... it's gonna be a great year! :) 

No, I didn't make this cupcake for me although I love how it turned out. I made it for a very dear friend of the family, who celebrated her Birthday this past weekend. Isn't it adorable?!

Pinkalicious 3D Paper Cupcake Treat Box | SVGCuts

Files: (bow) from SVG Cuts Gift Boxes SVG Kit
Paper: Bazzill cardstock 
Patterned Paper: Anna Griffin's Valentina Collection
Stamp: from Stampendous
Cut: with the Silhouette Cameo
I enlarged these files to fit on a 12x12 paper. I also cut little perforations to the cupcake wrap. 


This box was big enough to stuff full of chocolate treats! Want to see a few other cupcakes I've created? Click here and here :)

I hope you like this fun.... and as my daughter called it "pinkalicious" treat box as much as I enjoyed making and giving it away! 

Thanks for stopping by!
Happy Crafting :)

Sunday, June 16, 2013

Shirt Shaped Cards for Dad | SVGCuts

Happy Father's Day to all the Daddies in your lives! 


Shirt Shaped Cards for Dad by Ilovedoingallthingscrafty

Here are some fun cards I made for the men in my life. Aren't they super cute?! Love this fun paper collection. I'm sure I'll be making more of these cards... so easy and quick to put together. They would also be perfect for birthdays or summer vacations!

Shirt Shaped Cards for Dad by Ilovedoingallthingscrafty

Stamp: Bitty Regards from Unity Stamps
Paper: Carolyn Gavin Collection from K and Company 
Cut: on the Silhouette Cameo

Shirt Shaped Cards for Dad by Ilovedoingallthingscrafty

I hope today is a special day for you all! Thanks for stopping by... 


Happy Crafting :)