Showing posts with label papercrafts. Show all posts

Wednesday, March 19, 2014

Finally Baby Arrived Turtle Card | SVGCuts

A quick blog post for you all tonight, unlike the slowpoke turtle in the card I'm sharing with you ;)

We have been waiting patiently for our newest family member. A little overdue, but finally my cousin gave birth yesterday to the cutest little guy! Welcome to the family Andre!

So I thought this card was perfect for the occasion.
Sweet and simple! Very quick to make :)

green,turtle,SVGCuts,Finally Arrived Baby Card,Silhouette Cameo,ilovedoingallthingscrafty,baby card,birth,brown,papercrafts,SVG File, cricut, hand made,Paper crafts,

The files I used for this card come from Wild Child SVG Collection.
Check out the rest of the collection... TOO cute!

Wild Child SVG Collection

Papers from Family Outings, Momenta Cardstock Pad.
The sentiment was created with Print n Cut on the Silhouette Cameo


Thanks for stopping by!
Happy Crafting  :)

Tuesday, February 11, 2014

Illuminated 3D Paper I Love U Sign | SVGCuts

I just realized that two years ago today was my first blog post EVER! Hard to believe how far I've come... for someone technically challenged it makes me excited about all that I have learned and done these last few years! Yay me!!! Anyway, enough about me let's get to the post ;)

I'm really excited to share my latest SVGCuts DT creation with you! Inspired by the recent marquee craze, I thought I would try my hand at creating a Valentine's "I Love U" sign! This project makes a great Valentine's decor piece or a unique gift idea!

For complete instructions on how I created this project make sure you click HERE.

3D,SVG file,SVGCuts,Silhouette Cameo,ilovedoingallthingscrafty,Marquee Sign,Valentines Decor,Word Sign,papercrafts,Illuminated I Love U Sign,3D Paper Art,Paper crafts, Cricut,handmade art,

I love it when something I had envisioned actually turned out as I planned. It was actually quite easy and quick to put together too :)

Illuminated 3D Paper I Love U Sign | SVGCuts Files

Here is what it looks like when the room lights are turned off, and the LED lights are turned on.
 Love how it looks in the dark. Ooooo, Aaahhhh!

Illuminated 3D Paper I Love U Sign | SVGCuts Files

To create this look, I used a battery-operated string of LED lights, added a hole to the back panel, and strung them through! Clever right?! The coolest part is that this battery pack has a built-in timer that turns on every 24 hours and stays lit for 6 hours! I don't even have to touch it!!! A pleasant bonus as I found them at the dollar store...  Amazeballs, right?!

If you want to, the battery pack could easily be attached to the back and then the sign could be hung on the wall!

Illuminated 3D Paper I Love U Sign | SVGCuts Files

 For those interested here are the SVGCuts Kits you will need:


I hope you've enjoyed this project, maybe even inspired you to create your own LOVE or any other WORD sign for that matter!

Thanks for stopping by,
Happy Crafting  :)

Wednesday, January 15, 2014

Foxy Valentine's Day Paper Mailbox | SVGCuts

Are you all in a Valentine's mood yet? I sure am ;)

Today I want to share with you a really quick and super cute Foxy Mailbox I made using the fox from Hugs and Kisses SVGCuts Kit! Quick, simple, and useful are my favorite kinds of projects! I know my daughter will love this and it will be the perfect place for her to store all her Valentine's Day cards! Now I have to make one for my son, a not-so-girly fox... I don't think he would appreciate pink too much :) 

Fox Say,SVGCuts,Silhouette Cameo,ilovedoingallthingscrafty,Fox Mailbox,papercrafts,SVG Files,Valentine's Day Mailbox, Cricut,handmade,Paper crafts, Card

Just LOVE her! This is one Foxy Fox!!!

Fox Say,SVGCuts,Silhouette Cameo,ilovedoingallthingscrafty,Fox Mailbox,papercrafts,SVG Files,Valentine's Day Mailbox, Cricut,handmade,Paper crafts, Card

The sentiment on her heart-shaped belly was created on the Silhouette Cameo with the Print n Cut feature. I love how you can create your own phrases on the Silhouette! I thought I'd incorporate "Fox Say" from the popular hit song "What does a Fox Say?" in my phrase. Arhhhh, now I have that song stuck in my head, lol!

Fox Say,SVGCuts,Silhouette Cameo,ilovedoingallthingscrafty,Fox Mailbox,papercrafts,SVG Files,Valentine's Day Mailbox, Cricut,handmade,Paper crafts, Card

Look at her, with her head down... ready for a nap, too CUTE ;)

Fox Say,SVGCuts,Silhouette Cameo,ilovedoingallthingscrafty,Fox Mailbox,papercrafts,SVG Files,Valentine's Day Mailbox, Cricut,handmade,Paper crafts, Card

Here are the SVG files you will need for the project:

Fox (modified by using the knife tool in the SSDE) and Hearts - Hugs And Kisses SVG Kit 

I hope this has inspired you to create some of your own cute Mailboxes. The box is also big enough to fill with treats and give as a gift! I think it would make a great Valentine's Day Teacher gift too!


Check out this week's SVG Cuts FREEGIFT with a $9.98 purchase.


vintage-valentines-hero

Thanks for stopping by!
 Happy Crafting  :)

Wednesday, January 1, 2014

Noah 3D Paper Letters | SVGCuts

Happy New Year Everyone!!! I hope 2014 is going to be a great year for all of us! May it bring health, happiness, and many crafty inspirations! 

I have a quick project to share with you today that I made for my cousin to give as a Christmas gift! Welcome to the world Baby Noah! 

SVGCuts,Silhouette Cameo,ilovedoingallthingscrafty,yellow,papercrafts,boy,Noah,Paper Letters,SVG Files,baby gift,grey,3D letters,Name 3D,3D Paper Art,handmade,Paper crafts,

I was asked to do the letters in grey and yellow to coordinate with the baby's room. Well, what do you think???   I think CUTENESS!!!


Letters come from SVGCuts 3D Letters SVG Kit
Cut out on the Silhouette Cameo
LOVE how they turned out! Hope you did too :)

Thanks for stopping by!
Happy Crafting  :)

Monday, December 23, 2013

Paper Christmas Tree Tower for Treats | SVGCuts

Happy Holidays to all my Crafty Friends! Today I'm excited to share with you the cutest Christmas Tree Treat Stand!

The perfect centerpiece to display all your Christmas goodies. For specific instructions on how to put this together, you'll want to check out my latest SVG Cuts Guest Post... "Christmas Tree of Treats"

Gift,SVGCuts,Silhouette Cameo,Treat Stand,ilovedoingallthingscrafty,Treat display,Christmas Tree of Treats,SVG file,papercrafts,guest post,Table Decor,French Macaroons, Cricut,Paper crafts,paper art, crafts

This project comes together fairly quickly. Simple, elegant, and my favorite USEFUL! Need to store some extra treats? No problem, the base of the tree is the perfect place to hide all those extra treats!

Gift,SVGCuts,Silhouette Cameo,Treat Stand,ilovedoingallthingscrafty,Treat display,Christmas Tree of Treats,SVG file,papercrafts,guest post,Table Decor,French Macaroons, Cricut,Paper crafts,paper art, crafts

Functional and Fun! 

The top of the tree is adorned with a bright star that lights up with a flick of a switch. The tea light just pokes through the center of the star to add a little twinkle!

Gift,SVGCuts,Silhouette Cameo,Treat Stand,ilovedoingallthingscrafty,Treat display,Christmas Tree of Treats,SVG file,papercrafts,guest post,Table Decor,French Macaroons, Cricut,Paper crafts,paper art, crafts

Use some fun papers and colors to coordinate your treat stand with the rest of your table and party decor. 

Gift,SVGCuts,Silhouette Cameo,Treat Stand,ilovedoingallthingscrafty,Treat display,Christmas Tree of Treats,SVG file,papercrafts,guest post,Table Decor,French Macaroons, Cricut,Paper crafts,paper art, crafts

For those interested here are the SVGCuts files you will need:

Tree bottom - December Gifts SVG Kit

Cut on the Silhouette Cameo with SSDE

I hope this has inspired you to create your own treat stand to display and serve your Holiday goodness! Make sure you stop by the SVGCuts Blog for all the how-tos and exact instructions.

Also if you are interested in the macaroons I made click here for a link to a previous post and the recipe I used :)

Thanks for stopping by, stay SAFE everyone!
Happy Crafting  :)

Monday, December 16, 2013

DIY Christmas Labels on the Silhouette with Fleurette Bloom Designs | Ink On 3 Files

My favorite projects are quick and useful! Today I want to walk you through how to make your own Christmas labels using Fleurette Bloom files. Once you know-how, you'll be making labels for everything :) 


DIY Christmas Labels on the Silhouette with Fleurette Bloom Designs | Ink On 3 Files

For this project I used:

Avery Sticker Project Paper (Silhouette Brand Printable Sticker paper is also available, but did not have any on hand)
Silhouette Cameo with SSDE

Instructions:
  1. The first thing you will need to do is select the PNG images and the SVG files you want to use.
  2. Open them up onto your workspace.
  3. With the SVG's you have selected to use as labels, click on each SVG and change the cut style to "cut". 
  4. Group one PNG design with one SVG file. (Play with the PNG sizes until you like the look and placement on each label). 
  5. I chose to include "to: and a from:" If you do that ensure you change the cut style setting on the font to "no cut". Copy and paste it into each label and group them.
  6. I don't like to waste paper, so once my labels were created I tried to fit as many as possible on to one sheet. You will notice I changed some of them in size to fit more! Variety in sizes is good to have because all gifts come in different sizes too ;)

Since I had set my line color to transparent, it was hard to visually see the labels when working on the white workspace. To solve for this I just worked on the side of my workspace (see image below) You could also in the Page setting, set it to reveal your cutting mat.

DIY Christmas Labels on the Silhouette with Fleurette Bloom Designs | Ink On 3 Files
  • Slide the labels back onto your workspace. Turn on the cut line setting and align your shapes within your registration marks. Make sure that the only cut lines you see are only on the edges of the labels. 
DIY Christmas Labels on the Silhouette with Fleurette Bloom Designs | Ink On 3 Files
  • Now you are ready to send it to the printer.
  • Before cutting out your shapes, change the pressure setting on your cutting machine, I set my pressure setting to 2. This is just enough to cut through the top layer leaving the backing intact. 
That's it! Easy right!?

Here is a little treat box I made with one of the labels I cut out! Since you already know who the gift is from you could also have the names already printed on there too :)

DIY Christmas Labels on the Silhouette with Fleurette Bloom Designs | Ink On 3 Files

I hope you find this tutorial useful! This was so easy and quick to do on the Silhouette, that I have so many ideas for other labels I want to make now! If you have any questions I'd be happy to answer them for you :)

Also check out Fleurette's latest release!
Perfect for any occasion "Nesting Gift Box" SVG Collection.

Thanks so much for stopping by!
Happy Crafting  :)

Tuesday, October 29, 2013

Spiderweb Pillow Treat Boxes | Ink On 3 Files


Need some last-minute quick Halloween treat boxes for the kiddos? 

I have the perfect Spiderweb Pillow Boxes for you, just released today by Fleurette Bloom! On SALE for $0.49. These will take you around 5 minutes to cut out and assemble!

Spiderweb Pillow Treat Boxes | Ink On 3 Files

I enlarged the file to 8x10 inches. This way I could fit lots of goodies inside!

Spiderweb Pillow Treat Boxes | Ink On 3 Files

Recipe for my boxes:
This fun paper comes from and Company Spooktacular Collection
Trendy Twine - Lime Grapesicle and Limeade
Epiphany Shape Round 25 Tool and bubble caps
Black Ink Pad
Ribbon

Cut on the Silhouette Cameo using the Silhouette Studio Designer Edition

Embellish these however you like, or not! They look good as they are!

Spiderweb Pillow Treat Boxes | Ink On 3 Files

Make sure you stop by Fleurette Bloom's Facebook Page and give her some love! Like her Page, if you haven't already and leave her a comment to win her latest "Anytime Pillow Box" Collection! These boxes are gorgeous and they are perfect for so many occasions!


Thanks so much for stopping by! 
Happy Crafting :)

Tuesday, April 3, 2012

3D Paper Letters - SADIE | & DIY Glass Buttons | SVGCuts

Wow... It feels like a while since my last post! I have been crazy busy... between work, life, and planning my son's birthday party for this weekend, I am ready to pull my hair out :(  I'll have posts on my son's "Star Wars" themed birthday crafts hopefully within the next few days! Stay tuned if you are a Star Wars fan :)

But first... I want to share with you the 3D paper name I made last week for my cousin's friend.

3D Paper Letters - SADIE | & DIY Glass Buttons by ilovedoingallthingscrafty.com

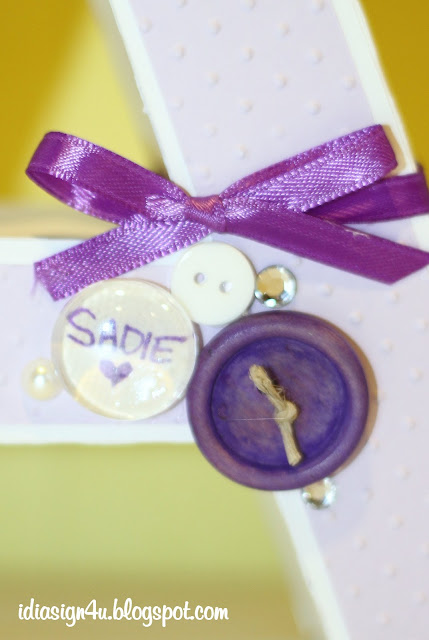
These paper 3D letters stand about 6.5" tall. They were filled with some dried beans to keep them from toppling over. The 3D letters are from SVG Cuts 3D letter kit. The butterfly is from the SCAL library. Added some buttons, bows, and a silk flower to dot the "I". Boy did I have a tough time making the "S"... I have made a few of these names in the past but never had to make an "S", maybe next time it will be easier!  The "A" and the "I" were embossed with the Cuttlebug (hard to see in this picture). The paper I purchased at Micheal's is in the open card stock paper section, sorry don't have the exact company names for them :(

Here are a few more close-ups.

3D Paper Letters - SADIE | & DIY Glass Buttons by ilovedoingallthingscrafty.com


3D Paper Letters - SADIE | & DIY Glass Buttons by ilovedoingallthingscrafty.com

I don't have an Epiphany Craft button make, but I really do like the look... I did though have glass beads and hot glue, so I made due! I think it turned out pretty cute and so simple. I found this idea on Pinterest here, so I knew I had to try it! 

So here is what I did...

3D Paper Letters - SADIE | & DIY Glass Buttons by ilovedoingallthingscrafty.com

 You need scissors, hot glue, paper, a pen, and a flattened glass bead.

3D Paper Letters - SADIE | & DIY Glass Buttons by ilovedoingallthingscrafty.com

Write your message on a scrap piece of paper, and place a fair amount of glue on the back of the glass bead.

3D Paper Letters - SADIE | & DIY Glass Buttons by ilovedoingallthingscrafty.com

Press the glass bead centered on the message.

3D Paper Letters - SADIE | & DIY Glass Buttons by ilovedoingallthingscrafty.com

Cut around the bead.

3D Paper Letters - SADIE | & DIY Glass Buttons by ilovedoingallthingscrafty.com

And there you have a new glass button to embellish your project! Hope you liked this, I love how easy it was and I'm sure I'll be making more of these!

Happy crafting!
Ilda :)