Showing posts with label Free Silhouette .Studio file. Show all posts

Friday, October 14, 2016

Bride to Be Free - Silhouette .studio file


Hello Everyone!

Today I have a FREE Silhouette .studio file to share with you all. That means it is only Silhouette machine compatible. Sorry don't have an SVG for it! But, if you like... watch my video HERE as I explain how to I created it and you may be able to do something similar as well.

As you can see this is for a Bride To Be Wedding Shower Cake topper that I recently made for some one and since I know how expensive these events can get, I thought I would share it with all the DIYers out there for FREE!


All I ask before you download... 
is to read and follow my free files RULES!
  1. If you choose to download all I ask is you become a follower. (Any social media link to the right of this pg would be appreciated)
  2. Note my files are for personal use only! (Personal use means... only for you to use (no trading, or sharing of my files... let me do that!) 
  3. If you want to share, send your friends over to my blog for the download. 
  4. I'm OK with people sharing my files on their own sites as long as there is a direct link back to this blog...Please give credit where credit is due! (a message to me would also be appreciated)
If you would like to donate, (click the đŸ‘‰DONATE button on the sidebar) I will happily accept any amount you see fit. No pressure at all either :) It will just make my day that someone wants to support my passion.

So here you go, ENJOY!
Bride To Be Cake Topper Silhouette .studio file

TIPS:
  • Make sure you avoid using sparklers or candles nearby as it is paper and totally flammable! 
  • If you are using this on top of buttercream icing (or any other moist type of icing) insert the topper just before revealing the cake as paper can absorb any grease that the icing may contain, or just have it barely touch the top of the cake. I have used these toppers on fondant-covered cakes, and there has been no grease transfer.


If you create one of these Cake toppers I would love to see how they look on your cake.
Share them on my FB page, tag me on Instagram or just email me your photos :)
Always fun to see what you do with them!


Thanks for stopping by!
Happy Crafting  :)


Monday, July 4, 2016

DIY Personalized Etched Cutting Board Tutorial + Free .studio File


Hello my Crafty Friends!

Today I want to share with you a fun wedding gift I made for a beautiful couple that got married this past weekend. I hope they love it as much as I loved enjoyed making it. This project was super simple and easy to make and I'll show you exactly how I did it!

How cool looking is this cutting board!? 
I think I might have to make one for myself now ;)


For my DIYer friends, I have numbered each picture and will explain step by step how I did it. Hopefully the steps are easy enough to follow!

  • 1. Buy yourself a glass cutting board. I found this one at the Dollar Store. Yes, the dollar store... Don't worry it's going to go from drab to FAB!
  • 2. Flip the board onto its front side. (You will be etching the smooth glass surface on the back.)
  • 3. Peal away the backing. 
  • 4. In this case the backing was vinyl and pealed off really nicely.


  • 5. Use Goo Gone or any type of adhesive remover to remove any glue residue left behind.
  • 6. Use warm soapy water and wipe the board clean.
  • 7. Use an electronic cutting Machine to cut out your design (I used the Silhouette Cameo). The script font I used is called Arabella and the type font is Bernard Mt Condensed. I also used inexpensive vinyl (the kind you line drawers with) because you will be discarding it. No need to waste the good stuff! Make sure you reverse the image as this is done on the bottom/reverse side of the glass.  I then used painters masking tape to transfer the vinyl and keep my pieces together.
  • 8. Peal off the backing from the vinyl.


  • 9. Flip over your vinyl and centre it on the cutting board. Make sure you are using the smooth glass surface (bottom of the board).
  • 10. Remove the painters tape and ensure the edges are stuck really well to the glass. You do not want any thing to seep under the edges or you may not get a crisp design.
  • 11. Use Armour Etch Cream and a paintbrush to apply the mixture to the exposed glass areas.
  • 12. Follow the instructions of the Armour Etch. I like to leave mine on a little longer than instructed to ensure a deeper etched look, about 15 minutes.


  • 13. Rinse off the cream using warm water.
  • 14. Once the cream is off peal the vinyl back. 
  • 15. Dry off your board and add clear non slip pads to each corner of the bottom of the cutting board.
  • 16. Flip it over and you are now ready to use it!


For those of you that have a Silhouette and would like the Design I used I'm giving it away for FREE!

All I ask before you download...
is to read my free files RULES!!!
  1. If you choose to download all I ask is you become a follower. (Any social media link to the right of this pg would be appreciated)
  2. Note my files are for personal use only! (Personal use means... only for you to use (no trading, or sharing of my files... let me do that!) 
  3. If you want to share, send your friends over to my blog for the download. 
  4. I'm OK with people sharing my files on their own sites as long as there is a direct link back to this blog...Please give credit where credit is due! (a message to me would also be appreciated)
Here is what the design you download will look like, play with it and add your own fonts and designs to make it your own! 


Click on the link for your FREE Spoon, Knife and Fork Cutting Board Design 
Note this file will only work with Silhouette Studio Software!

Here is one last look at this beauty! 
I'm pretty sure it won't be the last one of these I make ;)
Is it too soon to start thinking of Christmas gifts!?!


Hope you liked my Personalized Etched Cutting Board Tutorial, and if you downloaded my file and plan on using it I definitely would love to see it! Feel free to share it with me by leaving me a link to your work, emailing it to me or sharing it on my FB page!

 I find sometimes it's the smallest gifts made from the heart are the ones that mean the most!

I'll be posting the cute wedding card I made for the beautiful couple next... stay tuned :)

Thanks for stopping by!
Happy Crafting  :)


Monday, April 15, 2013

Ninjago Cupcake Toppers - Free Print and Cut Silhouette File


Hey everyone are you tired of Ninjago yet? I'm getting really close... It feels like I've been eating, sleeping, breathing all things Ninja! I can't wait to see it all come together already! :)

Today I want to share with you the Ninjago cupcake toppers I made. I'm still not sure I will be using them like that. I may just use them as food picks and sporadically place them on the food trays.

I created them again using the Silhouette software. I printed them and then cut them out on the Cameo. Here is what they look like once they were cut out.

Ninjago Cupcake Toppers - Free Print and Cut Silhouette File

They come together in a matter of minutes. All that is left to do is fold and glue them down onto a toothpick. I just used a dab of hot glue and pinched the two pieces of paper together onto the toothpick. Really easy!

Ninjago Cupcake Toppers - Free Print and Cut Silhouette File

The image I used comes from here. Make sure to stop by, she also had some great ideas on the theme. If you have a Silhouette machine and would like to have a copy of this file click on the link below :)

Before you download...
My free files RULES!!!

  1. If you choose to download all I ask is you become a follower.
  2. Note my files are for personal use only! (Personal use means... only for you to use (no trading, or sharing of my files... let me do that!) 
  3. If you want to share, send your friends over to my blog for the download. 
  4. I'm OK with people sharing my files on their own sites as long as there is a direct link back to this blog...Give credit where credit is due! (a message to me would also be appreciated)

Ninjago Ninja Cupcake Toppers - (Silhouette - Print and Cut) .studio file

If you would like to donate, (click the đŸ‘‰DONATE button on the sidebar) I will happily accept any amount you see fit. No pressure at all either :) It will just make my day that someone wants to support my passion.

Coming up...


Have a great day and thanks for coming by,
Happy Crafting :)

 Sharing this with my Crafty Peeps!

Saturday, April 13, 2013

Ninjago Balloon Stickers - Free Silhouette Print and Cut Studio File


Ninjago Balloon Stickers - Free Silhouette Print and Cut Studio File

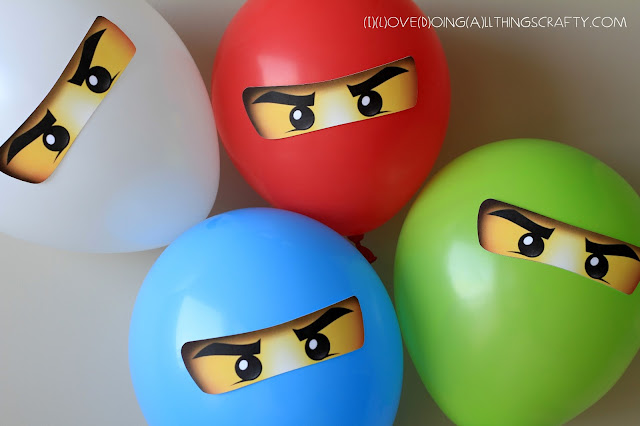
Here is a really quick and simple project I made for my son's Ninjago party. I created the Ninja eyes with the print and cut feature of the Silhouette software. For those of you with a Silhouette machine, all that is left to do is Print and Cut. 

You can print it onto an adhesive lined sheet of paper and just stick them on your balloons. I didn't have any adhesive paper, so I just printed them out on regular card stock and taped them to the balloons! You can use these eyes on pretty much anything for your party! I'm sure I'll be using them for a few more things! Just have fun with them :)


Click on the link below for your free file!

Before you download...
My free files RULES!!!

  1. If you choose to download all I ask is you become a follower.
  2. Note my files are for personal use only! (Personal use means... only for you to use (no trading, or sharing of my files... let me do that!) 
  3. If you want to share, send your friends over to my blog for the download. 
  4. I'm OK with people sharing my files on their own sites as long as there is a direct link back to this blog...Give credit where credit is due! (a message to me would also be appreciated)
Ninjago Bday Balloon Stickers (Silhouette, print and cut) .studio file (image came from here)

If you would like to donate, (click the đŸ‘‰DONATE button on the sidebar) I will happily accept any amount you see fit. No pressure at all either :) It will just make my day that someone wants to support my passion.

Coming up...


Have a great day and thanks for stopping in,
Happy Crafting :)

 Sharing this with my Crafty Peeps!

Friday, April 12, 2013

Ninjago Themed Photo Props - Free Silhouette Files


Continuing on with the Ninjago themed Birthday Party...

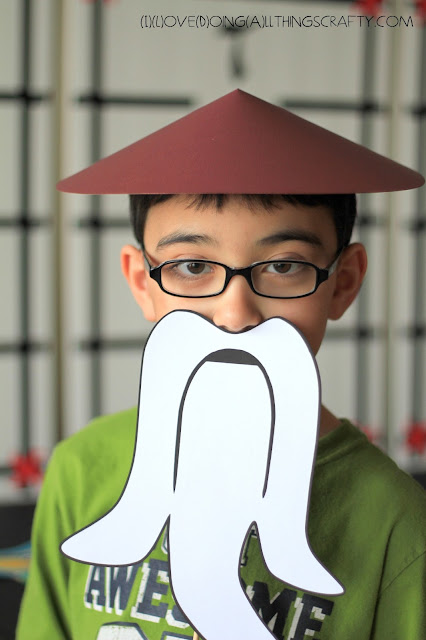
Here are some of the Photo Props I have created for some fun pictures that night! I got some of my inspiration from here, make sure you stop by their blog to see more wonderful ideas!
Again, I will be sharing all these Silhouette files for those of you interested :)

The Ninjas are all frowning, they actually look kinda scary... I think it's the hole in the eyes, creepy! Hopefully, they won't scare anyone too much! Might make for some interesting photos ;)

Ninjago Themed Photo Props - Free Silhouette Files

Here are some fun bubbles I made too!

Ninjago Themed Photo Props - Free Silhouette Files

I also made a prop container simply by wrapping a mason jar with the lantern file. Notice I also made some cool Ninjago weapons, I'm sure those will be popular with the boys!

Ninjago Themed Photo Props - Free Silhouette Files

Here is the Birthday boy, Tomas posing and testing out Sensei Wu's Props. So serious Sensei Tomas! He didn't like that I was laughing at his new look, not pleased at all can you tell? LOL!

Ninjago Themed Photo Props - Free Silhouette Files

Click on the links below for your free files!

Before you download...
My free files RULES!!!

  1. If you choose to download all I ask is you become a follower.
  2. Note my files are for personal use only! (Personal use means... only for you to use (no trading, or sharing of my files... let me do that!) 
  3. If you want to share, send your friends over to my blog for the download. 
  4. I'm OK with people sharing my files on their own sites as long as there is a direct link back to this blog...Give credit where credit is due! (a message to me would also be appreciated)
Ninjago Bday Photo Props (Silhouette) .studio file
Ninjago Bday Bubble Props (Silhouette) .studio file
Ninjago Bday Weapon Props (Silhouette, print and cut). studio file (images came from here)

If you would like to donate, (click the đŸ‘‰DONATE button on the sidebar) I will happily accept any amount you see fit. No pressure at all either :) It will just make my day that someone wants to support my passion.

Ninjago Birthday Party Lanterns - Free Silhouette Studio file


Today I am going to share with you how I made some little lanterns to go with my son's Ninjago themed party.

Do you remember making these in Elementary School??? I sure do! I really like how these turned out and how quickly they came together! 

Since I wanted to make a few of these lanterns, I thought rather than cutting them out by hand I would create a file for them with my Silhouette program. Now I can share it with you all!

Before you download...
My free files RULES!!!

  1. If you choose to download all I ask is you become a follower.
  2. Note my files are for personal use only! (Personal use means... only for you to use (no trading, or sharing of my files... let me do that!) 
  3. If you want to share, send your friends over to my blog for the download. 
  4. I'm OK with people sharing my files on their own sites as long as there is a direct link back to this blog...Give credit where credit is due! (a message to me would also be appreciated)

Click here for the Lantern (Silhouette) .studio file

If you would like to donate, (click the đŸ‘‰DONATE button on the sidebar) I will happily accept any amount you see fit. No pressure at all either :) It will just make my day that someone wants to support my passion.

Ninjago Birthday Party Lanterns - Free Silhouette Studio file

Here is a quick pictorial on how simple they came together. Pretty self-explanatory I think!

Ninjago Birthday Party Lanterns - Free Silhouette Studio file


Easy right?  Coming up...


Have a great day and thanks for stopping in,
Happy Crafting :)