Monday, September 2, 2013

Back to School Project Ideas | Teacher and Student Gifts


I hope everyone is enjoying the long weekend... I, unfortunately, have to work today... yup, the life of a nurse! Today, I wanted to share with you some of the back to school projects that I made for the kids and teachers over the last few years.

Are your children back to school yet? Are you all sad or are you all doing the happy dance? My kids started school last week, thankfully it went better than expected, only a few tears were shed... and hopefully no more this week!


This teacher's Apple was the very first SVGCuts project I had ever made, way before my blog and way before I had my Silhouette! My how far I have come and learned from those days! This file is actually a pumpkin that I made to look like am an apple, before Mary had created an apple of her own! The file comes from the PICK A PUMPKIN KIT here.


Here is the second project I made from SVG Cuts... never shared before! This one comes from SVG Cuts Miss Karen's Back to School SVG Kit. The worm from the apple also comes from here!


I was so excited when SVGCuts came out with an actual Apple file! Click here for all the details from a previous post.


Here are some teacher appreciation gifts I made for the end of the school year a few years ago.


Find out how I also created these etched glasses here!


Here are some personalized water containers I made for my kids a while ago... now they take them to school each day to stay hydrated!


This has got to be one of my favorite projects! See how I made this DIY Canvas bag, so easy and useful!


Stay organized with this super quick project! DIY Desk organizer, your kids will love it... you may too!


If you've been following my blog you'll know this was a recent project I made for my son's teacher this year. 3D sneaker... so cool!


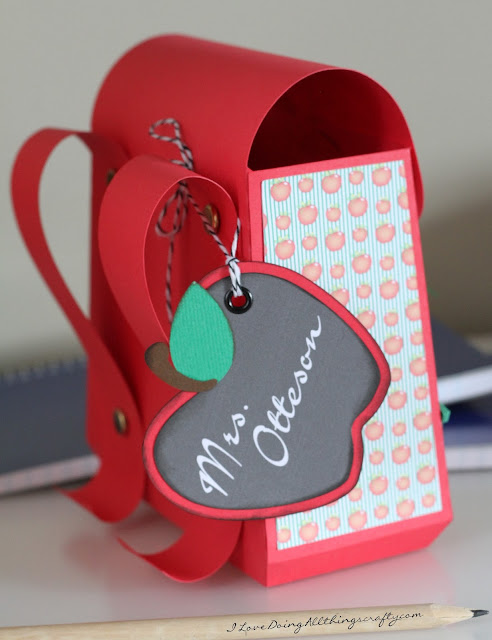
And finally here is the cute little backpack I made for my daughter's teacher this year. The perfect little bag to stuff with treats!

Well, there they are... Back to School Project Ideas, sure to put a smile on someone's face :) Hopefully, they have inspired you to share with someone headed back to school!

Thanks so much for stopping by today!
Happy Crafting :)


Tuesday, August 27, 2013

3D Paper Back Pack | SVGCuts

My kids start school already tomorrow, where has the summer gone *as I dry weepy eye's*  :( 
So for today, I want to share with you all this cute 3D Paper Back Pack I made for my daughter's teacher!

teacher gifts,SVG,Fleurette Bloom Paper files,ilovedoingallthingscrafty,Teacher,back to school ideas,3D Paper Back Pack,SVGCuts Files,Paper crafts,Back to School, Treat bag

This awesome file from SVGCuts is super quick and easy to put together. 
The file comes from their Back to the Books SVG Kit. The cute patterned paper I used is from Fleurette Bloom's School Days Paper Pack. If you're still looking for last-minute school projects you should definitely check out these links!


Here's a closer look! The backpack is the perfect size to fill up with a few goodies. Great for someone headed back to school!


I hope her teacher is gonna love it as much as I do! Also, if you haven't yet check out the cool 3D sneaker I made for my son's teacher!

Thanks so much for stopping by today!
Happy Crafting :)

Wednesday, August 21, 2013

Baby Carriage Shaped Card | SVGCuts

Very good friends of ours recently had their baby boy. I'm super excited for them! Congratulations Vic and Emilia your newest blessing... Cristiano!

Here is the card I made for them.

Baby Carriage shaped card,SVGCuts,Silhouette Cameo,ilovedoingallthingscrafty,baby card,Baby boy,Bundle of Joy SVG Kit, Cricut,handmade card,Paper crafts,

 The file comes from SVGCuts Bundle of Joy SVG Kit. I used the carriage file from the extras folder to create this shaped card. Real quick and simple to make!


I hope you liked this cute shaped card. Thanks for coming by today!
Happy Crafting :)


Tuesday, August 20, 2013

Freezer Paper Stencils on the Silhouette | DIY Baby Onesie

Today I going to share with you all this cute little onesie I made for a good friend who recently had her baby. I had seen a shirt like this on our last visit to San Francisco and thought it was the funniest thing ever, and so I want to see if I could make one too. I absolutely love how it turned out and so easy to do. 
I didn't have any heat transfer material on hand so I thought I would try using freezer paper. Recently, I had cut out some stencils from freezer paper for a friend who wanted to make some shirts for her husband's band. So I thought I could do the same for this project and show you all how too! (Thanks Amanda for the inspiration)

Here is what you will need:
Shirt - in this case a onesie (pre-washed)
Freezer Paper
Fabric Paint
Foam Brush
Iron


Here is how...
  • First, I created my image on the Silhouette SDE using basic shapes and a font that looked like the iPod font. 
  • Then I loaded cutting mat with the freezer paper, shiny side down. (If you choose to do shiny side up you will need to reverse your image). 
  • I set my speed to 3 and thickness was set to 20. (I had to do a few test cuts until I found the setting I liked).


Here's what it looked like once the freezer paper was cut... a few snags, no big deal! (My blade was brand new, but my mat was not (if it's too sticky it may tear the paper). Do not throw away any little piece of paper, you will need it when you transfer the paper to the fabric to keep everything lined up properly.


  • Once you have the paper lined up how you like on the fabric, iron on the freezer paper (do not use a steam setting). 
  • On the inside of the shirt place, another piece of freezer paper shiny face up. Iron it on, ensuring that the piece is covering the entire area to be painted. This will prevent bleeding to the back of the shirt. You may also want to use cardboard for extra protection and to keep the shirt surface straight and flat.


Flood the image by blotting the area to be painted with a foam brush. Do not brush the paint on as it may cause bleeding underneath the freezer paper. Allow the paint to dry before applying another coat. Dry time is dependent on the paint you use, follow the directions on the fabric paint bottle. That's it, now just let the paint completely dry before removing the freezer paper.


Here is a close up of the onesie! I think it turned out pretty awesome, if you are looking for perfect I would recommend using heat transfer material (a bit more pricy). But if your not, this technique will work just as well!

Hope I've inspired you to go and create some fun projects using freezer paper!  

Thanks so much for stopping by!
Happy Crafting :)

Saturday, August 17, 2013

DIY Desk Organizers | Recycled Tin Cans


One of my most popular posts was this desk organizer I made for my craft room. Click HERE to check it out! So with back to school around the corner, I thought I would make a few more and get the kids coloring supplies organized.


This project is super simple and quick to make! The two I made below must have taken me less then 15 minutes make. All you need is a few tin cans, decorative duct tape, hot glue, and ribbon if you like. Make them with as many cans as you like... so easy! Click here for instructions.
Here is the hot pink zebra-patterned organizer I made for my daughter.


And here is the one I made for my son with the mustache pattern. 


Hopefully, this will get my kids back into school mode (fingers crossed). Well if it doesn't, hopefully at least it inspires you to create your own. Something like this would also be perfect in the kitchen or the bathroom... Hmmm, getting more ideas... better keep saving those cans!

Thanks so much for stopping by! 
Happy Crafting :)

Wednesday, August 14, 2013

3D High Top Paper Shoe | SVG Cuts

Hi Everyone!

With back to school around the corner, I've been busy creating some fun school-themed projects. Check out this cool sneaker. Don't you just love it?! 

It makes the perfect little back-to-school treat. Surprise your kids with it, or fill it with some treats and give it to the Teacher. Whoever you give it to they will surely love it!

teacher gifts,School Treat Container,SVGCuts,School themed gift,Silhouette Cameo,3D paper sneaker,Fleurette Bloom Paper files,ilovedoingallthingscrafty,SVGCut Files,Back To School, Sneakers,Paper craft, Cricut

The sneaker file comes from Back to the Books SVG Kit. I definitely want to check it out, so many fun files in this kit!

The pattern paper I used comes from Fleurette Bloom's latest paper collection ABC 123 Paper Pack. Love the chalkboard scribble look. If you're looking for a school-themed paper you'll also want to check out her School Days Paper Pack.


This fun tag was created with the Print and Cut feature of the Silhouette. I have to say I'm really enjoying this function, not only do I save on paper... I also save on stamps!

Thanks so much for stopping by! 
Happy Crafting :)


Friday, August 9, 2013

3D High Heel Paper Shoe | SVG Cuts

SVGCuts is doing another $6.99 gift card giveaway! This time its a 3D high heel shoe. All you have to do is download this free 3D high heel shoe, make it and submit your photo! Hurry offer expires on 8/12/2013. They are also giving away BONUS $25.00 gift cards... click HERE for all the details!

shoe-promo-hero

I've had this file in my collection for a while but haven't had an excuse to make it so today was the day! LOVE them!

birthday,Gift card  Giveaway,bridesmaids,SVGCuts,ilovedoingallthingscrafty,brides,Love Always SVG Kit,solemates,treat box,zebra print,3D high heel shoe svg file,SVGCuts Giveaway,shoe addict,Paper craft,

They make the perfect pair of heels... Solemates, lol! The possibilities are endless. Change the papers and you have a completely different look! I think these would be great little treats for brides, bridesmaids, shoe addicts or for a girlfriends' birthday!

The bows from the shoes come from Gift Boxes SVG Kit and the shoe comes from the Love Always SVG Kit.
The patterned paper from Recollections. 

birthday,Gift card  Giveaway,bridesmaids,SVGCuts,ilovedoingallthingscrafty,brides,Love Always SVG Kit,solemates,treat box,zebra print,3D high heel shoe svg file,SVGCuts Giveaway,shoe addict,Paper craft,

Here they are again from a different angle! Aren't they hot?! 
I hope you like my take on the high heel shoe. Thanks so much to SVG Cuts for this awesome giveaway!

Happy Crafting :)

Rock Star Birthday Party | DIY Party

This past weekend our family celebrated my daughter's 7th Birthday.  Hard to believe my little girl is 7 already! For her party, she wanted to go with a rock star theme. She's really into karaoke these days and likes to act like a rock star... DIVA and all! I can hardly wait for those teenage years! If you've been following my blog you'll know she already had an early birthday party about a month ago with all her little girlfriends from school. Click HERE for her Paint themed Party!

Here is our little DIVA!


Other than the ceiling decor, I didn't do too much to decorate for the party. I had seen this done somewhere on Pinterest and thought about doing something similar for her party. Such a simple and inexpensive decoration too.

The only things I did purchase from Party City that were Rock Star themed were the balloons, 1 table cloth, hanging coils, and loot bags.

Here's what I used to make the ceiling decoration: 
  • 2 black plastic tablecloths 
  • 1 blue plastic tablecloth
  • 1 pink plastic tablecloth
  • 12 pink tissue paper sheets for the tissue pompom. Click HERE for directions.
(All supplies listed above were bought at a Dollar Store (for less than $5) why spend more when it goes right into the garbage when you are done!)
    All I did was cut each table cloth in half lengthwise. Then I chose my center point on the ceiling. I then took one end of the plastic pieces of table cloth gathered it together and with a thumbtack pierced it into the ceiling. Then I stretched out the same piece and secured each end of that piece with another tack. (For extra strength and to prevent it from ripping, I rolled the end of the cloth first and then pierce through two layers. This also hid the tack from view). Repeat the process with as many pieces as you like!

    Don't worry too much about the holes left behind on the ceiling, they are barely noticeable. Especially if you have a textured ceiling like I do.


    I also created this table back drop by covering 2 foam board pieces with pink wrapping paper and then used another black table to create the curtains of a stage. The stars were created with my Silhouette Cameo.


    Finally, here is the cake I made for my little Rock Star! The bottom layer was a chocolate flavored 10 inch cake and the top a vanilla flavored 6 inch cake. All covered with vanilla butter cream and finished with fondant.  I used rice crispy treats to create the guitar shape and covered it with fondant, and the guitar strings.... SPAGHETTI!  Yup, just painted them silver. I was mostly excited about the bottom quilted layer. For my first try doing this technique it turned out pretty awesome! 


    Hope you like my take on the Rock Star themed Party! I know my little girl did :)
    Thanks so much for stopping by.

    Happy Party Planning :)

    Friday, July 26, 2013

    Wrist Watch Birthday Cake | DIY Cake

    Birthdays, birthdays, birthdays! So many in our family during the summer months! This past weekend we celebrated my DH 40th Birthday... I knew I had to come up with something that he loved, and surprise him with it. Since he is a huge wristwatch lover and collector of many, I thought a watch cake would be perfect. Here is the cake replica of one of his favorite watches. By the way, he loved this surprise!


    The cake was vanilla flavored, baked in 11x11 square pans and then just cut the corners to get this shape. Frosted with a vanilla buttercream icing and covered with fondant.


    This was probably one of my most detailed cakes, only because of the hand piping. Took about 6 hours from start to finish. I wanted to finish it before my husband got home so I skipped lunch... bad move because I was starting to get a little shaky by the end as you can tell in my writing, haha!


    I hope you like my hubbies 40th Hublot watch cake. I had a lot of fun creating it! Thanks so much for coming by!

    Happy Baking  :)

    Wednesday, July 24, 2013

    Pirate Birthday Party Hats | DIY | SVGCuts

    Yesterday was my little niece Olivia's 2nd Birthday. My Sister in Law asked if I would make Olivia's Party Hat again for this year's Party. Of course, I said yes! Click here to see last year's party hat.

    This year Olivia will be celebrating her birthday along with our little cousin Marko who will also be turning 2. They will be having a Pirate themed party this weekend. It should be a lot of fun! 

    My inspiration for the hats came from these cute invitations that were made by the Birthday Girl's God Mother.


    Here is what I came up with for the little guests of Honor! Sweet and simple. 
    They arrrrrrrrrrrrrr sure going to look cute... haha, that's as good as my pirate accent gets?!

    Red,SVG Cuts files,Pirate theme Birthday Party,white,SVGCuts,ilovedoingallthingscrafty,black,Pirate Paper Party Hats,Skull,Pirarte Ship, paper crafts, handmade

    The file for the Party Hat comes from SVGCuts Happy Birthday to You SVG Kit. Super easy and quick to make. Papers were done with the Print n Cut feature of the Silhouette. I also wanted to incorporate the little pirate ship from the invite. To do that, I traced the image and then shrunk it down enough to create the little button embellishments with my Epiphany Craft Shape Studio Tool (Round 25) I love how the buttons tie it all together. 


     I'm not a huge skull fan, but isn't this one so cute?!


    I hope you like my Pirate Party hats and saw how easy it was to make your own to tie into any party theme! 

    Happy Birthday Olivia and Marko!!! Thanks so much for stopping by.

    Happy Crafting  :)

    Friday, July 19, 2013

    3D Bee Hive Treat Box and Card | SVGCuts

    Hello! It feels like a while since I've last posted! It's been a bit chaotic and crazy busy around here, haven't had too much time to craft :(

    So today I want to share with you a cute Design Team project I made a while back for the Cutting Edge Online Magazine! If you are already a subscriber you may have seen this in the March/April Issue. The magazine is dedicated to all electronic die cutting machine users and paper craft addicts like me! Make sure you check it out, they also have a Facebook page, go and like them... they are always giving away stuff or sharing new projects :)


    Well, this project kind of reminds me of how what's going in on right now in my world... Busy, busy, busy, Bee!

    Bee hive treat box,container,SVG files,Cutting Edge Magazine,SVGCuts,Silhouette Cameo,ilovedoingallthingscrafty,tutorial,Honeycomb paper,Bees,3D Paper Bee Hive,Card, paper crafts,Cricut,

    Here are the files I used for the Beehive:
    Bee file from Chamomile Friendship Cards SVG Kit and the Egg Shaped container from Poplar Street Tulips SVG Kit SVGCuts

    Bee hive treat box,container,SVG files,Cutting Edge Magazine,SVGCuts,Silhouette Cameo,ilovedoingallthingscrafty,tutorial,Honeycomb paper,Bees,3D Paper Bee Hive,Card, paper crafts,Cricut,

    The container is perfect to fill with yummy goodness!


    Here is a close-up of a cute little bee that I glued to a twisted wire.

    To create the entrance to the beehive:
    In the Silhouette SDE, load the bottom panels onto a work surface, then ungroup them. Next, I created a circle. Placed the circle over one of the bottom panels, then selected both images. Click on the Object button, select Modify then Subtract. You should be left with one panel with a circle cut out of it. Now cut out all your pieces. Follow the assembly instructions for the egg container file.


    Bee hive treat box,container,SVG files,Cutting Edge Magazine,SVGCuts,Silhouette Cameo,ilovedoingallthingscrafty,tutorial,Honeycomb paper,Bees,3D Paper Bee Hive,Card, paper crafts,Cricut,

    Here is a card I made to go along with the treat box. It was a perfect little gift for a dear friend of mine on her birthday. Files for the card come from CHAMOMILLE FRIENDSHIP CARDS KIT here.


    Here is a quick tutorial on how I created my own Honeycomb patterned paper...

    • To do this I searched google images until I found an image I liked (Make sure it’s free to use first).
    • Copy your image and paste it onto your workspace in the Silhouette DSE
    • Next, you need to trace the image, to do that click on the trace window, select your trace area, then trace.
    • You now should have the hexagon grid skeleton.
    • Fill in the image with color and the same for the outline.
    • To create the yellow on the pattern, first I created a rectangle the size of my paper and filled it with the yellow color and outline.
    • Drag your honeycomb image over the rectangle and resize the image until it matches up with the yellow rectangle.
    • Group the two together.
    • Send to printer.
    It’s that easy!

    Hope you enjoyed my little projects, now I'd better get back to my busy reality! Have a great weekend everyone!

    Happy Crafting  :)