Friday, May 10, 2013

Paper Clock Lamp | SVGCuts Challenge Entry

Hello Everyone and WELCOME to all my new followers! SO happy to see new faces on this little blog of mine! Make sure you leave me a comment and say HI so I can get to know you as well!

Today, I want to share with you my second attempt at the SVG Cuts Facebook Lamp Challenge! This time around I stuck to the rules, LOL! My inspiration came from the paper used, DCWV Tattered Time Stack. I love the vintage, "MAN"ly look of it! 

So here is my lamp, LOVE how it turned out :)

SVGCuts Facebook Lamp Challenge,ilovedoingallthingscrafty,Clock Lamp,SVGCuts,SVGCuts Files, Cricut,Paper crafts,Decoration Piece,

The files I used all came from SVGCuts, Maison de Madeline SVG Kit. I've been wanting to make the wall clock and thought why not incorporate it in the lamp. 

Paper Clock Lamp | SVGCuts Challenge Entry

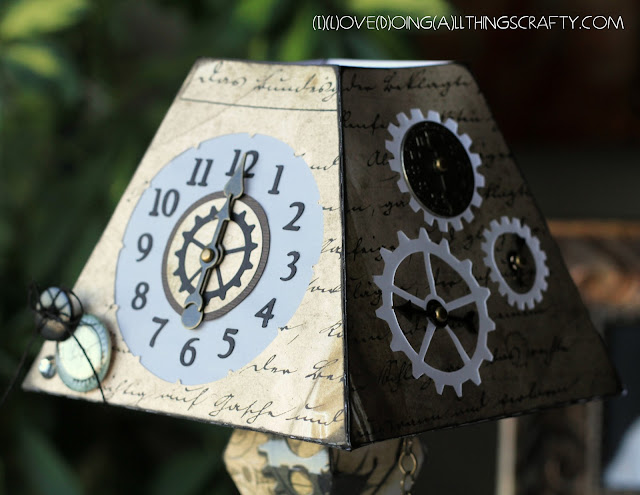
 Here is a closer look at the lampshade. I really wanted to make the clock functional but couldn't find a small enough clock movement kit for this project. I did find the next best thing... Tim Holtz's Idea-ology Time Pieces. His stuff is AWESOME!

Paper Clock Lamp | SVGCuts Challenge Entry

Side view of the lampshade and all the gears.

Paper Clock Lamp | SVGCuts Challenge Entry

Below is a close-up of the details on the base of the lamp.  Stamp comes from Stampendous Time Flies collection. I finished the pull cord chain with the cutest Flair button from Paper Play Studio, I thought "dreamer" was the perfect little touch for a lamp. 

Paper Clock Lamp | SVGCuts Challenge Entry

And my favorite part of the lamp is actually seeing it all lit up! Isn't it pretty?!? I think this is going to be the perfect Father's Day gift for my hubby! He collects watches, so I know he is gonna love this!

Paper Clock Lamp | SVGCuts Challenge Entry

Thanks for stopping by. I hope you've enjoyed my version of the lamp. If you're a paper crafter make sure you enter the challenge! It's really all about fun and pushing your creativity, and if you win something it's a bonus!

Happy Crafting :)

Thursday, May 9, 2013

Pine Tree Paper Camping Scene Lamp and | Camp Lamp | SVGCuts


Hey Guys! SVG Cuts is having another Facebook Challenge, this time we are to create our version of the lamp from Maison de Madeline SVG Kit. Since we just ended the longest winter ever here in Edmonton, Summer has been on my mind... which led me to create this "Camp" lamp! 

This may be one of my favorite creations, love how it all came together! I'm always amazed at what paper and a little creativity can do!

Silhouette Cameo,SVGCuts Facebook Lamp Challenge,SVGCuts File,ilovedoingallthingscrafty,Camp Lamp, Cricut,Paper crafts, DIY

Unfortunately, this project will NOT be entered into the Challenge as I got a bit ahead of myself. I got halfway through it only to realize that when I read the challenge rules a bit more closely, it did not qualify as I modified the lamp shape :( 

Oh, well... Lamp FAIL! I'm not too heartbroken though, my son fell in love with it as soon as he saw it... the only problem so did my daughter! I guess I may be making another one, lol! This would also make a great Father's Day gift for the Outdoorsy Man in your life!

Here is a closer look at the campground ;)
Isn't that Teepee the cutest thing ever? It's even functional too. Lift off the top and the base can be filled with little goodies!

Pine Tree Paper Camping Scene Lamp and | Camp Lamp | SVGCuts

Here is a birds-eye view from above...

Pine Tree Paper Camping Scene Lamp and | Camp Lamp | SVGCuts

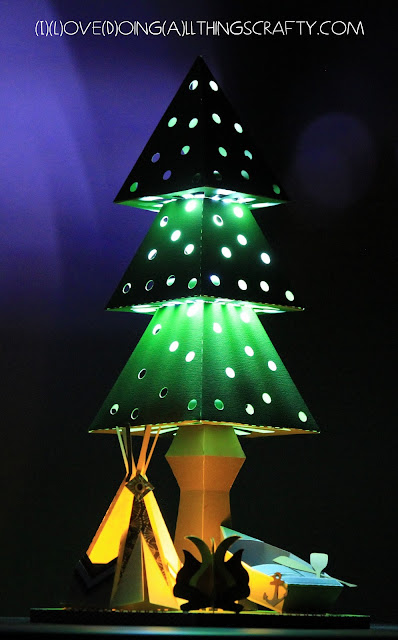
My favorite part of all is when the tree is all lit up. Instead of using battery-operated tea lights, I used battery-operated LEDs, that I had purchased at the dollar store (the kinds you push down to light up a small closet). Since I used 3 of them, they actually do light up the room. I did use a tea light in the Teepee to give it a soft glow. I love the lit tree... reminds me of the sky at night. 

Pine Tree Paper Camping Scene Lamp and | Camp Lamp | SVGCuts

Recipe for Camp Lamp:

Lamp file comes from Maison de Madeline SVG Kit 
First I enlarged the whole lamp, then I created the middle and top shade slightly smaller than each other. Welded a triangle and tab to the top shade to create the point on the tree. Finally, I added the holes (circles) to the lampshade. (I didn't do this but, I would recommend you cut at least 2 or 3 pieces of the lampshade base for each tier. I think that would make the tree a little stronger)
The tree measures about 20 inches tall.
Teepee file and fire comes from Camp Smore SVG Kit
The Rowboat comes from Picnic in the Park SVG Kit
Modifications to the files done on the Silhouette DSE, all cut on the Silhouette Cameo.
For the base of my lamp, I used an unfinished wood picture frame (I need something strong and sturdy). Covered it up with cardstock and finished the edge with washi tape.


There you have it! The possibilities are endless... I'm sure I'll be making a few more of these trees for Christmas time... maybe even a Christmas scene! Oh, the wheels are turning... 


Well, onto my next project... SVG Cut Facebook Lamp Challenge... wait, didn't I do that already, he, he! Oh, oh, here we go again ;)

Thanks for coming by :)

Monday, May 6, 2013

Piece of Cake Treat Box and Card | SVG Cuts

Today I want to share with you a little gift box  I made for one of my girlfriends. We've been friends since childhood... come to think of it, I was about my daughter's age when we first met... Over 30 years ago! Time flies Suzie... and yes we are on the slippery slope to 40! C'est la Vie, and what a wonderful life it is :)

birthday gift,treat box,Silhouette Cameo,SVG Cuts file,ilovedoingallthingscrafty,Slice of Cake,Gift Box,SVGCuts,B is for Birthday SVGCuts Kit,Paper crafts,Cricut,

Supplies:
File from SVG Cuts - B is for Birthday SVG Kit - Love this Kit!
Flocked Pattern paper from Anna Griffin's Valentina Collection
Ivory paper from Recollection
Cuttlebug
Happy Birthday Embossing folder
Stamp - Spotted Owl Soup Stamp Set from Unity Stamps
Cut on the Silhouette Cameo


Here is a closer look at the mini card I made! Tucks really nicely inside the box :)

Piece of Cake Treat Box and Card | SVG Cuts

I hope you like this "Piece of Cake" gift box. It really was a piece of cake to put together, lol! I'm sure I'll be making a few more of these! 

Thanks for coming by... Been a Slice!
Happy Crafting :)

Tuesday, April 23, 2013

Ninjago Birthday Party Wrap Up

Ninjago Birthday Party Wrap Up

Hi Everyone! 

The Ninjago party has finally happened and I have to say it was a lot of fun! Tomas had a blast with all his little buddies school, family and friends! 

We had rented out a Community Hall that used to be an old Movie Theatre. It was the perfect place for kids of all ages. The facility allowed us to play our own Movie, there was a playroom (jungle gym), party room and many lounge areas for the adults. 

While the guests were still arriving and the place was being set up, the kids started off by burning some energy in the playroom.

Ninjago Birthday Party Wrap Up

Here are a few of my favorite pictures using the photo props and the background I made! I love the one of our little friend Sofia on the bottom left corner. She looks so devilish with that big smile and those frowning eyebrows... Looks like she's gone MAD, lol!!!

Ninjago Birthday Party Wrap Up

There were Ninja eyes everywhere, watching every move we made! 

Ninjago Birthday Party Wrap Up

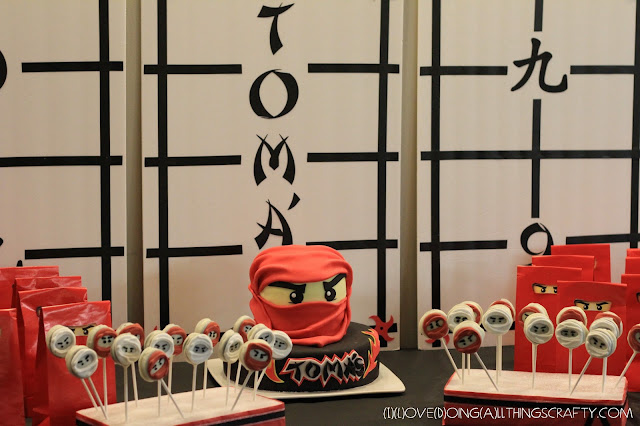
I am really glad I had set up the table at home prior to the party. It made the setting up at the Hall much easier, I knew where everything should go.

Ninjago Birthday Party Wrap Up

It never even crossed my mind when I made this cake on how the kids would react to it when it was being served. This picture below says it all... The boys went wild, they thought cutting into Kai's head was the funniest thing ever! Maybe a bit morbid, but the expression on those little faces are PRICELESS!

Ninjago Birthday Party Wrap Up

Thank you all so much for following along with all the party planning! Thank goodness these events only happen once a year. I'm sooooo "Ninjago'ed" out!


If you missed it, here is a recap of all the links to the Ninjago Party + don't forget to pick up some freebie Silhouette files!

Ninja Banner - freebie file
Ninja Paper Lanterns - freebie file
Ninjago Photo Props - freebie file
Ninja Balloons - freebie file
Ninjago Cupcake Toppers - freebie file

Ninjago Birthday Party Wrap Up

Happy Crafting and Happy Planning :)

Sunday, April 21, 2013

Ninjago Birthday Cake

Good Morning everyone! I have pre-scheduled this post because I'm sure I'm going to need to recover from the night's festivities!

Today I am sharing with you the cake I made for my son's 9th Ninjago themed Birthday Party!
What do you think? I love how he turned out!!! Actually, wasn't very hard to make either.

Ninjago Birthday Cake

Here's a quick pictorial on how I made "KAI's" head.

Ninjago Birthday Cake

  1. I baked, sliced and filled with icing, the centers of two 5 inch cakes. Separating the layers with a cake board.
  2. Next, I dirty iced the entire head.
  3. Rolled out my fondant pieces. For the eyebrow, I drew and cut out a shape on a piece paper first and laid it on the fondant then cut it out with the tip of a sharp knife.
  4. I placed my pieces on top of the rolled fondant I used as the face. I "glued" the pieces with a little water using a small paintbrush.
  5. Then I placed the face on the head. At this point, I placed the head on the bottom layer of the cake that I had already covered with black fondant.
  6. Finally, I wrapped the rest of the head with Kai's Ninja mask.

The top part of the cake is chocolate flavored and the bottom 10 inch layer is made out of a yellow cake. The entire cake is covered with a vanilla buttercream icing and finished with fondant.


Hope you have enjoyed this Ninjago Birthday Party Series of posts, I hopefully will have some pictures of the party to share with you all soon!

Up next...


Have a great Sunday and thanks for coming by,
Happy Crafting :)

Saturday, April 20, 2013

Ninjago Birthday Party Oreo Pops

No, you aren't seeing double! Yes, this is my second post today! Since I made two different kinds of cookies I thought I would share how I made these Oreo Pops with you all as well!

Ninjago Birthday Party Oreo Pops

Here is what you will need:

One package of Double Stuff Oreos
White Candy Melts
Lollipop sticks
Icing Colours

Directions:

Melt your Candy Melts in the microwave at 30 seconds at a time, stirring in between each increment. I added a teaspoon of shortening to make the consistency of the melts a little runnier. 

Ninjago Birthday Party Oreo Pops

Twist apart all of the Oreo cookies. With the lollipop stick make an indentation in the white filling of each cookie. Dip the end of the lollipop stick and place it into the indentation you just made in the cookie.

Ninjago Birthday Party Oreo Pops


 Place the top of the cookie back on. Once you have about half of them done place them in the freezer until you are ready for the next step.


Ninjago Birthday Party Oreo Pops

With the chilled cookies that you just removed from the freezer, dip the cookies one at a time into the melted chocolate. I used a spoon to drizzle over them, I found this way I wasn't leaving "Oreo dust" behind. Shake off the excess chocolate by tapping the side of the bowl gently. 

TIP: To keep my Candy Melts from hardening I had placed my glass bowl on top of another bowl that had been filled with boiling water.

Ninjago Birthday Party Oreo Pops

Place your dipped Oreo's on parchment paper to dry.

Ninjago Birthday Party Oreo Pops

Once the cookies were dry, I finished them off by adding their faces. See my Sugar Cookie post on how I added the Royal Icing.

Ninjago Birthday Party Oreo Pops

I hope you've enjoyed this little tutorial on Oreo Pops, a great alternative to Cake Pops. I love them both, I just wanted to try something new!

Up next...


Have a great day and thanks for coming by,
Happy Crafting :)

Ninjago Birthday Party Sugar Cookies

Hi everyone! Today is party day!!! Woohoo, I may be more excited than the Birthday Boy, LOL! Everything is ready for tonight, phewww! *sigh*  

The next thing I'm going to share with you today is how I made my sugar cookies. Guess what... this was my first time ever, and I am so happy with the results! If I can do it, you can too!

Ninjago Birthday Party Sugar Cookies

The first thing I did was look up a recipe for making sugar cookies. HERE is the one I finally used.

Ninjago Birthday Party Sugar Cookies

Next, I made Royal Icing. HERE is the recipe I used for it.

Ninjago Birthday Party Sugar Cookies

I made my icing consistency a bit on the runnier side. I wanted to pipe and flood the cookie right away. I was a little impatient, hehe!

Ninjago Birthday Party Sugar Cookies

I then outlined the outside of the cookie and the outside of the mask and went straight into flooding them.

Ninjago Birthday Party Sugar Cookies

I first did all the white and then all my red cookies. Once those were piped and flooded I then went back and flooded the center faces with yellow icing. You need to wait at least 20 minutes before adding another color. 

Ninjago Birthday Party Sugar Cookies

I finished them off by pipping on their eyes and eyebrows. Some of the black icing I used for the eyes ended up bleeding into the yellow icing... I probably was too impatient, and didn't wait for the face to harden up enough or my black icing was too runny! Either way, they still taste the same but look like they have on runny mascara, LOL! ;)

Ninjago Birthday Party Sugar Cookies

I then let these little Ninjas rest overnight. The next day I wrapped them individually and placed one in each treat bag for Tomas' guests!

Next...


Have a great day and thanks for coming by,
Happy Crafting :)


Friday, April 19, 2013

Ninja Throwing Stars


Well, the Birthday Party is tomorrow!!! I have been so busy with work and catching up with everything else around the house that I haven't had time to put up any of my recent Ninjago projects!

Today I want to share with you the Ninja Stars I made for the kids. I remember making many of them as a kid but have since forgotten. Click here for the pictorial I used to make mine. There are also a lot of YouTube videos on them as well! Hopefully, we will have time to play a little game with them. If any of the kids at the party want to learn how to make one themselves I will take some extra paper with me to teach them how.  

Ninja Throwing Stars

Up next ...


Have a great day and thanks for coming by,
Happy Crafting :)

Wednesday, April 17, 2013

DIY No Sew Ninjago Headbands

Hey all!!! I hope you're not all bored to death with all this Ninjago Party planning of mine. All I want is to make my son's birthday memorable, and maybe inspire some of you with ideas when planning your next party! 

Today I'm going to share with you how I made the Ninja headbands. Really easy, I promise!!!

DIY No Sew Ninjago Headbands

I didn't want to spend any time sewing. My solution....  ribbon! I bought a 1.5-inch wide ribbon that I found at Micheal's. Cut it to the desired length, for as many as you need.

DIY No Sew Ninjago Headbands

The only problem with ribbon is that it frays :(
TIP: I used my heat embossing tool to heat the ends and slightly melt them. No more fraying! Probably could do the same with a candle,  but be very CAREFUL if you do!

Next, I printed the kid's names out and taped the paper up on my kitchen window. I then took the piece of ribbon that I had cut and found the middle. I then aligned it over each name and secured it to the window with more tape. All that is left to do is trace it with a sharpie. Super easy, right?!?

DIY No Sew Ninjago Headbands

These will make a great keepsake for the guests to take home, and even if they are thrown out you won't feel so bad because it was that easy!!!


Up next ...


Have a great day and thanks for coming by,
Happy Crafting :)

Monday, April 15, 2013

Ninjago Cupcake Toppers - Free Print and Cut Silhouette File


Hey everyone are you tired of Ninjago yet? I'm getting really close... It feels like I've been eating, sleeping, breathing all things Ninja! I can't wait to see it all come together already! :)

Today I want to share with you the Ninjago cupcake toppers I made. I'm still not sure I will be using them like that. I may just use them as food picks and sporadically place them on the food trays.

I created them again using the Silhouette software. I printed them and then cut them out on the Cameo. Here is what they look like once they were cut out.

Ninjago Cupcake Toppers - Free Print and Cut Silhouette File

They come together in a matter of minutes. All that is left to do is fold and glue them down onto a toothpick. I just used a dab of hot glue and pinched the two pieces of paper together onto the toothpick. Really easy!

Ninjago Cupcake Toppers - Free Print and Cut Silhouette File

The image I used comes from here. Make sure to stop by, she also had some great ideas on the theme. If you have a Silhouette machine and would like to have a copy of this file click on the link below :)

Before you download...
My free files RULES!!!

  1. If you choose to download all I ask is you become a follower.
  2. Note my files are for personal use only! (Personal use means... only for you to use (no trading, or sharing of my files... let me do that!) 
  3. If you want to share, send your friends over to my blog for the download. 
  4. I'm OK with people sharing my files on their own sites as long as there is a direct link back to this blog...Give credit where credit is due! (a message to me would also be appreciated)

Ninjago Ninja Cupcake Toppers - (Silhouette - Print and Cut) .studio file

If you would like to donate, (click the 👉DONATE button on the sidebar) I will happily accept any amount you see fit. No pressure at all either :) It will just make my day that someone wants to support my passion.

Coming up...


Have a great day and thanks for coming by,
Happy Crafting :)

 Sharing this with my Crafty Peeps!