Showing posts with label boy. Show all posts

Tuesday, April 12, 2016

ARI 3D Paper Letters | SVGCuts

Hi All!

Today's post will be short and sweet just like this cute 3D Letter Name I made for baby ARI! I love you can coordinate paper to match any room decor. 

#SVGCuts,Silhouette Cameo,3D letters,yellow,Ari,Name 3D,boy,Paper Letters,SVGCuts Files,baby gift,grey,ilovedoingallthingscrafty,

Here is what I used on this creation:

Letters 3D Letters SVG Kit
Paper: White (AC Cardstock), Pattern (Hello Sunshine - Pink Paislee)
Dies: Stars Framelits (Sizzix)
Embellishments: Arrows/squares (Studio G) Sequins and Drops (Pretty Pink Posh)
Cut out on the Silhouette Cameo


These 3D Letters make great baby gifts and are the perfect touch for any nursery. 
I LOVE how they turned out, hope you did too!


Don't forget to check out SVG Cuts latest! 
Fairy Cottage SVG Kit
Isn't it GORGEOUS!?!
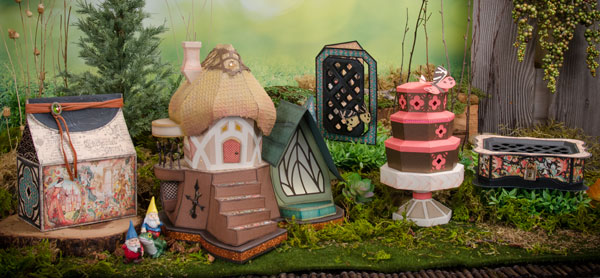
I think it is one of my favorites, just need some time to make it! 
Hope that comes soon ;)  


Thanks for stopping by!
Happy Crafting  :)


Friday, September 18, 2015

Soccer Ball Spinner Birthday Card | SVGCuts

Hey all!

Today I have a really cute Soccer Ball Spinner card to share with you all! Made this birthday card a couple of weeks ago for a super cool 15 year old, who loves everything soccer! 

birthday,SVGCuts files,#SVGCuts,Soccer,Silhouette Cameo,Soccer Ball Spinner Card,Snarky Stamps,guy,tutorial,boy,Card,ilovedoingallthingscrafty,

The only file I used for this card was the soccer ball that comes from SVGCuts Sports Lovers SVG Collection.


This card is super simple to make, so here is how I made mine...
  1. Cut out two soccer balls and glue them back to back with a piece of embroidery string or twine running down the center in between the layers. Set this to the side.
  2. Next using circle dies, cut a large enough circle out of the front panel of the base card as well as the top layer of your card. 
  3. Attach the soccer ball cut out using the stings to the top and bottom of the circle cut out, make sure to pull the strings taught. Use strong adhesive.
  4. Emboss the top layer of the card if you like, and glue that layer to the top of the card covering up the string ends and sandwiching them between the layers. 
  5. I cut out a (red) circle border to finish the opening around the soccer ball using two different-sized circle dies. 
  6. Embellish the rest of the card as you like!
SUPER easy!


The stamp inside is a combination of stamps I used from Snarky Stamps.

Hope you have enjoyed my Soccer Ball Spinner Card, maybe even inspired to make one of your own!

Have a great weekend!
& Happy Crafting  :)

Wednesday, April 15, 2015

Simple Blue and Green Birthday Party Theme - Tomas' 11th Birthday!


This past weekend my son Tomas celebrated his 11th Birthday.  So today I would like to invite you all to our house for a peak at how I prepared for our family party!

Other than a few store bought decor pieces everything was pretty much DIY!

For parties like this it's just easier to go with paper plates and cups... who wants to do dishes?!? So much easier and adds lots of color to the room!


The banner and numbers were created with the Silhouette Cameo. My go to machine for all my party decor... what was life like before my Cameo?!? ... well, everything was store bought and not personalized!

The paper tissue garland banner was another DIY project. SO easy, you can find lots of tutorials online!

Pictured below is what my basement looked like before the family arrived.


What's a party with out a Cake? Here is how I set up my cake table!


I also made some cake pops and oreo truffles for the table. 
For the blue cake pops I used marble cake and the green ones were lemon cake flavored. 
I love how you can find such fun straws to coordinate with any color theme. I found these at Micheal's.

Thank you treat tags for the kids were also created using the Cameo.


Want to know how I kept the wooden letter T's from falling? Here is an iphone pic I took... I just hot glued a toothpick to the back as a support! Clever right? They never feel down once! ;)


I also found these large tissue paper rosettes at Micheal's and then made some smaller ones to fill in the spaces and create a backdrop for the cake. Here is a link to an older post of how I make my rosettes.


Speaking of cake...
Here is the fun cake I made to coordinate with the rest of the decor. I wanted to go with a simple yet modern look for the cake. I think I achieved that, love how it turned out!

Again I also used the Silhouette to create the numbers and the bunting banner for the cake toppers.


Top view of the cake.


Close up table view.


I also added some more blue and green decorations through out the rest of the living areas. Here is what our kitchen nook looked like.


Even our sun room got a little attention. Thought it would be warm enough for people to hang out up there but it turned out to be fairly cold that day :( Oh well, still looked good!


I had lots of fun decorating our staircase too!
I made a bunch of these tissue paper poms in various sizes and hung them up using fishing line. I wanted to make them look like they were suspended in mid air.  This was my favorite decoration piece! In fact, I haven't taken it down yet... I think we will enjoy it a little longer until I get sick of it, lol!


Look at suspended poms from the opening in the staircase below.


And here is my 11 year old blowing out his candles!


Hope you enjoyed a peak of Tomas' Simple Blue and Green Birthday Party theme! Maybe even a little inspired to do your own DIY party decor?!

 What am I going to come up with for next year? I'm starting to run out of ideas... Good thing I have a year to think about it!

Thanks for stopping by!
Happy Crafting  :)


Sharing this post on:

Saturday, June 28, 2014

Andre 3D Paper Letters | SVGCuts

Recently we had a new arrival in the family. My cousin's little guy Andre! 
Since he has been born I had been meaning to make his name using SVGCuts 3D letters. Well, I finally got around to making them! Perfect time too as today was his Baptism and they were used to help decorate for the event :)


Here are a few close-ups...


I think these papers I chose are timeless and yet still cute enough for a baby Andre to grow into a little man.


 I love this little tag in the picture... It is what I wish for Andre, I hope he always dreams big and is able to achieve all he hopes for!


These 3D Letters make great baby gifts and are the perfect touch for any nursery. I LOVE how they turned out, hope you did too!

Thanks for stopping by,
Happy Crafting  :)

Monday, June 2, 2014

3D Paper Rocket Ship Gift Box


The day I made this 3D Rocketship I began with the plan of creating a simple Birthday Card. Somewhere along the way the card turned into this Rocket Ship. Totally cool with me as I was happy with the results and hopefully the Birthday Boy was too!


The file for the Rocket Ship comes from Fleurette Blooms Outer Limits - Space 3D SVG Kit. I have been wanting to make this for a while, maybe that explains my change in direction!


Check out the little Alien at the window, SO cute! (Well for an Alien I anyways)


The Space Ship is perfect for storing little treats or a giftcards for the Birthday Boy. This would also make a cool decoration or centerpiece for a Boy's Birthday Party!


Thanks for stopping by, hope you liked my 3D Rocket Ship. If you make one of these don't forget to share it on Fleurette Bloom's FB page!

Happy Crafting Everyone :)

Sunday, March 16, 2014

Thomas the Train Birthday Cake | DIY Cakes


"They're two they're four they're six and eight
Shunting trucks and hauling freight 
red and green and brown and blue
they're the really useful crew"


Do you have that song stuck in your head now? Hehe! I remember those years when my son Tomas was infatuated with Thomas the Train. I miss those days 😢

Well this weekend I had the pleasure of making a Thomas the Train Cake for another little friend! Happy Birthday Sam! I hope you have an awesome Birthday Party!!!

So without further ado here is Thomas!

Thomas the Train Birthday Cake | DIY Cakes

This is quite a tall cake, approx 6" in height baked in 9" cake pans.
The bottom layer is chocolate flavored and the top vanilla. The entire cake was frosted with vanilla buttercream icing, covered and decorated with fondant.

Thomas the Train Birthday Cake | DIY Cakes

I love how cute these 3D clouds and the trees turned out!
With every cake I make I learn something new. Sometimes I wish I had more time to take actual decorating classes... but who has time these days! Thank goodness for Mr.You Tube, my go-to an instructor, lol!

Thomas the Train Birthday Cake | DIY Cakes

I hope you like my take on Thomas the Train Cake. Thanks so much for stopping by!

Happy Crafting whatever it may be! :)

Wednesday, January 1, 2014

Noah 3D Paper Letters | SVGCuts

Happy New Year Everyone!!! I hope 2014 is going to be a great year for all of us! May it bring health, happiness, and many crafty inspirations! 

I have a quick project to share with you today that I had made for my cousin to give as a Christmas gift! Welcome to the world Baby Noah! 


I was asked to do the letters in grey and yellow to coordinate with the baby's room. Well, what do you think???   I think CUTENESS!!!


Letters come from SVGCuts 3D Letters SVG Kit
Cut out on the Silhouette Cameo

LOVE how they turned out! Hope you did too :)

Thanks for stopping by!
Happy Crafting  :)

Monday, May 27, 2013

Winnie the Pooh Cake

Happy Memorial Day to all my American Friends hope you are all enjoying the holiday!

Today, I would like to share with you a cake I made for my friend Karen's little boy. William turned 1 this past weekend and I had the honor of making his very first Birthday Cake! Yay, Will!

What 1 year old doesn't love Winnie the Pooh?! Isn't he cute??? I love how it all came together. Winnie is all made of fondant and the center of his body is Rice Krispies treats. Totally edible if Will wanted to take a bite, lol!

Winnie the Pooh Cake

Here are a few more pics of the cake... close up and from different angles. 

Winnie the Pooh Cake
Aren't those bumblebees just the cutest little things?

The inside of the cake had a chocolate flavored bottom layer and a yellow cake top layer, iced and with vanilla buttercream. It was finished and decorated with fondant. Measured 10 inches in diameter and approximately 4 inches high (not including the toppers). 

Happy Birthday, Will, hope you have an amazing year! 

Thanks for coming by, if you are planning on making a Winnie the Pooh cake hopefully I have inspired you!

Happy Crafting :)

Wednesday, April 4, 2012

DIY Lightsabers for Star Wars Birthday Party


Welcome back... if you have a little boy you sure are going to love this post! (hopefully)

My son's request for this year's birthday party theme was Star Wars. Thankfully there are lots out there for you. Being a crazy crafter I always want to make most of my decor myself! What a task... one idea always leads to another, and it feels never-ending! As long as everything is ready for Saturday I'll be happy :)

So this first post I will share with you how I made my lightsabers.

DIY Lightsabers for Star Wars Birthday Party by ilovedoingallthingscrafty.com

Here is what I used... Water noodles, black duct tape and foil tape, and scissors. These were all purchased at the Dollar Store! With the noodles, I cut each one of them in half.

DIY Lightsabers for Star Wars Birthday Party by ilovedoingallthingscrafty.com

Next, I covered one of the ends with black duct tape and folded down the excess tape.

DIY Lightsabers for Star Wars Birthday Party by ilovedoingallthingscrafty.com

Then I added a strip of tape to the top of the noodle, ensuring that I was wrapping around it pretty straight.

DIY Lightsabers for Star Wars Birthday Party by ilovedoingallthingscrafty.com

Repeated the last step to make a wider handle.

DIY Lightsabers for Star Wars Birthday Party by ilovedoingallthingscrafty.com

With my one inch punch, I cut out a piece of foil tape This tape comes with a backing that peels of before you adhere it.

DIY Lightsabers for Star Wars Birthday Party by ilovedoingallthingscrafty.com

Peeled off the backing and added it to the handle.

DIY Lightsabers for Star Wars Birthday Party by ilovedoingallthingscrafty.com

To embellish the handle, I cut the foil tape lengthwise to create some strips.

DIY Lightsabers for Star Wars Birthday Party by ilovedoingallthingscrafty.com

Wrapped it around the base of the handle.

DIY Lightsabers for Star Wars Birthday Party by ilovedoingallthingscrafty.com

And there you go homemade lightsabers, that the kids can enjoy (hopefully they won't hurt each other too badly!)


Thanks for visiting,
Ilda :)