Showing posts with label Winter. Show all posts

Tuesday, October 12, 2021

Vintage Holiday Release Day 2 Sneak Peeks | Honey Bee Stamps

Vintage Holiday, Release,Sneak Peeks,Honey Bee Stamps, Lovely Layers, Anemones Dies,Winter, White, Card Making, Stamping, Die Cutting, handmade card, ilovedoingallthingscrafty, Stamps, how to,Floral Card,

Hello and welcome back to Day 2 of the Vintage Holiday Release for Honey Bee Stamps.

My card today features the gorgeous new Lovely Layers: Anemone Dies. This is a larger card (A7), simply because I wanted to use all of these flowers together. They would have fit onto an A2 card base but it would have been too small for the sentiment I wanted to use.


Make sure you stop by the Honey Bee Stamps Blog for more inspiration from the Design Team featuring more day 2 product reveals! Please note that  links will not be active until the Release goes live on October 14th, 2021 @9pm CST.

CARD RECIPE

Here is a breakdown of what I used to make this pretty wintery card.


Stamps: 

Dies:

Paper: 

Stencil:

Ink:

Emb. Powder:

Die Cut Machine:

Adhesives:

Embellishments:

Other Tools:

Once my Anemone flowers were all die-cut and assembled, I then just had to figure out the background design. I  used the ★Crystal Kaleidoscope Stencil to apply this silver paste to the Scallop A7 Card Frame layer. 

Vintage Holiday, Release,Sneak Peeks,Honey Bee Stamps, Lovely Layers, Anemones Dies,Winter, White, Card Making, Stamping, Die Cutting, handmade card, ilovedoingallthingscrafty, Stamps, how to,Floral Card,

To make these centers pop, I used foam tape in between each layer and added glue to the outside edge of the center layers which were then dipped in sparkle glitter. Before attaching the centers to the flowers, I drew some black lines on the base of the petals. To the end of the lines, I added the cutest little domes to make it look like Stamen. 

Vintage Holiday, Release,Sneak Peeks,Honey Bee Stamps, Lovely Layers, Anemones Dies,Winter, White, Card Making, Stamping, Die Cutting, handmade card, ilovedoingallthingscrafty, Stamps, how to,Floral Card,

Here's a close-up. Check out the dimension. Also, it is difficult to see from the photos but I did blend Hickory Smoke Distress Oxide Ink to the white centers of the flowers to give some extra depth and dimension.

Vintage Holiday, Release,Sneak Peeks,Honey Bee Stamps, Lovely Layers, Anemones Dies,Winter, White, Card Making, Stamping, Die Cutting, handmade card, ilovedoingallthingscrafty, Stamps, how to,Floral Card,

I hope you were inspired by this Hello Winter Anenomes Card. If you have been following me you will know that I love all the Lovely Layer Flowers from Honey Bee and this Anemone did not disappoint. 
Thank you for stopping by and I will see you back here tomorrow for day 3 sneak peeks... Happy Crafting!

Ilda 💗

Want to watch a quick process IG Reel? Click the link below!

Tuesday, November 22, 2016

Let It Snow, Let It Snow, Let It Snow - Cards


Bet that song is stuck in your head now... hehe!

So today I want to share a couple of fun winter cards I made using one of Fleurette Bloom's latest sets Let It Snow.

For this first card, the stamping was super simple. I used VersaMark ink to randomly stamp the background of my shaker card and heat embossed it using some fine white embossing powder. Then used scribbled some Zig Clean Color inks on clear acetate and smooshed it on the watercolor paper. Once it was all dry I created this beautiful shaker card with it!


For the second card, I randomly stamped a few images on watercolor paper and then did some messy coloring using my Zig Clean Color real Brushes. I then used some clear Wink of Stella to add sparkle to the skates, mitts and snowflakes (difficult to see on the picture, but in person this card sparkles). I thought it would be fun to make this one a New Years Card, as it reminded me of skating at the park in the New Year!


Check out the links below for a list of the supplies I used. And if you haven't already, check out Fleurette Bloom's Winter Bundle Stamps... they are awesome!

Thanks for stopping by!
Happy Crafting  :)

SUPPLIES 
To make supplies easy to find, I have linked them below. If something I used is no longer available I will link to a similar product. Affiliate links may be used depending on the product. Your purchases help keep my blog running, so thanks in advance for the support!

FBS Let It Snow 4x6 Stamp Set
Shop at:
FB
Canson XL WATERCOLOR PAPER 9x12 140lb Pad
Shop at:
SSS | AMZ
Neenah 110 LB SOLAR WHITE Paper
Shop at:
SSS | AMZ

Vellum Value Pack 8.5"X11" 50/Pkg
Shop at:
AMZ
Fiskars Easy LARGE STAMPING PRESS Stamp
Shop at:
SSS | AMZ
Kuretake Zig CLEAN COLOR 60+ 80 SET Real Brush
Shop at:
SSS | AMZ
Inkadinkado Embossing Magic
Shop at:
SSS | AMZ
VersaMark Watermark Stamp Pad
Shop at:
SSS | AMZ
HEAT RESISTANT ACETATE 5 Sheets
Shop at:
SSS | AMZ
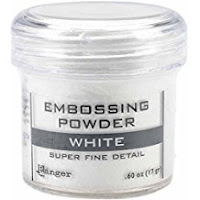
Ranger Embossing Powder, .60 oz, White
Shop at:
AMZ
Black & Decker HG1300 Dual Temperature Heat Gun
Shop at:
AMZ
Tim Holtz Detailer Water Brush
Shop at:
SSS | AMZ
Sizzix Big Shot
Sizzix Big Shot
Shop at:
SSS | AMZ
Simon Says Stamp STITCHED RECTANGLES Wafer Dies
Shop at:
SSS
MFT STITCHED RECTANGLE SCALLOP FRAMES
Shop at:
SSS
Sizzix Big Shot Kick STANDARD CUTTING PADS
Shop at:
SSS
Sizzix Big Shot Magnetic Platform
Shop at:
AMZ
Tsukineko VersaFine ONYX BLACK Ink Pad
Shop at:
SSS | AMZ
PLANETARIUM 4 Dew Drop Ink Pads Metallics
Shop at:
SSS | AMZ
Scotch Quick-Drying Tacky Glue 4Oz
Shop at:
SSS | AMZ
3M Scotch 1/2-Inch Double-Sided Foam Tape
Shop at:
SSS | AMZ
Ranger .5 Oz. MINI MULTI MEDIUM MATTE Glue
Shop at:
SSS | AMZ
Quilled Creations PRECISION TIP Applicator Bottle
Shop at:
SSS | AMZ
3M Scotch PINK ATG ADVANCED TAPE GLIDER
Shop at:
SSS | AMZ
ZIG Wink of Stella GLITTER CLEAR Brush Tip Marker
Shop at:
SSS | AMZ
PPP SILVER MINI STAR Sequins
Shop at:
SSS
Doodlebug LILY WHITE Sequins
Shop at:
SSS
Doodlebug BEETLE BLACK Sequins
Shop at:
SSS
Pretty Pink Posh SPARKLING CLEAR MIX
Shop at:
SSS

Friday, November 29, 2013

Winter Wonderland - A 3D Lit Winter Wall Decoration | SVGCuts

Did you have your first snowfall yet? Here in Edmonton we've had it for about a month now! Last week it came down pretty hard. Even though we all complain about the cold weather, Winter is actually quite beautiful! It was also the inspiration for my latest project... A 3D Lit Winter Wall Decoration. 

Isn't it "Cool"?!?

Winter Wonderland - A 3D Lit Winter Wall Decoration | SVGCuts Files


In order to make it a Wall Decoration, I added a hole to the backside from which to hang it from. Also on the bottom of the back panel, I created a cut out that folds open to allow you to insert some battery operated tea lights. This frame looks just as good as a tabletop decoration if you chose not to hang it. 
This is what it looks like with a soft glow during the day. 

Winter Wonderland - A 3D Lit Winter Wall Decoration | SVGCuts Files

Here is the list of files you will need to recreate this project:

Letter O (altered, and used to make the frame) - SVG Cuts - 3D Letters SVG Kit
Snowflakes - SVGCuts 
Winter Wonderland - SVG Cuts - Free Designs

To create the Frame - I enlarged the letter O from the 3D Letters and altered the front and back pieces of it. (see the second image)

For the Front - I selected random snowflakes and if they didn't have an offset to them I created one. I then centered the "Winter Wonderland" within the center of the "O". Next, I placed snowflakes all around the empty spaces. Once I was happy with their placement, I welded only the offset of my snowflakes with the outside "O" frame. I then cut out all the pieces and decorated each of them with glitter and rhinestones. Each snowflake was glued onto its offset. For embellishments, I added a ribbon and sequin trim to finish it up. 

This frame measures 11.25" W x 10.5" H
All cut on the Silhouette Cameo

 TIP: Go easy on the glue when adding glitter to your snowflakes. Paper tends to curl when wet. To avoid the curl, you can also use the Xyron sticker maker to add a layer of tackiness, then glitter!

And now in complete darkness! COOL right?
I love to make things light up :)

Winter Wonderland - A 3D Lit Winter Wall Decoration | SVGCuts Files

I hope you enjoyed my Winter Wonderland Wall Decoration!

If you like this idea but want to make it more personal,  it's easy to change the Word Art in the center. It could say, "Merry Christmas" "Happy Holidays" in English or a different language. Make it personal, with your Family's Last name or as a gift for someone else... the possibilities are endless!

Thanks for stopping by!
Happy Crafting  :)