Friday, July 27, 2012

Personalized Etched Glass Souvenirs | DIY

It's almost time for our Portugal vacation!!! Can't wait to see all our family! I didn't realize how much Canada stuff I had bought to give away, I think I'm going to have a suitcase full just in souvenirs! I hope I have enough room for everything! Hopefully, I'll be able to get some blogging time of my adventures there, if not I have scheduled posts for while I'm gone!


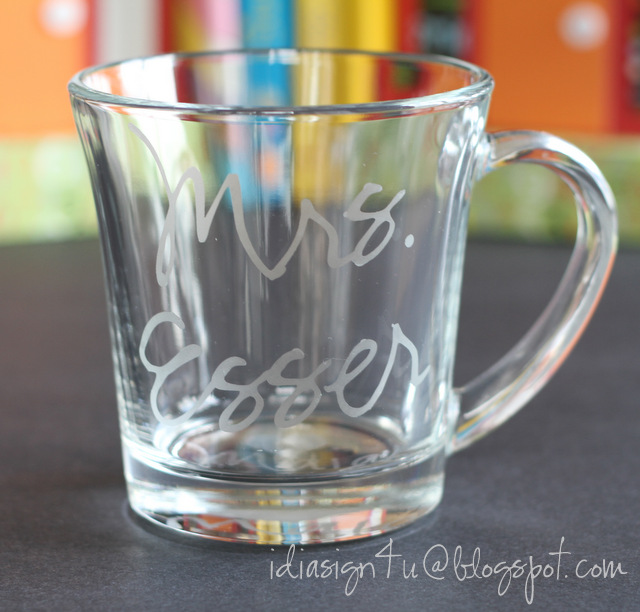
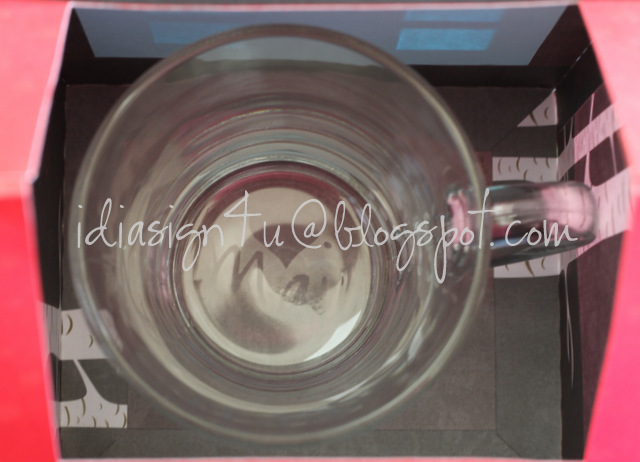
Anyways, I always find it hard to decide on what to take everyone. So for a few people that I know love crafts I decided I would make them a personalized etched glass mug. This one is for my Aunt Judite (Judith in Portuguese)! Hope she likes it, I know she loves crafting so I know she will appreciate it!


On the backside of the mug I added a maple leaf!


 Love how it turned out. If you want to know how I did this check out my previous blog posts on etched glass projects! Here, here, and here!

Happy crafting everyone :)

Tuesday, July 24, 2012

DIY No Sew Floral Headband

I've been wanting to try this out for so long. Today I finally had to do it! When I get something in my head I won't rest until it gets done so, while I made supper and did some laundry, (no time to waste, lol) here is what I made...  my first fabric floral headband for my daughter. The best part was that it was a no-sew project. It literally took 10 mins to make!

DIY No Sew Floral Headband

I used an old summer dress of hers that was way too small and had ripped seams in so many places. I really didn't feel like fixing it :(


I started off by cutting strips of fabric. 1 inch wide by as long as I could go with the fabric I had.


Start by tying a knot.


Twist the fabric around itself and then wrap it around the knot. Use hot-glue to adhere to the back of the flower as it gets bigger.


Tuck the end of the fabric underneath the flower and glue it in place.

DIY No Sew Floral Headband

Once you have all your flowers done, arrange them how you like and glue them to a felt backing. Then choose your headband (I just used and elasticized band) then used felt to secure it in place. And voila a brand new OK recycled headband! I'm sure I'll be making more of these :)

 Happy crafting!

Friday, July 20, 2012

Wedding Invitation turned Wedding Card | DIY

What do you do with wedding invitations after you have been to the wedding? I usually keep them for a while and then like anything else they end up in the recycling bin :(

Well just so happened that we are going to a wedding tomorrow and I completely forgot I didn't have a card yet so I thought well why not use the card stock from the invite. That way it for sure would coordinate with the wedding itself! So easy and simple, it saved me so much time trying to pick papers! I wished I had taken a picture of the invite itself, so you could see the difference, oops next time! Hopefully, the couple won't take offense to me taking their invitation apart, lol!

Wedding Invitation turned Wedding Card | DIY

I used today's freebie from My Scrap Chick - Blooming Mum, and cut it out with my Silhouette Cameo. Isn't it pretty?  

I love how it turned out and how quick it came together!

Hope you all have a wonderful weekend!


Thursday, July 12, 2012

DIY Party Hat, Birthday Card and 3D Number Keepsake | Olivia's 1st Bday Party | SVGCuts

My Niece Olivia is turning 1 next week! So I thought I would have some fun making her some paper goodies for her party! My Sister in law (also very crafty) is decorating the event with pink and green and turns out I just had the perfect paper stack to coordinate with for her party! I love this paper, it comes from the DCWV Cherry Limeade Stack.

DIY Party Hat, Birthday Card and 3D Number Keepsake | Olivia's 1st Bday Party | SVGCuts
 I used the files from SVG Cuts HAPPY BIRTHDAY TO YOU SVG KIT, and their 3D NUMBERS PARTY SVG KIT. I love how it all turned out! Everything was cut using my Cameo.

DIY Party Hat, Birthday Card and 3D Number Keepsake | Olivia's 1st Bday Party | SVGCuts

Pictured above is the card I made for Olivia... I combined a few files from the HAPPY BIRTHDAY TO YOU SVG KIT to create this card. I'm not much of a card maker but just love how it tuned out!!! I think I will just have to enter it in the SVG Cuts Facebook Challenge for the Summer, wish me luck! The competition is amazing :)

DIY Party Hat, Birthday Card and 3D Number Keepsake | Olivia's 1st Bday Party | SVGCuts

And here is O's party hat! Isn't it adorable?! 

DIY Party Hat, Birthday Card and 3D Number Keepsake | Olivia's 1st Bday Party | SVGCuts

Finally the number 1... a great keepsake from the party! I know she won't remember her party, but when she looks back at photos when she's older I'm sure she'll love it!

I hope this has inspired some of you to pretty up your next party!

Monday, July 9, 2012

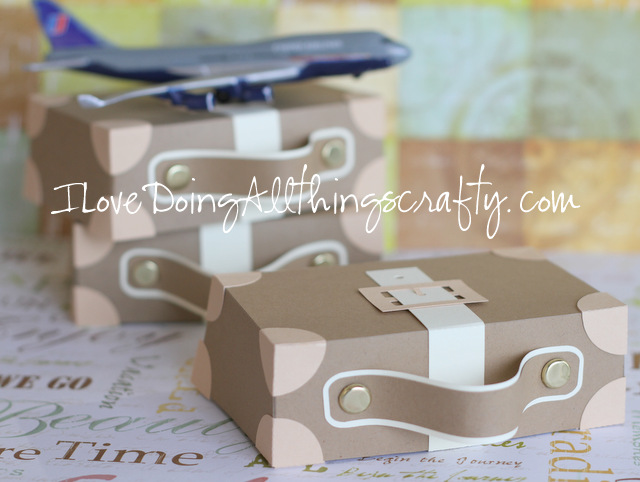
"All my bags are packed, I'm ready to go..." | 3D Paper Suitcase Treat Box Silhouette Studio File | Free Download

Every time I pack a suitcase, I think of this song... not that I'm packing, well not yet anyway. We will be leaving soon enough to visit our family in Portugal! So excited can't wait, my son is already there with my In-laws and I miss him terribly, and even though his sister hates to admit it she misses him too!

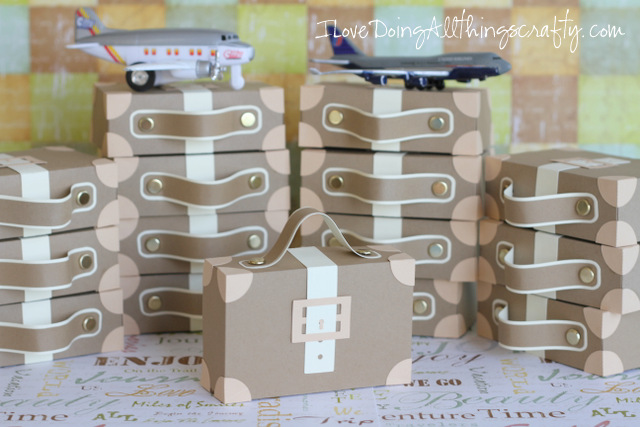
Ok, ok, now back to the fun stuff!!! My cousin Marisa, asked me if I could make her a suitcase out of paper for her son Marko's 1st Birthday Party. Her theme for his party is travel by plane, train, or car... so a suitcase is what she chose to fill as a goody bag/treat for every child! That meant I would have to make 15 of them! Wow, anything for you Marisa, good thing I love soooo much!!!

It probably would have been a lot easier if I had bought a suitcase file, but if know me I always like to do things the hard way! I made this file with the Silhouette Designer Studio Edition Software. I'm so used to using SCAL, so this was a bit more challenging for me... but I think it turned out pretty well!


"All my bags are packed, I'm ready to go..." | 3D Paper Suitcase Treat Box Silhouette Studio File | Free Download

 Cute right?!
"All my bags are packed, I'm ready to go..." | 3D Paper Suitcase Treat Box Silhouette Studio File | Free Download

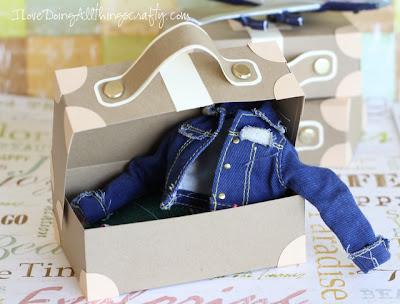
The suitcases measure
4.5x3x1.5 inches. Big enough to hold some treats for the kiddos! Or as you can see here big enough for Barbie's clothes, lol!


Hope she likes them! I love how they turned out! Too bad I'm sure they won't last more than a few minutes in kiddy hands... :(

"All my bags are packed, I'm ready to go..." | 3D Paper Suitcase Treat Box Silhouette Studio File | Free Download

So I'll finish with the end of the song, cause it still continues to play in my head! Bah!!!, don't you just hate when you can't rid of a song in your head, lol!

 "And I'm leaving on a jet plane,
I don't know when I'll be back again,
Oh, babe, I hate to go!"
I'm happy to share with you this suitcase file but,
Before you download...
My free files RULES!!!

  1. If you choose to download all I ask is you become a follower.
  2. Note my files are for personal use only! (Personal use means... only for you to use (no trading, or sharing of my files... let me do that!) 
  3. If you want to share, send your friends over to my blog for the download. 
  4. I'm OK with people sharing my files on their own sites as long as there is a direct link back to this blog...Give credit where credit is due! (a message to me would also be appreciated)
Suitcase box - .studio (Silhouette) file

Tuesday, June 26, 2012

DIY Credit Card Wallet | Holder for All Loyalty/Credit Cards

This one is for all the shoppers out there!!! I think your just going to love this idea! 
If you are anything like me you have a ton of cards taking up precious space in your already crowded wallet! NOT anymore!!!!

About 2 years ago now I had an idea to make a credit card wallet after working on some pockets that I had created for a mini album. I actually sold them on Etsy, but since I closed the shop down I thought I would share the idea with everybody!

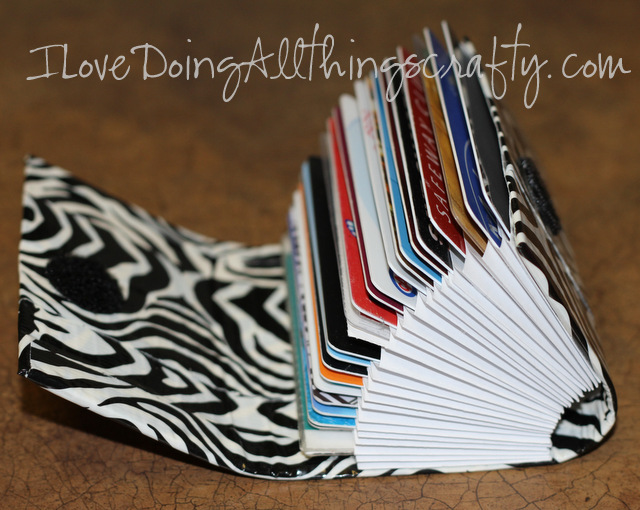
Here is my original card wallet... was getting pretty worn out! Even though it was made out of paper, I'm surprised it lasted this long! You would not believe how many compliments and inquiries I've had on it!!! 

DIY Credit Card Wallet | Holder for All Loyalty/Credit Cards

While I was shopping at Home Depot on the weekend with my DH, I saw decorative duct tape... I had seen it many times before but it wasn't until then that I had my light bulb moment!  Why not line my card stock with duct tape! Brilliant... It would now last forever! Or until I get sick of the pattern, lol!

So here is how to make your own... 

DIY Credit Card Wallet | Holder for All Loyalty/Credit Cards
Supplies:
  • double-sided tape
  • duct tape (I guess if your a guy you might like the regular kind, hehe)
  • envelopes (I bought mine at the dollar store, but you could probably use recycled ones) 
  • a piece of scrap card stock
DIY Credit Card Wallet | Holder for All Loyalty/Credit Cards
  1. First I cut my envelope ends to 4.5 x 9.2 cm or for my US friends, 1 3/4 x 3 5/8 inches ( I used 25 pockets for this wallet)
  2. I then applied my double-sided tape around the outer edges of the pocket (make sure to go as close to the top and bottom edge as possible, but not the sides... come in about 3mm or 1/8 of an inch from the outer edge)
  3. Line it up with the next pocket and adhere them together, ensure it is all lined up and that the opening of the pockets is in the same direction!

DIY Credit Card Wallet | Holder for All Loyalty/Credit Cards

Repeat until all pockets are glued together.

DIY Credit Card Wallet | Holder for All Loyalty/Credit Cards

Next, take the scrap card stock, and cut it to 20 x 9.5 cm or 8 x 3 3/4 inches, then place the edge of the paper or the sticky side of the duct tape.

DIY Credit Card Wallet | Holder for All Loyalty/Credit Cards

Next cut a little slit on the duct tape where the paper ends and fold the duct over on to itself. 

DIY Credit Card Wallet | Holder for All Loyalty/Credit Cards

Then take that same piece of duct tape and adhere it to the paper. Bend over the edge of the duct tape that remains and this will create a nice clean outer edge...  (Confused yet??? I would be! lol! Hopefully, the pics are self-explanatory!) 

DIY Credit Card Wallet | Holder for All Loyalty/Credit Cards

Repeat the last step for the other side.

DIY Credit Card Wallet | Holder for All Loyalty/Credit Cards

Continue by cover the remaining paper down the middle (ensure you cut a piece long enough to cover the other side as well)

DIY Credit Card Wallet | Holder for All Loyalty/Credit Cards

Next glue the pockets to the inside bottom of the duct tape layer, making sure to align the top edges.

DIY Credit Card Wallet | Holder for All Loyalty/Credit Cards

Then wrap the duct layer all the way around the pockets until it overlaps on the front of the wallet leave enough room for the wallet to expand and for the credit cards to stick out at the top. Then adhere the back of the pockets to the inside of the duct tape layer.

DIY Credit Card Wallet | Holder for All Loyalty/Credit Cards

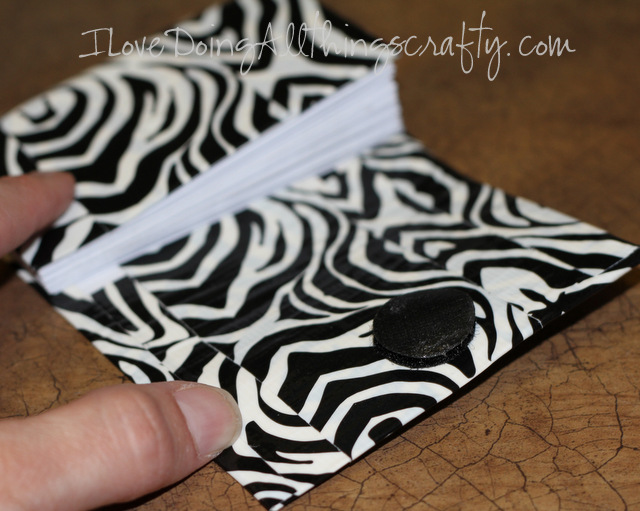
To secure it closed I used a Velcro dot. The easiest way to ensure that the dots line up is to take both top and bottom pieces of Velcro and center it on the inner lid of the wallet, then fold it closed.

DIY Credit Card Wallet | Holder for All Loyalty/Credit Cards

Once you open it the dot will be left on the other side of the wallet! EASY right?!

DIY Credit Card Wallet | Holder for All Loyalty/Credit Cards

Finally, fill with all your plastic! (I use this for the cards I don't use every day, the important ones are kept in my main wallet!)

DIY Credit Card Wallet | Holder for All Loyalty/Credit Cards

There you go... just pull it out when you need to!

DIY Credit Card Wallet | Holder for All Loyalty/Credit Cards

Fits perfectly in a side pocket of my purse ;)

DIY Credit Card Wallet | Holder for All Loyalty/Credit Cards

I hope you like this tutorial and if you make one I would love to see it!

Happy crafting!


UPDATE
February 10, 2017
Check out VERSION 3 of the DIY Credit/Loyalty Card Duct Tape Wallet
or watch me make it on YouTube!


Sunday, June 24, 2012

Facebook page is live!

Hi all! I hope everybody is having a wonderful weekend! 


I'm so excited to share with you, my new Facebook page! Just another way to connect with all my craft blogging buddies and followers! 

Just click on the side button that says Facebook (kinda hard to miss!) and "LIKE" my page! Easy right?

Before I shared it with the world, I wanted to add a bunch of projects to the page. So, I loaded it up with pictures of previous work I had done prior to having a blog and more recent post ones. Hope you "LIKE" my page, and visit me often...  here on my blog, or there with me on Facebook! Leave me a comment or just say HI!... Sometimes I just need to know I'm not just talking to myself, lol!

Have a great Sunday!


Friday, June 22, 2012

DIY Personalized Glass Etched Mugs

DIY Personalized Glass Etched Mugs by ilovedoingallthingscrafty.com

In my previous post, I had shown you the gifts I made for the teachers. So I thought I would share with you some pictures of how that was done. Also please refer to my posts on other etched glass projects I have done, here and here.

DIY Personalized Glass Etched Mugs by ilovedoingallthingscrafty.com

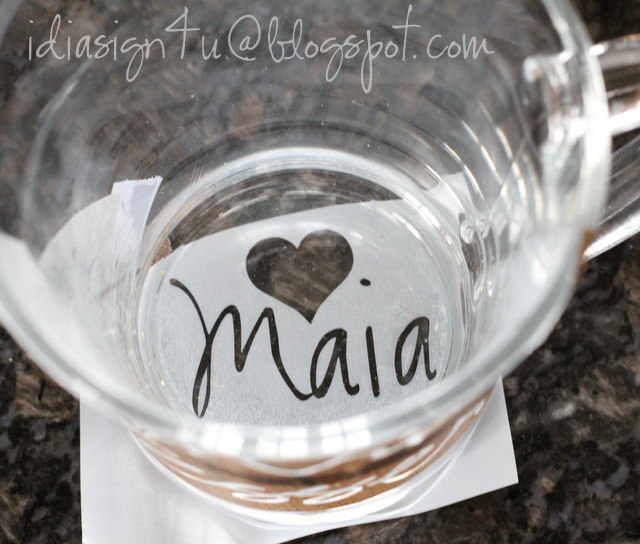
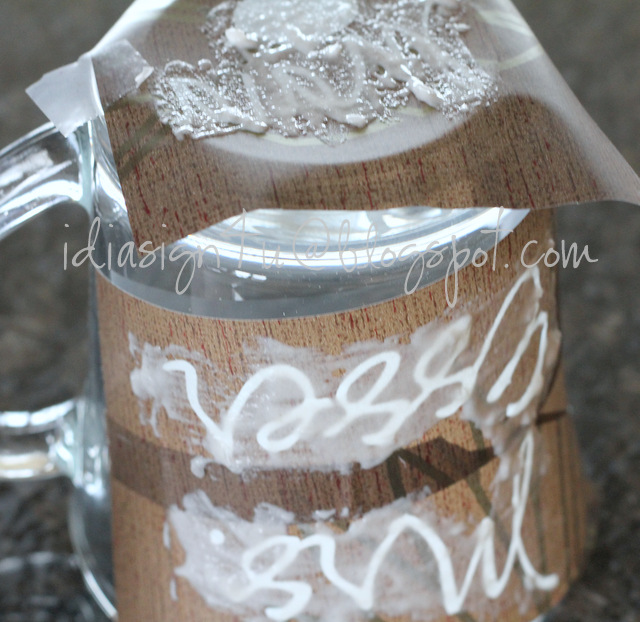
First I cut out the image I wanted from contact paper, with the Silhouette Cameo. No need to use up expensive vinyl especially if it's going to get thrown out!

DIY Personalized Glass Etched Mugs by ilovedoingallthingscrafty.com

Then I applied etching cream very liberally to the exposed areas with a paintbrush. Then just followed the directions on the Armour Etch bottle. Removed the contact paper and rinsed off the cream. 

DIY Personalized Glass Etched Mugs by ilovedoingallthingscrafty.com

There you have it sooooo simple and pretty quick to make! The perfect gift for a teacher or for yourself, just add your name or whatever else you like!

 Happy crafting, have a great weekend!


3D Paper School House Treat Boxes for Teachers | SVGCuts

Yeaaaaah! School is almost done!!! My kids are so excited for the summer holidays to begin... they have started the countdown a while ago, LOL! 

My son is even more excited he gets to miss the last week of school... even though they are the fun school days, he really doesn't care! He leaves tonight with my In-laws for Portugal! He is so excited, I'm sure going to miss my little man :'( Well join them there in August!

So because today was his last day of school I wanted him to give his teacher a little gift to thank her for all her help this year... (I think teachers have the hardest job! They deserve so much more!!!) Of course I made the same gift for my daughter's teacher, but she won't receive it until next week! Hopefully, Mrs. Stiksma doesn't show Mrs. Esser, LOL!

3D Paper School House Treat Boxes for Teachers | SVGCuts by ilovedoingallthingscrafty.com
 Aren't the School Houses adorable!!! The cutest part is that they are totally functional, flip open the roof and they are gift boxes! Fill them up with goodies and they could also be used as bookends :)  What teacher would love them? 

3D Paper School House Treat Boxes for Teachers | SVGCuts by ilovedoingallthingscrafty.com

The files I used come from SVG Cuts SCHOOL DAYS SVG KITLOVE their files!!! (I did have to enlarge the files to accommodate the size of my gifts) The cardstock comes from DCWV, the Grade School Stack, all cut with the Cameo.


3D Paper School House Treat Boxes for Teachers | SVGCuts by ilovedoingallthingscrafty.com

Used the apple file to make a tag!

3D Paper School House Treat Boxes for Teachers | SVGCuts by ilovedoingallthingscrafty.com


3D Paper School House Treat Boxes for Teachers | SVGCuts by ilovedoingallthingscrafty.com

And here is what goes inside the gift box! Love personalized gifts... just makes it that more special! Thank you, Mrs. Esser! Maia is sure going to miss you!!!

3D Paper School House Treat Boxes for Teachers | SVGCuts by ilovedoingallthingscrafty.com

Thank you Mrs. Stiksma! Tomas adores you and will miss you very much!

3D Paper School House Treat Boxes for Teachers | SVGCuts by ilovedoingallthingscrafty.com

Etched the bottom of the glass with the kids' names :)

3D Paper School House Treat Boxes for Teachers | SVGCuts by ilovedoingallthingscrafty.com

A perfect fit inside the School House gift box! Add tissue paper and perhaps a coffee gift card and DONE!

3D Paper School House Treat Boxes for Teachers | SVGCuts by ilovedoingallthingscrafty.com

I'll post some pics of how I etched the glass mugs in my next post!

Thanks for stopping by,