Hello, my friends!
I am back again today with a second blog post, this time for my first post as an official team member of the Hero Arts Global Team! YAY!!!💃
My cards feature the My Monthly Hero Kit for NOVEMBER 2021 which is already SOLD OUT! What!?! Can you believe it?! Wow, that went fast, so I hope you were one of the lucky ones to get your hands on one. Also, remember there are the Awesome Add-Ons that are still available! I will be sharing a few more cards throughout the month using them as well. So let's get on with sharing these fun cards.
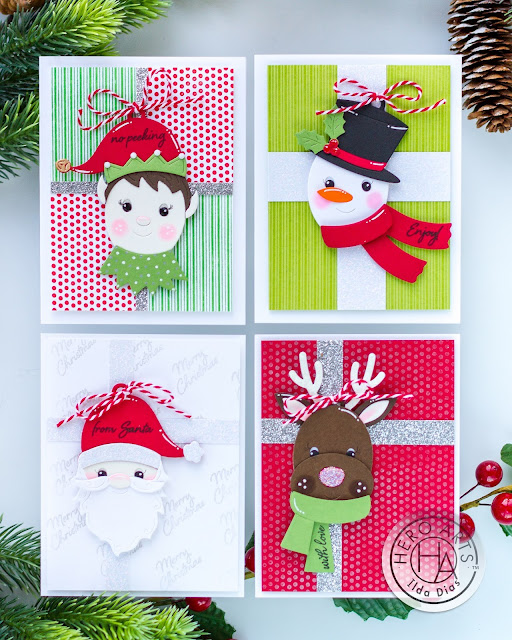
The idea behind this card set was to make the cards look like Christmas presents. All the cards came together using the same process, I will explain the first card and then share the differences along the way so I am not repeating myself.
For this first card, I pieced together the Santa.
- To his hat, I used pieces of white glitter paper.
- Stamped the sentiment on his hat using Intensified Black Ink.
- Added color to his nose and cheeks using RV10 Copic marker.
- Added white gel pen details, and drew tiny eyelashes with a black detail pen.
- Tied the Holiday Twine onto the Hat Loop.
For the card base and panel.
- Stamp the Merry Christmas Sentiment on the card panel using Versamark Ink.
- Then rub the surface of the card using perfect pearls confetti white to give it a hint of shine.
- Trim a couple of pieces of white glitter paper cardstock to create the illusion of the ribbon tied onto the present (whatever width you like).
- Trim panel.
- Pop Santa over where the area the "ribbon" crosses on the bow.
- Attach to the card base using a foam tape layer.
For the Snowman, the only unique difference here is that I used the inside earpiece of the deer antler die-cut to create a nose for "Frosty".
To the background, I used the lined stamp to stamp out the line on a green piece of cardstock using the Green Apple Mini Reactive Ink.
For the Reindeer Card, I stamped the background again with the Dots stamp with Versmark Ink and added the Perfect Pearls over top. For the "ribbon" I used silver glitter cardstock.
To the nose, I added some Glossy Accents and then sprinkled Fine Glitter over the top while it was still wet. The antlers also have a layer of glitter using the Sparkle Clear Lacquer Pen.
And finally last Elf Card. The difference here is in the background as I used both stamps and two different colors.
Added details include gold and silver gelly pen details, and white gem stickers to the points on the hat.
I hope this set of Christmas Present Card Set featuring the My Monthly Hero Kit inspired you. There are so many possibilities for these darling dies. I can't wait to see what you all make with this kit! Let me know in the comments below if you have any questions. I am always happy to help!
Also, a reminder for all My Monthly Hero subscribers. You have the opportunity to add extra items, including but not limited to add-ons, to your kit shipments with no additional shipping charges. Simply log in to your Hero Arts store account and place your order by 11:59am PT on Thursday, November 4 to take advantage of this offer. If you are not subscribed already make sure you do so you don't miss out next time!
To make supplies easy for you to find, I have linked them above. If something is no longer available I will link to a similar product. Affiliate links may be used depending on the product linked. Please help support my blog by using these links while shopping at no additional cost to you. For more information about the affiliates I use, please visit my disclaimer here. Thanks so much for all your support!


