Monday, January 25, 2021

Birthday Fortune Cookies Card | Honey Bee Stamps


***Please note links in the post are no longer active, if you are looking for something specific use this link here to 👉 HONEY BEE STAMPS and search for the product listed. My apologies for the inconvenience and thanks in advance for using my link ***

Happy Monday crafty Friends. 

I have a super cute interactive Birthday card to share with you today featuring the new Fortune Cookie collection from Honey Bee Stamps

CARD DETAILS

To start, I die cut all the pieces for the Fortune Cookies using the FORTUNATE COOKIE SLIDER dies and scrap pieces of different shades of brown cardstock. I then pieced them together.


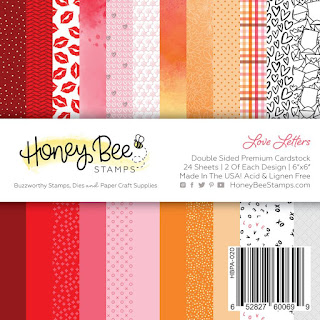
The next thing I did was choose the piece of cardstock for the background. I really liked this pink xoxo pattern that comes from the LOVE LETTER PAPER PAD. The piece was then trimmed to an A2 size panel.

Rather than using the slider die, I chose to create a small slit in the center of the paper for my fortune message to slip into. To do this I stamped the "So Lucky to know you" fortune on one of the banners from the FORTUNATE TO HAVE YOU set by creating a partial die cut of the banner so that I could extend the length of it. I then hand cut the remainder of the banner, slid the banner through the slit, and then glued one end onto one-half of the fortune cookie. On the backside of the pattern paper, I added a little scrap piece of paper to the end of the banner so that when pulled out the banner wouldn't slide out completely. I then glued the panel to the card base avoiding any glue around the area the banner would be sliding through. I did not use foam tape as it moved ok without the added space.


I then just covered up the slit area with the other half of the Fortune Cookie.

The other two fortune cookies also have an interactive banner that slides out as well. On the bottom left one, the fortune comes out completely but slides back into place easily and the bottom right one has the built-in stopper banner. They are all fun to pull and play with.

For the sentiment, I used the BEE BOLD ALPHABET CUTS to spell out PICK and then added the "a fortune" form the FORTUNATE TO HAVE YOU that was stamped on black cardstock and heat embossed in white and then die cut using the coordinating FORTUNATE TO HAVE YOU DIES. To each letter, I then added a light layer of glue to the top half and dipped it in glitter.


To finish off the inside of this birthday card, I stamped out the birthday fortune from the FORTUNATE TO HAVE YOU set and added a little die-cut heart from the FORTUNATE TO HAVE YOU DIES set.


Here is a fun little clip of the card in action.


I hope you find a happy fortune today and hope this Birthday Fortune Cookies Card inspired you. Thank you for stopping by and until next time... Happy Crafting!

SUPPLIES
FORTUNATE TO HAVE YOU BUNDLE
Shop at:
HBS
FORTUNATE COOKIE SLIDER
Shop at:
SSS | SB | HBS
FORTUNATE TO HAVE YOU
Shop at:
SSS | SB | HBS
FORTUNATE TO HAVE YOU DIES
Shop at:
SSS | SB | HBS
BEE BOLD ALPHABET CUTS
Shop at:
SSS | SB | HBS
LOVE LETTER PAPER PAD
Shop at:
SSS | SB | HBS
BEE CREATIVE GLUE
BEE CREATIVE GLUE
Shop at:
SSS | SB | HBS
MINI MISTI
MINI MISTI
Shop at:
SSS | SB | HBS
GEMINI JR. DIE CUTTER
Shop at:
SSS | SB
BLACKOUT INK
BLACKOUT INK
Shop at:
SSS | HBS | IO3
ATELIER SHARK TOOTH
ATELIER SHARK TOOTH
Shop at:
SSS | IO3
ARCTIC WHITE POWDER
ARCTIC WHITE POWDER
Shop at:
SSS | IO3
SPARKLE GLITTER
SPARKLE GLITTER
Shop at:
SSS | SK
PenBlade - 3 Pack Stainless Steel Craft Knives
Shop at:
SSS | AMZ
FOAM TAPE - WHITE
FOAM TAPE - WHITE
Shop at:
SSS | SK
To make supplies easy for you to find, I have linked them above. If something is no longer available I will link to a similar product. Affiliate links may be used depending on the product linked. Please help support my blog by using these links while shopping at no additional cost to you. For more information about the affiliates I use, please visit my disclaimer here. Thanks so much for all your support!

Friday, January 22, 2021

Valentine's Day Rainbow Heart Cards | Studio Katia

Valentine's Day Card, Rainbow, Heart Cards, Studio Katia, Card Making, Stamping, Die Cutting, handmade card, ilovedoingallthingscrafty, Stamps, how to,Ink Blending,Atelier Inks,

Happy Friday Friends. I hope you have had a safe and wonderful week.

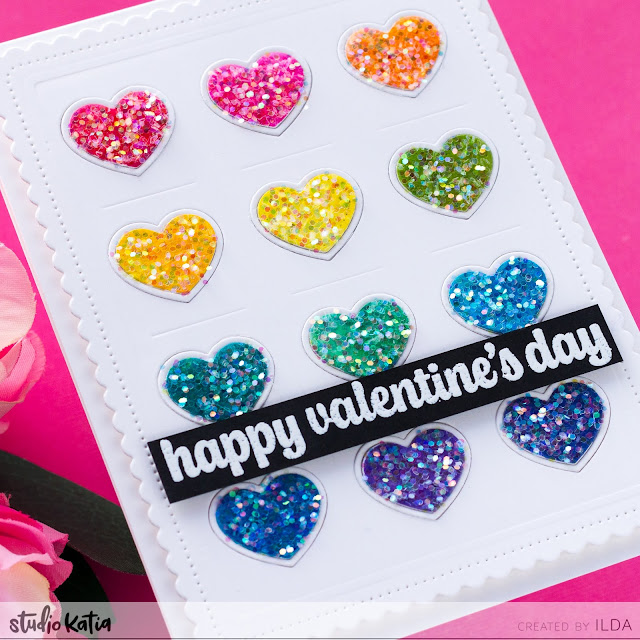
Today's cards are once again rainbow inspired. As you all must know by now, I love rainbows and today's Valentine Day cards reflect that. I must however apologize as I did not realize that the SCALLOP HEARTS COVER and the LOOPS: CREATIVE DIES are SOLD OUT! So if you already own them then hopefully this will inspire you today and if you don't I'm sure you could achieve similar results with some creativity. 

CARD DETAILS

To begin, I die cut the SCALLOP HEARTS COVER twice in order to make two cards and just set the extra pieces aside. I then removed the hearts and heart frames from the openings. Next, I used a variety of Atelier inks to blend out each heart. I then separated the hearts from the outer heart frames. 

Valentine's Day Card, Rainbow, Heart Cards, Studio Katia, Card Making, Stamping, Die Cutting, handmade card, ilovedoingallthingscrafty, Stamps, how to,Ink Blending,Atelier Inks,

To each heart, I then painted on a little layer of  STUDIO KATIA GLUE and then dipped the heart into  CHUNKY SPARKLE GLITTER. I then glued the hearts from the other card I had cut out back into the heart spaces and then stacked the glittery colored hearts in rainbow order back onto the card front. 

Valentine's Day Card, Rainbow, Heart Cards, Studio Katia, Card Making, Stamping, Die Cutting, handmade card, ilovedoingallthingscrafty, Stamps, how to,Ink Blending,Atelier Inks,

The sentiments come from the HAPPY CELEBRATIONS set that was stamped on black cardstock and heat embossed in white. I then stuck foam under the sentiment strip and added it to the card panel that I then glued onto the card base.

Valentine's Day Card, Rainbow, Heart Cards, Studio Katia, Card Making, Stamping, Die Cutting, handmade card, ilovedoingallthingscrafty, Stamps, how to,Ink Blending,Atelier Inks,

For this next card when I die cut the SCALLOP HEARTS COVER panel, I removed the scalloped frame for a different look. I then glued on the thin dotted frame from the LOOPS: CREATIVE DIES.

Valentine's Day Card, Rainbow, Heart Cards, Studio Katia, Card Making, Stamping, Die Cutting, handmade card, ilovedoingallthingscrafty, Stamps, how to,Ink Blending,Atelier Inks,

I had previously removed the hearts from this panel to use on my previous card. To the back of the panel, I then glued on a piece of acetate, added a foam border along the outer edge, and glued it onto the card base that was filled with some SPARKLING HEARTS CONF. GLITTER

Valentine's Day Card, Rainbow, Heart Cards, Studio Katia, Card Making, Stamping, Die Cutting, handmade card, ilovedoingallthingscrafty, Stamps, how to,Ink Blending,Atelier Inks,

To finish off the card front, I then added the heart frames to each window in rainbow order. The sentiment stamp I used comes from the GIFT TAG GREETINGS: VALENTINES set that was also stamped on black and heat embossed in white. The piece was then trimmed and foam mounted on top of one of the hearts.

Valentine's Day Card, Rainbow, Heart Cards, Studio Katia, Card Making, Stamping, Die Cutting, handmade card, ilovedoingallthingscrafty, Stamps, how to,Ink Blending,Atelier Inks,

The last thing I did was add some pearls for an extra pop of color. I hope these Valentine's Day Rainbow Heart Cards inspired you today. These both could be used for any occasion simply by changing out the greeting.

Thank you for stopping by and until next time... Happy Crafting!

SUPPLIES

SCALLOP HEARTS COVER
Shop at:
SSS | SK
LOOPS: CREATIVE DIES
Shop at:
SSS | SK
HAPPY CELEBRATIONS
HAPPY CELEBRATIONS
Shop at:
SSS | SK
GIFT TAG GREETINGS: VALENTINES
Shop at:
SK
CLEAR ACETATE SHEETS
Shop at:
SSS | SK
LEMON BURST PEARLS
LEMON BURST PEARLS
Shop at:
SSS | SK
MOSS GREEN PEARLS
MOSS GREEN PEARLS
Shop at:
SSS | SK
AMETHYST PEARLS
AMETHYST PEARLS
Shop at:
SSS | SK
CHUNKY SPARKLE GLITTER
Shop at:
SK
SPARKLING HEARTS CONF. GLITTER
Shop at:
SSS | SK
INK BLENDER BRUSHES
INK BLENDER BRUSHES
Shop at:
SSS | SK
EMBELLISHMENT WAND
EMBELLISHMENT WAND
Shop at:
SSS | SK
STUDIO KATIA GLUE
STUDIO KATIA GLUE
Shop at:
SSS | SK
FOAM TAPE - WHITE
FOAM TAPE - WHITE
Shop at:
SSS | SK
ATELIER SHARK TOOTH
ATELIER SHARK TOOTH
Shop at:
SSS | IO3
NEENAH SOLAR WHITE 110
Shop at:
SSS | AMZ | HBS
MINI MISTI
MINI MISTI
Shop at:
SSS | SB | HBS
GEMINI JR. DIE CUTTER
Shop at:
SSS | SB
ARCTIC WHITE POWDER
ARCTIC WHITE POWDER
Shop at:
SSS | IO3
ATELIER SWEET PETUNIA
Shop at:
SSS | IO3
ATELIER MARILYN RED
ATELIER MARILYN RED
Shop at:
SSS | HBS | IO3
ATELIER MARIGOLD ORANGE
Shop at:
SSS | HBS | IO3
ATELIER BEE STING YELLOW
Shop at:
SSS | HBS | IO3
ATELIER GODDESS GREEN
Shop at:
SSS | HBS | IO3
ATELIER TRINITY TEAL
Shop at:
SSS | IO3
ATELIER PEACOCK BLUE
Shop at:
SSS | HBS | IO3
ATELIER MY PURPLE JAM
Shop at:
SSS | HBS | IO3
To make supplies easy for you to find, I have linked them above. If something is no longer available I will link to a similar product. Affiliate links may be used depending on the product linked. Please help support my blog by using these links while shopping at no additional cost to you. For more information about the affiliates I use, please visit my disclaimer here. Thanks so much for all your support!