 Boo Shop at: SSS | SB | HBS |
 Boo Dies Shop at: SSS | SB | HBS |
 BUSY BEE Shop at: SSS | SB | HBS |
 BUSY BEE DIES Shop at: SSS | SB | HBS |
 THE NAME'S JACK | HONEY CUTS Shop at: SSS | SB | HBS |
 TAILGATE ALPHABET DIES Shop at: SSS | SB | HBS |
 SLIMLINE SENTIMENT STITCHED Shop at: SSS | SB | HBS |
 Scattered Leaves Stencils Shop at: SSS | SB | HBS |
 Background Blender Brushes Shop at: SSS | HBS |
 Intense Black Ink Shop at: SSS | SB | HBS |
 Bee Creative Glue Shop at: SSS | SB | HBS |
 GEMINI JR. DIE CUTTER Shop at: SSS | SB |
 Vellum Value Pack Shop at: SSS | AMZ |
 Shark Tooth White Atelier Ink Shop at: SSS | IO3 |
 JUICY INK Shop at: SSS | HBS | IO3 |
 GOLD RUSH EMB. PWD. Shop at: SSS | IO3 |
 METALLIC WATERCOLORS Shop at: SSS | PIGM |
 GOOGLY EYES Shop at: SSS |
 Foam Squares Shop at: SSS | HBS |
Monday, October 18, 2021
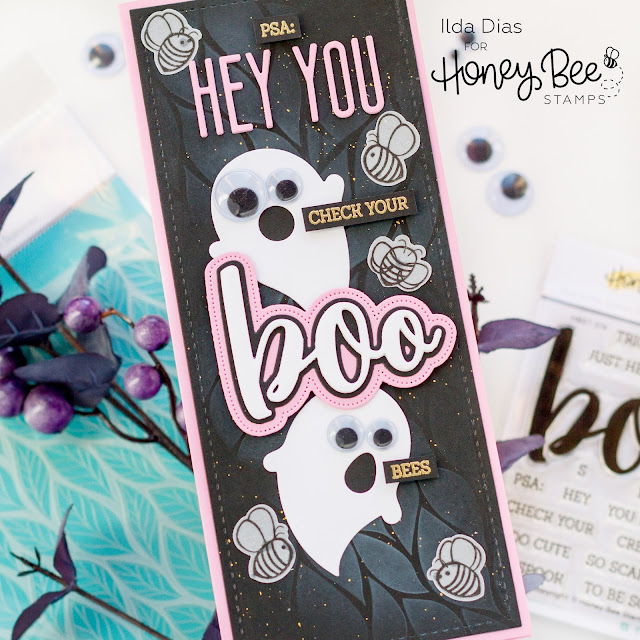
Check Your Boo Bees Slimline Card | Honey Bee Stamps
***Please note links in the post are no longer active, if you are looking for something specific use this link here to 👉 HONEY BEE STAMPS and search for the product listed. My apologies for the inconvenience and thanks in advance for using my link ***
Hello, my Crafty friends!
Today's card is kind of a Public Service Announcement as well as a punny not so funny card if you know what I mean.
October is Breast Cancer Awareness month as well as the obvious Halloween Month. So I thought it would be fun to mash the two.
As you may or may not know I don't just make cards, I also am an Oncology Nurse in my day or evening job (depending on what shift I'm working). Did you know breast cancer is the most commonly occurring cancer in women and is the second most common cancer overall! Also, it is rare but it can also happen in men. It's true I have had male breast cancer patients. So please, do your diligence and get your tata's checked, and while you are at it check everything else. I like to think of October as a reminder to look at when I have to book my next Mammogram and check-up.
Ok enough serious talk, let's look at this slimline Boobee card! Get it, Boo Bees... LOL! I crack myself up sometimes and laugh at my one jokes 😂 life is too serious!!!
I began by adding white ink blending to the black slimline panel by using the top layer of the Scattered Leaves Stencils. Don't they kinda look like ghosts shapes? For a pop of color and some sparkle, I splattered some gold onto the background panel.
I then die-cut all the elements I needed to put it all together. The Ghosts, the Boo Buzz word, and the letters. See all the supplies linked below.
Finally, I stamped out the bees onto vellum, to give them a ghostly look and then stamped out the sentiments that were then heat embossed in gold.
I hope no one takes offense to my card today. I love punny cards and hope you do too. If time permits I will share an IG reel over on my Instagram feed. Hope to see you there.
In the meantime, ladies check your ladies and all your other parts, gents you can do the same (your own parts I mean), and thank you for stopping by! Until next time... Happy Crafting!
Ilda 💗
SUPPLIES
To make supplies easy for you to find, I have linked them above. If something is no longer available I will link to a similar product. Affiliate links may be used depending on the product linked. Please help support my blog by using these links while shopping at no additional cost to you. For more information about the affiliates I use, please visit my disclaimer here. Thanks so much for all your support!
Labels:
Boo,
Boobs,
breast cancer awareness,
card making,
Check Your Boo Bees,
Die cutting,
Ghosts,
Halloween Card,
handmade card,
Honey Bee Stamps,
how to,
ilovedoingallthingscrafty,
punny,
Slimline Card,
stamping,
Stamps
Thursday, October 14, 2021
Vintage Holiday Release Day 4 Sneak Peeks | Honey Bee Stamps
***Please note links in the post are no longer active, if you are looking for something specific use this link here to 👉 HONEY BEE STAMPS and search for the product listed. My apologies for the inconvenience and thanks in advance for using my link ***
Hello friends!
We have made it to the last day of sneak Peeks for Honey Bee Stamps Vintage Holiday Release. YAY!
My card features the new ★Layering Vintage Ornaments Stencils. Have you ever seen Iridescent Christmas Glass Ornaments? They have all the colors of the rainbow and if you know me I love my rainbows! So I just had to make a Christmas rainbow Card 🌈💝
Here is a pic of what I was imagining... can you see the rainbows?
Make sure you stop by the Honey Bee Stamps Blog for more inspiration from the Design Team featuring more day 4 product reveals! Please note that ★ links will not be active until the Release goes live tonight, October 14th, 2021 @9pm CST.
CARD RECIPE
Here are the ingredients for this Vintage Iridescent Christmas Glass Ornament Card.
Stamps:
Dies:
Stencil:
Paper:
Die Cut Machine:
Ink for Blending:
Ink for Stamping
Emb. Pdw:
- Gold Rush Emb Pwd (IO3)
Adhesives:
Embellishments:
Other Tools:
I'm not going to lie to you and tell you that this card was quick. I like to complicate things by using three colors to blend out the rainbow for each ornament. You can create a beautiful card using one color to blend with I am sure.
The other thing I did was use 3 different pastes. Which meant I had to make sure each paste was dry before moving on to the next. But once the paste was all dry the rest was fun. I love to embellish the heck out of my cards, the more bling the better.
Even though this card was time-consuming the results were worth it. I love how it turned out!
Watch an example of how this card was blended on the IG Reel Linked below.
SHOP Vintage Holiday Release → HERE
Thank you for stopping by and joining me for this beautiful Vintage Holiday Release, until next time... Happy Crafting!
Ilda 💖
Here is a recap of all the sneak peeks I created in case you missed any of them👇
Wednesday, October 13, 2021
Vintage Holiday Release Day 3 Sneak Peeks | Honey Bee Stamps
***Please note links in the post are no longer active, if you are looking for something specific use this link here to 👉 HONEY BEE STAMPS and search for the product listed. My apologies for the inconvenience and thanks in advance for using my link ***
Welcome back to Day 3 of the Honey Bee Stamps Vintage Holiday Release!
Can you believe 2022 is not that far away! After these last couple of crappy Pandemic Years, I am hoping 2022 will be a great year for us all.
Today's Cheers to the New Year Fireworks Card features the new ★Layering Fireworks Stencil and the ★Cheers Buzzword Stamps and Dies.
Make sure you stop by the Honey Bee Stamps Blog for more inspiration from the Design Team featuring more day 3 product reveals! Please note that ★ links will not be active until the Release goes live on October 14th, 2021 @9pm CST.
CARD RECIPE
Here is a breakdown of the products I used.
Stamps:
Dies:
Stencil:
Paper:
- Black Cardstock
Ink for Blending:
Paste:
Ink for Stamping:
Emb. Pdw:
- Arctic White Emb.Pwd. (IO3)
Die Cut Machine:
Adhesives:
Embellishments:
Other Tools:
For the base layer of each of the fireworks, I used distress oxide ink. I then added Moonstone litter past to create the top sparkly layer. To the centers, I used ★Vintage Holiday Gems.
I love this Cheers Buzzword Die-cut done in Holographic Rainbow paper! This card turned out so sparkly and pretty, perfect for sending a friend in the New Year.
Ilda 👋
Tuesday, October 12, 2021
Vintage Holiday Release Day 2 Sneak Peeks | Honey Bee Stamps
***Please note links in the post are no longer active, if you are looking for something specific use this link here to 👉 HONEY BEE STAMPS and search for the product listed. My apologies for the inconvenience and thanks in advance for using my link ***
Hello and welcome back to Day 2 of the Vintage Holiday Release for Honey Bee Stamps.
My card today features the gorgeous new Lovely Layers: Anemone Dies. This is a larger card (A7), simply because I wanted to use all of these flowers together. They would have fit onto an A2 card base but it would have been too small for the sentiment I wanted to use.
Make sure you stop by the Honey Bee Stamps Blog for more inspiration from the Design Team featuring more day 2 product reveals! Please note that ★ links will not be active until the Release goes live on October 14th, 2021 @9pm CST.
CARD RECIPE
Here is a breakdown of what I used to make this pretty wintery card.
Stamps:
Dies:
Paper:
Green and Black Heavyweight Cardstock
Stencil:
Ink:
Emb. Powder:
Die Cut Machine:
Adhesives:
Embellishments:
Other Tools:
Once my Anemone flowers were all die-cut and assembled, I then just had to figure out the background design. I used the ★Crystal Kaleidoscope Stencil to apply this silver paste to the Scallop A7 Card Frame layer.
To make these centers pop, I used foam tape in between each layer and added glue to the outside edge of the center layers which were then dipped in sparkle glitter. Before attaching the centers to the flowers, I drew some black lines on the base of the petals. To the end of the lines, I added the cutest little domes to make it look like Stamen.
Here's a close-up. Check out the dimension. Also, it is difficult to see from the photos but I did blend Hickory Smoke Distress Oxide Ink to the white centers of the flowers to give some extra depth and dimension.
Thank you for stopping by and I will see you back here tomorrow for day 3 sneak peeks... Happy Crafting!
Ilda 💗
Want to watch a quick process IG Reel? Click the link below!
Labels:
Anemones Dies,
card making,
Die cutting,
Floral Card,
handmade card,
Honey Bee Stamps,
how to,
ilovedoingallthingscrafty,
Lovely Layers,
Release,
sneak peeks,
stamping,
Stamps,
Vintage Holiday,
white,
Winter
Subscribe to:
Posts (Atom)


