Hello Everyone and welcome to the Gina K. Designs and Ink On 3 Collaboration Blog Hop! These two fabulous companies have teamed up to inspire you with some amazing projects today. If you have already started the Hop you would have come from uber talented Emily Loggans' Blog. For those that want to start off at the beginning click → HERE
The next stop on the Hop and Giveaway details will be found at the ends of this post.
So let's get started on the cards I made for you today.
CARD DETAILS
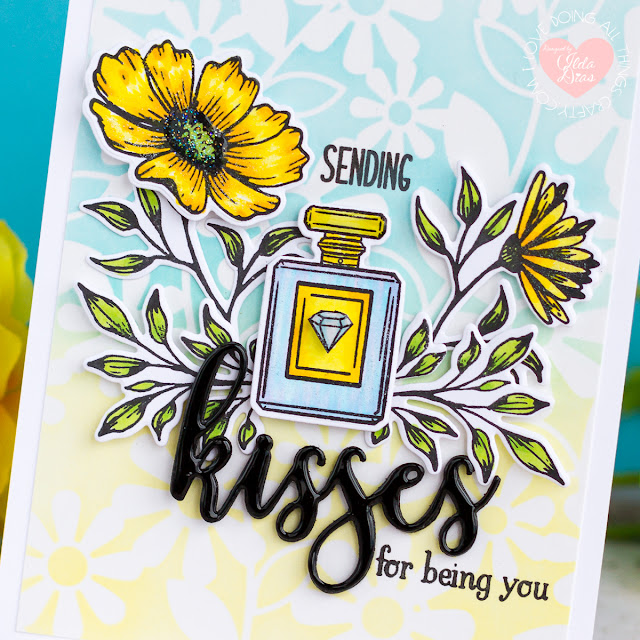
For my first card, I began by stamping out the images from the VIBRANT BLOOMS set and then perfume bottle and diamond from the newest Ink On 3 Set BAD & BOUJEE set using Blackout Ink. I then colored them in using Copic Markers.
Next, I used the coordinating dies for both the VIBRANT BLOOMS and the BAD & BOUJEE set to die cut the images. The tiny little diamond I fussy cut and popped it place with a tiny foam adhesive.
I then die cut the scripted Kisses word die out using black cardstock and then using Juicy Ink I added a few layers of Black As Night Embossing Powder to heat set it with a high gloss finish.
For the background, I used the Daisy Chain Stencil from Gina K and blended out Squeezed Lemonade and Broken China Distress Oxide inks that I then trimmed and glued to the card base. I then arranged the stamped images as shown, using foam tape to add dimension and layers. I then placed the card in my positioning tool and stamped out the sentiment Sending from the BAD & BOUJEE set and the for being you from the VIBRANT BLOOMS stamp set.
To finish and add sparkle to the piece, I painted on some LIQUID PIXIE DUST and added Glossy Accents to some areas.
Check out the sparkle!
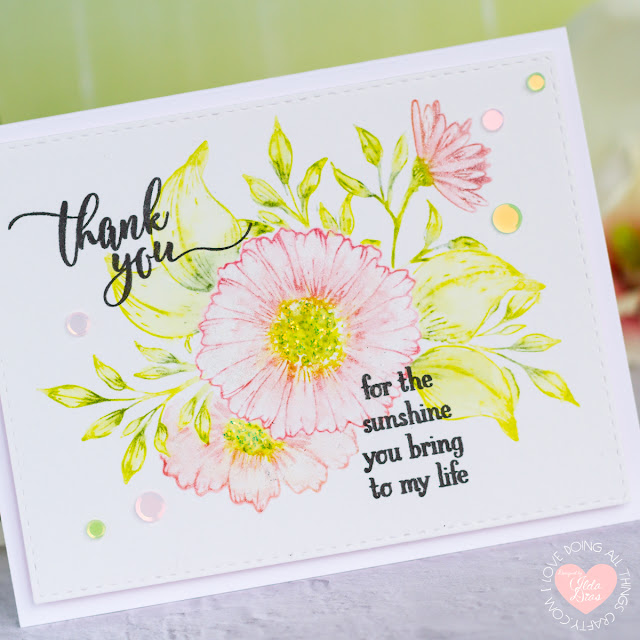
For this next card I, I kept things really simple. I used 3 Tombow Markers (133, 158, 772) to add color to the stamps from the VIBRANT BLOOM set. I began with the largest bloom in the center and then masked the images as I went on to build the bouquet of flowers. I used the coordinating dies to create the masks but would align them right along the edge of the area that I would be stamping next to, this just saved me time from fussy cutting out the image and it worked really well.
It was getting late when I took these pictures so it is difficult to see, but I used LIQUID PIXIE DUST to blend out the color on the flower petals and to add a bit sparkle to them at the same time.
The card panel was die cut using a stitched rectangle frame and then placed back in the stamp positioner to stamp out the sentiments from the VIBRANT BLOOM set using Blackout Ink.
To embellish the card, I added a few confetti sequins and added some Stickles Glitter Glue to the flower centers.
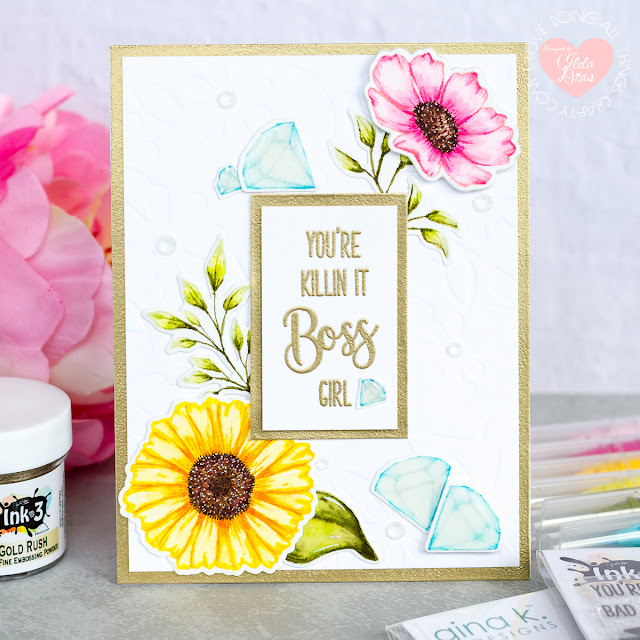
For this last card, I did a no line water coloring using the stamps from the VIBRANT BLOOM set. I stamped out the images onto Bristol paper using the Fadeout Ink and then used Zig Clean Color brushes to watercolored the images in. I also stamped and colored the diamonds from the BAD & BOUJEE set the same way. To finish this step, I die cut the pieces out with their coordinating die sets.
Next, I stamped out the sentiment by lining up the stamps from the BAD & BOUJEE set in a stamping positioner and then inked them up with Juicy Ink then heat set the ink using Gold Rush Embossing Powder. I also used the Juicy Ink and Gold Rush Embossing powder ink up the edges of papers I used behind the white pieces.
It may be difficult to see from the pictures, but I used the Daisy Chain Stencil to do some dry embossing onto the white background panel. Definitely, adds a lot of texture to the card.
To add more sparkle to the card I used LIQUID PIXIE DUST on the diamonds and once that layer was dry to touch I applied a layer of glossy accents to the top.
I also used some Sparkling Crystals to the center of the Daisies on the background embossed panel.
GIVEAWAY!
Both these companies are giving away a $50 Gift Certificate to their shops GK | IO3 So make sure you hop along and leave some love along the way to be entered. The more times you comment the more chances you get! Let me know what card was your favorite in the comments below, I'm always curious to know 😊 Winners will be announced on the GK and the InkOn3 Blogs on Monday the 8th of July. Good Luck to everyone!
Hope you were inspired by my cards today! I had so much fun mixing up the products from these two amazing companies.
Your next stop on the Hop is to the lovely Dana Joy's Blog. Thank you for stopping by and until next time... Happy Hopping 👋
Next, I stamped out the sentiment by lining up the stamps from the BAD & BOUJEE set in a stamping positioner and then inked them up with Juicy Ink then heat set the ink using Gold Rush Embossing Powder. I also used the Juicy Ink and Gold Rush Embossing powder ink up the edges of papers I used behind the white pieces.
It may be difficult to see from the pictures, but I used the Daisy Chain Stencil to do some dry embossing onto the white background panel. Definitely, adds a lot of texture to the card.
Here is a close up the this gorgeous Bloom! To the center, I added some details with a black 005 fine tip pen and white with a gelly roll pen.
To add more sparkle to the card I used LIQUID PIXIE DUST on the diamonds and once that layer was dry to touch I applied a layer of glossy accents to the top.
I also used some Sparkling Crystals to the center of the Daisies on the background embossed panel.
GIVEAWAY!
Both these companies are giving away a $50 Gift Certificate to their shops GK | IO3 So make sure you hop along and leave some love along the way to be entered. The more times you comment the more chances you get! Let me know what card was your favorite in the comments below, I'm always curious to know 😊 Winners will be announced on the GK and the InkOn3 Blogs on Monday the 8th of July. Good Luck to everyone!
Hope you were inspired by my cards today! I had so much fun mixing up the products from these two amazing companies.
Your next stop on the Hop is to the lovely Dana Joy's Blog. Thank you for stopping by and until next time... Happy Hopping 👋

SUPPLIES
 Bad and Boujee Stamps Shop at: IO3 |
 Bad and Boujee Die Set Shop at: IO3 |
 Vibrant Blooms Shop at: SSS |
 Vibrant Blooms Die Set Shop at: SSS |
 Daisy Chain Stencil Shop at: GK |
 Blackout Ink Shop at: SSS | IO3 |
 Fadeout No Line Ink Shop at: SSS | IO3 |
 Juicy Ink Shop at: SSS | IO3 |
 Black As Night Embossing Powder Shop at: SSS | IO3 |
 Liquid Pixie Dust Shop at: SSS | IO3 |
 Gold Rush Embossing Powder Shop at: SSS | IO3 |
 Small Fine Tip Water Brush Pen Shop at: IO3 |
 Mini Misti Tool Shop at: SSS | AMZ | SB | SK |
 Neenah 80 LB SOLAR WHITE Shop at: SSS | AMZ |
 Strathmore Bristol Pad Shop at: SSS | AMZ |
 Zig CLEAN COLOR 60+ 80 SET Shop at: SSS | AMZ |
 Gemini Jr Die Cutting/Embossing Machine Shop at: SSS | AMZ | SB |
 Oxide Ink Pad BROKEN CHINA Shop at: SSS | SB | HBS |
 Oxide Ink SQUEEZED LEMONADE Shop at: SSS | HBS |
 BLENDER BRUSH Set Shop at: SSS | AMZ | IO3 |
 STITCHED RECTANGLES Dies Shop at: SSS |
 Stickles Glitter Glue, Icicle Shop at: SSS | AMZ | HBS |
 Double-Sided Foam Tape Shop at: SSS | AMZ |
 Glossy Accents Shop at: SSS | AMZ | SB | HBS |
 SPARKLING CRYSTALS MIX Shop at: SSS | SK |
To make supplies easy for you to find, I have linked them above. If something is no longer available I will link to a similar product. Affiliate links may be used depending on the product linked. By shopping through my links you help keep my blog running at no extra cost to you. So thank you in advance for supporting my creations!


First to comment! YAY me! Such a wonderful collaboration! TFS your inspiration and creativity!!
ReplyDeleteBeautiful work just wonderful ❤
ReplyDeleteThese are gorgeous I love the stenciling in the first one and the yellow colors! BEAUTIFUL
ReplyDeleteFabulous coloring on
ReplyDeleteyour cards. I love
the first one, lovely
colors.
Carla from Utah
I think your last card, the boss girl one, was my favorite. And I'm now obsessed with liquid pixie dust and must get some!
ReplyDeleteVery nice cards. Love the different styles.
ReplyDeleteYour stenciled background on the first card is so clever. I like how you used two different colors. It is so fresh and pretty!
ReplyDeleteYour cards are stunning! Gorgeous colors and that stenciled background is beautiful.
ReplyDeleteOh, you are speaking my language! Pixie dust, glitter, embossing powder, Crystal Effects! I love it all!
ReplyDeleteCheers!
Marisela Delgado said: Awesome cards. mariandmonsterd@yahoo.com
ReplyDeleteSuper lovely work!
ReplyDeleteBeautiful cards! I love all the detail in the first cards and the softness of the second one.
ReplyDeleteI love your cards! So beautiful!
ReplyDeleteBeautiful set of cards.. thanks for the detailed tutorial..
ReplyDeleteOh Ilda, you are certainly the one that brings the sunshine with your gorgeous crafty creations that I always peep on social media, too! These are just a vision! I love the colors of your cards and the beautiful details ~ you have a masterful way of balancing the colors with the white backgrounds. Superb! TFS!
ReplyDeleteBeautiful cards. Love your ideas
ReplyDeleteAbsolutely gorgeous creations! Love all the beautiful coloring & the wonderful designs. The Daisy stencil is fabulous & needs to be in my craft room soon.
ReplyDeletepretty cards thank you for sharing
ReplyDeletePerfect color combos. Beautiful!
ReplyDeleteIlda! these are so pretty! i especially love that separation of color for the stencil. Amazing cards per usual. =)
ReplyDeleteAwesome cards Ilda, love your card designs and colouring. The sentiment of the Vibrant Bloom set is great! Thank you so much for sharing your inspiration.
ReplyDeleteI love the way of colouring of áll cards.Thanks for sharing them!
ReplyDeleteYour cards are beautiful - I really like your style
ReplyDeleteSOOOO beautiful, all of them! I'm especially drawn to the first one!!! Love the creativity!
ReplyDeletePretty colors and designs!
ReplyDeleteBeautiful! I need to check out the liquid pixie dust!
ReplyDeleteYou do such gorgeous work. I love the soft colors you achieved. I always have difficulty with that as I tend to darken up things too much. So that was so wonderful to see your work and be inspired.
ReplyDeleteYour cards are gorgeous! I love the layout and design of each one. Everything goes perfectly together. TFS!!
ReplyDeletestunning!!
ReplyDeleteLovely cards! :) I really like the soft look of the second one.
ReplyDeleteGorgeous cards! Love the floral designs and the pretty perfume bottle! Awesome coloring!
ReplyDeleteWow, gorgeous cards! Such beautiful designs and you so expertly combined elements from both Gina K and Ink on 3 - fantastic!
ReplyDeleteBeautiful cards! Each is so different! I love that. I'm kind of fond of the second one - it's almost like a real flower that's somehow been printed on the paper! (that doesn't really explain it very well, and there probably is a word for that but I don't know it!) Anyway, great inspiration!
ReplyDelete