Tuesday, October 29, 2013

Spiderweb Pillow Treat Boxes | Ink On 3 Files


Need some last-minute quick Halloween treat boxes for the kiddos? 

I have the perfect Spiderweb Pillow Boxes for you, just released today by Fleurette Bloom! On SALE for $0.49. These will take you around 5 minutes to cut out and assemble!

Spiderweb Pillow Treat Boxes | Ink On 3 Files

I enlarged the file to 8x10 inches. This way I could fit lots of goodies inside!

Spiderweb Pillow Treat Boxes | Ink On 3 Files

Recipe for my boxes:
This fun paper comes from and Company Spooktacular Collection
Trendy Twine - Lime Grapesicle and Limeade
Epiphany Shape Round 25 Tool and bubble caps
Black Ink Pad
Ribbon

Cut on the Silhouette Cameo using the Silhouette Studio Designer Edition

Embellish these however you like, or not! They look good as they are!

Spiderweb Pillow Treat Boxes | Ink On 3 Files

Make sure you stop by Fleurette Bloom's Facebook Page and give her some love! Like her Page, if you haven't already and leave her a comment to win her latest "Anytime Pillow Box" Collection! These boxes are gorgeous and they are perfect for so many occasions!


Thanks so much for stopping by! 
Happy Crafting :)

Friday, October 25, 2013

Halloween Owl Witch Treat Box | SVGCuts

Hi Everyone!

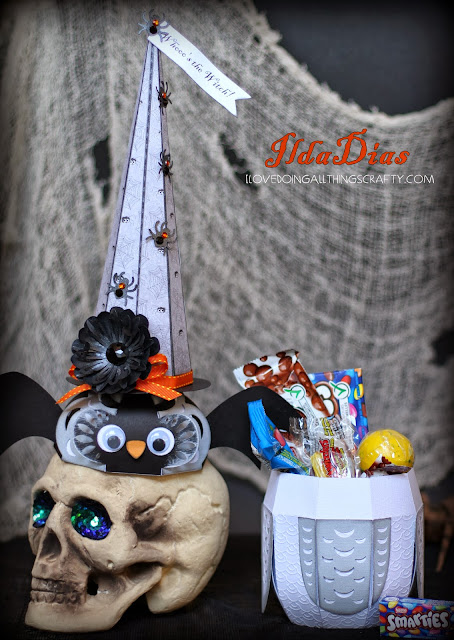
Today I want to share with you another Halloween project of mine. It's a Treat Box I made for my Daughter Maia. For now, until Halloween comes it looks like a nice decoration piece! Selfish, I know... Shhhh don't tell her!

Halloween Owl Witch Treat Box | SVGCuts Files

Who says only humans get dressed up for Halloween? Whoooo you!!! 
Whooo called her a Witch?!?! Boy she looks mad now, even her Bat Wings are up, LOL!

Halloween Owl Witch Treat Box | SVGCuts Files

Here in Edmonton, they are calling for snow this weekend... Nooooooo! I hope those weather people are wrong, at least until Halloween has passed! It's no fun Trick or Treating with snow boots on :( 
Since snow is coming I thought it would be cute to make my Owl a Snowy-looking one!

I used a few SVG Cuts Kits for this project:
Witch's hat - Catacomb Manor SVG Kit

Cut using the Silhouette Cameo

Halloween Owl Witch Treat Box | SVGCuts Files

The pretty patterned paper I used on the hat comes from Fleurette Bloom's Howlin Halloween Digital Paper Collection. The tag was also made on my Silhouette Cameo with the Print and Cut feature.

Halloween Owl Witch Treat Box | SVGCuts Files

Look!!! She REALLY is a Witch! Her head just came flew off, Muhahaha! 
As you can see lots of room to fill up with candy maybe even a little gift :)

Don't forget to stop by SVGCuts for their Halloween sale!

I had a Hoot making this one... I can't help myself with the Owl puns! Thanks so much for stopping by today, hope you've enjoyed this unusual Halloween Treat Box!

Happy Crafting :)

Tuesday, October 22, 2013

Faux Woodblock Halloween Signs | SVGCuts


Are you all ready for Halloween yet? I thought I was, but then I had another idea for a Halloween Decoration. Then, I also remembered I still wanted to make some treat containers for the kids. These ideas in my head are never-ending, lol!

For today's project, the woodblock signs that you see all over Pinterest were my inspiration. I didn't have wood handy but I had lots of paper! 

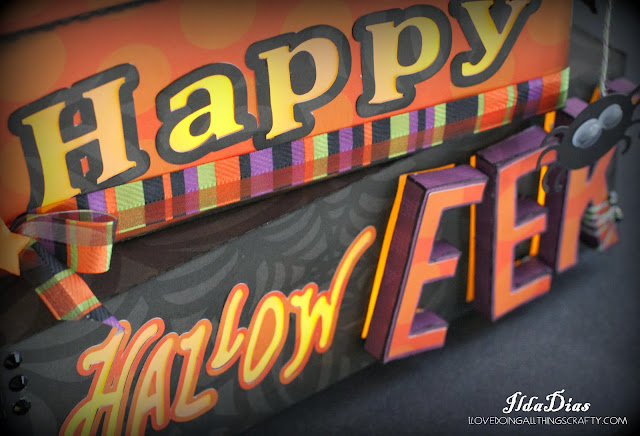
Here it is...  "Happy HallowEEK!" 
I thought this was the perfect Halloween Phrase (a combo of files from a few SVGCuts Kits).
Like someone had scared you all of a sudden...  maybe a great big spider!

Faux Woodblock Halloween Signs | SVGCuts Files

I have been wanting to do this since SVGCuts released Catacomb Manor SVG Kit. I knew I could turn the tall gift bag into a block. 

When I was planning the design, I also knew I wanted to make it light up with some battery-operated tea lights. The  "happy hallow" design comes from Maple Manor SVG Kit here, "EEK" and web from Catacomb Manor SVG Kit here, and the itsy bitsy spider hanging from some trendy twine comes from Spooky Cuties SVG Collection here.

Faux Woodblock Halloween Signs | SVGCuts Files

To turn the bag into a block, I removed the holes that would have been for the handle. Then I created the top tabs on the box by using the point editing tool. (Making it look just like the bottom of the bag) I also created 2 circle cutouts for where I would be inserting the tea lights. 

You can make your blocks as long or as short as you like, by using the stretch function in the Silhouette Design Studio.

Faux Woodblock Halloween Signs | SVGCuts Files

To create the outline for my glowing letters I made an offset. (Pictured above at the bottom of the screen capture) 

I also wanted some light to shine through the back of the EEK block letters. To do this I just cut the letters out underneath. Pop dots were used to elevate the block letters on the vellum, allowing light to filter through. NOTE: If I did this project again I would have created an offset of the EEK. I would have liked a little more light to glow around the block letters, next time :(


Once I had the word cut out from the panels, I glued vellum to the inside.

Faux Woodblock Halloween Signs | SVGCuts Files

Here is what it looks like in the dark!  EEEEEK! 
Is that not COOL?

Faux Woodblock Halloween Signs | SVGCuts Files

Thanks so much for stopping by, hope you like this idea and maybe even been a little inspired to make your own faux woodblock signs!

 I think I might be making so many more of these for other holidays, oh the possibilities!

Happy Crafting :)

Thursday, October 17, 2013

House of Haunts Halloween Decor | Facebook Challenge Entry | SVGCuts


Muhahahahahahah! Scared yet? You should be... this post is going to freak you out! WARNING, run if you don't like pictures... this is a very picture heavy post!

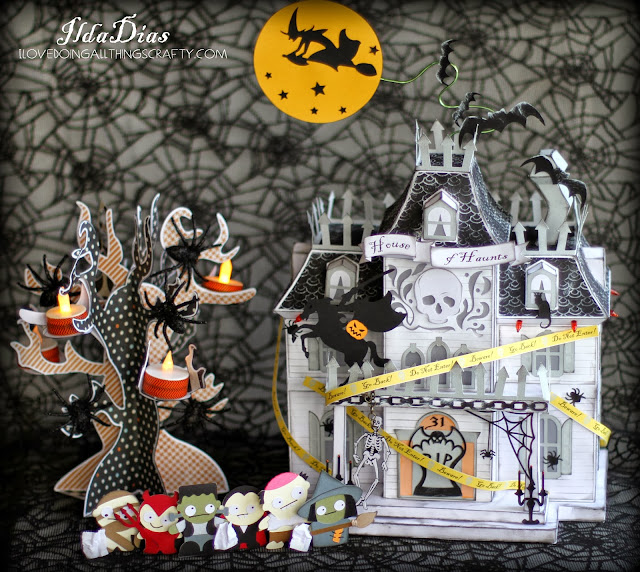
Today I'm so excited to share with you what I've been working on the past week! SVG Cuts is having another Facebook Challenge this time it's Halloween-themed. Of course, I can't resist a good challenge... they are so much fun! I LOVE to create, and with SVGCuts files, the possibilities are endless! For this challenge, I wanted to create a little street scene.

Wait until you see it all lit up!
  
House of Haunts | Facebook House of Haunts Halloween Decor | Facebook Challenge Entry | SVGCuts FilesChallenge Entry | SVGCuts Files


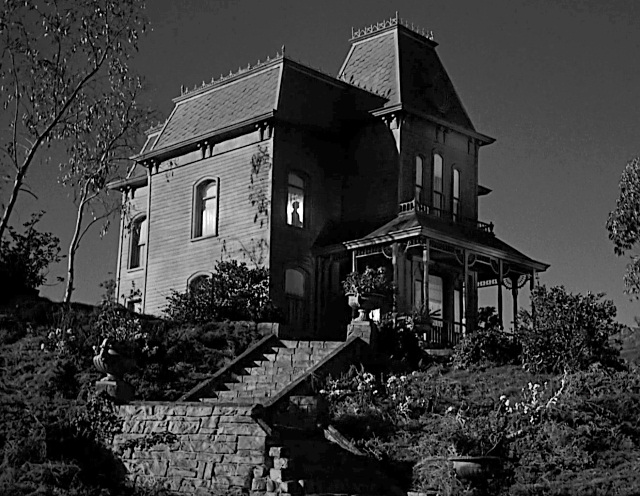
Since I wanted to create a spooky house, the first one I thought of was the Bates House from the movie Psycho. When I looked it up I knew it was the perfect inspiration I needed for my House of Haunts! 

Creepy isn't it!

So how did I do?  Looks a bit like the Bates house, doesn't it? OK well, maybe minus Norman!


For those that are interested, here are all the SVG Cuts Kits I used:


All cut out on the Silhouette Cameo

WOW, right! Love how it looks all lit up... I think this has to be one of my favorite paper projects to date and one of my most challenging for sure!

House of Haunts Halloween Decor | Facebook Challenge Entry | SVGCuts Files

Look at those little faces on the Trick or Tr-eaters! The Witch looks like she's ready to beat someone with her broom... leave it to the boys to send in the girl first, LOL!

House of Haunts Halloween Decor | Facebook Challenge Entry | SVGCuts Files

I can see why they are so scared... the skeleton, the headless horseman, the spiders, creepy tombstone door! These little cuties are working hard for their candy!

To make these little guys stand, I used a strip of paper and created score lines at different depths, essentially creating steps. Then adhered each one of them to a step.

House of Haunts Halloween Decor | Facebook Challenge Entry | SVGCuts Files

Poor Witch, she looks terrified! And, just for some scale, the skeleton measures 3 inches tall! I'm sure she can take him on!!!

House of Haunts Halloween Decor | Facebook Challenge Entry | SVGCuts Files

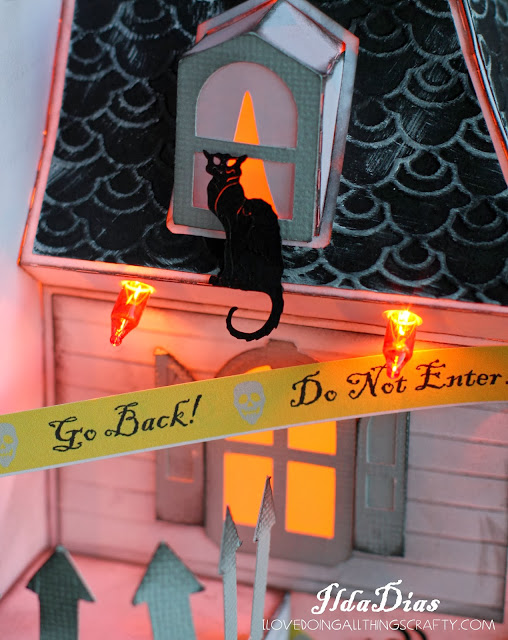
Did you notice the lights? It's a modern-day Victorian, complete with outdoor lighting, hehe! 

To add the string of lights, all I did when I cut out my house panels was add a couple of circle cutouts just underneath the roofline to poke my mini lights through. 

House of Haunts Halloween Decor | Facebook Challenge Entry | SVGCuts Files

Because I also wanted the top of the house to light up I also created two more holes in the top roof tower as shown below. Still, plenty of room to fill with goodies if you wanted to give a house like this away!

House of Haunts Halloween Decor | Facebook Challenge Entry | SVGCuts Files

I wanted to make the house look Evil, so another modification I did to the house was to remove the top window from the tower and add the Skull and flames. The banner was made using Print and Cut, and the file comes from TOIL AND TROUBLE KIT here

House of Haunts Halloween Decor | Facebook Challenge Entry | SVGCuts Files

To the rooftop, I added iron roof trim from ELMHURST HOLLOW here. To attach it, I added a score line to make a bend and then I adhered it to the edge of the roofline and porch. I also added the crooked chimney from the same kit. 

House of Haunts Halloween Decor | Facebook Challenge Entry | SVGCuts Files

Is that not the scariest-looking cat? He has no eyes... EEK! The file comes from MAPLE MANOR KIT.

The yellow tape you see I created with the Print and Cut feature of the Silhouette. The name of the font I used is Blackadder ITC. For the roof, I used a Japanese Scale embossing folder and ran them through the Cuttlebug. Then distressed them with a white ink pad.

House of Haunts Halloween Decor | Facebook Challenge Entry | SVGCuts Files

For my tree of spiders comes from the Spooky Soiree SVG Kit, I used a white card stock base and inked the edges black.  The patterned paper comes from My Mind's Eye Mischievous Paper Kit. To make my tea lights coordinate with the rest of the scene I wrapped Washi tape (Recollections) around them.

House of Haunts Halloween Decor | Facebook Challenge Entry | SVGCuts Files

Here is what the inside looks like with the string of lights through it... You could secure them all the top part of the roof but I found the lighting better when some of the lights were on the base of the house. This would also be a great idea for a Christmas Themed house, with all the lights around the house!

House of Haunts Halloween Decor | Facebook Challenge Entry | SVGCuts Files

To close it up, I just created a little slit with my scissors and pulled the end of the cord through.

House of Haunts Halloween Decor | Facebook Challenge Entry | SVGCuts Files

Did you notice the siding? I didn't have an embossing folder that looked like a siding of any kind, so I thought I would make my own.  I did it by creating score lines on my panels with my scoreboard. What took me forever was the ink distressing and "dirtying" of the house! But all so worth it, I absolutely love how it all came together :) Now I just have to clean up my dirty craft room :(

Here's one last look at the House of Haunts. Oh, almost forgot the flying witch comes from Midnight Jamboree SVG Kit here and the bats from Party On Elm Street SVG Kit here. I used some floral wiring and poked a hole through the top of the roof tower and used hot glue to secure it. 

House of Haunts Halloween Decor | Facebook Challenge Entry | SVGCuts Files

I hope you have enjoyed my House of Haunts! I have had so much fun coming up with it, and if you haven't entered there are still a few days left! Good luck to all that are participating, there are already many great entries.

Wish me luck on the Challenge, I sure would love to win a Sizzix Eclipse or anything else for that matter!

Thanks so much for stopping by, would love to hear what you think :)
Happy Crafting Everyone!

Tuesday, October 15, 2013

Batty For You Card Halloween Card | Ink On 3


Today I want to share with you my latest Fleurette Bloom card. "Batty for You". 

Batty For You Card Halloween Card | Ink On 3

Isn't he so CUTE?!? 

Batty For You Card Halloween Card | Ink On 3

I thought it would be cool to put the sentiment under his wings.... that way the little "vampire" could draw you in for the bite!


To close the wings, as you can see I just used a little pop dot. 


Here are the files you will need to make this card:
 Cut on the Silhouette Cameo


If you want to make the Bat like I did you will need to weld to the bat's body two wings and create score lines (as pictured above). I also created the white body layer by creating an internal offset and then used the print n cut feature of the Silhouette for the Sentiment.

Here's a peek at the inside of the card, used more digital papers... love those spooky little eyes!


So how "Batty" over this card are you? I love how it all came together... hope you did too!

Thanks for stopping by!
Happy Crafting :)→→

Sunday, October 13, 2013

Beary Sweet Train Baptism Cake | DIY Cakes


Happy Thanksgiving Weekend Everyone! Well at least to all my Canadian friends :) 
Today I have a Baptism Cake to share with you all! I was asked if I could make a cake for a Baptism this weekend. Funny how people think I'm a baker or something now, LOL! Of course as usual I said yes, hopefully, they will be happy with the results. I was sent a photo of some inspiration... Two bears, cross, blanket, and especially the train were musts. The photo I found came from Kimberly, an amazingly talented cake artist! I do have to give her credit, thank you, Kimberly, from Kimberly Dawn Cakes for the inspiration, love your work! 

Look at that "Bear" Bum! Isn't it a CUTIE! You could almost bite it... well technically you could, haha!

Beary Sweet Train Baptism Cake | DIY Cakes

Well what do you think? Two bears, cross, blanket, train, and I even threw in a rosary!
I really love how it came together :)


Beary Sweet Train Baptism Cake | DIY Cakes

Bear hanging out, waiting for the party to start!

Beary Sweet Train Baptism Cake | DIY Cakes

Here is bear #2, isn't he darling?

 The entire cake is edible except for the supports and the ribbon.

Beary Sweet Train Baptism Cake | DIY Cakes

Top layer - baked in two 6 inch round pans and is Red Velvet
Bottom layer - baked in a 10 inch round pan and is Marble
The entire cake was frosted with vanilla buttercream icing and covered with fondant.
The cake stands 14 inches tall to the top of the cross.

Beary Sweet Train Baptism Cake | DIY Cakes

Thanks so much for stopping by, hope you all liked this super cute Baptism cake. May God Bless Nicholas and his family on his special day!

Happy Crafting :)

Monday, October 7, 2013

Despicable Me 2 Minion Cake | DIY Cakes

I am super excited to share with you all the Despicable Me 2 Minion Cake I made for a double birthday party this past weekend! My Goddaughter Stella chose the theme for the party. My sister also turned 20 this week so the families got together for their joint party! So of course, I brought the cake ;)

Here is your first look of many pics to follow! Doesn't he look excited?!

Despicable Me 2 Minion Cake | DIY Cakes

My Goddaughter Stella turned 4, I thought it would be cute to have the Yellow Minion hold 4 candles and have the top portion of the cake represent her. While the bottom Minion, was made for my sister Catarina who turned 20 this week!

Really happy about how it all came together!

Despicable Me 2 Minion Cake | DIY Cakes

Top View

Despicable Me 2 Minion Cake | DIY Cakes

Close Up

Despicable Me 2 Minion Cake | DIY Cakes

 The Top Yellow Minion Cake - Chocolate cake frosted with chocolate buttercream icing
baked in a 6 inch round pan (3 layers) - measured around 9 inches tall

Bottom Purple Minion Cake - Vanilla Cake - Vanilla buttercream icing
baked in an 11 inch round pan (2 layers) - measured 4 inches tall

All covered with Fondant

Despicable Me 2 Minion Cake | DIY Cakes

Thanks so much for stopping by! I hope you liked my take on Despicable Me 2's Minion Cake! I had a lot of fun making it and a better time eating it!!! Yummo!

Happy Crafting! :)

Wednesday, October 2, 2013

Fall Flower Birthday Card | SVGCuts


Hi Everyone!

This past Monday, my baby sister graduated from being a teenager! That's right, I have a 20-year-old sister! She's the baby of the Family, came along when I was 17! Who knew my parents were still doing "it" LOL, it sure did surprise my brother and me! Now 20 years later, my kids adore her and think she's the coolest Aunty!  Happy Birthday Catarina WE love you!

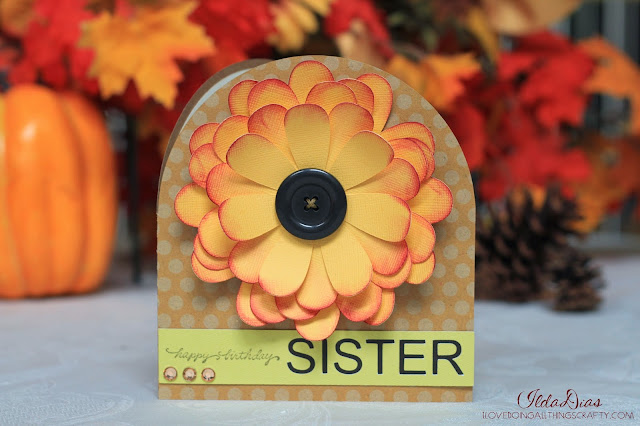
We had gone away for the weekend and I had no time to get something ready before we left, so I needed a really quick card! Since she is a Fall baby I thought it would be nice to make her a Fall Birthday Card. This card was super easy a quick to put together, it must have taken me less than 20 minutes including choosing the papers! 

Fall Flower Birthday Card | SVGCuts File

The only thing I did to alter this card was cut out the word "SISTER" on the strip and then cut out another contrasting layer to adhere to it. The files for the card comes from SVGCuts Cards for Mom SVG Kit cut on my Silhouette Cameo.

Speaking of SVGCuts.... did you know that they were the Grand Prize winner in the Martha Stewart American Made Awards! So happy and excited for them! Congrats Mary and Leo, what a few weeks you have had! That says so much....  if you have never purchased any of their SVG files you are definitely missing out! GO SHOP NOW!!! They are truly one of a kind! 


Thanks so much for stopping by! I hope you liked my take on my Sisters' Fall Flower Card...  I love how it turned out, hope you did too!

Happy Crafting :)