Thursday, October 17, 2019

Studio Katia Winter 2019 Release - Sneak Peek Day 1


Welcome to Studio Katia Winter 2019 Release - Sneak Peek Day 1. Today I am featuring a few new stamps and dies coming soon to the Studio Katia Shop. Please note that links to new products listed may not work until the release goes LIVE in the shop next week 😉

Studio Katia Winter 2019 Release - Sneak Peek Day 1 by ilovedoingallthingscrafty.com


CARD DETAILS

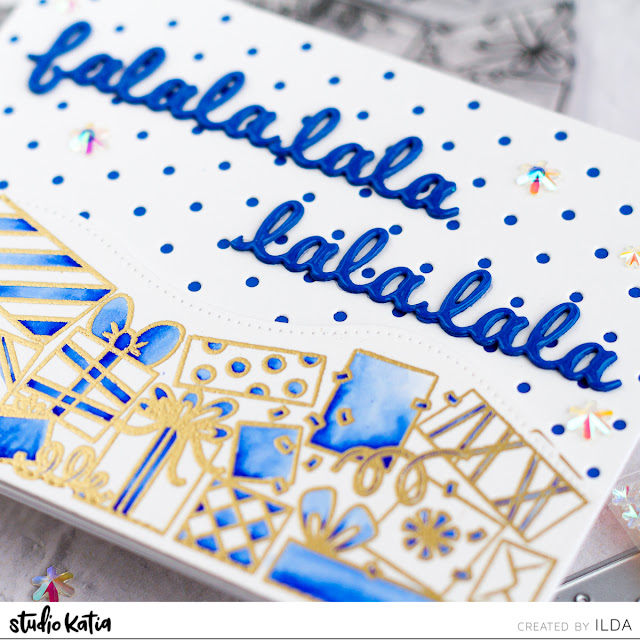
To begin I stamped out one of the images from the LOTS OF GIFTS TRIMMINGS stamp set and then heat embossed the lines in gold. I then used a Zig marker to add some coloring to the image.

Studio Katia Winter 2019 Release - Sneak Peek Day 1 by ilovedoingallthingscrafty.com

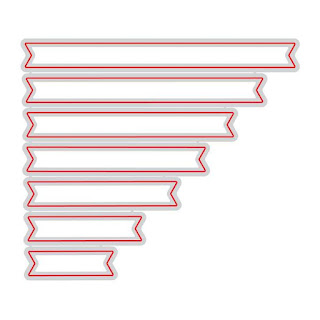
I then die cut the image out using the TRIMMINGS BORDERS CREATIVE DIES as well as the DARLING RIBBON AND FRAMES DIES.

Studio Katia Winter 2019 Release - Sneak Peek Day 1 by ilovedoingallthingscrafty.com

Next, I popped the image along the bottom of the card from that I had die cut using the new MINI POLKA DOTS COVER die that I had glued onto a piece of blue cardstock.

I then die cut a bunch of the "Falala's" from the HAPPY PAWLIDAYS die set that I trimmed and glued together to add as the sentiment on this festive card.

Studio Katia Winter 2019 Release - Sneak Peek Day 1 by ilovedoingallthingscrafty.com

To embellish the card I, added some IRIDESCENT ICE FLAKES. I hope you enjoyed today's sneak peek card. Come back tomorrow for another peek. 

Stop by the Studio Katia Blog for more → Day1 inspiration and make sure you leave them a comment over there to be entered to the daily sneak peek draw for a $15 Gift certificate to SHOP the new release!


Thank you for stopping by 😊
Until next time... Happy Crafting 👋

Monday, October 14, 2019

Season To Sparkle Blog Hop Day 1| Honey Bee Stamps


Hello Friends and welcome to Day 1 of the Honey Bee Stamps Season To Sparkle Blog Hop. If you have arrived from the uber-talented Mindy Eggen's Blog you are on the right track. I'll fill you in on where to go next at the end of this post. 


Today I have 4 sparkly cards to share with you featuring this Holiday Release, you so let's get started.

CARD DETAILS

If you have been catching the sneak peeks or have noticed the Release Banners you may have already seen this first card. It's so sparkly and beautiful that I had to make a few more and share with you all how easily they came together.


So to begin, I die cut the top WINTER PRISM COVERPLATE and the base one using white cardstock. For the middle layer, I first added a layer of Moonstone Glimmer paste to the panel, let it dry and then die cut it using the middle coverplate. You could just use glitter card stock, but I didn't have any on hand, so this worked really well.

I then lined up all the layers in order and glued them together.


Next, I stamped out the sentiment for each of the cards using the SEASON TO SPARKLE stamp set and then heat embossed the lettering in silver. I then used the coordinating SEASON TO SPARKLE die set to cut out the sentiments.

For the white card, I added a piece of patterned paper from the LOG CABIN Paper pad behind the Prisms to look like a pale sky was in the background and then glued it to the card base.

To add some additional embellishments to the card front, I used the LAYERING SNOWFLAKE dies that I had also added glimmer paste too. I then finished off by adding little PRISM GEM stickers for some more sparkle.


This next card was done in the exact same process, only using a different sentiment and color.


Absolutely love how these cards sparkle!


And finally the red version of the sparkly card.


I think these cards would be great to mass-produce for the holiday as they have the wow factor and actually are quite simple to make. Although, I would recommend getting glitter paper to save you the glitter application and drying time!


Since this hop is called Season To Sparkle, here is another sparkly card! For this card, I used the STAINED GLASS COVERPLATE to create this stained glass cross card.


The first thing I did was make an embossed impression using the STAINED GLASS COVERPLATE onto a piece of cardstock. I  then planed out the design and colored it in using Copic Markers. Once the background was colored in I added a layer of Moonstone Glimmer paste and set it off to the side to dry.


I then die cut a white panel using the STAINED GLASS COVERPLATE die cut layer to add to the top of the colored layer, doing my best to line it up with the design. I felt like the white didn't make the colors pop enough, so that's when I die cut and glued on another layer using black cardstock this time.

To the center of the cross, I added a tiny die-cut heart that came from the GINGERBREAD HOUSE ADD ON dies.


To finish off this colorful card, I die cut the BELIEVE and colored it in rainbow order using the same colors that I had used on the glass. To the BELIEVE die cut, I added a layer of liquid pixie dust and topped it off with glossy accents. It's difficult to see but I used vellum to make the shadow layer.

I also added the sentiments from the BELIEVE stamp set that I had die cut using the BANNER dies.


BLOG HOPline up!

Honey Bee Stamps
Leanne West
Mindy Eggen
Ilda Dias ← You are here 👋
Courtney Kreeber ← Up next!
Brenda Noelke
Emily Midgett
Caly Person 
Nicole Vogeli
Jana Millen
Seeka
Antonia Giuliana

GIVEAWAYS
Honey Bee Stamps is offering a $30 Gift Card for each day of the giveaway. To qualify you must hop along and comment to be entered to win. I would love to know what is your favorite product from the release?

SHOP the new SEASON to SPARKLE Release → HERE

Hopefully, you have been inspired by my creations today featuring the fabulous Season To Sparkle Release. Thank you for stopping by and until next time... Happy Hopping 👋


SUPPLIES

Winter Prism Coverplate - Base
Shop at:
HBS
Winter Prism Coverplate - Middle
Shop at:
HBS
Winter Prism Coverplate - Top
Shop at:
HBS
Season to Sparkle
Season to Sparkle
Shop at:
HBS
Season to Sparkle Dies
Shop at:
HBS
Layering Snowflake Dies
Shop at:
HBS
LOG CABIN Paper Pad
Log Cabin Paper Pad
Shop at:
HBS
Stained Glass Coverplate Die
Shop at:
HBS
Believe Buzz Word
Believe Buzz Word
Shop at:
HBS
Believe Buzz Word Dies
Shop at:
HBS
SENTIMENT BANNER DIES
Shop at:
SSS | HBS
Gingerbread House- Add on Dies
Shop at:
HBS
CRYSTAL PRISM GEM
CRYSTAL PRISM GEM
Shop at:
HBS
Neenah  80 LB SOLAR WHITE
Neenah 80 LB SOLAR WHITE
Shop at:
SSS | AMZ
Gemini Jr Die Cutting/Embossing Machine
Shop at:
SSS | AMZ | SB
Glimmer Paste | Moonstone
Shop at:
SSS | AMZ | HBS
Media Spatulas
Media Spatulas
Shop at:
SSS | HBS
Juicy Ink
Juicy Ink
Shop at:
SSS | IO3
Chrome Ultra Fine Embossing Powder
Shop at:
SSS | IO3
Mini Misti Tool
Mini Misti Tool
Shop at:
SSS | AMZ | SB | SK
Blackout Ink
Blackout Ink
Shop at:
SSS | IO3
Liquid Pixie Dust
Liquid Pixie Dust
Shop at:
SSS | IO3
Glossy Accents
Glossy Accents
Shop at:
SSS | AMZ | SB | HBS
STUDIO KATIA GLUE
STUDIO KATIA GLUE
Shop at:
SSS | SK
Double-Sided Foam Tape
Shop at:
SSS | AMZ

To make supplies easy for you to find, I have linked them above. If something is no longer available I will link to a similar product. Affiliate links may be used depending on the product linked. By shopping through my links you help keep my blog running at no extra cost to you. So thank you in advance for supporting my creations!

3-D Die Cut Autumn/Thanksgiving Cards | Studio Katia

3-D Die Cut Autumn/Thanksgiving Cards | Studio Katia by ilovedoingallthingscrafty.com

Hello, and Happy Thanksgiving to all my Canadian Friends!

It is only fitting that I share with you some Thanksgiving Cards today featuring a bunch of products from Studio Katia's last release.

CARD DETAILS

As you can see the focal point of these cards is done in 3D. So let me break down how each card came together.

3-D Die Cut Autumn/Thanksgiving Cards | Studio Katia by ilovedoingallthingscrafty.com

For the acorn version of the card, I began by die cutting the pieces of the SHAKER ACORN die 4 times. I then scored and folded each piece down the middle and applied a thin bead a glue down the crease and glued each layer in place.

Next, I glued the bottom acorn flat to the card panel that I had die cut using the large frame from the DARLING RIBBON AND FRAMES DIES set. I then die cut the outline of the acorn from black cardstock and glued it around the 3D acorn.

3-D Die Cut Autumn/Thanksgiving Cards | Studio Katia by ilovedoingallthingscrafty.com

The sentiment on this cute card comes from the AUTUMN BORDERS stamp set. I then finished it off by adding some EXOTIC ONYX PEARLS and adding an orange bow to the stem.

3-D Die Cut Autumn/Thanksgiving Cards | Studio Katia by ilovedoingallthingscrafty.com

For this next card, I repeated the same process as the previous card only this time I used the SHAKER APPLE DIE set.

3-D Die Cut Autumn/Thanksgiving Cards | Studio Katia by ilovedoingallthingscrafty.com

Here again, I used the AUTUMN BORDERS stamp set for the greeting only this time I embellished with ARCTIC BREEZE PEARLS.

3-D Die Cut Autumn/Thanksgiving Cards | Studio Katia by ilovedoingallthingscrafty.com

For this last card, I used the SHAKER PUMPKIN DIE set to make the 3D pumpkin. I then glued it on to a background panel that I had die cut using the HALFTONE DOTS CIRCLE DIES and the large frame from the DOTTED PATTERNS SET 3.

3-D Die Cut Autumn/Thanksgiving Cards | Studio Katia by ilovedoingallthingscrafty.com

I then glued the panel to a Kraft card base, stamped out the sentiment from the AUTUMN BORDERS stamp set and finished it off by adding some RIPE PERSIMMON PEARLS.

3-D Die Cut Autumn/Thanksgiving Cards | Studio Katia by ilovedoingallthingscrafty.com

And as you can see from this next photo, all the cards all fold flat for sending them through the mail.

3-D Die Cut Autumn/Thanksgiving Cards | Studio Katia by ilovedoingallthingscrafty.com

I hope these 3-D Die Cut Autumn/Thanksgiving Cards inspired you today. They are actually quite simple to make and the results look amazing.  I'd encourage you to give these a try!

Thank you for stopping by 😊
Until next time... Happy Crafting 👋


SUPPLIES
AUTUMN BORDERS
AUTUMN BORDERS
Shop at:
SSS | SK
SHAKER ACORN DIES
SHAKER ACORN DIES
Shop at:
SSS | SK
SHAKER APPLE DIES
SHAKER APPLE DIES
Shop at:
SSS | SK
SHAKER PUMPKIN DIES
SHAKER PUMPKIN DIES
Shop at:
SSS | SK
DARLING RIBBON AND FRAMES DIES
Shop at:
SSS | SK
DOTTED PATTERNS SET 3 CREATIVE DIES
Shop at:
SSS | SK
HALFTONE DOTS CIRCLE DIES
Shop at:
SSS | SK
EXOTIC ONYX PEARLS
EXOTIC ONYX PEARLS
Shop at:
SSS | SK
ARCTIC BREEZE PEARLS
Shop at:
SSS | SK
RIPE PERSIMMON PEARLS
Shop at:
SSS | SK
TRIANGLE TRAY
TRIANGLE TRAY
Shop at:
SSS | SK
STUDIO KATIA GLUE
STUDIO KATIA GLUE
Shop at:
SSS | SK
Gemini Jr Die Cutting/Embossing Machine
Shop at:
SSS | AMZ | SB
Mini Misti Tool
Mini Misti Tool
Shop at:
SSS | AMZ | SB | SK
Blackout Ink
Blackout Ink
Shop at:
SSS | IO3
To make supplies easy for you to find, I have linked them above. If something is no longer available I will link to a similar product. Affiliate links may be used depending on the product linked. By shopping through my links you help keep my blog running at no extra cost to you. So thank you in advance for supporting my creations!