Hello sweet friends and welcome back to my blog 👋
Today I am super excited to be a part of the Pigment Craft Co Instagram Hop for their June Release. They are a fairly new Stamp company and are proudly Canadian. Check them out!
These cards are part of an IG Hop. So make sure you are following me over on Instagram as I will be giving away a $25 Gift Card, plus if you hop and leave a comment on each stop you will also qualify for a chance at one of two $100 Gift Cards to the Pigment Craft Co Shop. The best part is that it is a very short hop, so it won't take long. I hope to see you there!
If you love fresh summer designs I think you will love Pigment's June Release. So let's get started with today's cards.
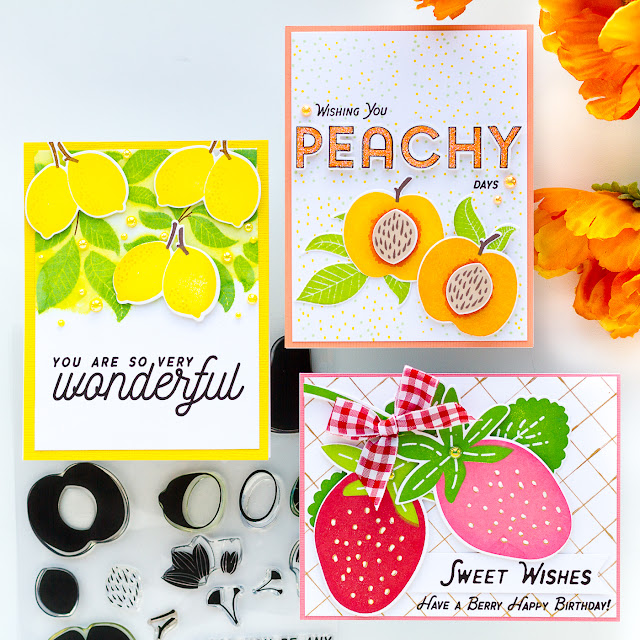
CARD RECIPE #1
- Stamp background using Pattern Builder: Flowering Petals. I used green and yellow ink from Pink Fresh Studio.
- Stamp out peaches and leaves using stamps from the Fruity Stamp Set and die cut using coordinating Fruity Dies. Pop up seed in the center of the peaches.
- Stamp out letters using Dashing Outline Fonts set to spell out Peachy. Color in the desired color. I used a Copic Marker.
- Die-cut using coordinating Dashing Fonts Dies.
- Use foam tape to pop up the peachy letters and space evenly on the card panel.
- Use a stamp positioner to stamp out the greeting using sentiments from the Berry Sentiments Stamp Set.
- Embellish with coordinating pearls.
- Add Sparkle Glitter for a pop of shine on the letters.
CARD RECIPE #2
- Use the leaves from the Fruity Set to stamp out the leaves on the top half of the background panel. I used a green distress oxide ink and then sprayed it down to cause some ink to bleed and move on the paper. Trim panel and set it aside to dry.
- Stamp out the lemons from the same Fruity Set. I used the Squeezed Lemon and Mustard Seed Oxide to stamp out the lemons.
- Stamp out the sentiment in the white space at the bottom of the panel.
- Pop the lemons in place using foam tape.
- Glue onto coordinating yellow cardstock background.
- Embellish using pearls.
CARD RECIPE #3
- Create the background using Bitty Diagonal Stripe Stencil, I used a gold gel pen to draw the lines.
- Stamp out the strawberries from the Jumbo Berry Stamp using desired inks. Here I used Candied Apple and Worn Lipstick and Picked Raspberry Oxide inks. Plus I also used Mowed Lawn and Twisted Citron OI for the foliage.
- The Sweet Wishes tag was made by die cutting the letters from a strip of paper using the dies from the Berry Sentiment Dies and then cutting out a fishtail flag. Attach to card using foam tape.
- Stamp the birthday greeting below the flag using a stamp positioner and the sentiment from the Berry Sentiments Stamp Set.
- Trim panel and add to a coordinating color cardstock panel and glue that to the card base.
- Finish card by adding extra design details. Green Pearls, a Gingham bow, gold gel pen details to the seeds topped off using White Crystal Drops for dimension.
Free Shipping on all orders over $150
$5 OFF orders over $50 (use code 50OFFJUNERELEASE)
$20 OFF on all orders over $300 (use code 20OFFNEWRELEASE)
Promo codes expire May 27th at 11:59pm

To make supplies easy for you to find, I have linked them above. If something is no longer available I will link to a similar product. Affiliate links may be used depending on the product linked. Please help support my blog by using these links while shopping at no additional cost to you. For more information about the affiliates I use, please visit my disclaimer here. Thanks so much for all your support!


